📖USER INSTRUCTIONS
CHEPPY ENGLISH LEARNING WEBSITE
Version 1.0 – Updated June 04, 2026
1. OVERVIEW
1.1. Introduction
This document is designed to support learners in accessing, using, and studying on Cheppy - an online English learning platform that integrates Artificial Intelligence (AI) technology and a gamified learning model. This approach allows students to learn through play and play while learning. The learning content is built based on curriculum prescribed by the Ministry of Education and Training (MOET), combined with the Common European Framework of Reference for Languages (CEFR), aimed at helping students comprehensively develop their foreign language competencies.
1.2. Terminology Conversion
The following table includes terms used in the application in a gamified style, ensuring consistent understanding and usage by students – teachers – parents.
| Educational Term | In-App Term | Function |
|---|---|---|
| Unit | Mission | Each Mission corresponds to a learning topic, helping students feel they have a clear goal and learning journey. |
| Exercise | Stage | Each Mission contains Stages. Each Stage includes questions on the same topic to achieve the skill objectives and competency outcomes of the Mission. |
| Score | Score | The score after completing a Stage is calculated based on the number of correct answers out of the total questions. |
| EXP | Students received experience points upon completing each Mission. These points are used to rank up in levels or receive learning achievements. | |
| Reward | Students receive gems as rewards after completing Missions to buy customs and accessories for their characters. | |
| Competition Tracking Board | Leaderboard | The system displays student ranking by class or grade level based on: rewards, EXP, motivating students to maintain their learning habits. |
Although the language changes, the lesson structure - skill objectives - competency outcomes are still ensured under the supervision of the educational advisory team.
2. LOGIN/REGISTRATION GUIDE
Step 1: Access the website: https://learn.cheppy.ai/login
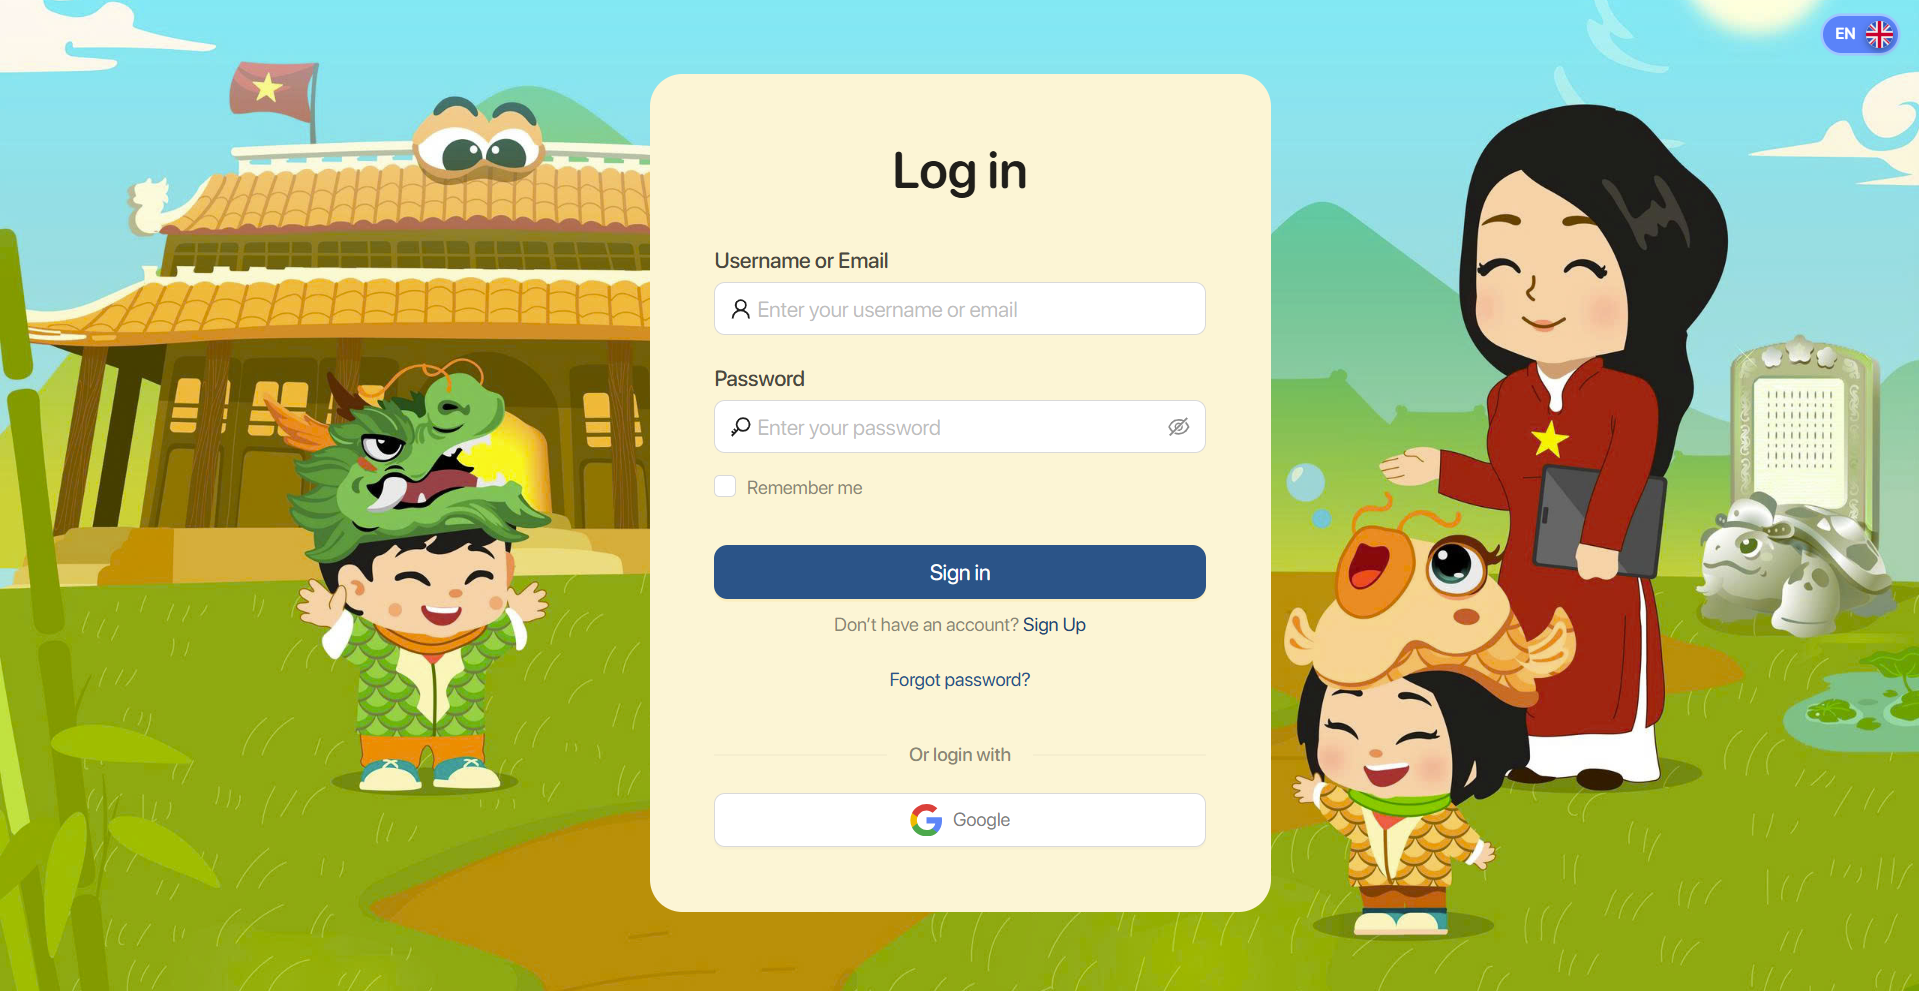
Step 2: Click on the icon  để thay đổi ngôn ngữ hiển thị theo tiếng Anh - tiếng Việt. to change the display language between English and Vietnamese.
2.1. REGISTRATION
Step 1: Click Sign up to switch to the new account creation

Step 2: Enter all required account information, including:
- Username
- Full Name
- Password: A password from 8 to 16 characters, including at least 1 digit.
- Confirm Password: Re-enter the password.
Note: The information entered in Password and Confirm password fields must match.

Step 3: After completing all required information, click the “Terms and Conditions" link to review the platform’s terms of use. If you agree with the terms, tick the box
Step 4: Click Sign up  to complete account registration.
Note: After clicking Sign up, some information may be identified as invalid. Please re-enter the information to meet the requirements.
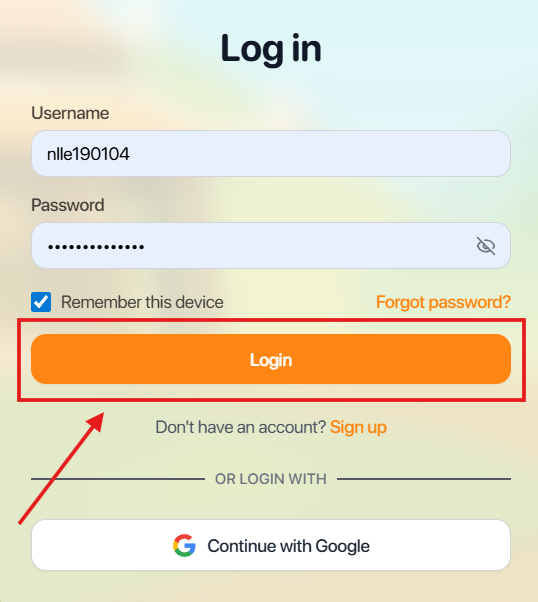
2.2. LOGIN
Step 1: On the login screen, users can log in by 2 ways.
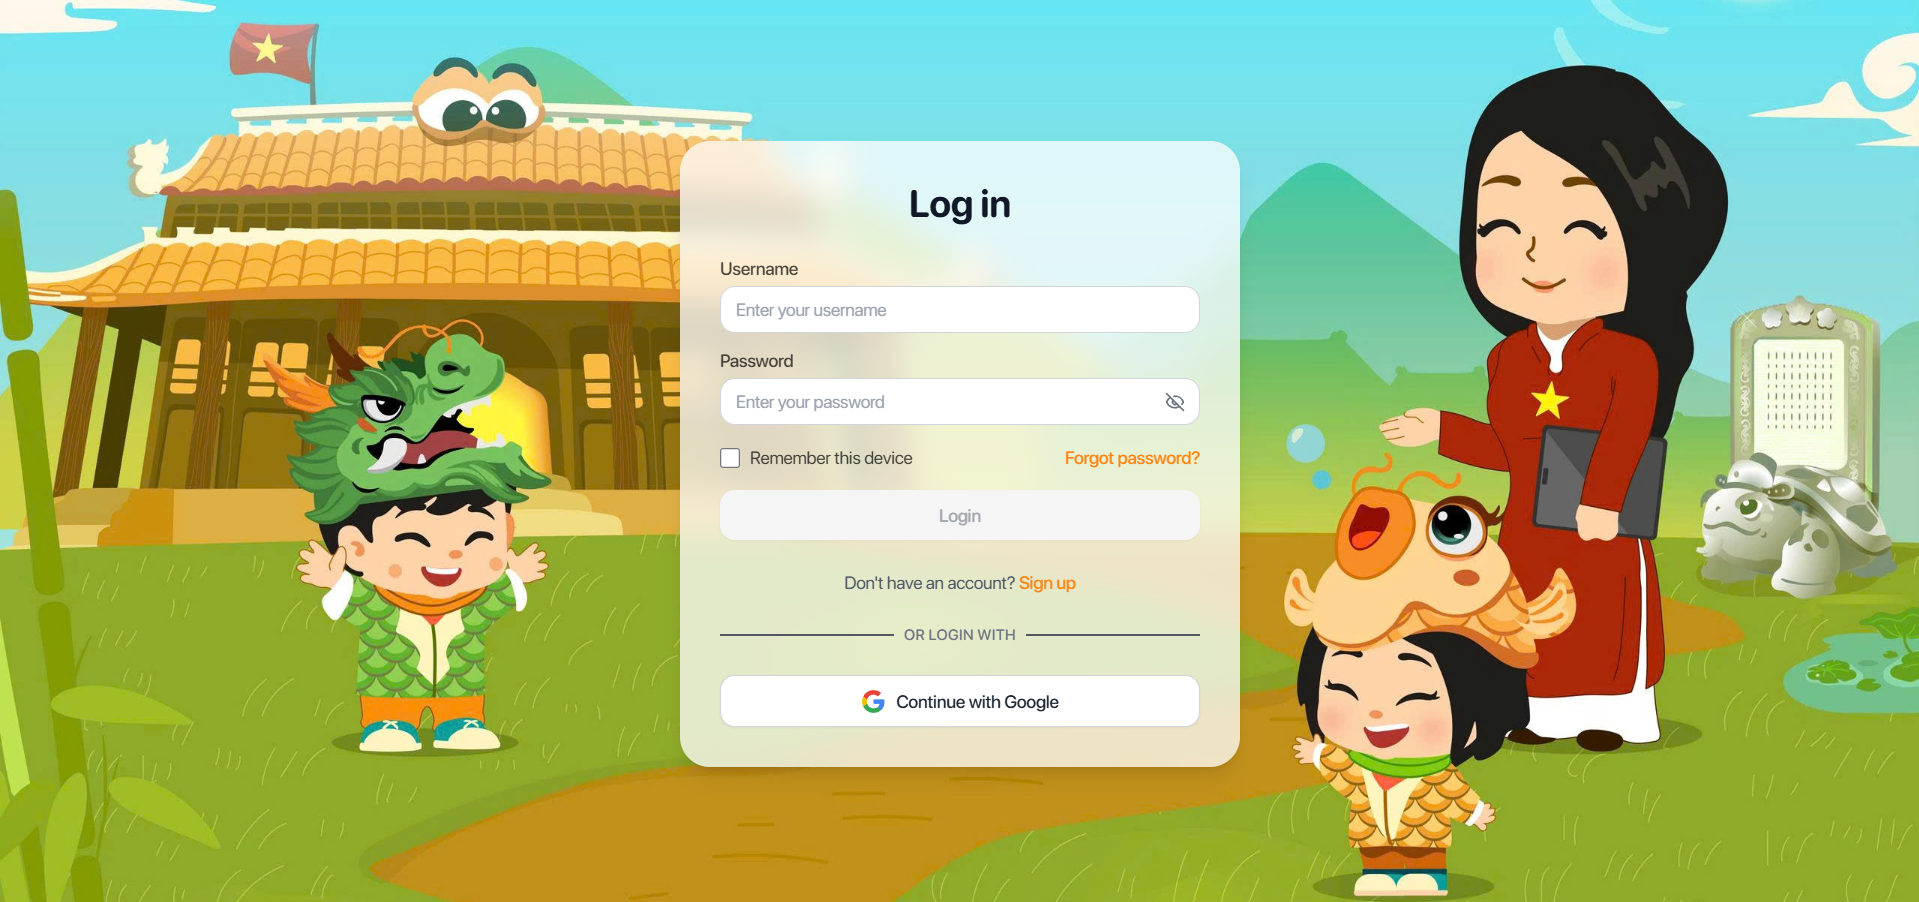
Method 1: Login with Account Information
- Username or Email: Your username or registered email address.
- Password
Method 2: Sign in quickly using your Google account.
Step 2: Click the button to access the website.
2.3. PASSWORD RESET
Step 1: If you forget your password, click Forgot password?
Bước 2: Enter your registered email and click ![]()
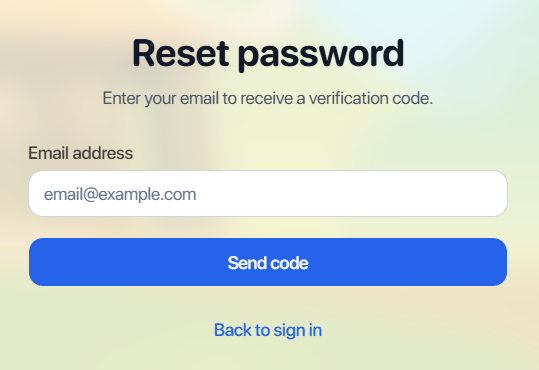
Step 3: Access your email box and enter the 6-digit verification code.
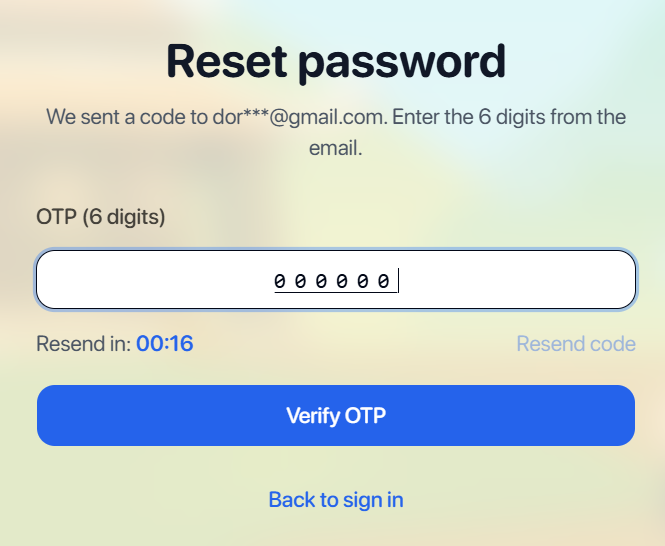
Note: If you don’t receive the code or the code has expired, click Resend to request a new code.
Step 4: Click  to confirm the verification code.
Step 5: Enter a new password and click to complete Password Reset.
3. ACCOUNT INFORMATION
Bước 1: On the Account Information page, fill in the following details:
- Boy/Girl: Gender
- Name: English display name(maximum 20 characters)
- Grade: Grade level
- Your birthday: Date of birth
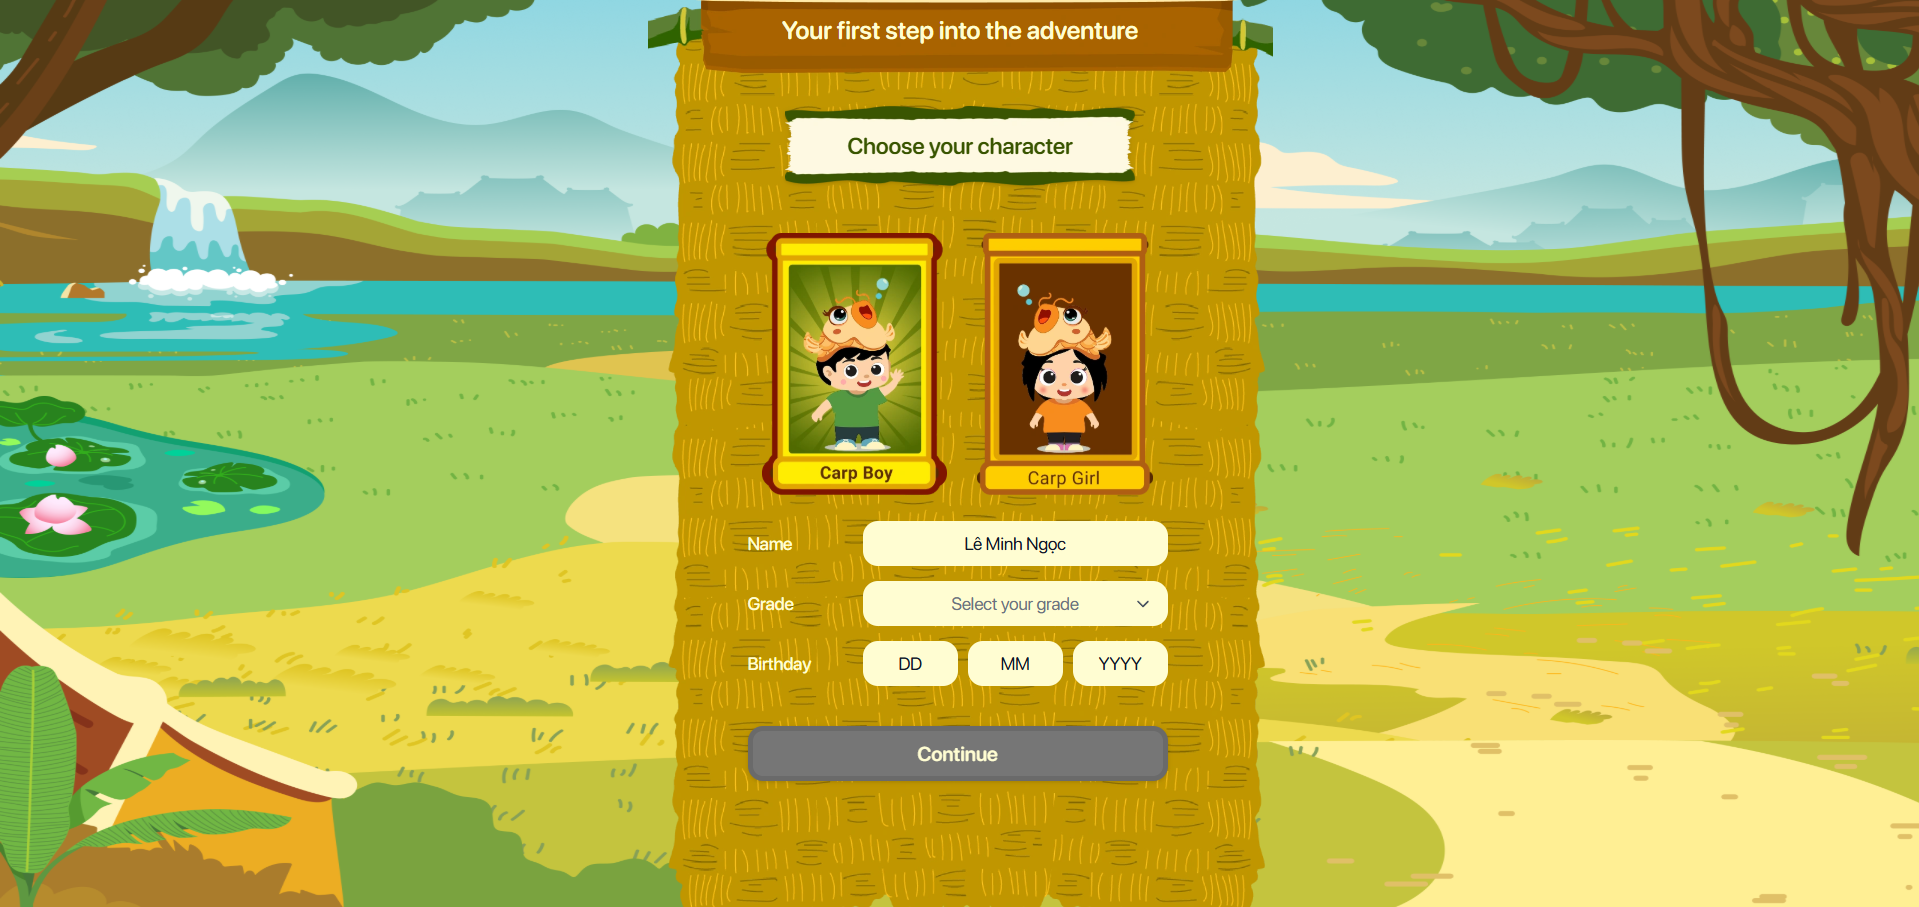
Step 2: After completing all the information, click  to confirm.
4. HOME PAGE
- Purpose : This section provides users with quick access to the application's learning areas.
| No | Icon | Function | Description |
|---|---|---|---|
| 1 |  | My Profile | Show the user's name and level. |
| 2 |  | My School | View the school and class information that the user is currently joining in. |
| 3 | Reward | Earn rewards upon completing tasks and use them to purchase items. | |
| 4 |  | Profile | View and manage the user's personal information.  |
| 5 |  | Settings | Manage application settings, including editing the profile, changing the password, accessing FAQs, and contacting support. |
| 6 |  | Sound | Turn sound on or off while using the application and studying. |
| 7 |  | Mission | Display the learning tasks that the learner needs to complete. |
| 8 |  | Practice | Help users review incorrect answers, reinforce knowledge, and improve their skills. |
| 9 |  | Leaderboard | Display student rankings by class and grade level. |
5. MY PROFILE
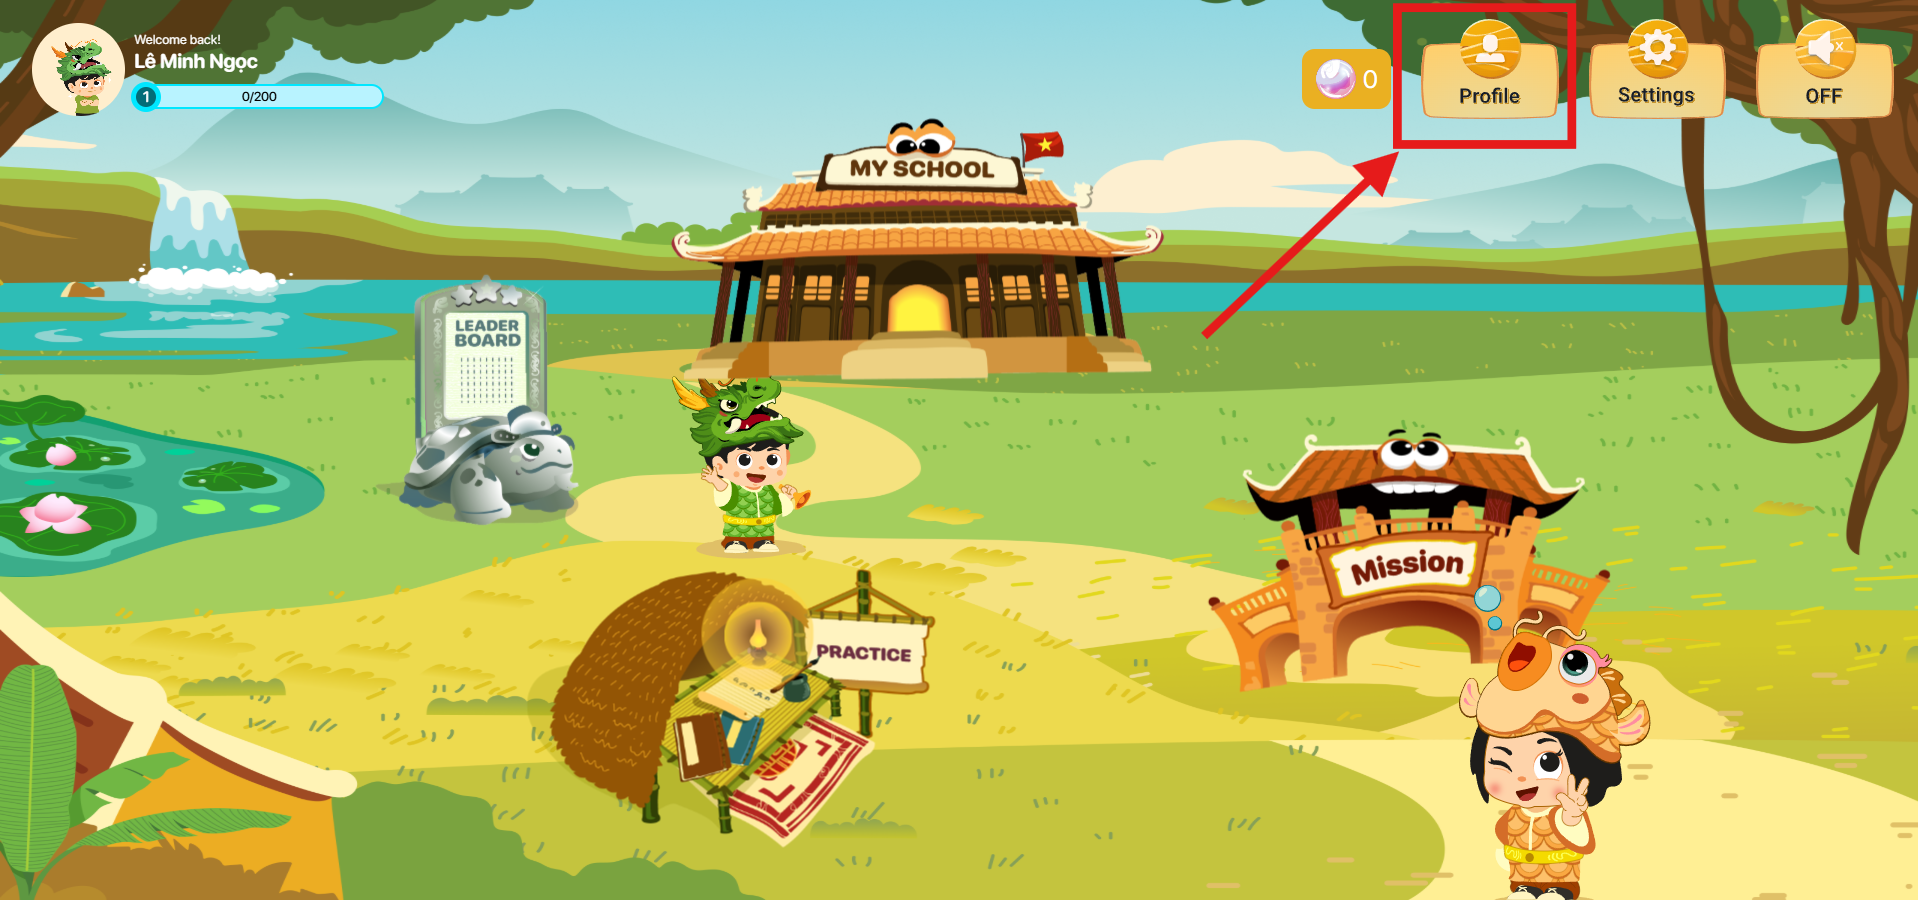
Step 1: From the Home screen, tap the icon located in the top-right corner of the screen.
Step 2: On the Overview screen, users can view a summary report of their learning performance for the current day and the last 7 days, including the following information:
– Studied Time: Total time spent studying
– Completed Games: Number of completed stages
– Accuracy Rate: Percentage of correct answers

Step 3: Scroll down to view a detailed assessment of each learning skill, including:
- Pronunciation (Phát âm)
- Listening (Nghe)
- Writing (Viết)
- Speaking (Nói)
- Vocabulary (Từ vựng)
- Reading (Đọc)
- Grammar (Ngữ pháp)
Each skill is displayed using a star-rating scale, allowing users to easily identify their strengths and areas that need improvement. This helps learners create a more effective study plan and focus on developing weaker skills to enhance their overall learning performance.
Step 4: Tap anywhere outside the Profile tab to exit the Profile screen and return to the Home screen.
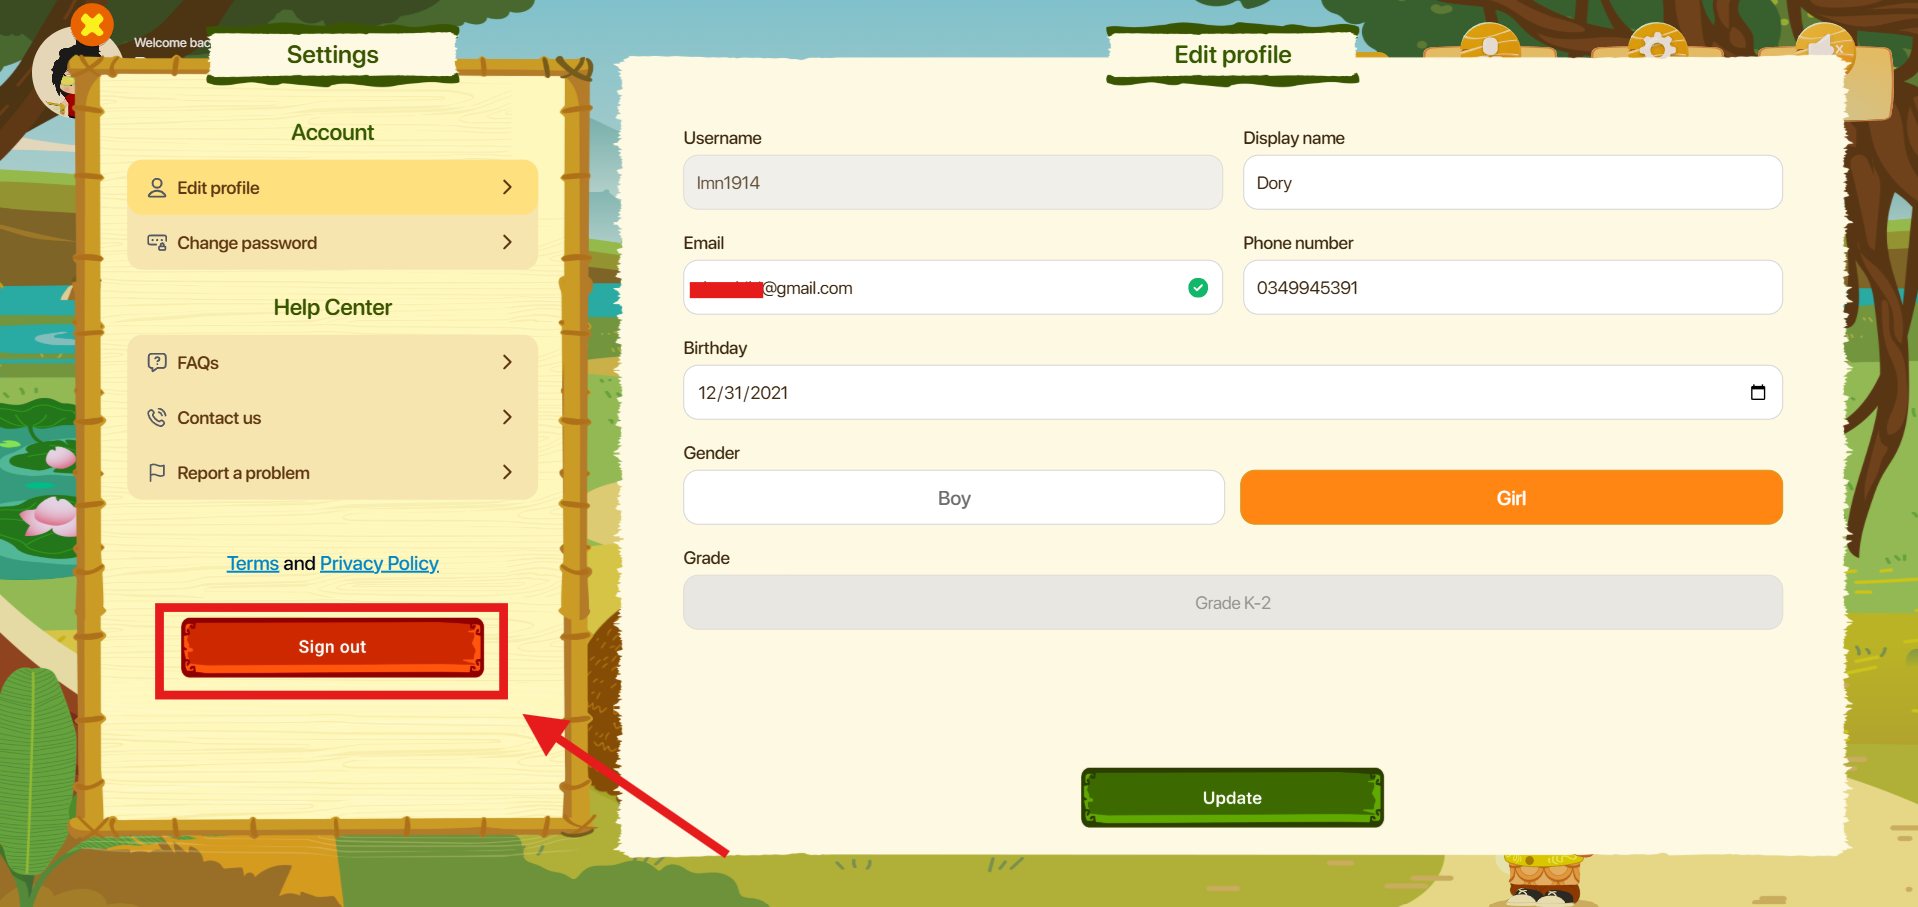
6. SETTINGS
Step 1: From the Home screen, tap the icon located in the top-right corner of the screen.
Step 2: The system will display the Settings screen.
3: Tap the Sign out button to sign out of your account.
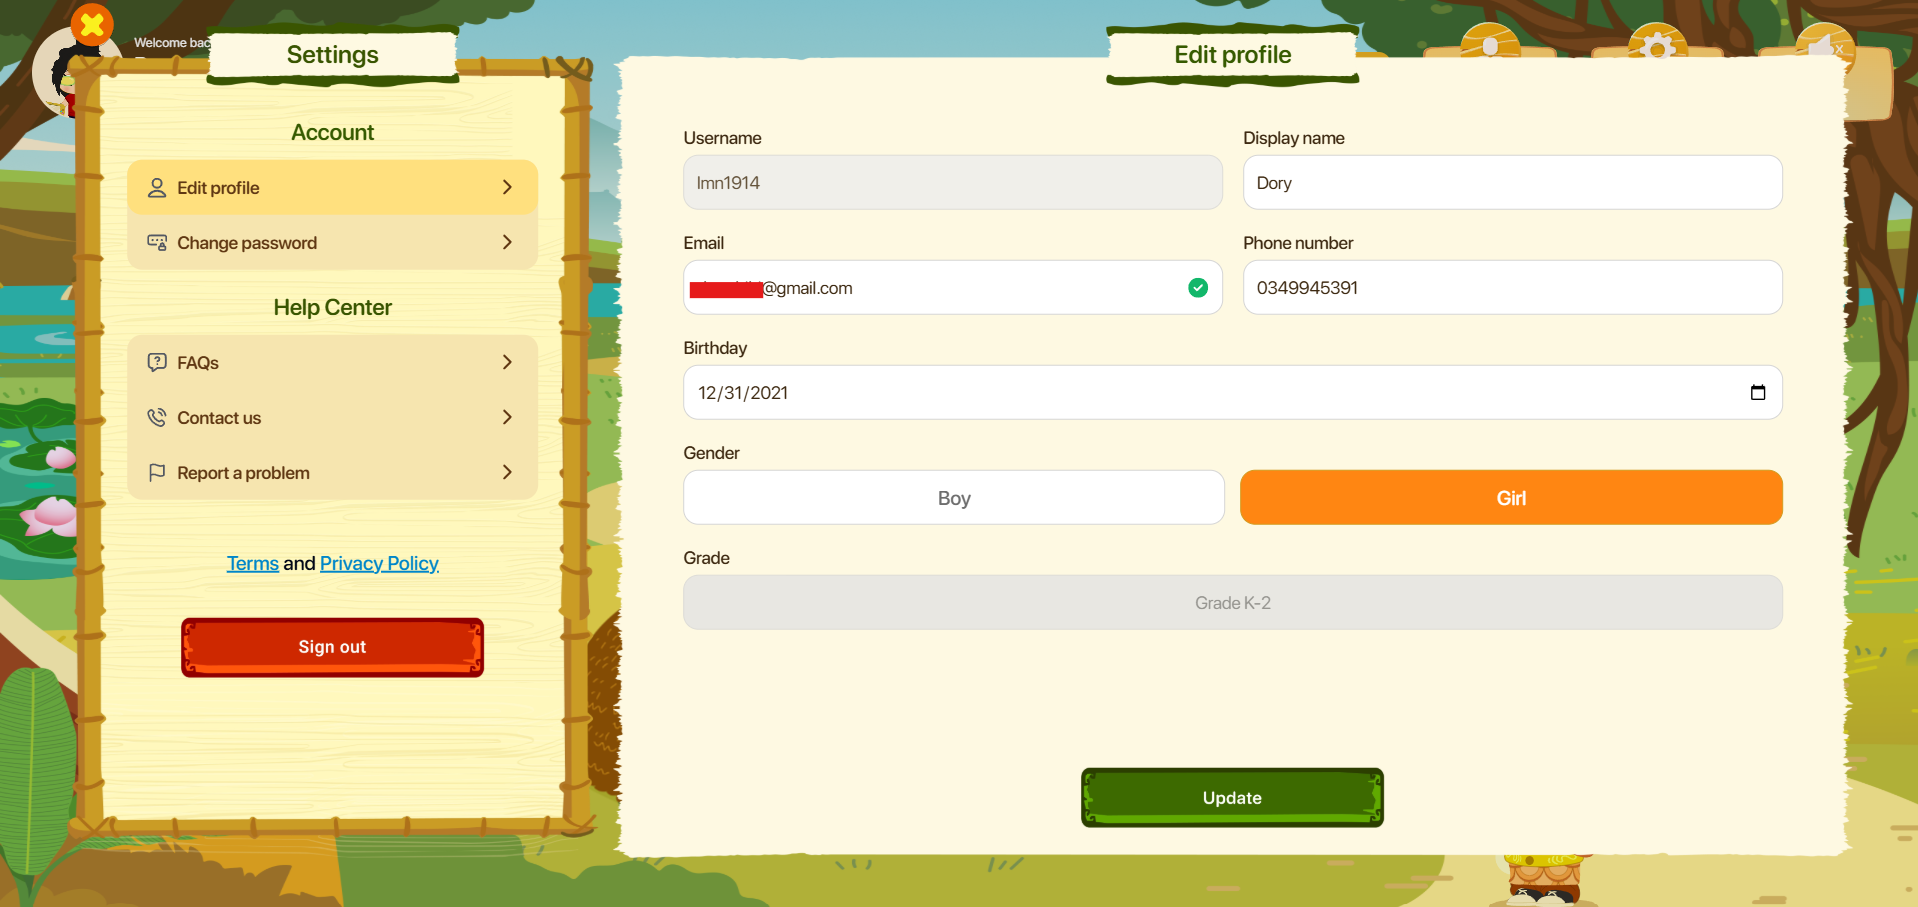
6.1. EDIT PROFILE
Step 1: Tap the Edit profile button  to update your account information.
Step 2: On the Edit profile screen, users can view and manage the following information:
- Username
- Display name
- Mobile number
- My birthday
- Gender
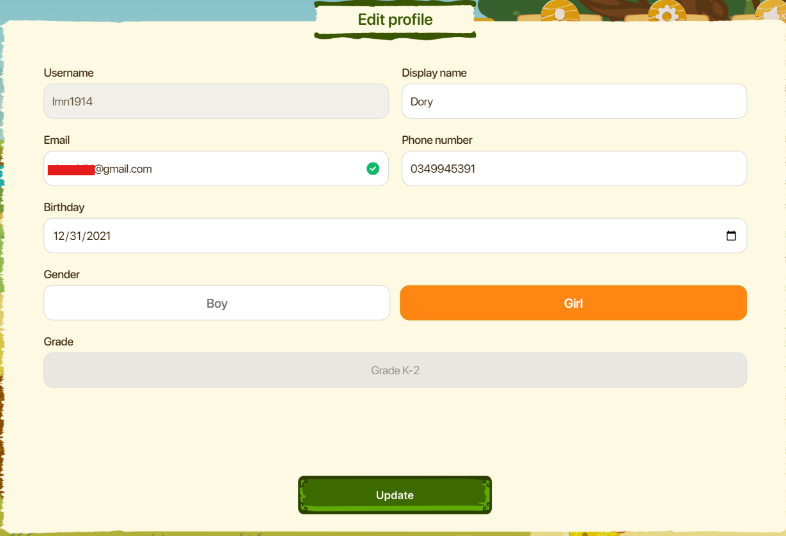
Step 3: After updating the information, tap the Update button  to save the changes.
Note : If the information cannot be saved successfully, please check the following:
– Internet connection
– All required fields have been completed
– Information is entered in a valid format
– Do not modify default account information, including the username
6.2. CHANGE PASSWORD
Step 1: Tap the Change password button ![]() to change password.
to change password.
Step 2: On the Change Password screen, users can view and enter the following information:
- Current password: Current password
- New password: Password must be between 8 and 16 characters long and contain at least one number.
- Confirm password: Re-enter the new password.
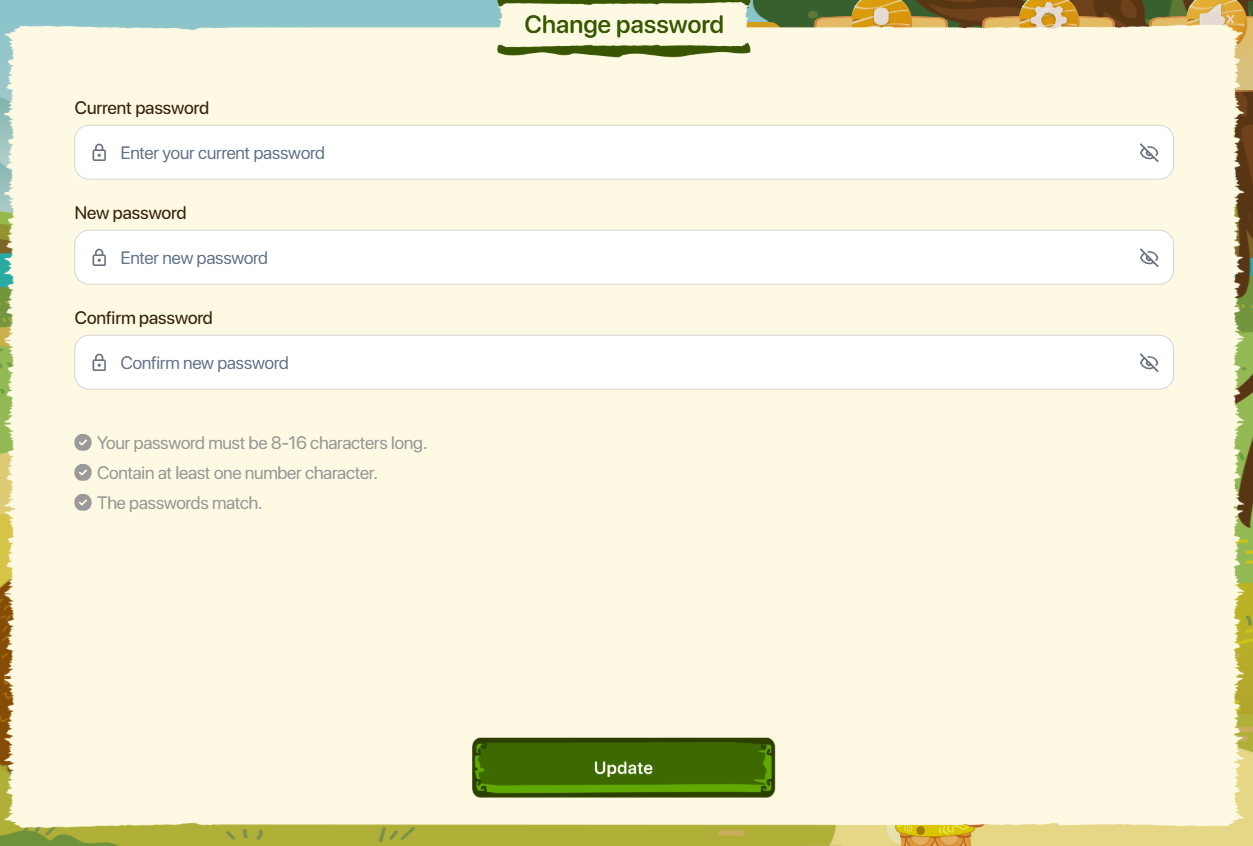
Step 3: Tap the Update button to update the password.
6.3. FAQs

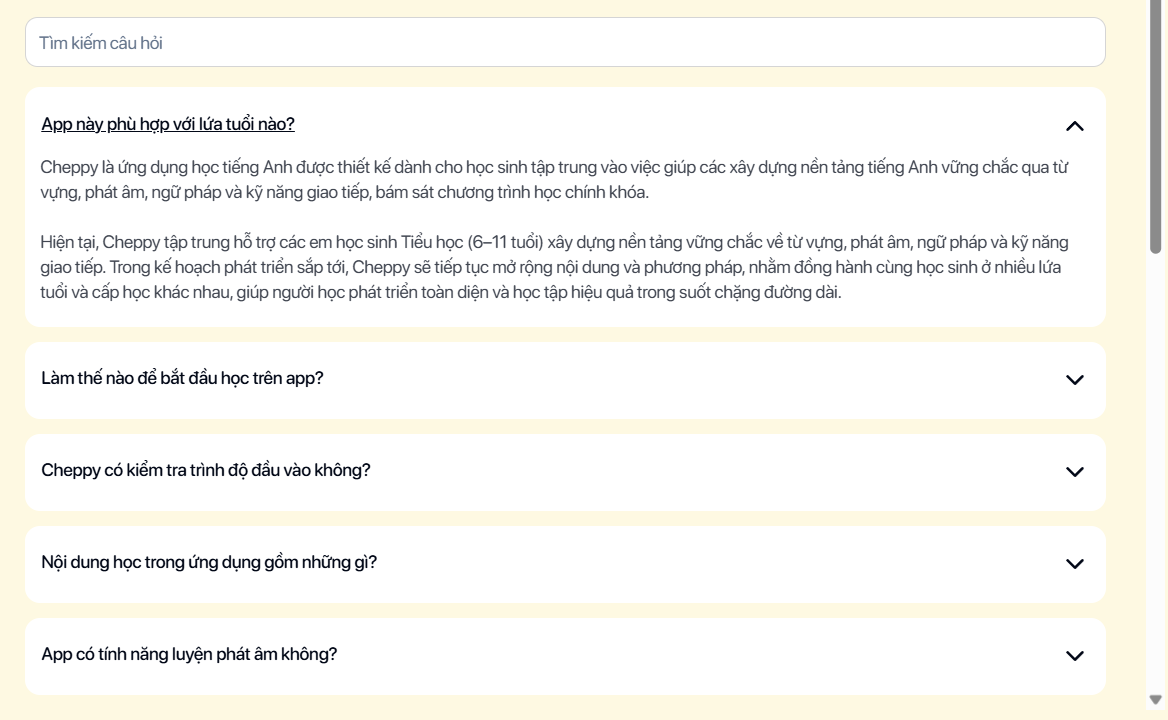
Step 1: Tap the FAQs button to open the Frequently Asked Questions screen.

Step 2: Enter a keyword to search for a relevant question.
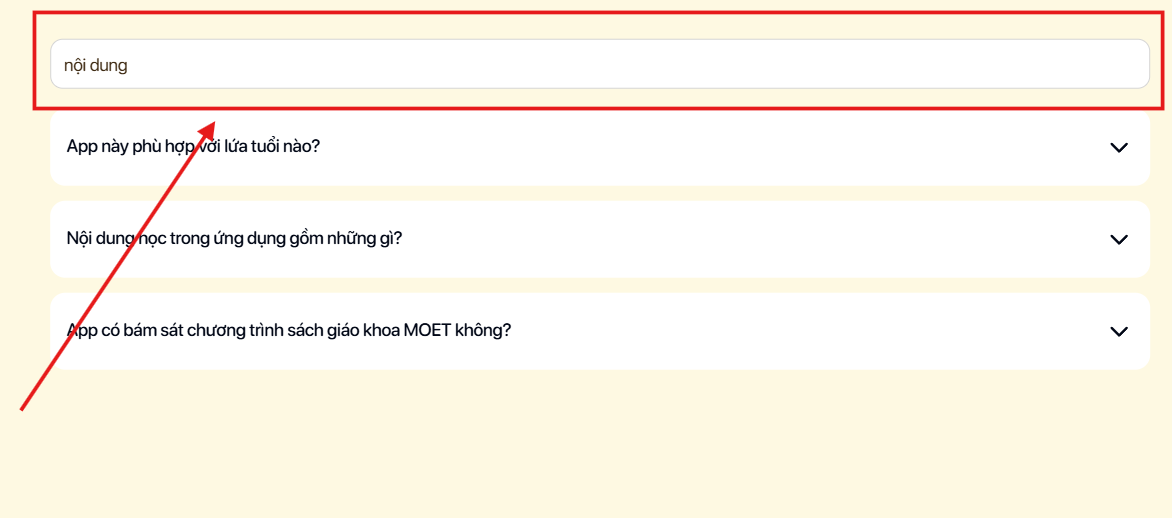
Step 3: Tap a question to view its detailed answer.
6.4. CONTACT US
Step 1: Tap the Contact us button ![]() to open the contact information screen.
to open the contact information screen.
Step 2: The system will launch the device's default email application.
Step 3: After entering the email content, tap Send to submit your message to the Cheppy support team.
6.5. REPORT A PROBLEM
Step 1: Tap the Report a problem button ![]() to open the reporting screen.
to open the reporting screen.
Step 2: On the Report a Problem screen, enter the following information:
- Type of problem: Type of issue.
- Description: Description of the issue.
- Attachments: Attached images (PNG or JPEG format)
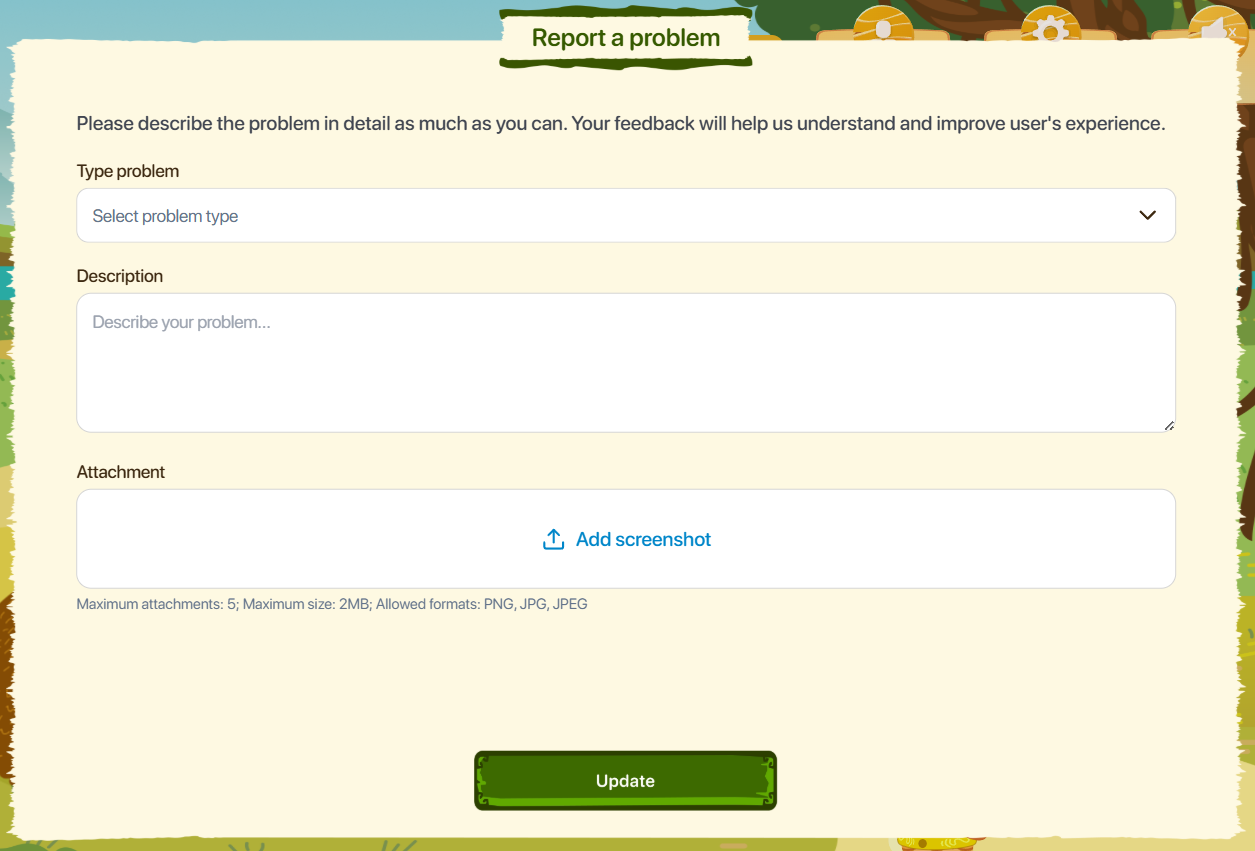
Step 3: After completing the information, tap the Update button  to send the report.
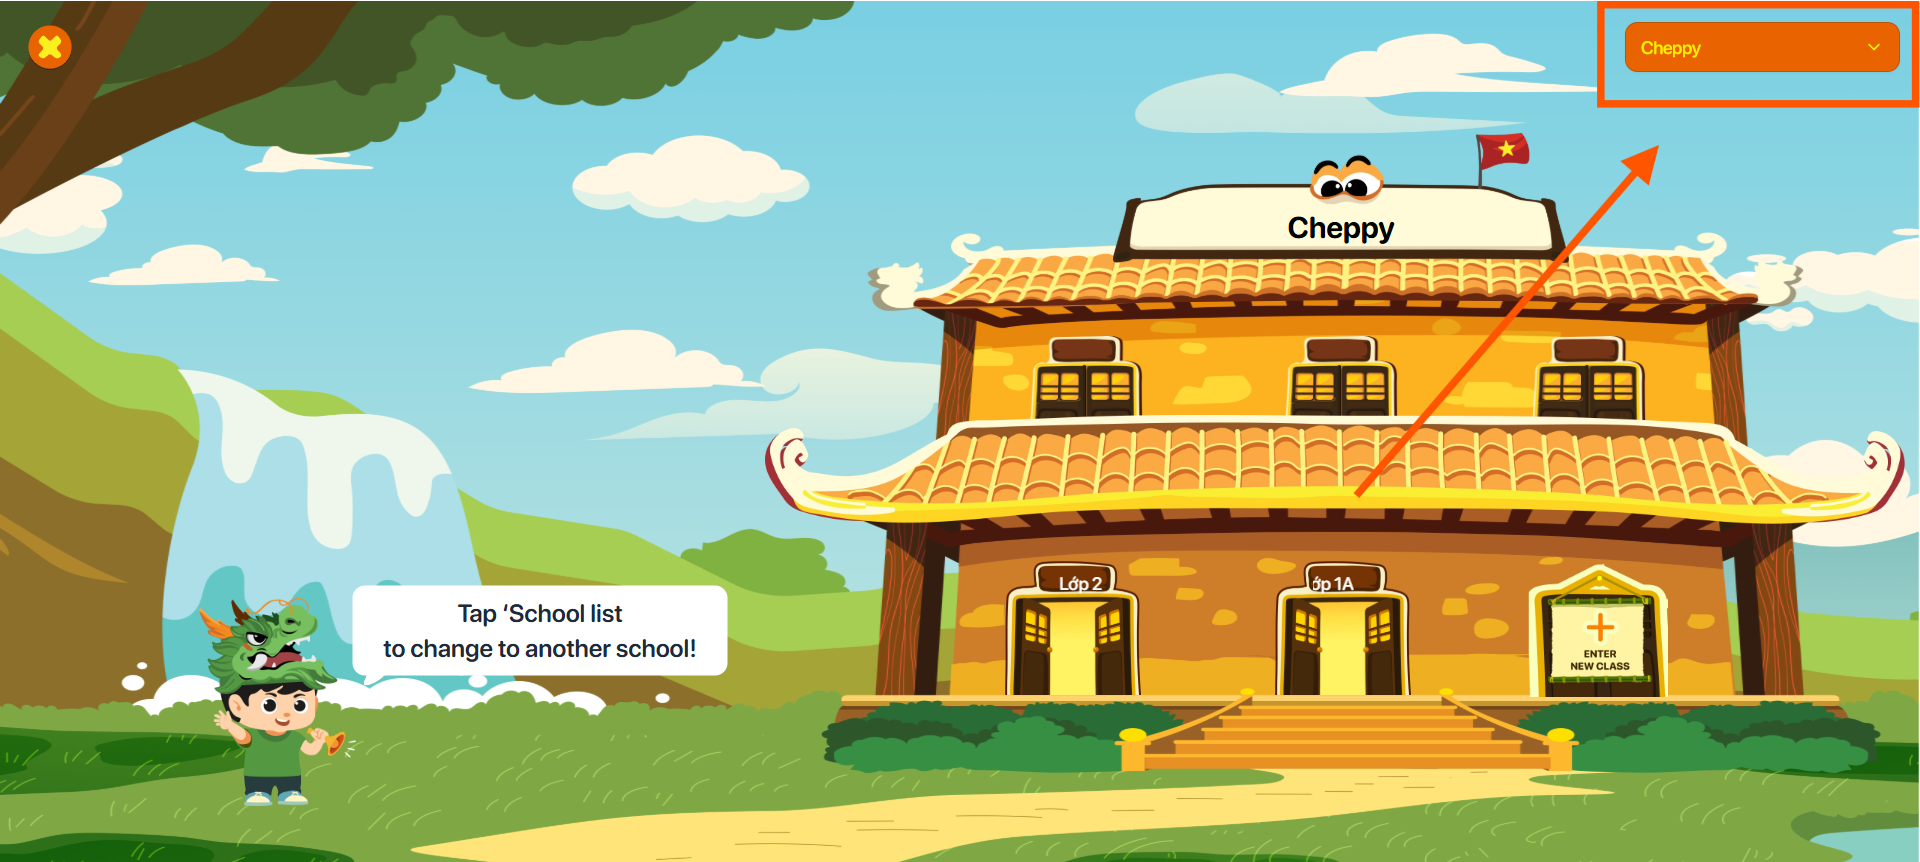
7. MY SCHOOL
Step 1: From the Home screen, tap the My School icon.
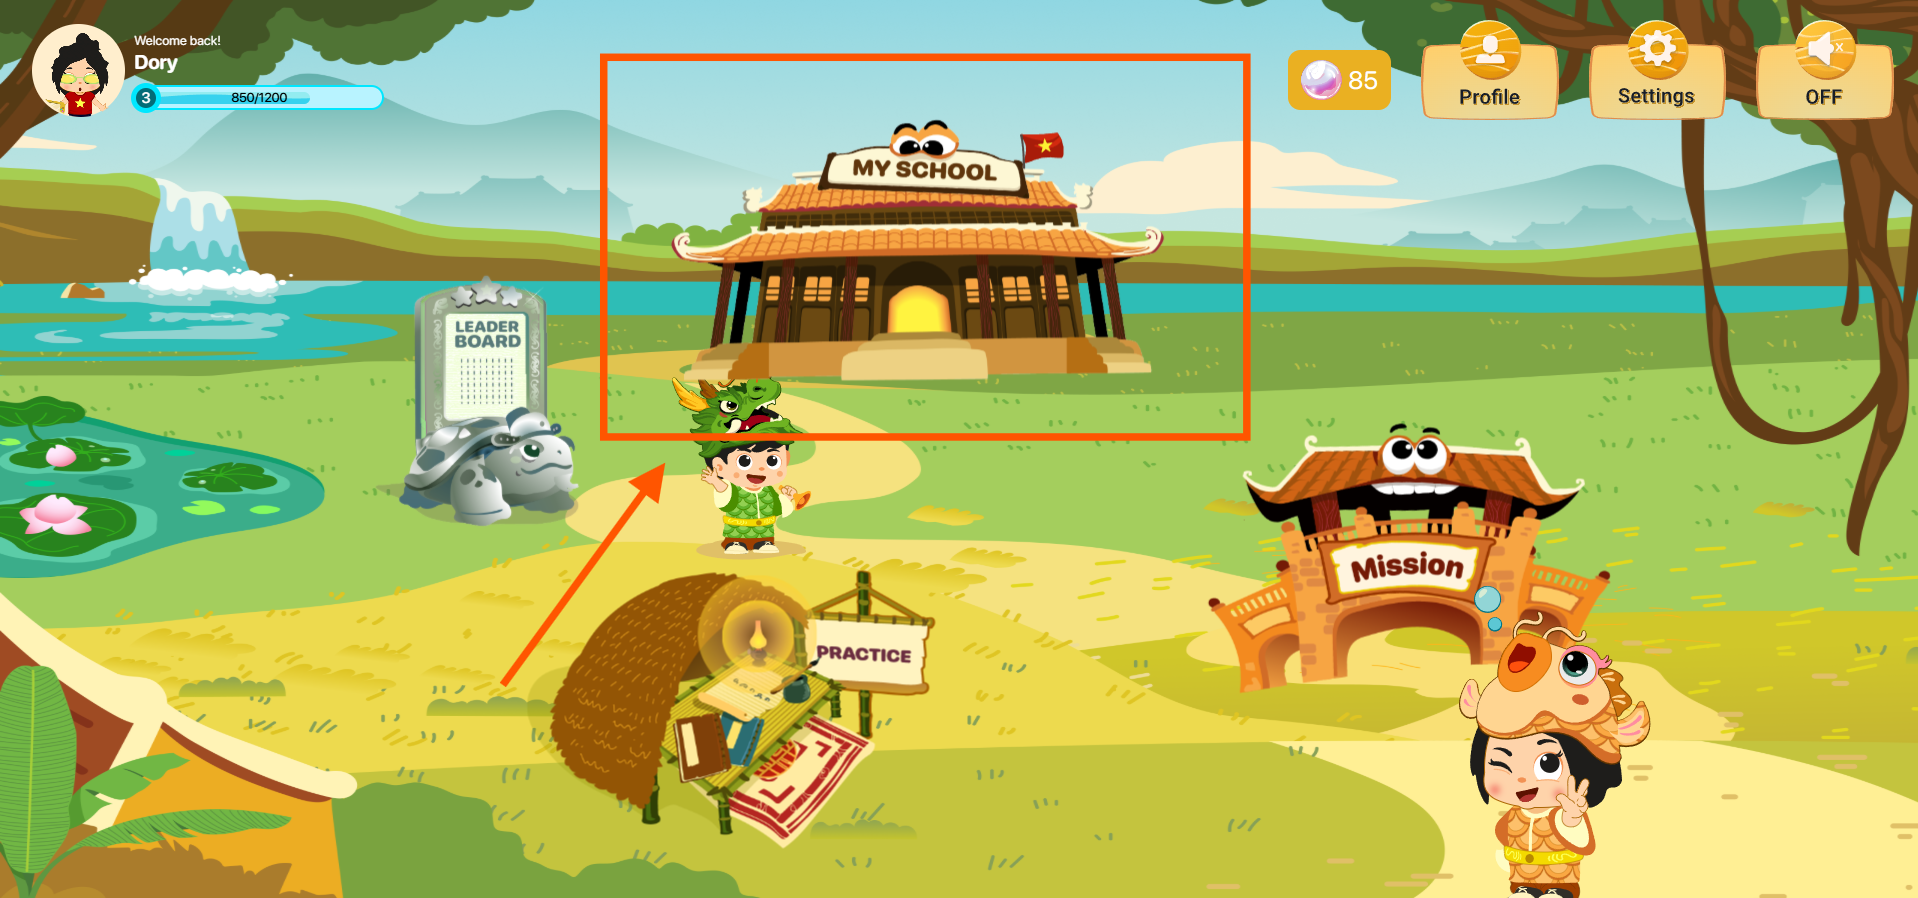
Step 2: The system will display the My School screen.

7.1. JOIN CLASS
Step 1: On the My School screen, users can join a class using one of the following methods:
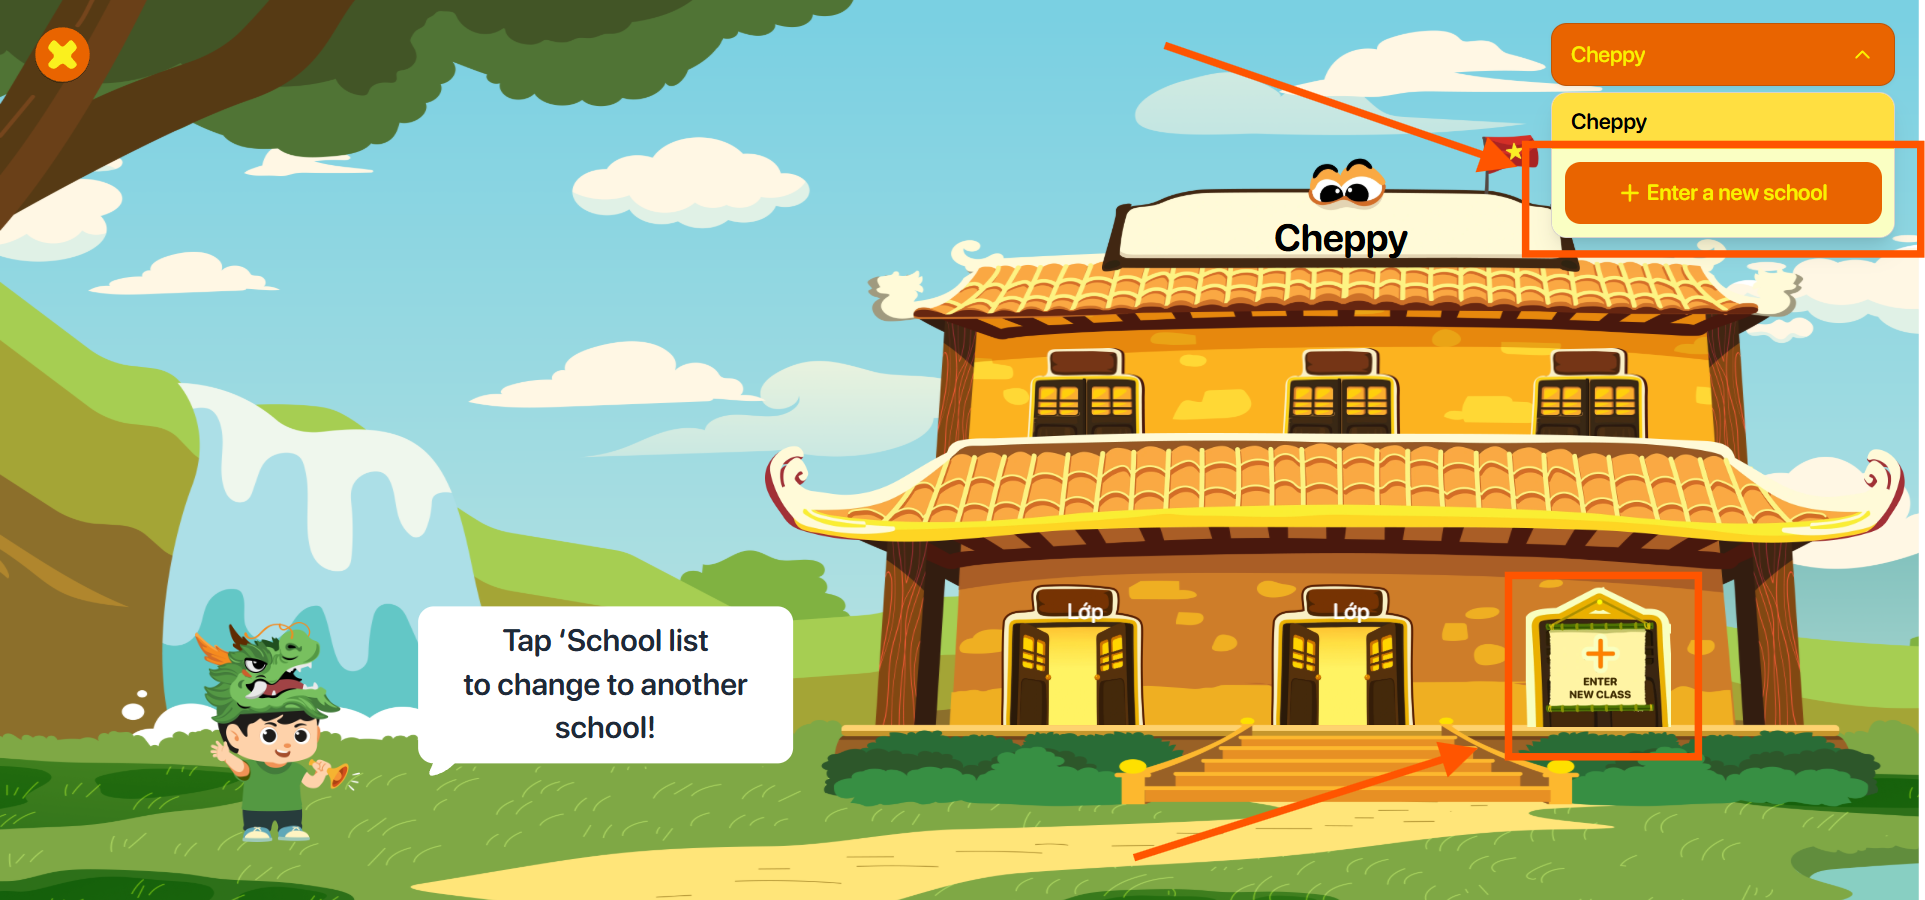
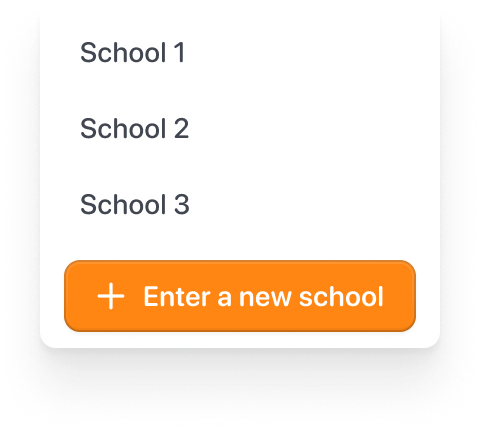
Method 1: Tap the button  to display the list of schools.
Then tap the Enter a new school button 
Method 2: Tap the Enter new class icon 
Method 3: Contact your teacher and request to be added to a class. Once the teacher successfully adds you, the system will automatically update and display the new class on the My School screen.
Note : If the new class does not appear after being added by the teacher, please verify that you have provided the correct account information. If the issue persists, contact the Cheppy support team through the Contact Us section.
Step 2: Enter the class code provided by your teacher for the corresponding school.
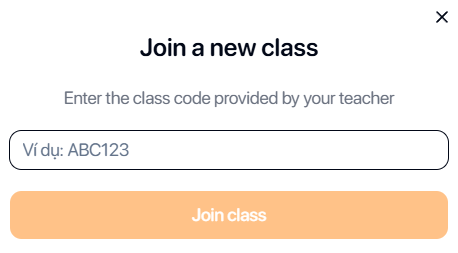
Step 3: Tap the Join Class button  to join the class.
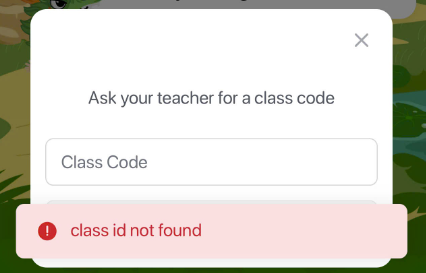
Note : If you receive an invalid code notification, please verify the class code provided by your teacher. If the code is correct but the error still occurs, contact the Cheppy support team through the Contact Us section.
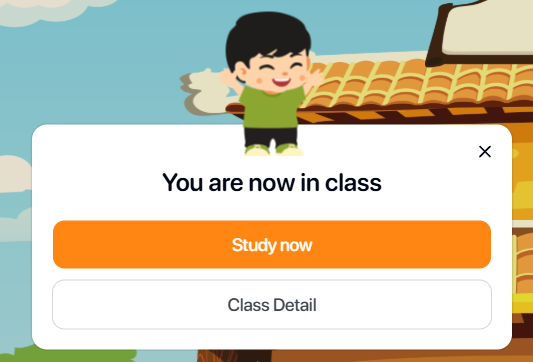
Step 4: After successfully entering the class code, tap the Study now button  to start accessing the learning areas of the application.
Step 5: Tap the Class detail button  to view detailed class information.
7.2. MY CLASS
Step 1: Tap the button  to display the list of schools.
Step 2: Select a school from the list.
Step 3: Tap the class icon to open the Class Information screen.

Note : Class statuses include:
| No. | Icon | Status | Action |
|---|---|---|---|
| 1 | 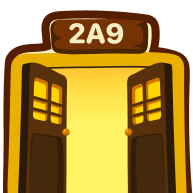 | Active Class | Tap the icon to open the Class Information screen. |
| 2 |  | Completed Class | Tap the icon to open the Class Information screen. |
| 2 |  | Not Joined | Follow the class joining instructions to participate. |
Step 4: On the Active Class screen, users can view the following information:
- Class name: Name of the class.
- Teacher name: Name of the teacher.
- Number of students: Total number of students in the class.
- Joined since: Date of joining the class.
- To-do missions: List of assigned missions.
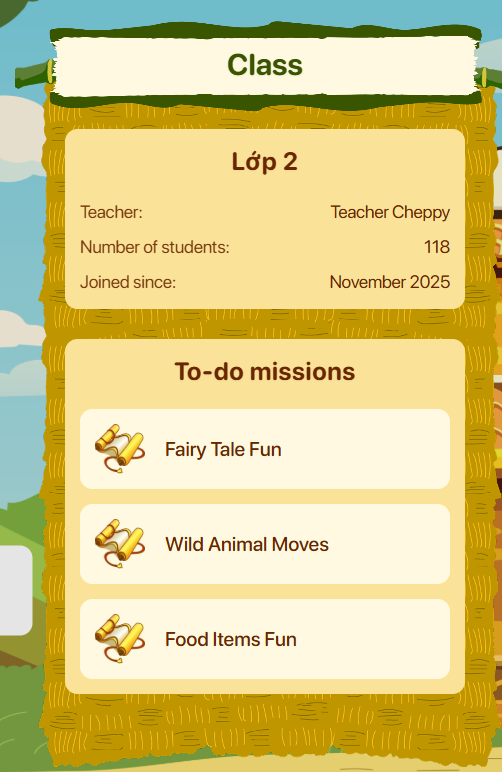
Step 5: Tap any mission to start the assigned task.
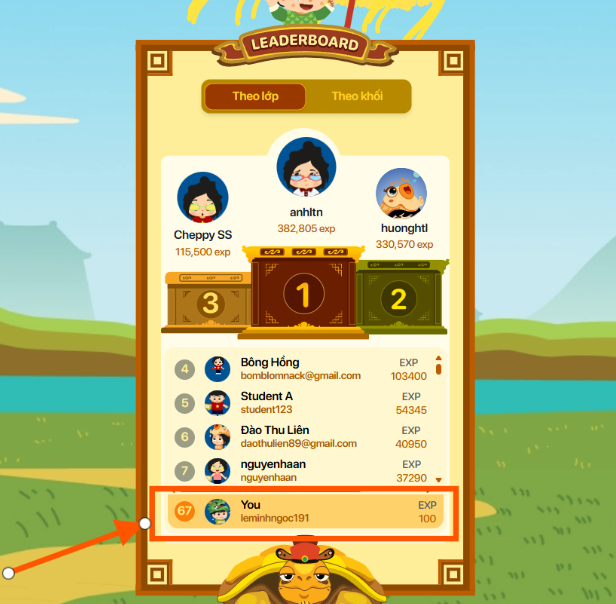
8. LEADERBOARD
Step 1: From the Home screen, tap the Leaderboard section.
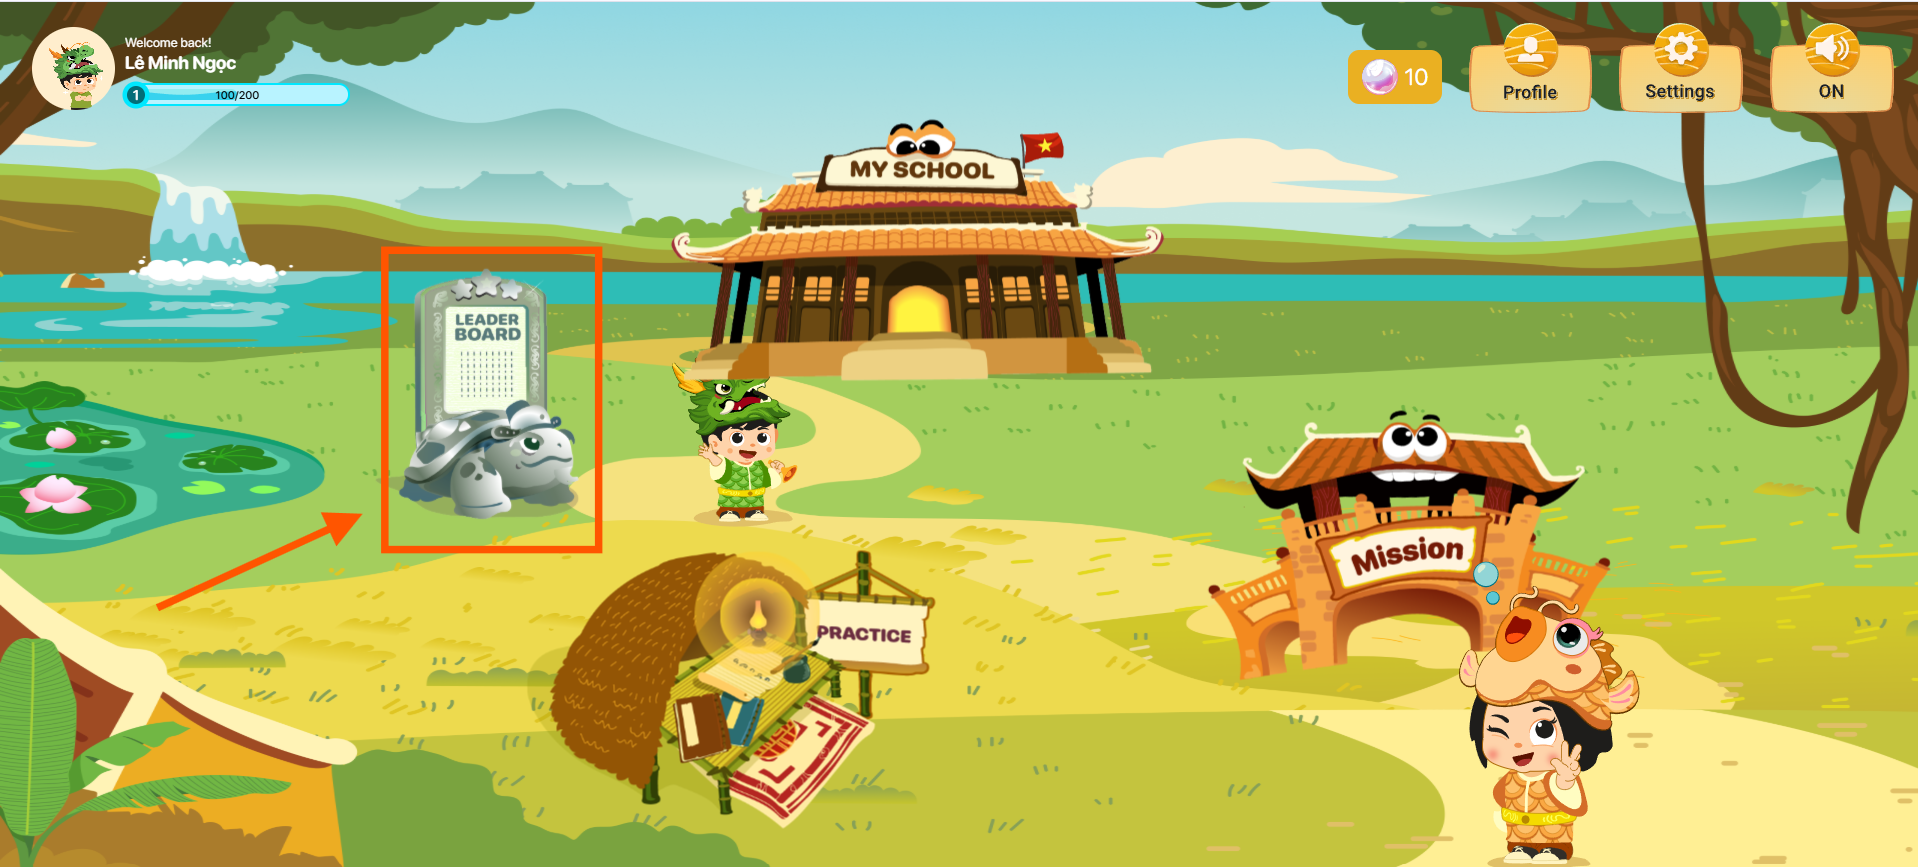
Step 2: Select a class from the top-right corner of the screen. The system will display the rankings of students in the selected class.

Note : Users can select Theo khối to view their ranking among students in the same grade level.
Step 3: The user's ranking is displayed below the leaderboard list.
9. MISSION
Step 1: From the Home screen, tap the Mission icon.
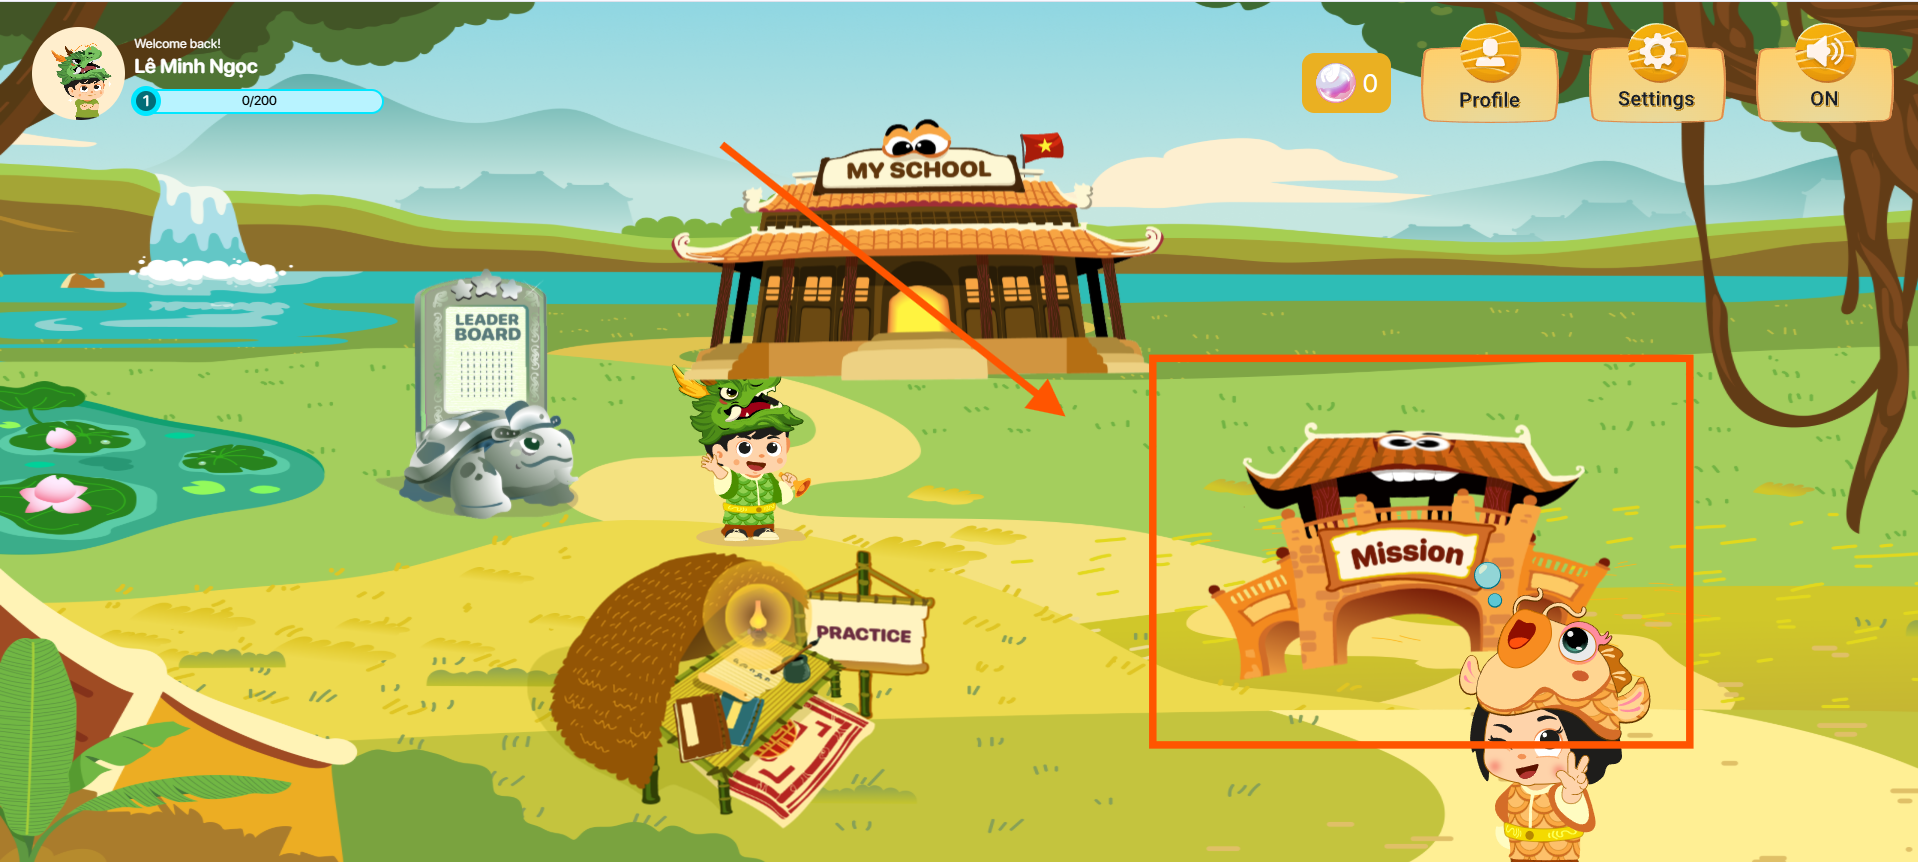
Step 2: On the Mission screen, the system displays the Mission Map arranged according to the teacher's assignment order. The most recently assigned mission is displayed on the far right.

Note : Mission statuses include:
| No. | Icon | Status | Description |
|---|---|---|---|
| 1 |  | Locked | The mission cannot be accessed because the stage has expired or the unlock date has not yet been reached. |
| 2 | 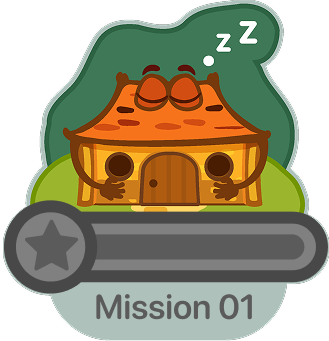 | Unlocked | The mission is available and users can start completing stages to earn scores. |
| 3 | 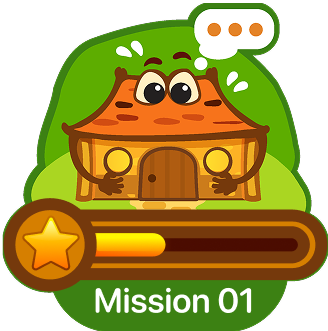 | In Progress | The user is currently completing stages within the mission. |
| 4 | 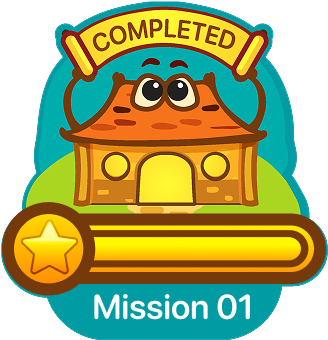 | Completed | The user has completed all stages and received the corresponding score. |
Step 3: Tap the button  to display the list of joined classes.
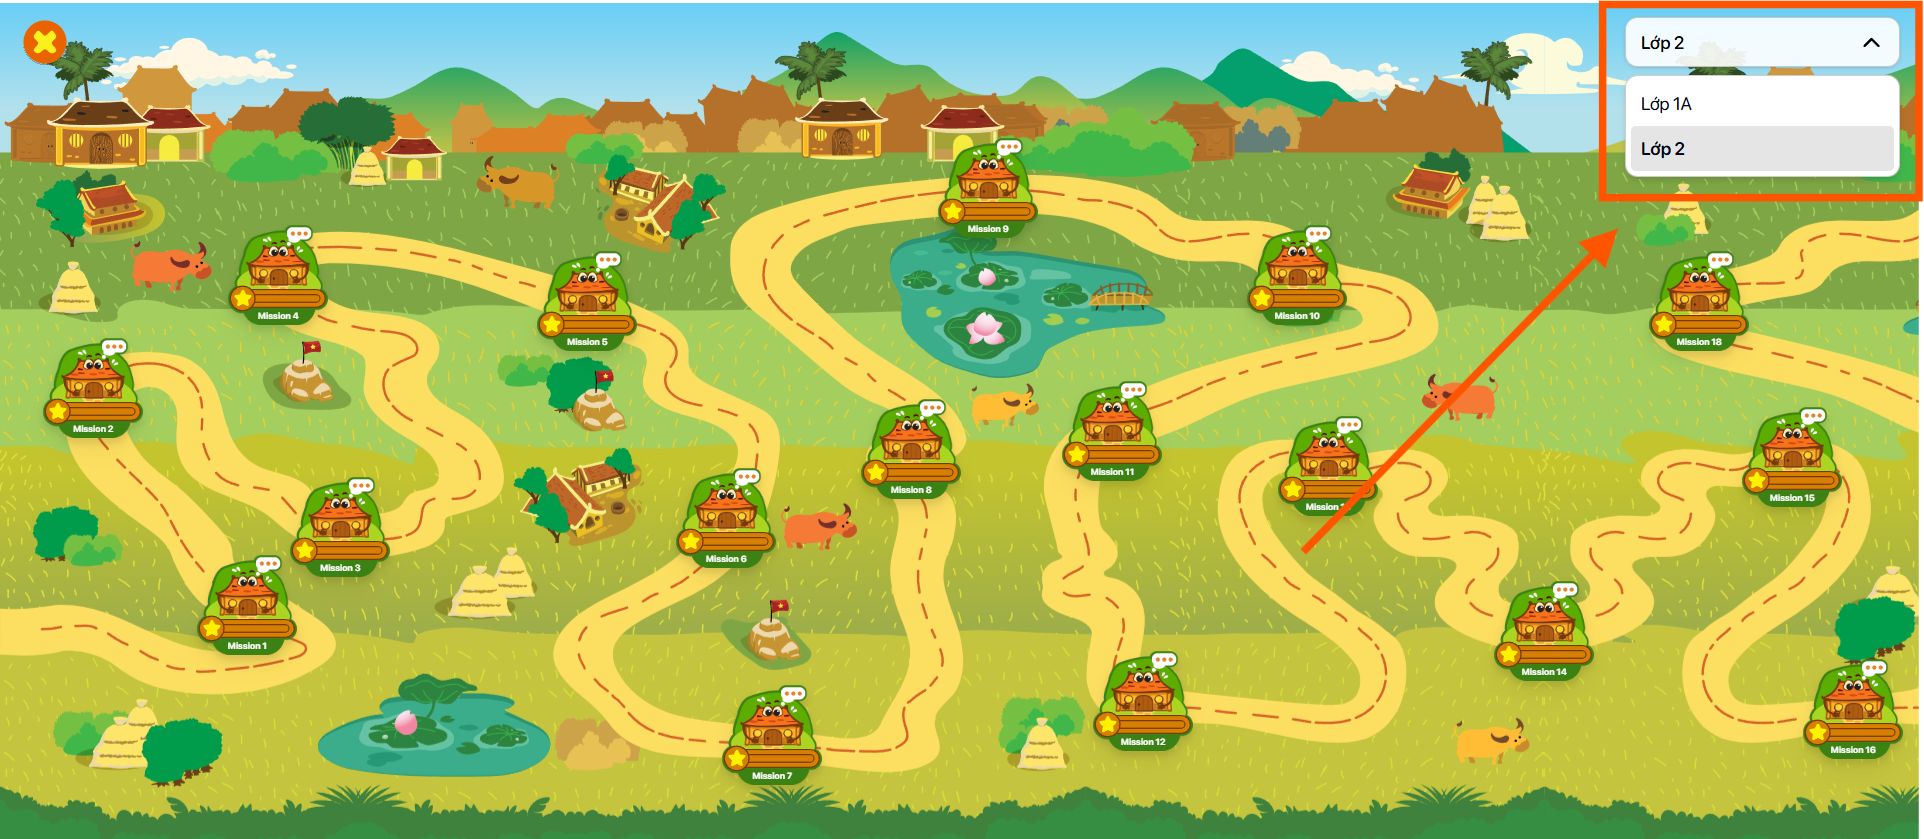
Step 4: Select a class from the list.
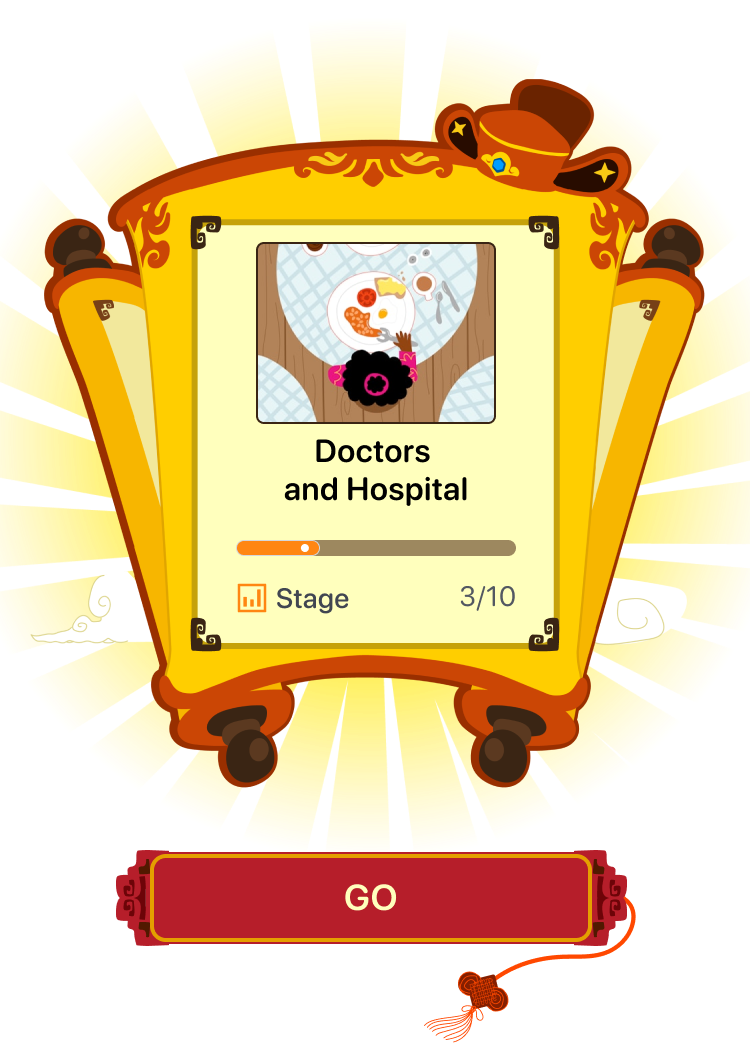
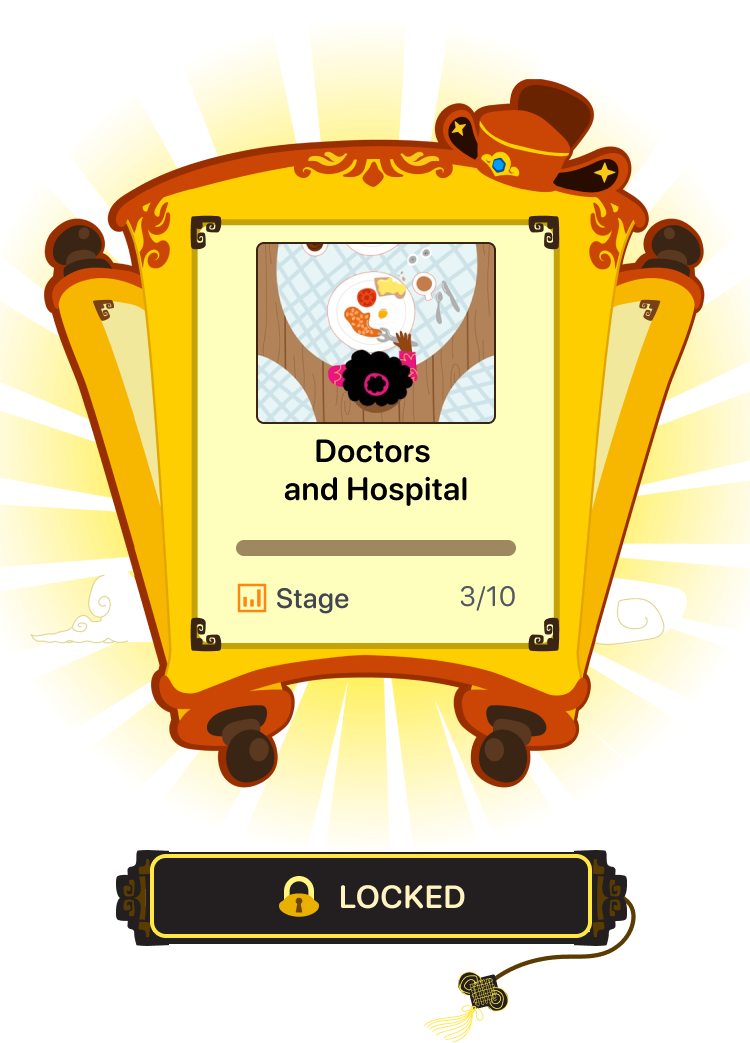
Step 5: After selecting a mission, users can view the following information:

- Thumbnail: Thumbnail image.
- Mission name: Name of the mission.
- Stage: Number of completed stages out of the total number of stages.
- Progress bar: Display the stage completion progress.
For unlocked missions, tap the Go button  to access the Stage Map screen.
For locked missions, tap anywhere outside the mission information panel to return to the Mission Map.
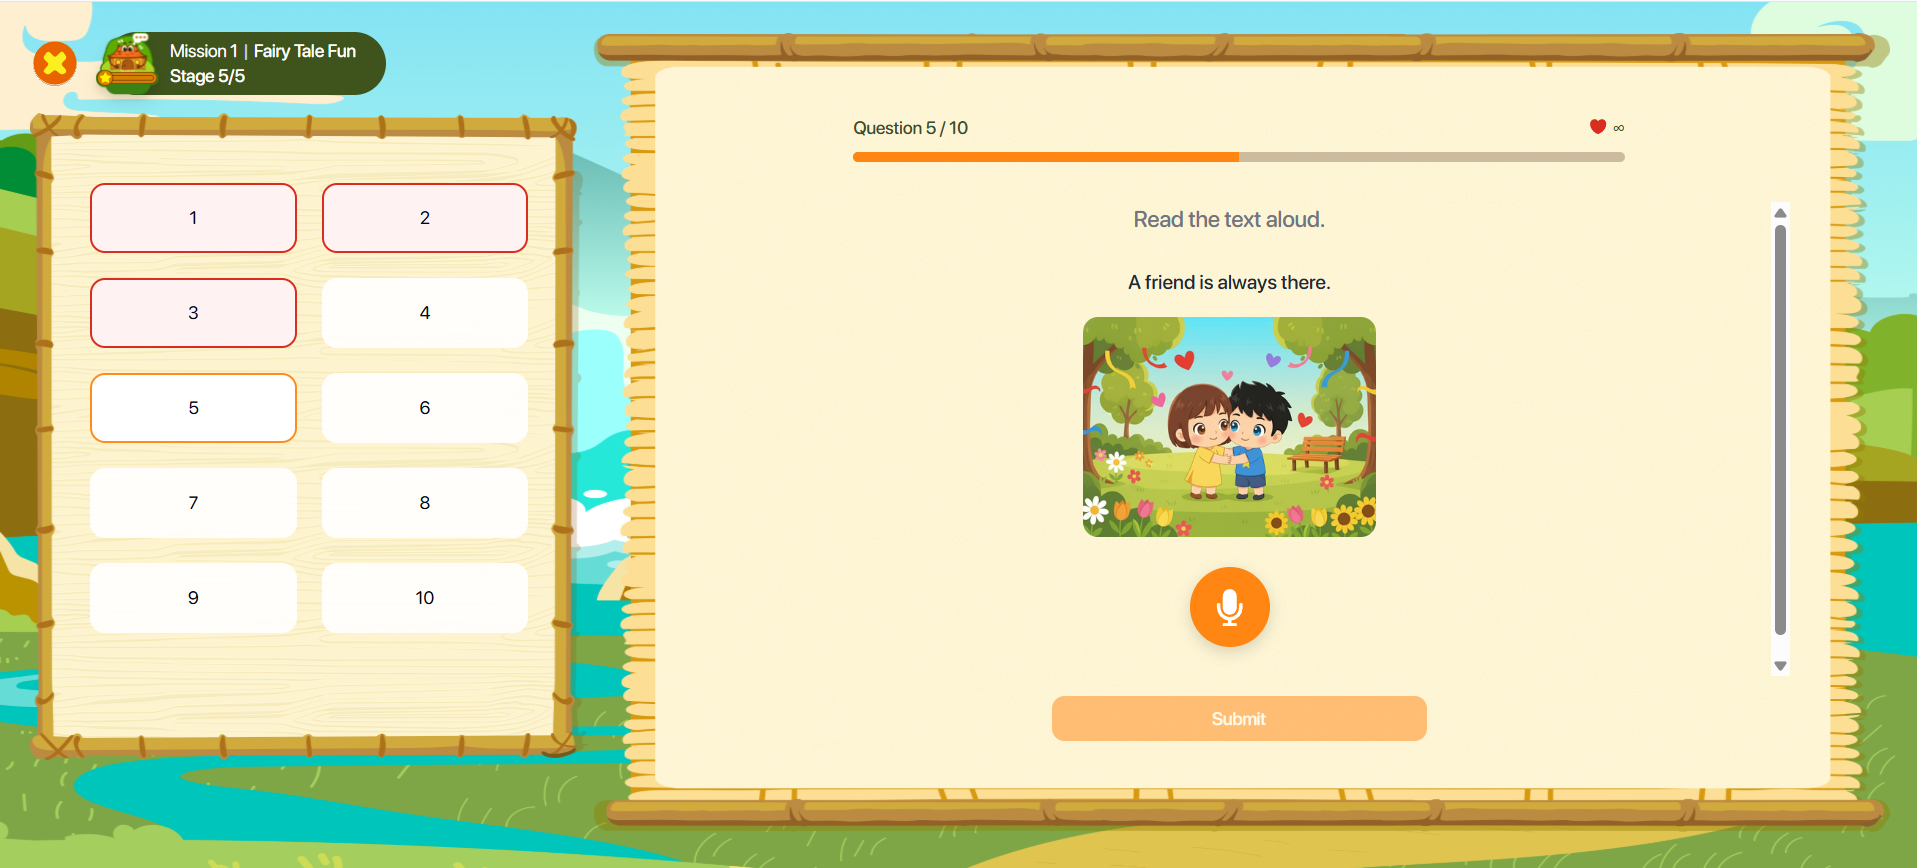
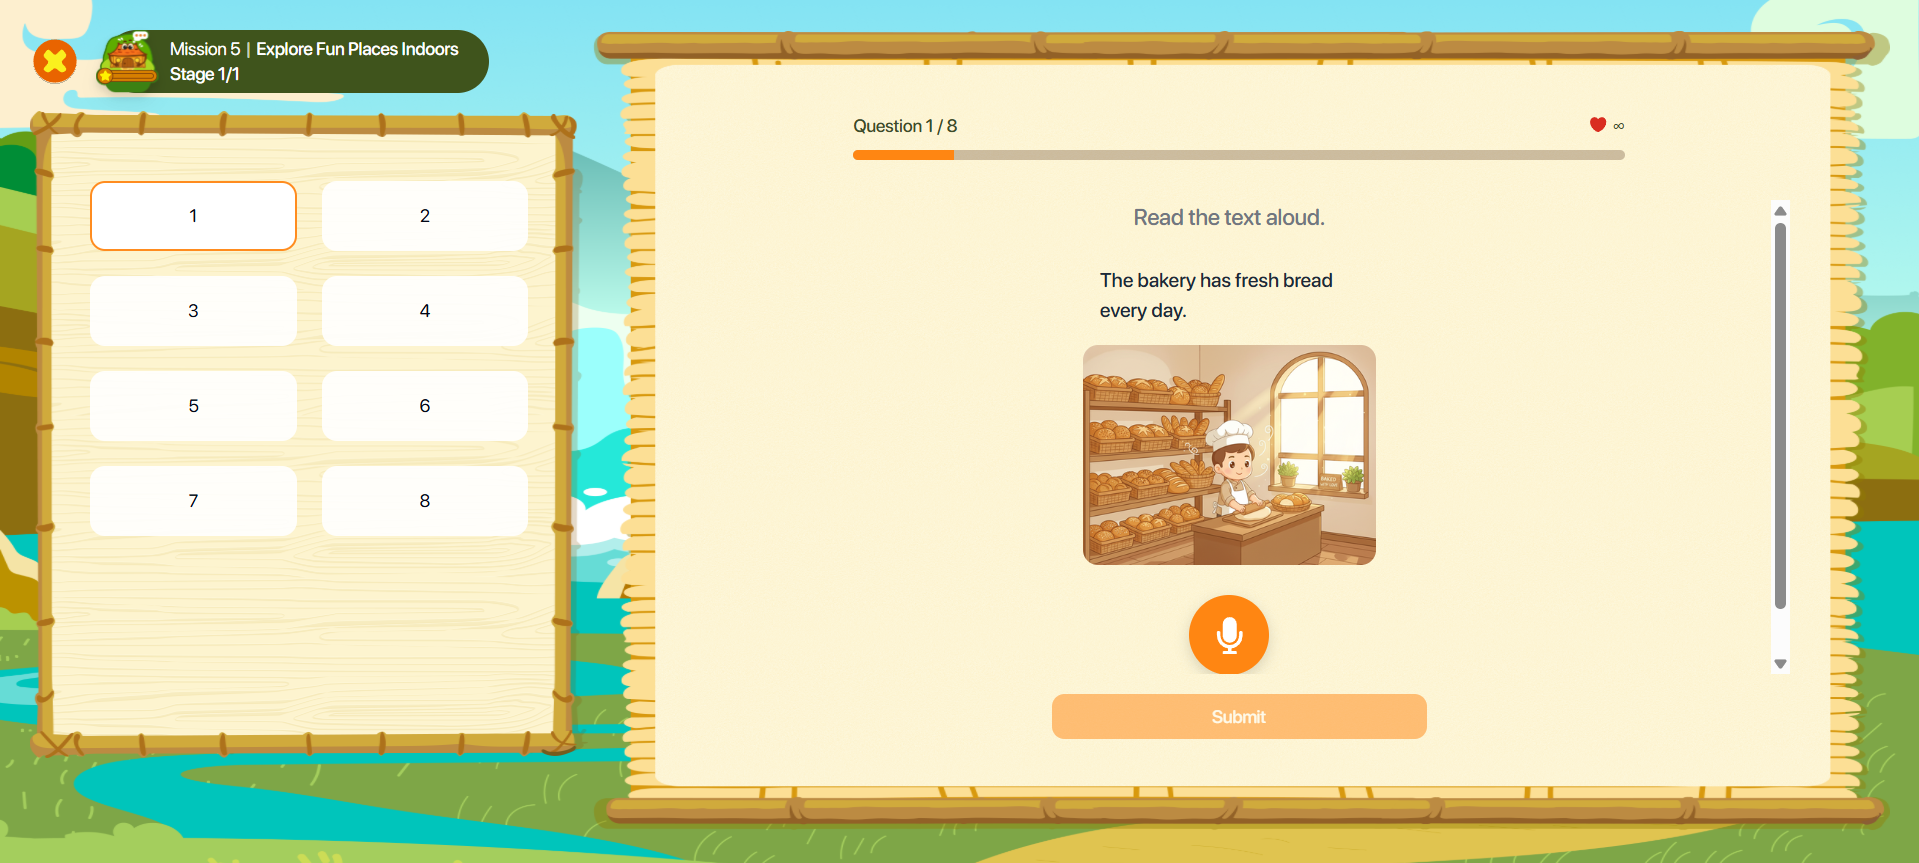
9.1. STAGE
Step 1: On the Stage screen, the system displays the Stage Map.

Note : Stage icons indicate the following statuses:
| No. | Icon | Status | Description |
|---|---|---|---|
| 1 |  | Completed | The user has completed the stage and received the corresponding score. |
| 2 |  | Due Soon | The stage has not been completed and less than one day remains before the deadline. |
| 3 |  | In Progress | The stage has been unlocked and is available for completion. |
| 4 |  | Locked | The stage cannot be accessed because it has expired or the unlock date has not yet been reached. |
Step 2: After selecting a stage, users can view the following information:
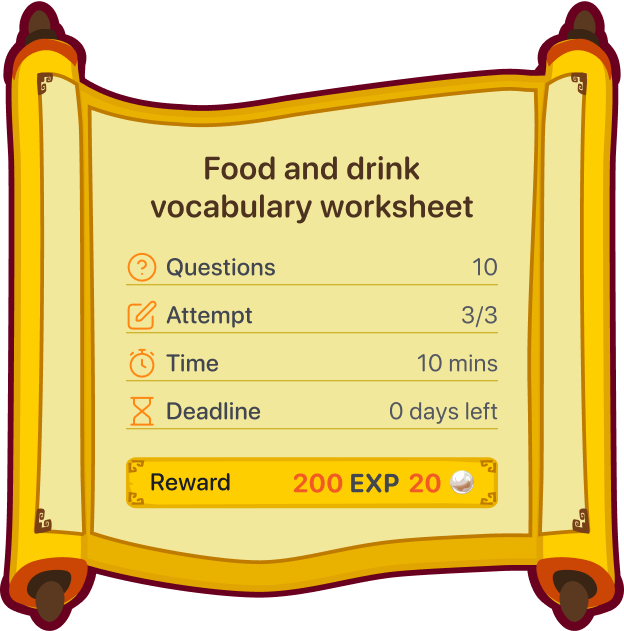
- Stage name: Name of the stage.
- Questions: Number of questions.
- Best score: Highest score achieved across all attempts.
- Attempt: Number of attempts.
- Time: Time allowed to complete the stage.
- Deadline: Stage completion deadline.
- Reward: Rewards earned upon completing the stage, including Gems and EXP.
Note : Stage statuses support the following actions:
| No. | Image | Status | Action |
|---|---|---|---|
| 1 | 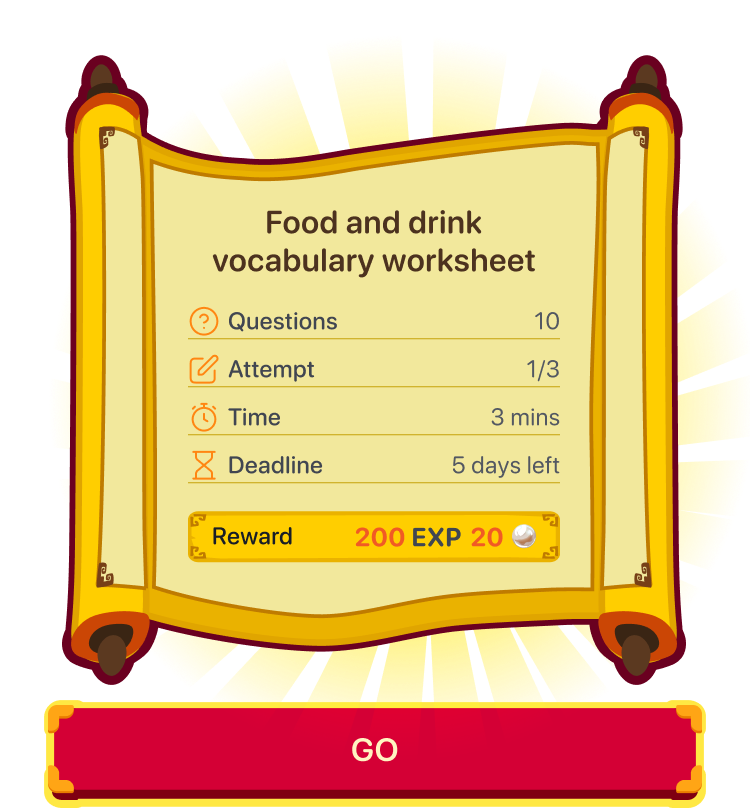 | Unlocked | Tap the Start button to begin the stage. |
| 2 | 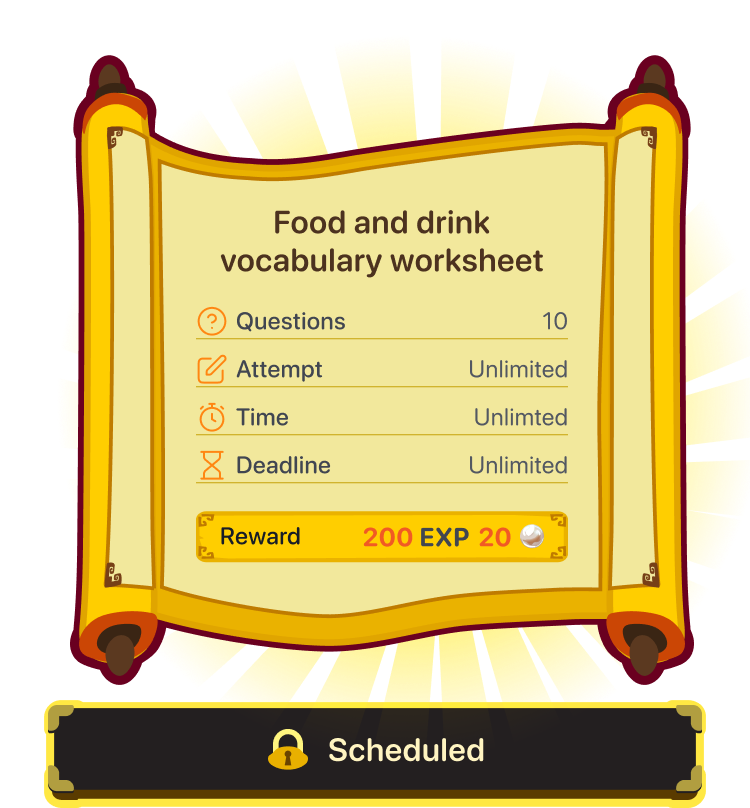 | Not Yet Available | Tap anywhere outside the Stage information panel to return to the Stage Map. |
| 3 | 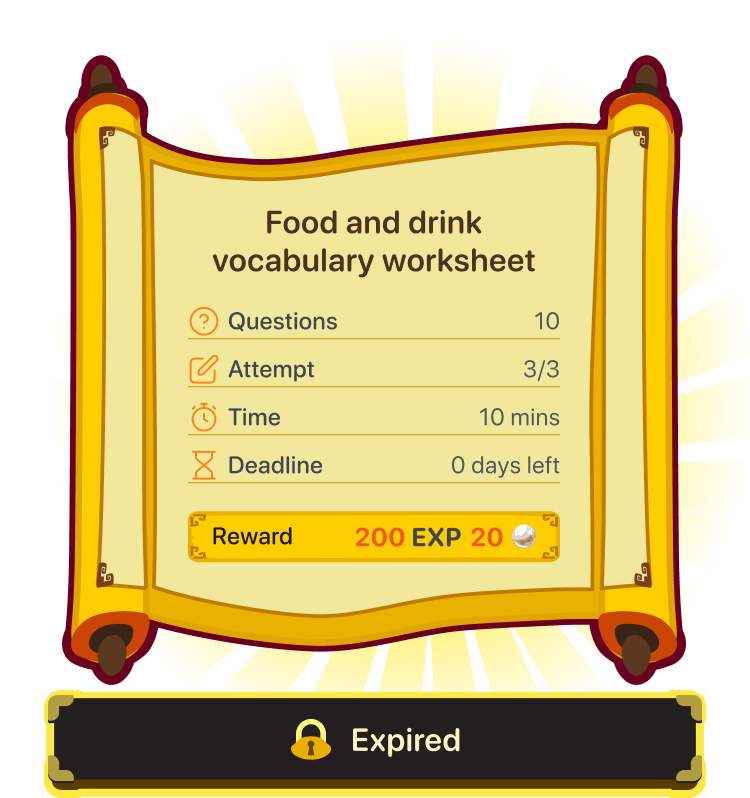 | Expired | Tap anywhere outside the Stage information panel to return to the Stage Map. |
| 4 |  | Completed (Attempts Remaining) | Tap the Do again button  to attempt the stage again.Or tap the Review button to attempt the stage again.Or tap the Review button  to view the results of the highest-scoring attempt. to view the results of the highest-scoring attempt. |
| 5 |  | Completed (No Attempts Remaining) | Tap the Review button  to view the results of the highest-scoring attempt. to view the results of the highest-scoring attempt. |
Step 3: Select an unlocked stage.
Step 4: On the Stage screen, users can interact as follows:
- The left panel displays the list of questions. Users can select any question to view. Previously completed questions can be reviewed but cannot be answered again during the same attempt.
- The right panel displays the selected question, where users complete the activity and view the results.
Note : When users click the Exit icon  , a confirmation message will be displayed.

If users choose to the button ![]() , all progress in the current stage will not be recorded, and no rewards or EXP will be granted for that stage.
, all progress in the current stage will not be recorded, and no rewards or EXP will be granted for that stage.
Step 5: On the Stage screen, users can interact with and answer questions through a variety of exercise types.
Step 6: After completing the stage, the system displays the Completed screen with the following information:
- Correct answers: Number of correct answers out of the total number of questions.
- EXP: Experience points earned.
- Gems: Reward gems earned.

Note : Different rewards will be granted depending on the stage completion outcome.
For the first attempt, rewards are granted based on the number of correct answers.
For subsequent attempts, rewards are granted according to the achieved results. If a user correctly answers a question that was previously answered incorrectly, additional rewards for that question will be awarded.
When replaying a stage belonging to a completed class, only the score will be recorded; no rewards will be granted.
If the time limit expires or the user exceeds the maximum number of incorrect answers allowed, the stage will end automatically. The stage will be recorded as incomplete with a score of 0. Tap the Continue button  to return to the Stage Map.

Step 7: On the Completed screen, tap the Review button  to review and attempt the stage again.
Or tap the Continue button  to continue with the next stage.
9.2. PRONUNCIATION
Step 1: Follow the instructions for the corresponding exercise type.
Image Type : Observe the sentence and image displayed on the screen.
Audio Type : Tap the Play button  to listen to the sample audio.
Note : Users can view the sentence to be pronounced by tapping the icon. ![]()
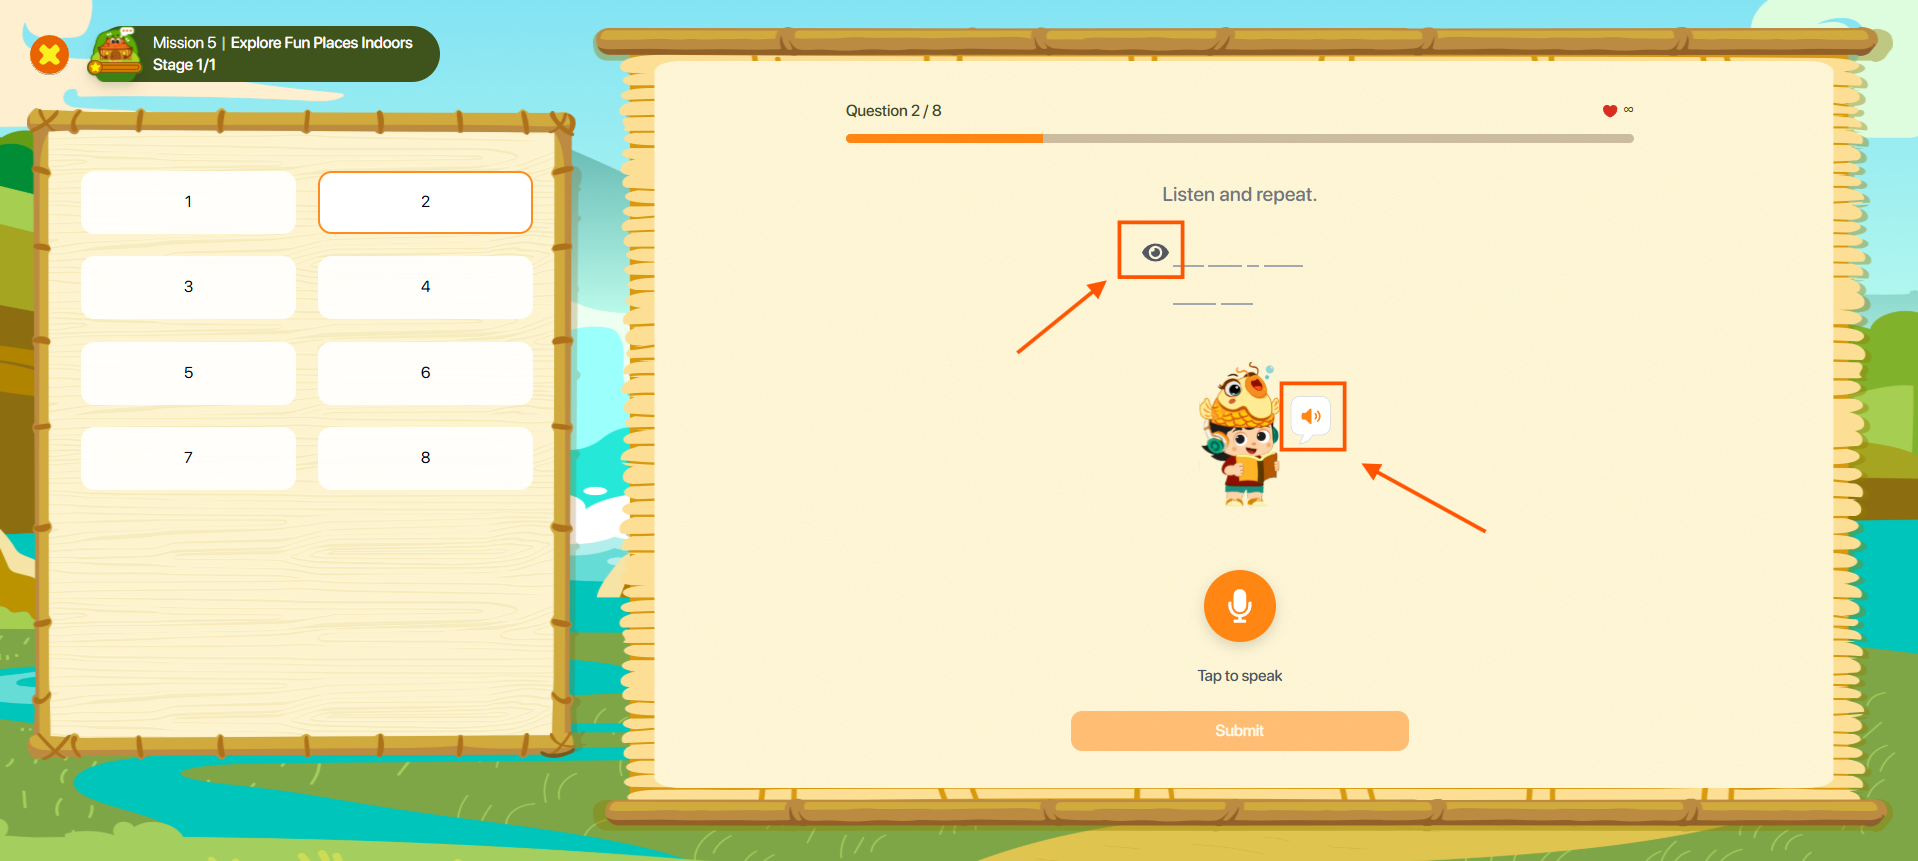
Step 2: Tap the Record button  to start recording.
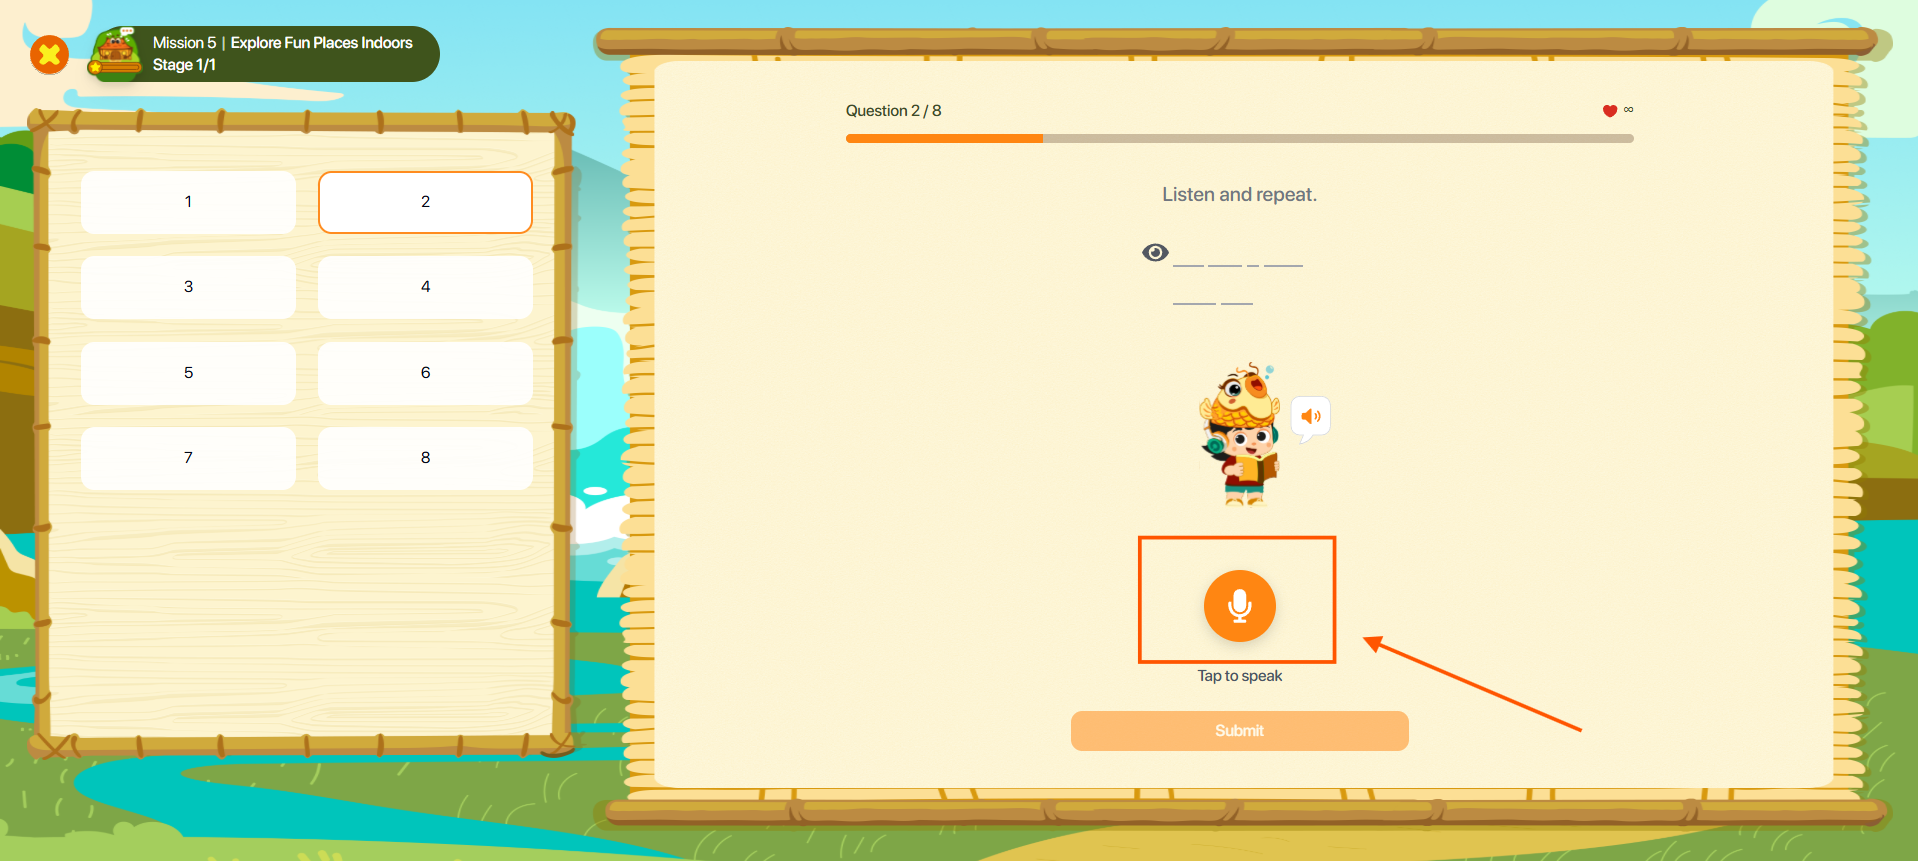
Step 3: Tap the Stop button  to end the recording.
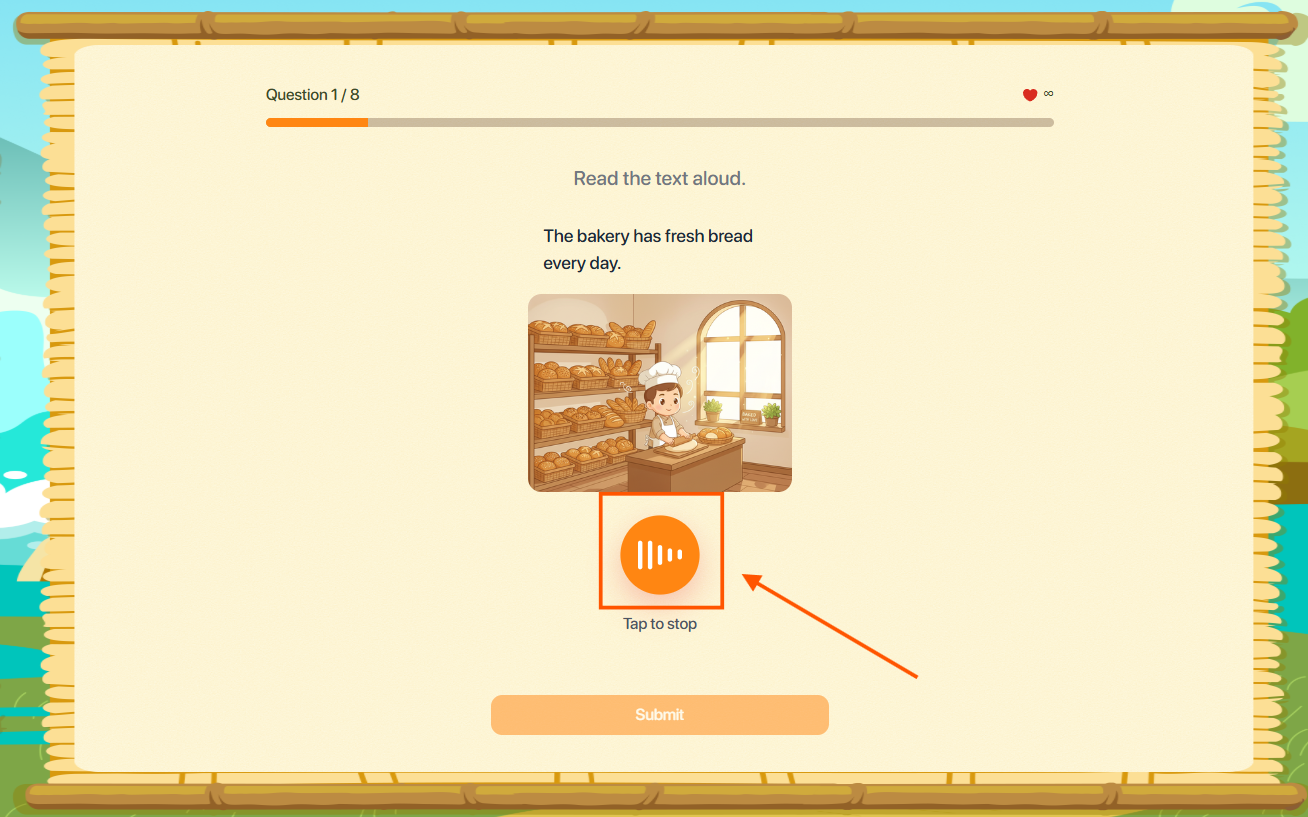
Step 4: After finishing, tap the Submit button  to confirm your answer. The system will evaluate the pronunciation and provide color-coded feedback to help learners improve their speaking skills.
- Green 🟢 : Correct pronunciation.
- Yellow 🟡: Nearly correct pronunciation.
- Red 🔴: Needs improvement.
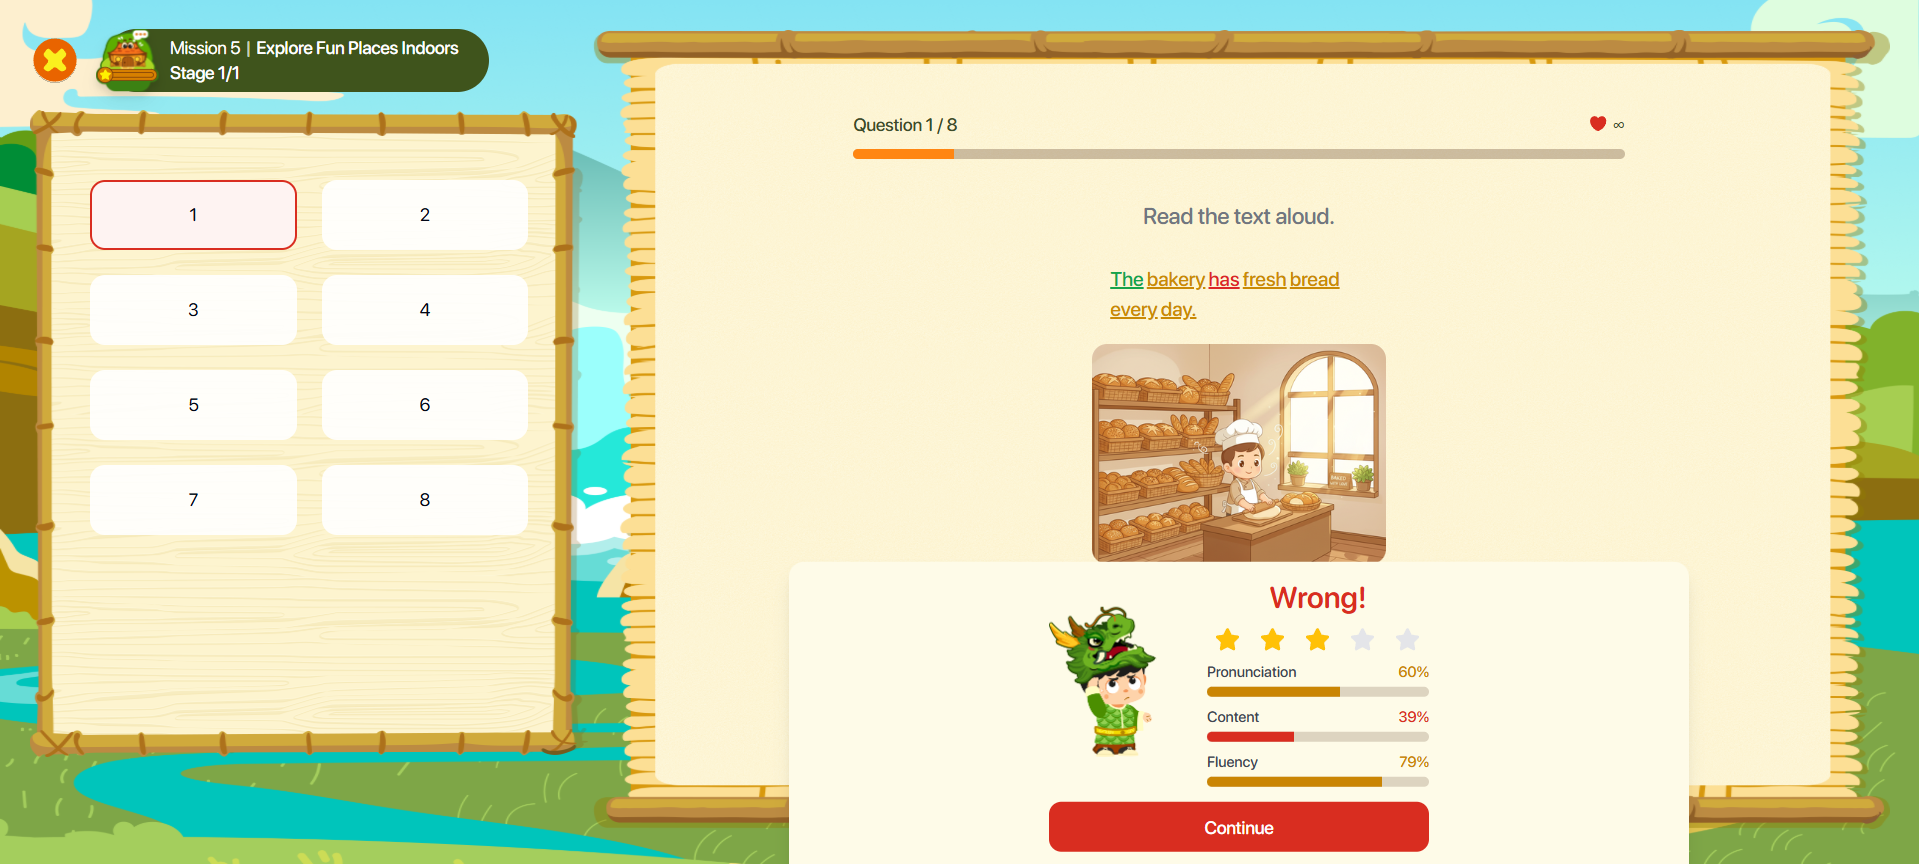
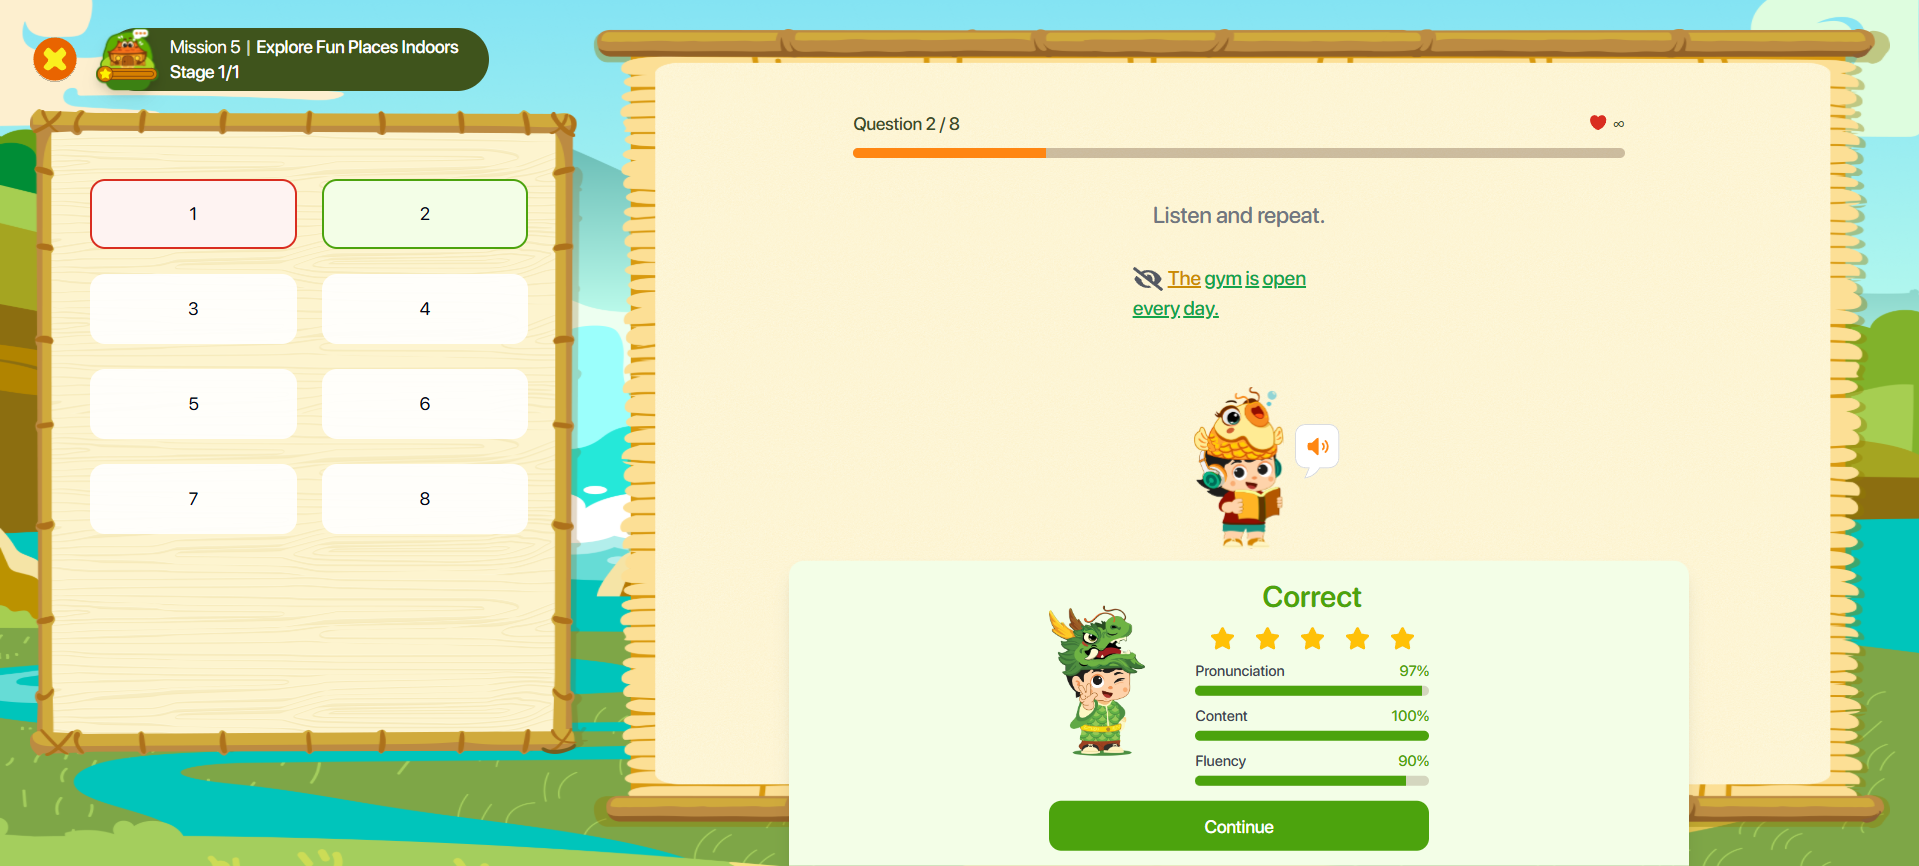
Step 5: Tap any word in the sentence to display a tooltip with pronunciation support.
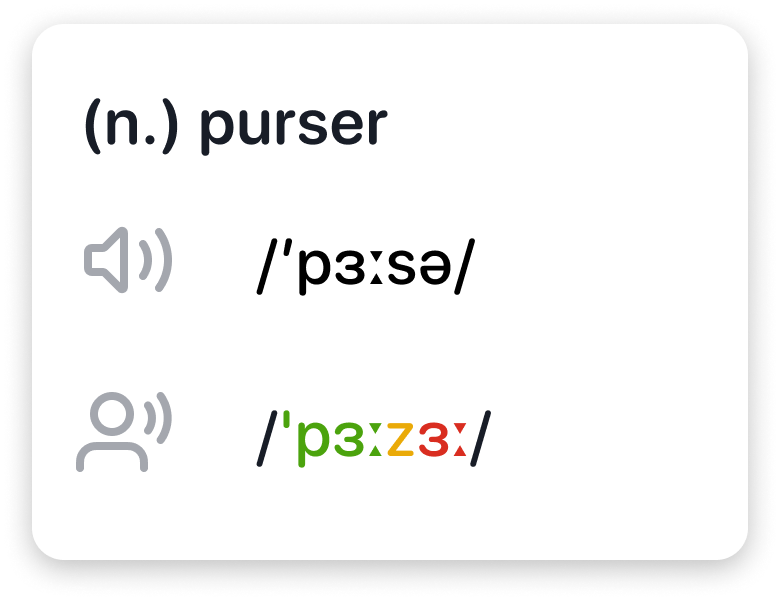
Note : Users can view the following information:
- Part of speech: Word class.
- IPA (International Phonetic Alphabet): Standard phonetic transcription.
- Tap the Speaker button
 to hear the correct pronunciation.
 - Tap the Replay button
 to listen to your own recording.
9.3. MATCHING PAIR
Step 1: Follow the instructions for the corresponding exercise type.
Text – Image: Match a word or sentence with the corresponding image.
Text – Audio: Match a word or sentence with the corresponding audio clip.
Audio – Image: Match an audio clip with the corresponding image.
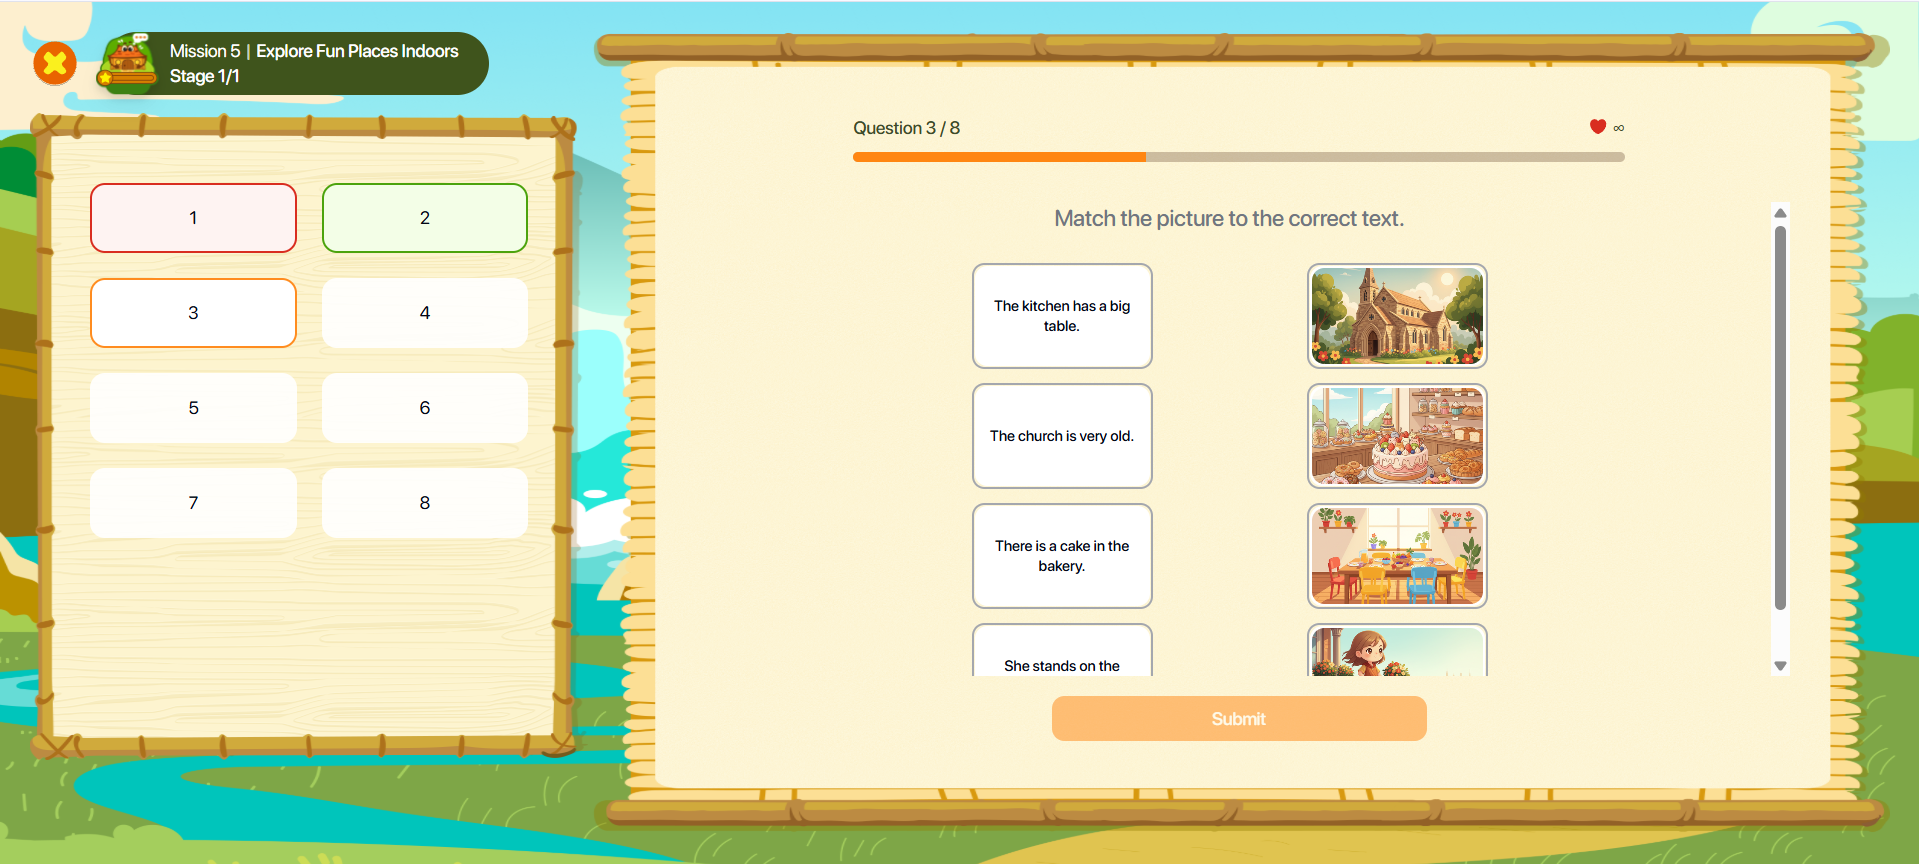
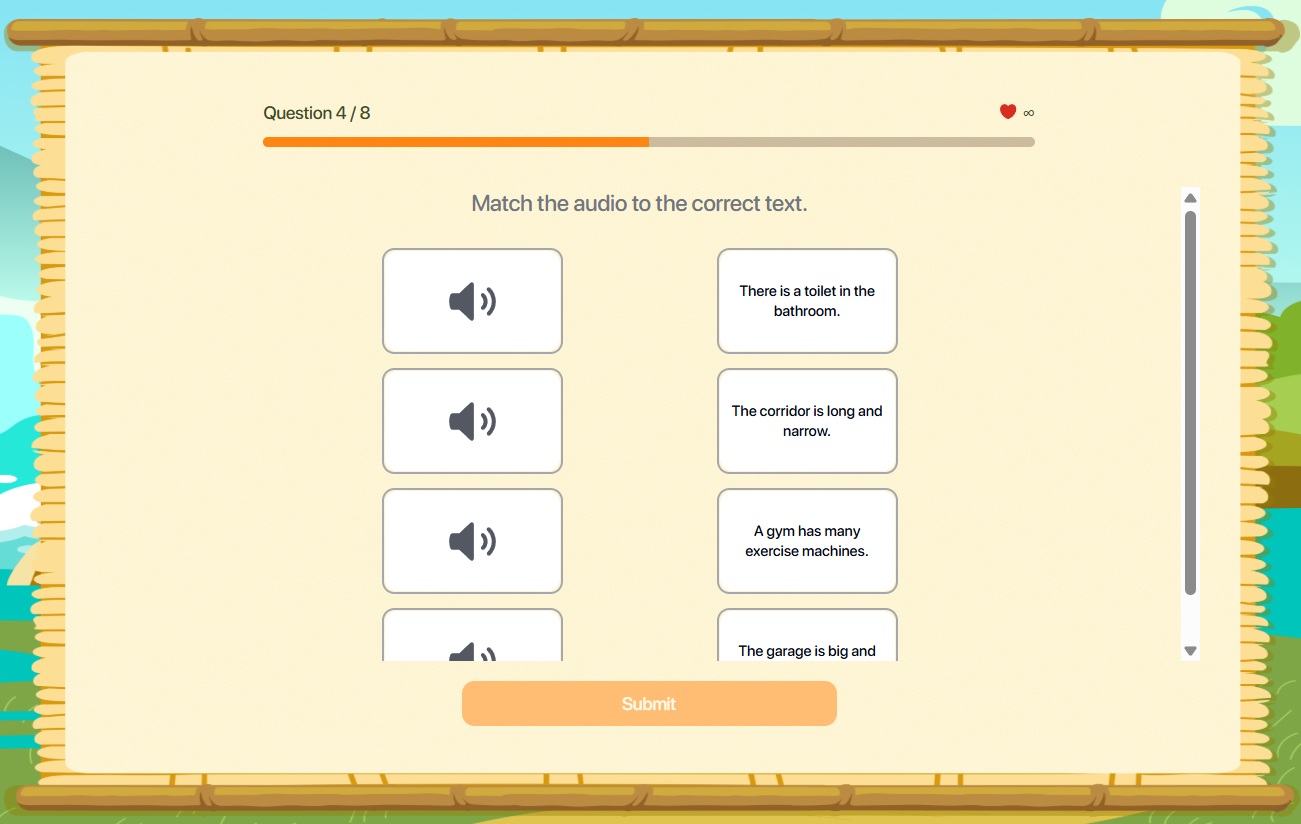
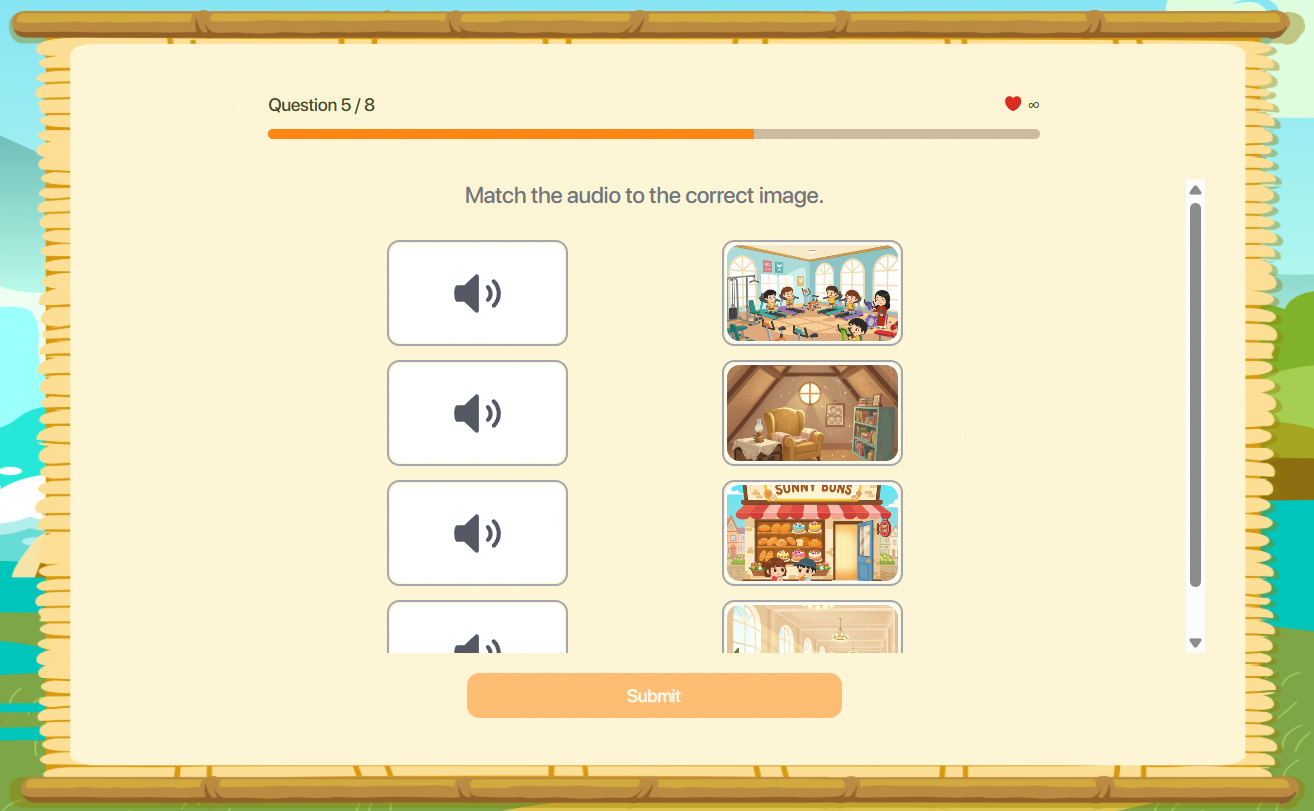
Step 2: Tap the word, sentence, image, or audio item in the two columns to create a matching pair.

Note : To change a selected pair, tap the existing connection to remove it.
Step 3: After completing all matches, tap the Submit button to confirm your answer.

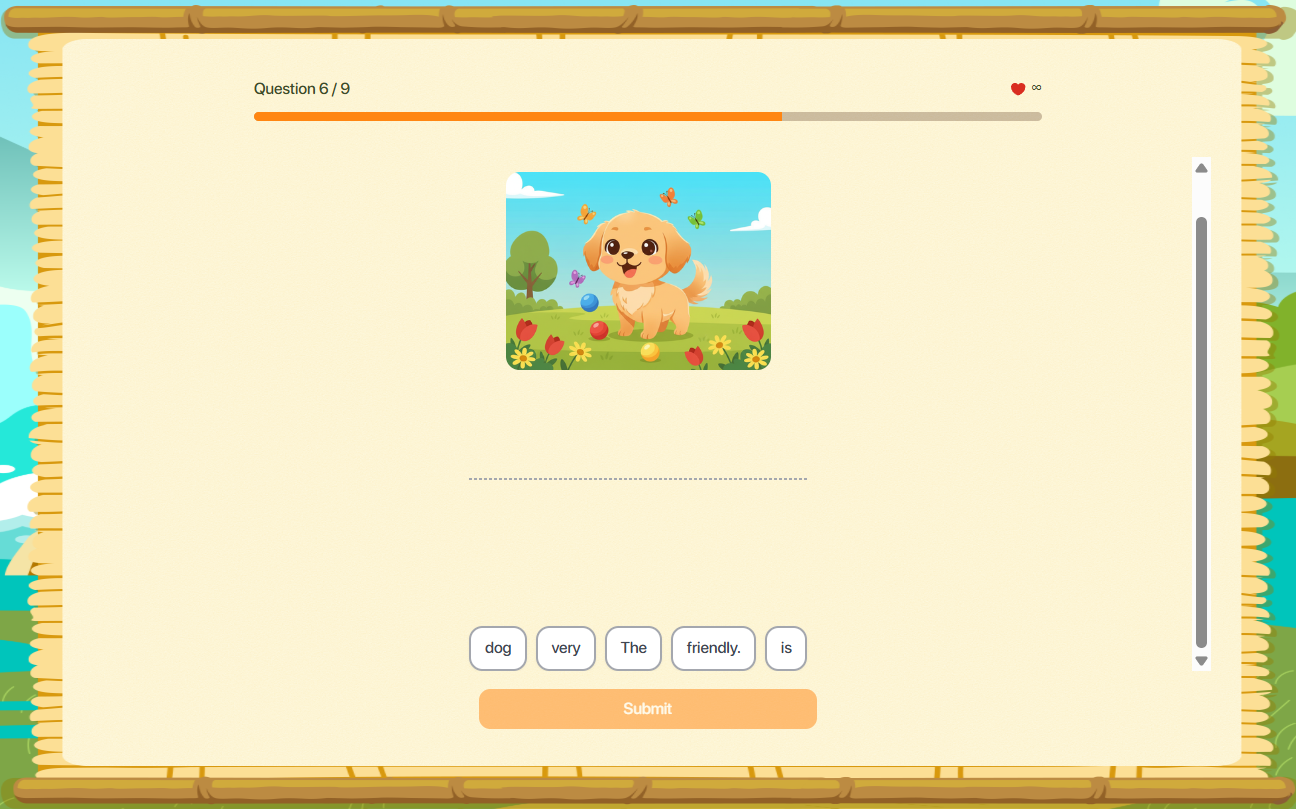
9.4. DRAG AND DROP
Step 1: Follow the instructions for the corresponding exercise type.
Text – Image: Complete the sentence based on the image displayed on the screen.
Text – Audio: Tap the Audio icon to listen to the complete sentence.
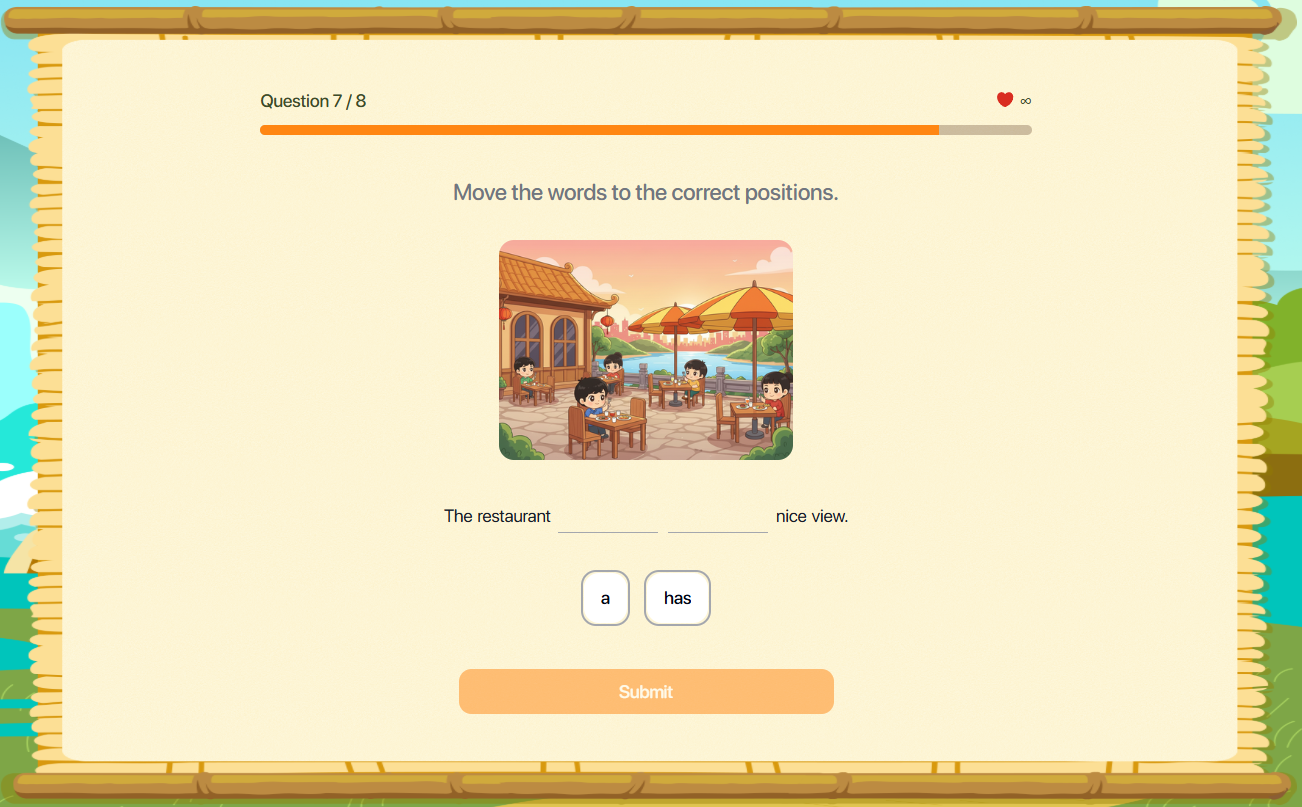
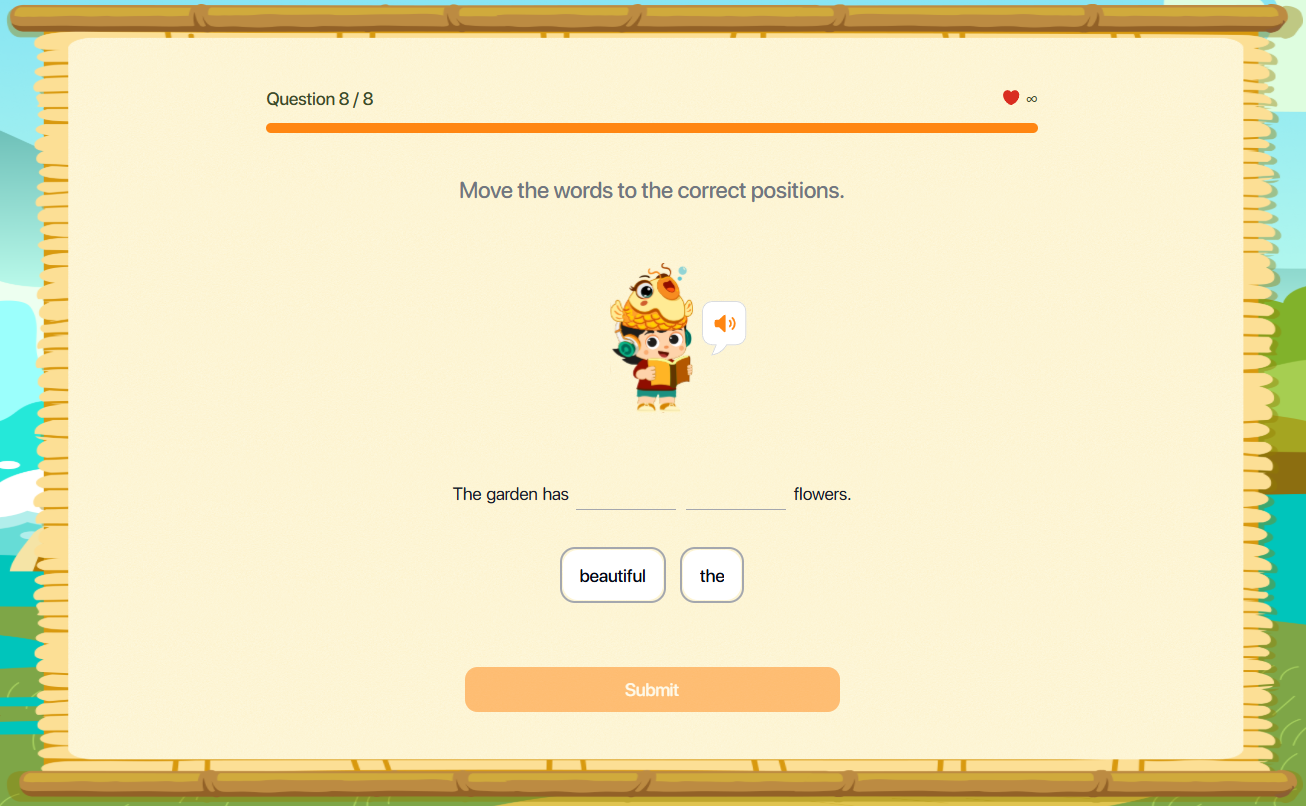
Step 2: Tap a word from the list displayed below the audio clip or image.
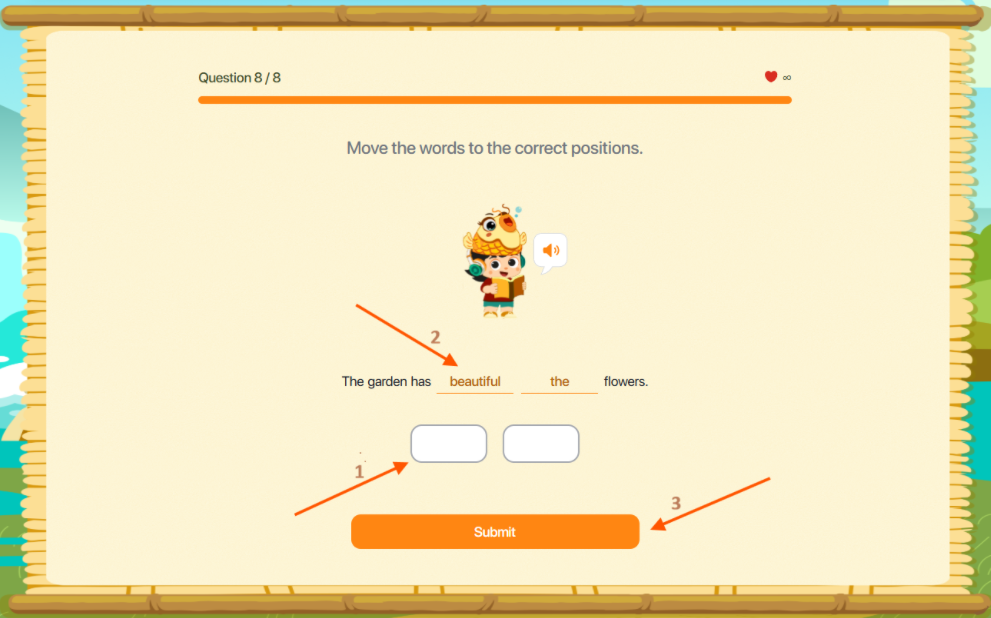
Note : To change a selected answer, tap the chosen word to remove it, then select another word from the list.
Step 3: After completing the task, tap the Submit button to confirm your answer.
9.5. DROP DOWN
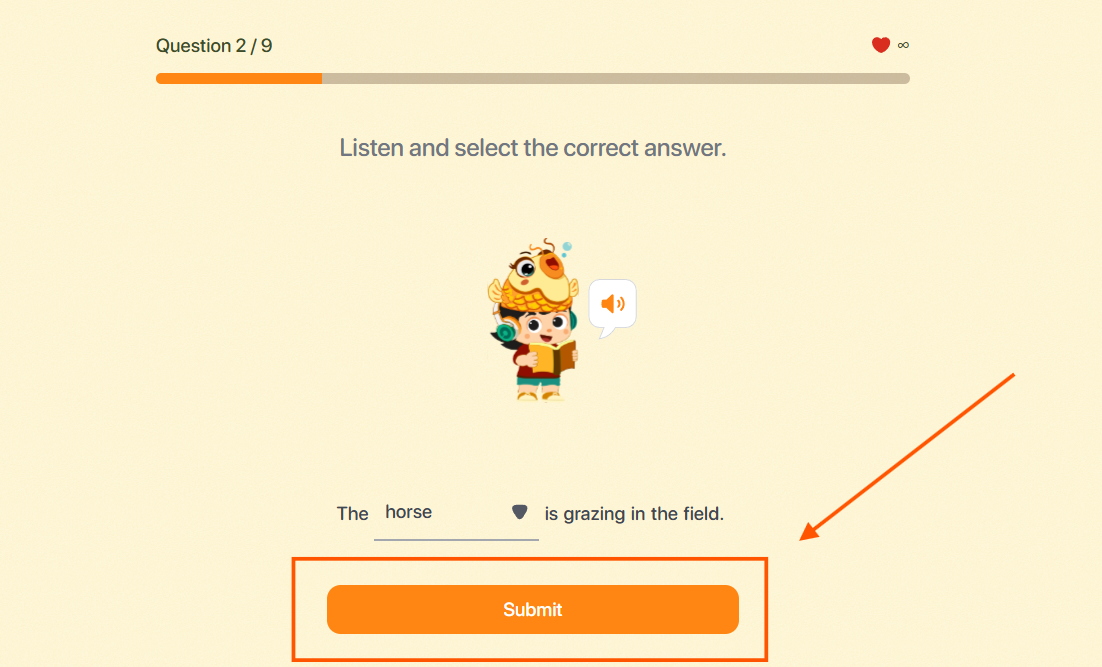
Step 1: Follow the instructions for the corresponding exercise type.
Image Type : Observe the sentence and image displayed on the screen.
Audio Type : Tap the Play button to listen to the sample audio.
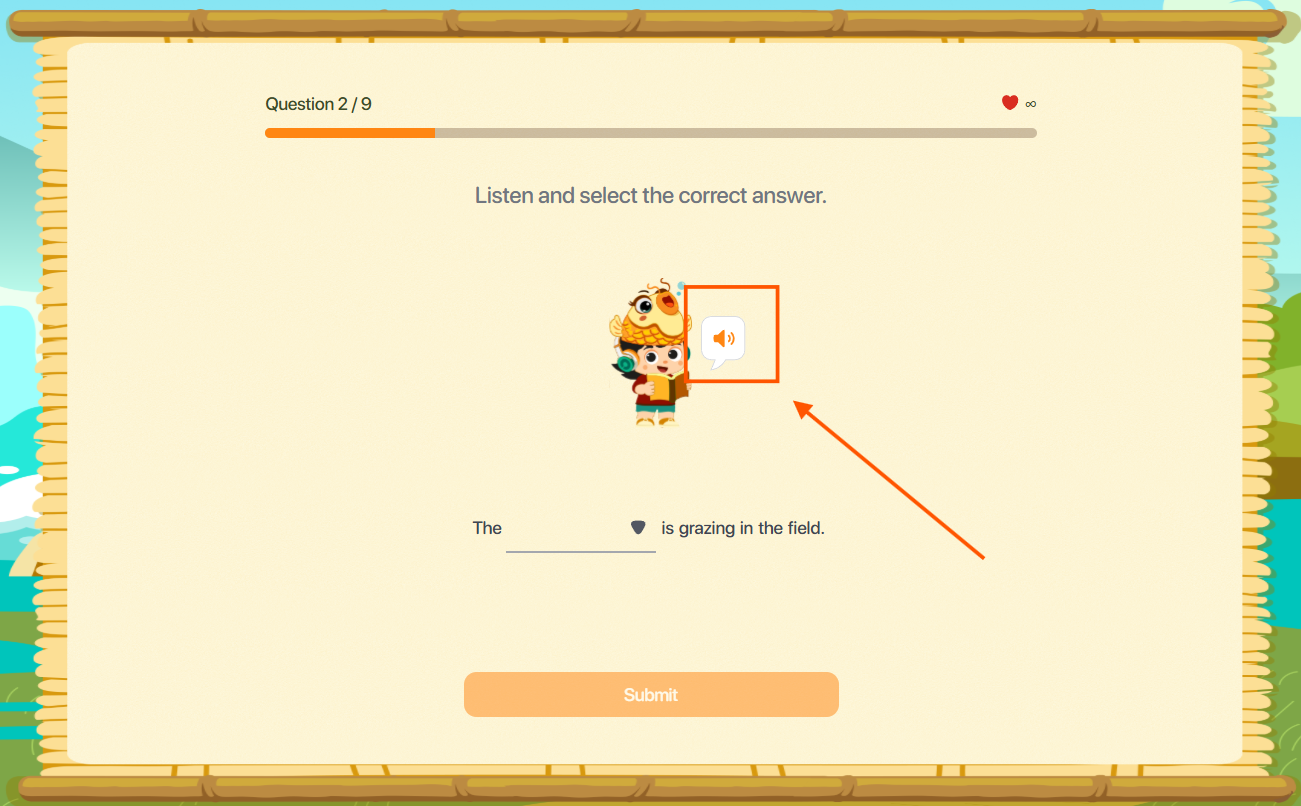
Step 2: Tap the dropdown field  to select the appropriate word from the list.
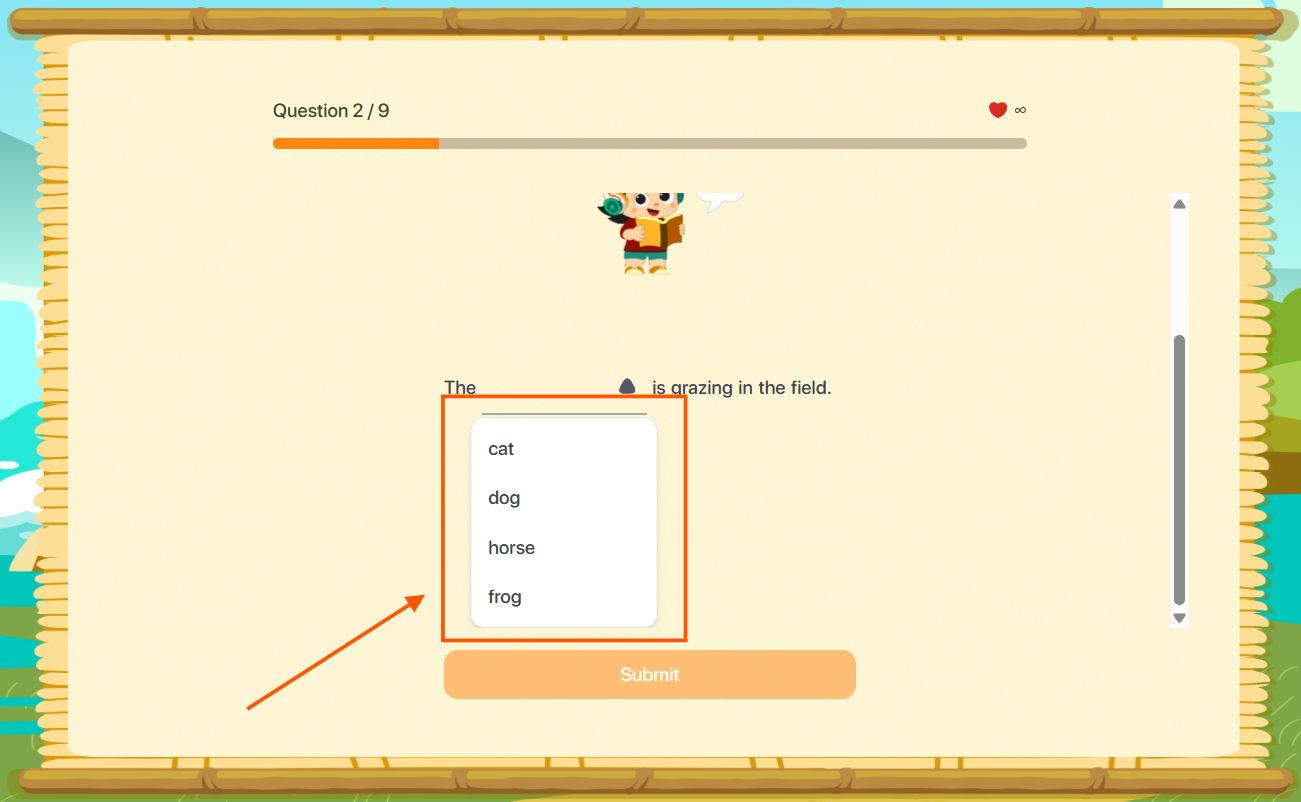
Note : To change your selection, tap the dropdown field again and choose a different word.
Step 3: After completing the task, tap the Submit button to confirm your answer.
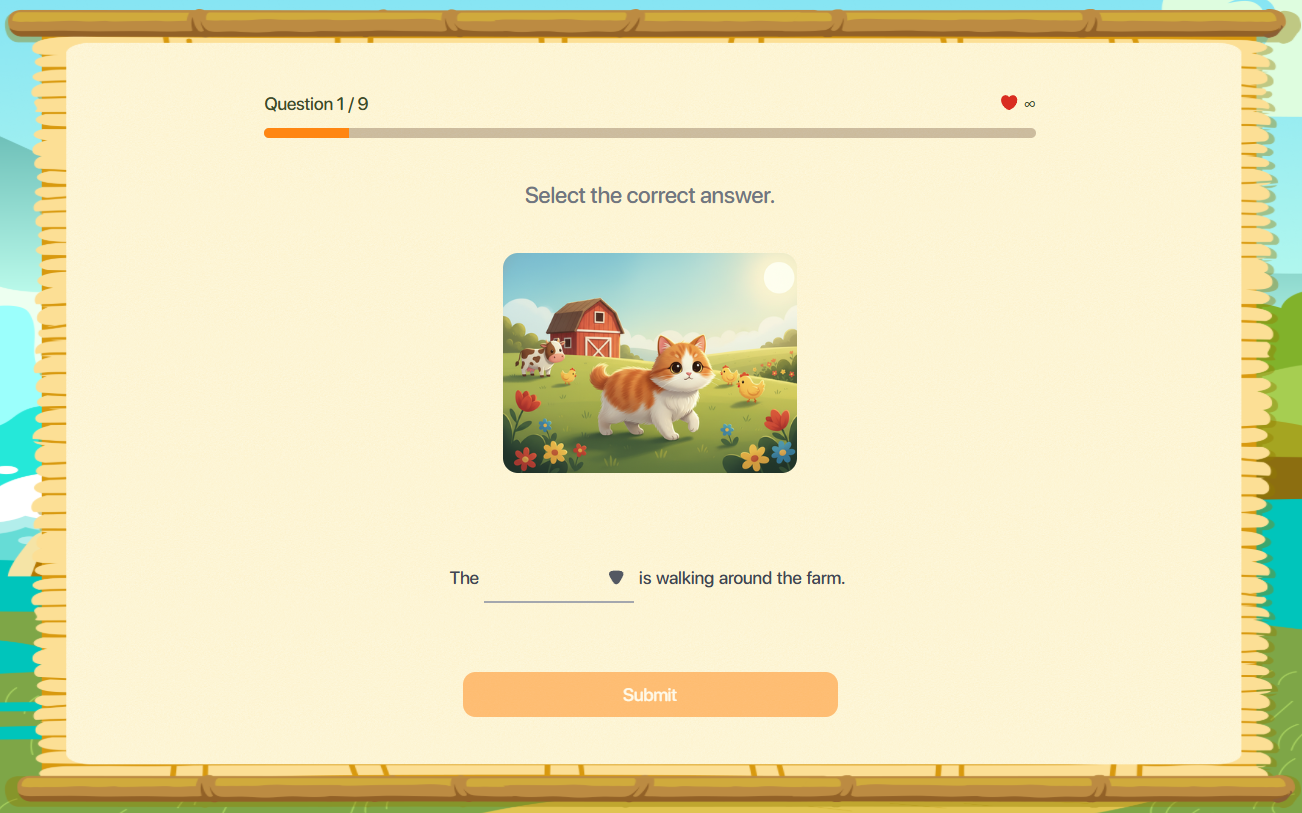
9.6. MULTIPLE CHOICE
Step 1: Follow the instructions for the corresponding exercise type.
Image Type : Observe the sentence and image displayed on the screen.
Audio Type : Tap the Play button to listen to the sample audio.
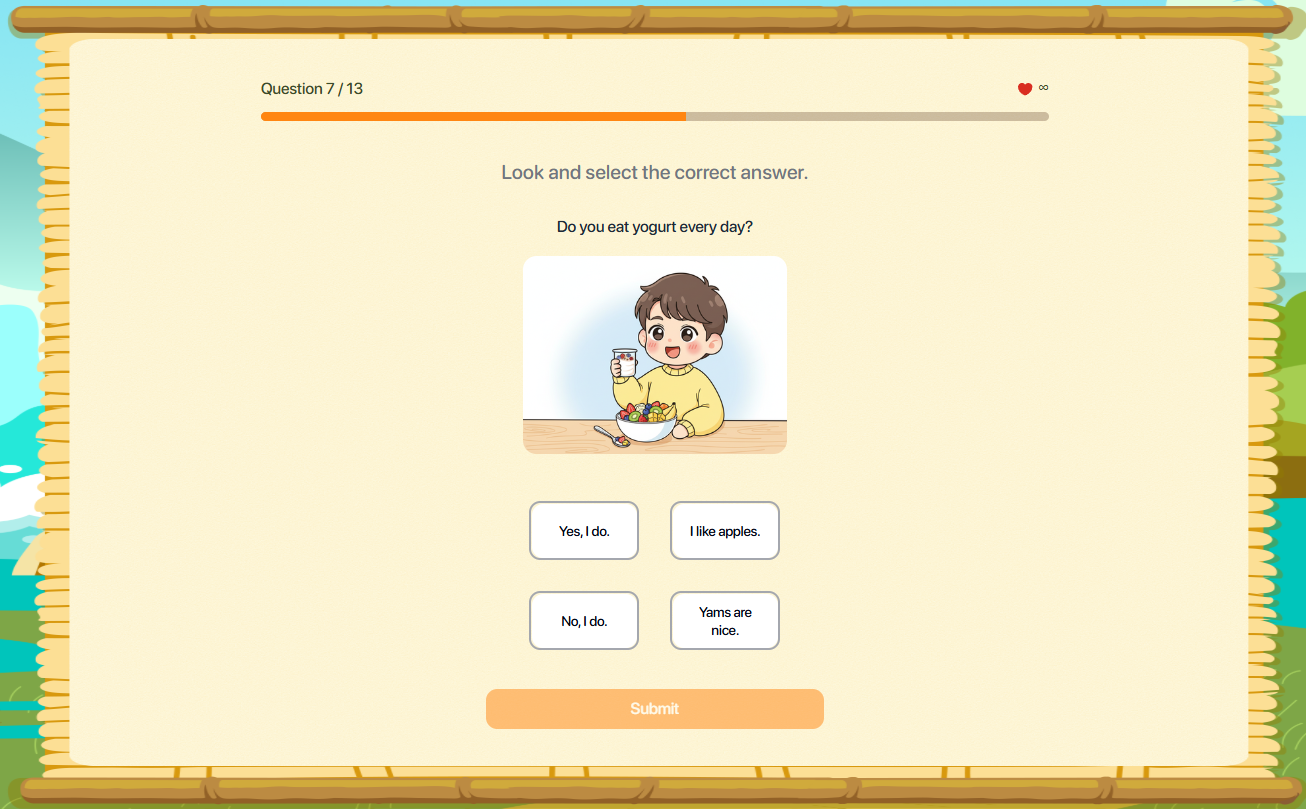
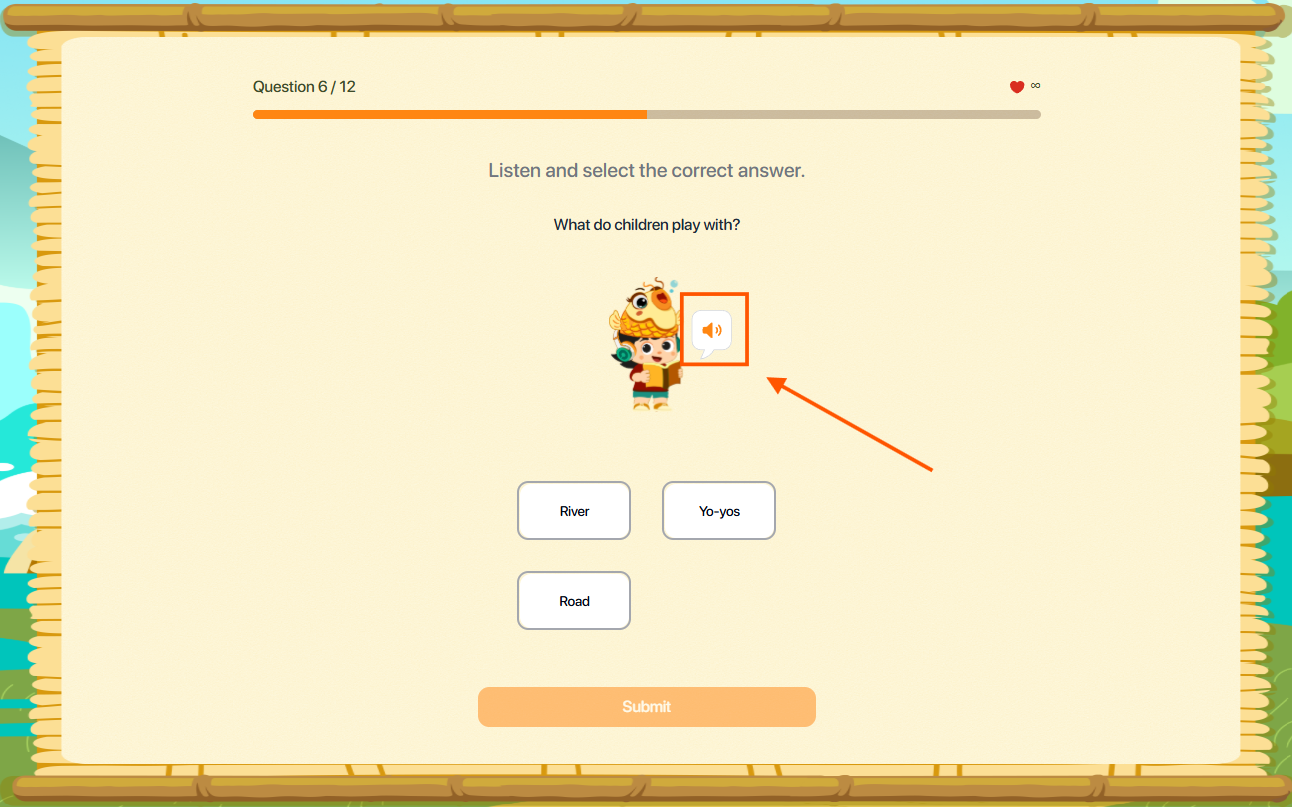
Step 2: Tap the answer field  to choose the most appropriate option from the list.
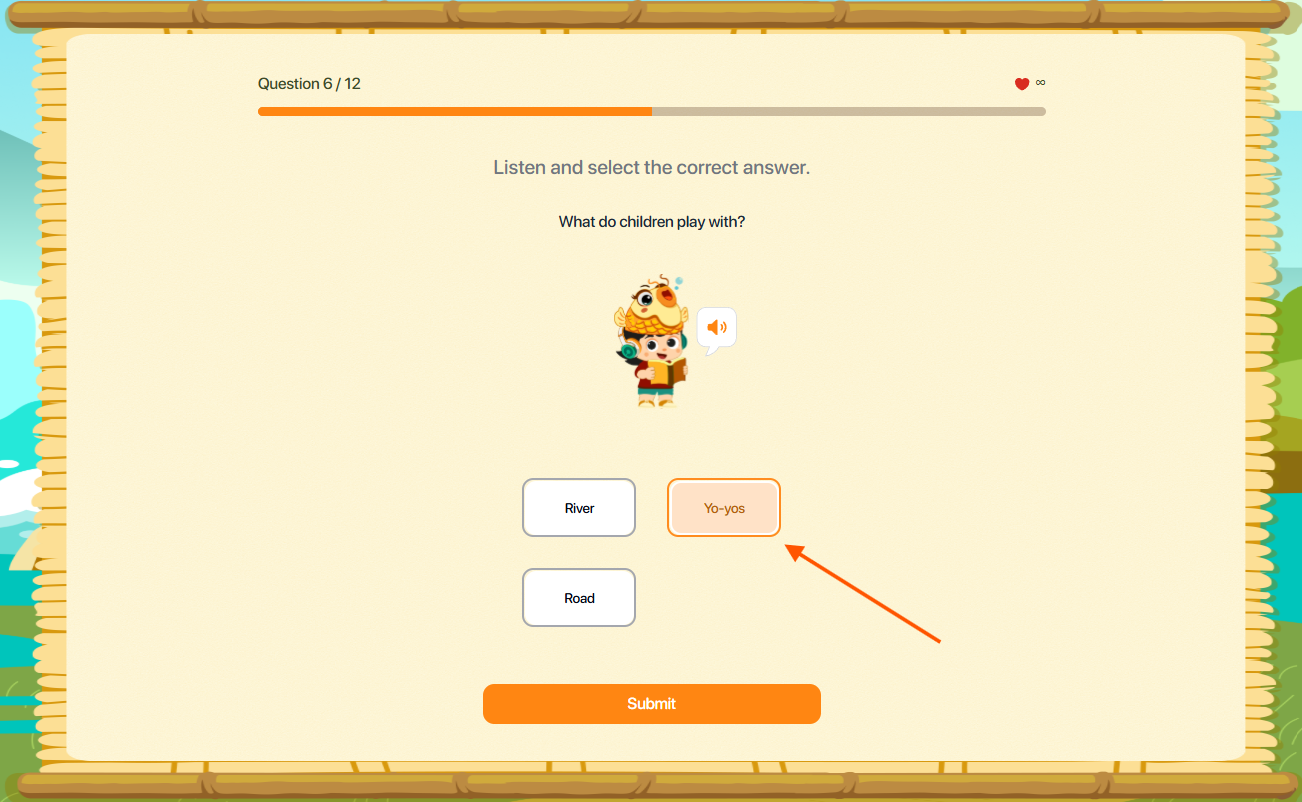
Note : To change your selection, simply choose another option.
Step 3: After completing the task, tap the Submit button to confirm your answer.
9.7. FILL IN THE BLANK
Step 1: Follow the instructions for the corresponding exercise type.
Image Type: Observe the sentence and image displayed on the screen.
Audio Type : Tap the Play button to listen to the sample audio.

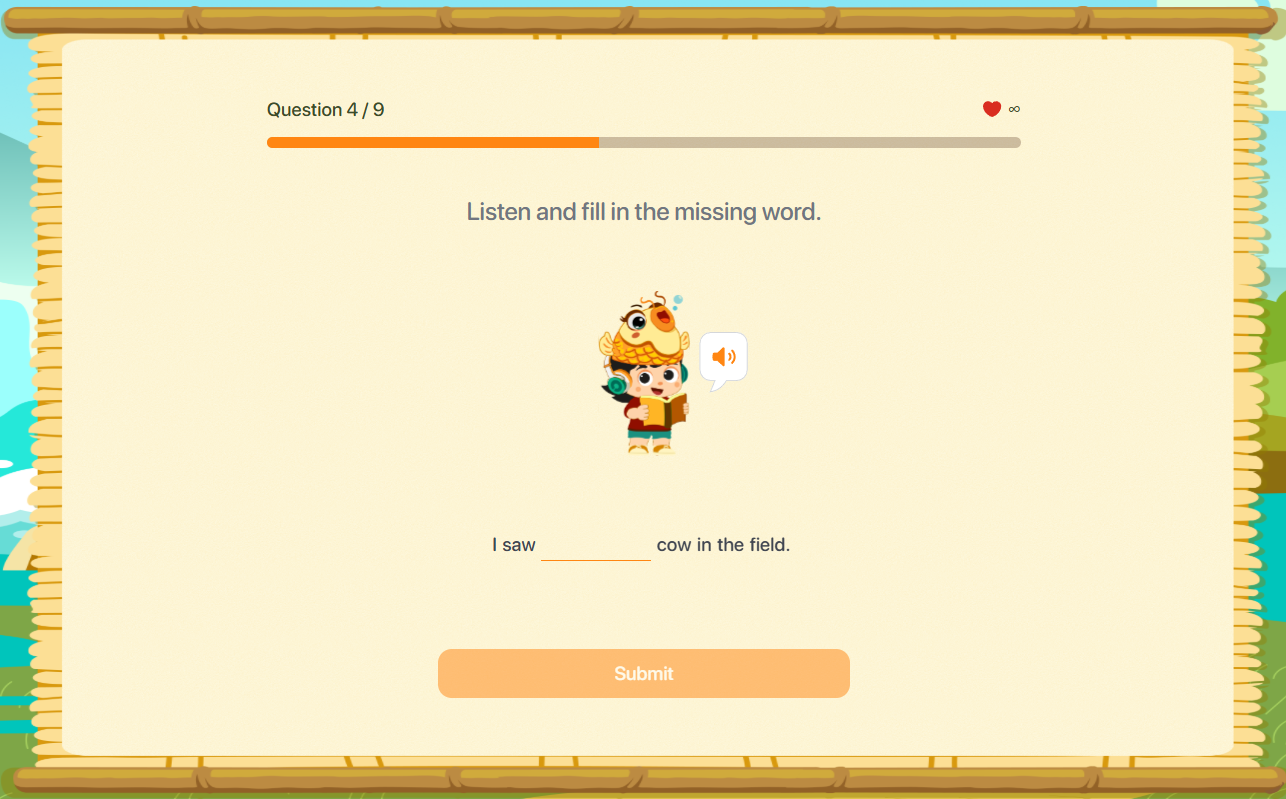
Step 2: Click the answer field and enter your response using the keyboard.
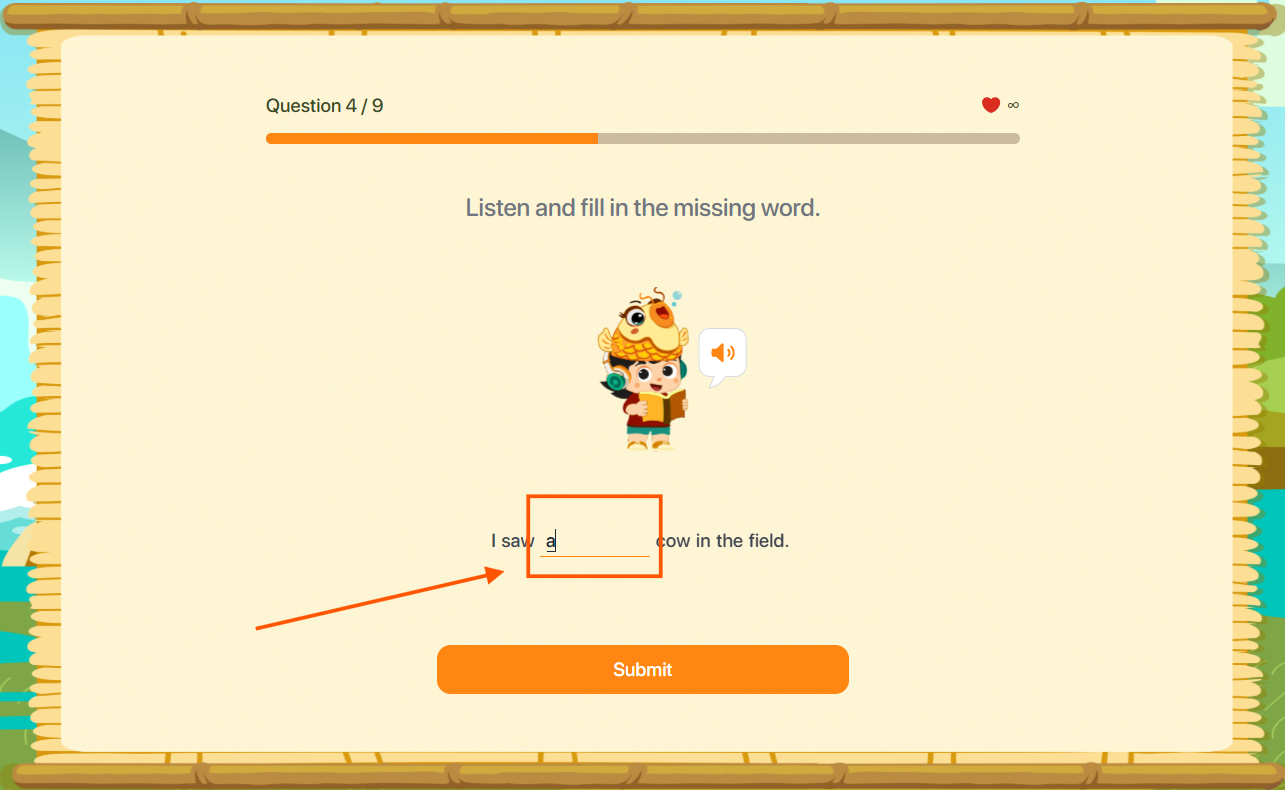
Note : To change your answer, click the field and enter a different response.
Step 3: After completing the task, tap the Submit button to confirm your answer.
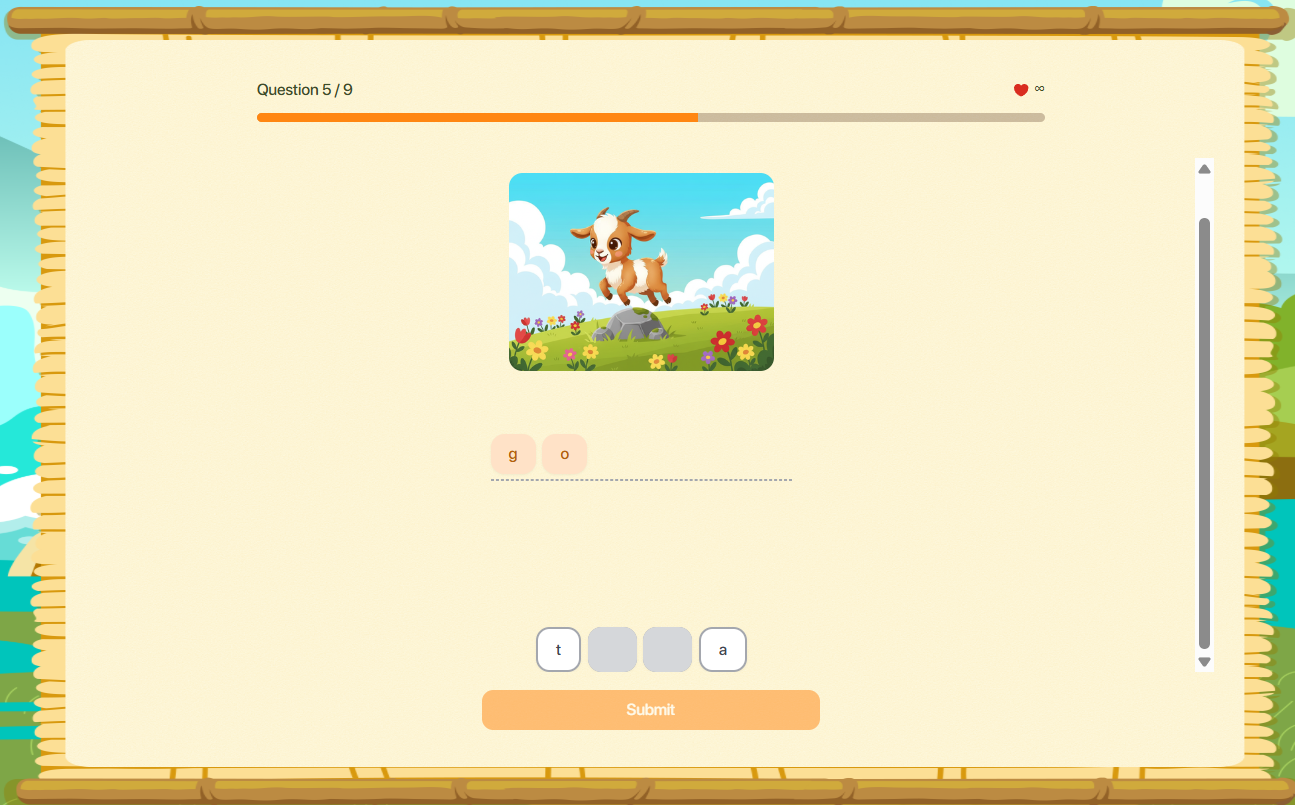
9.8. ARRANGEMENT
Step 1: Follow the instructions for the corresponding question type.
Character type: Arrange characters to form a complete word.
Word type: Arrange words to form a complete sentence.
Sentence type: Arrange sentences to form a complete dialogue.

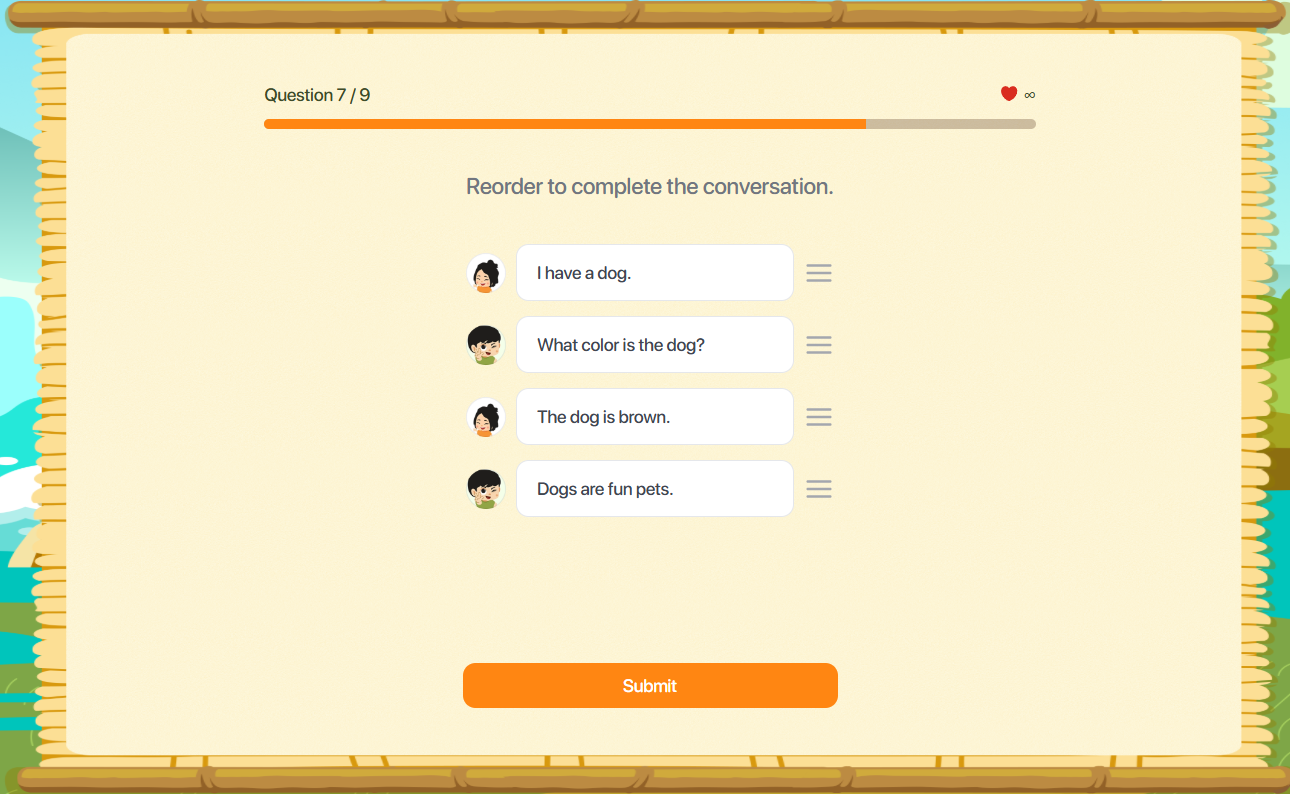
Step 2: Click on a character or word to arrange them in order. For Dialogue type: Click and hold the icon ![]() and drag-and-drop it into the correct position.
and drag-and-drop it into the correct position.
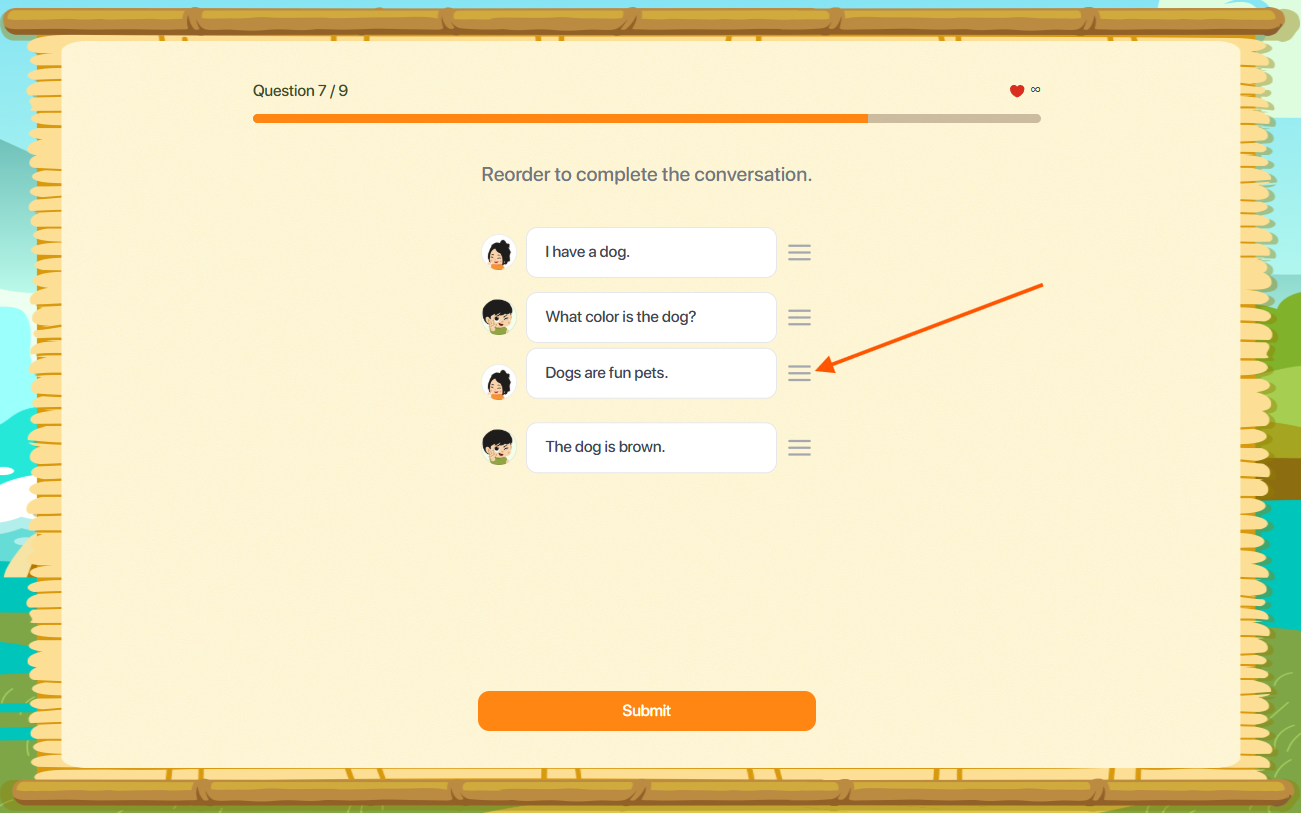
Note: To change your selection, please click on the selected box to deselect it, then reselect to complete the arrangement.
Step 3: Once completed, click the button to confirm your answer.
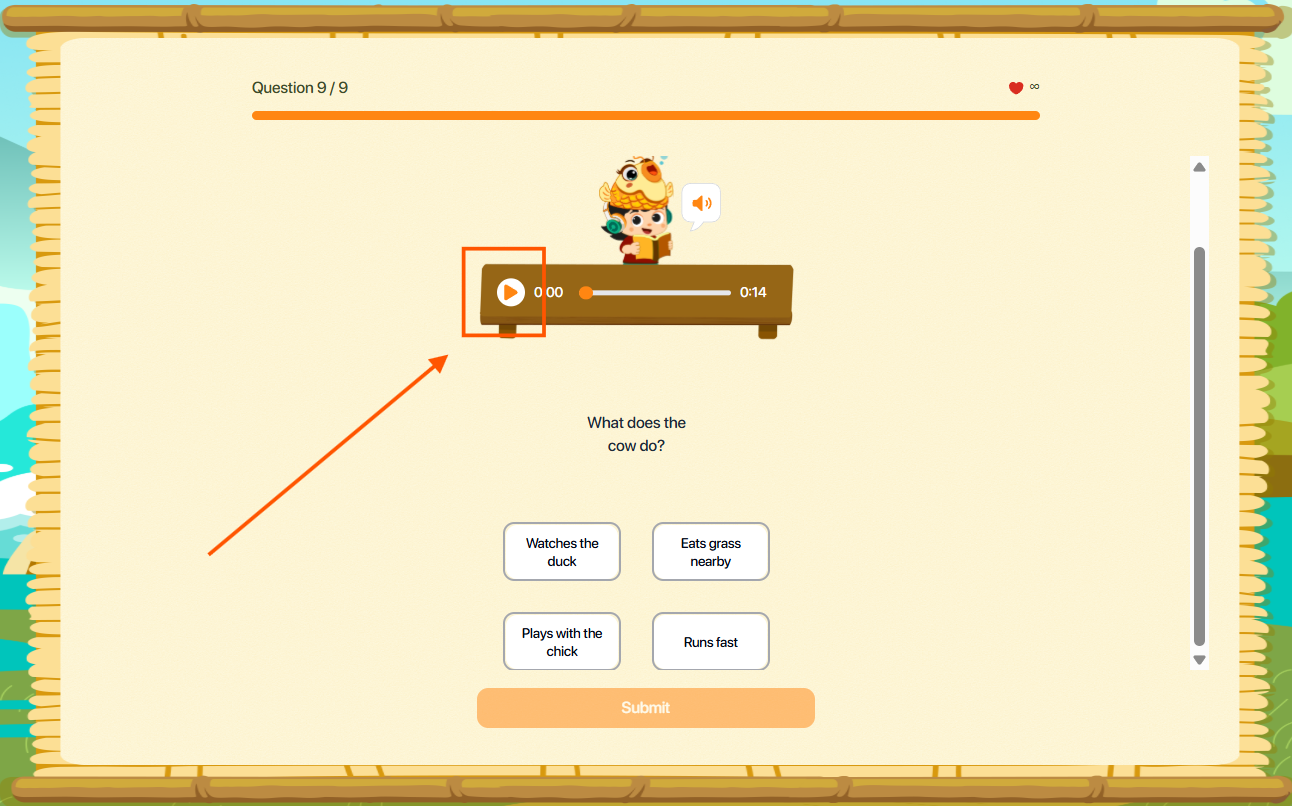
9.9. COMPREHENSION
Step 1: Follow the instructions for the corresponding question type.
Reading (Multiple choice / Fill in the blank / Drag and drop): Read the passage and the questions displayed on the screen.
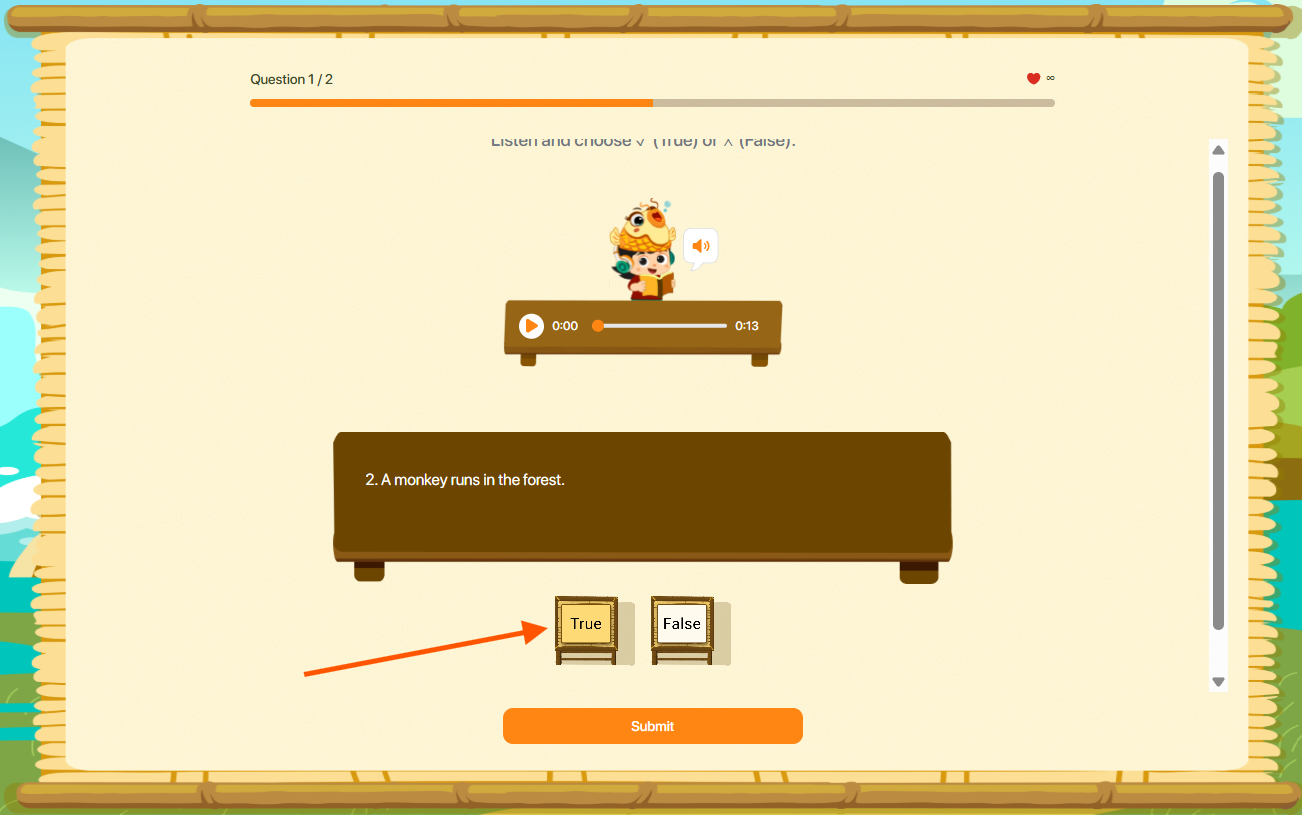
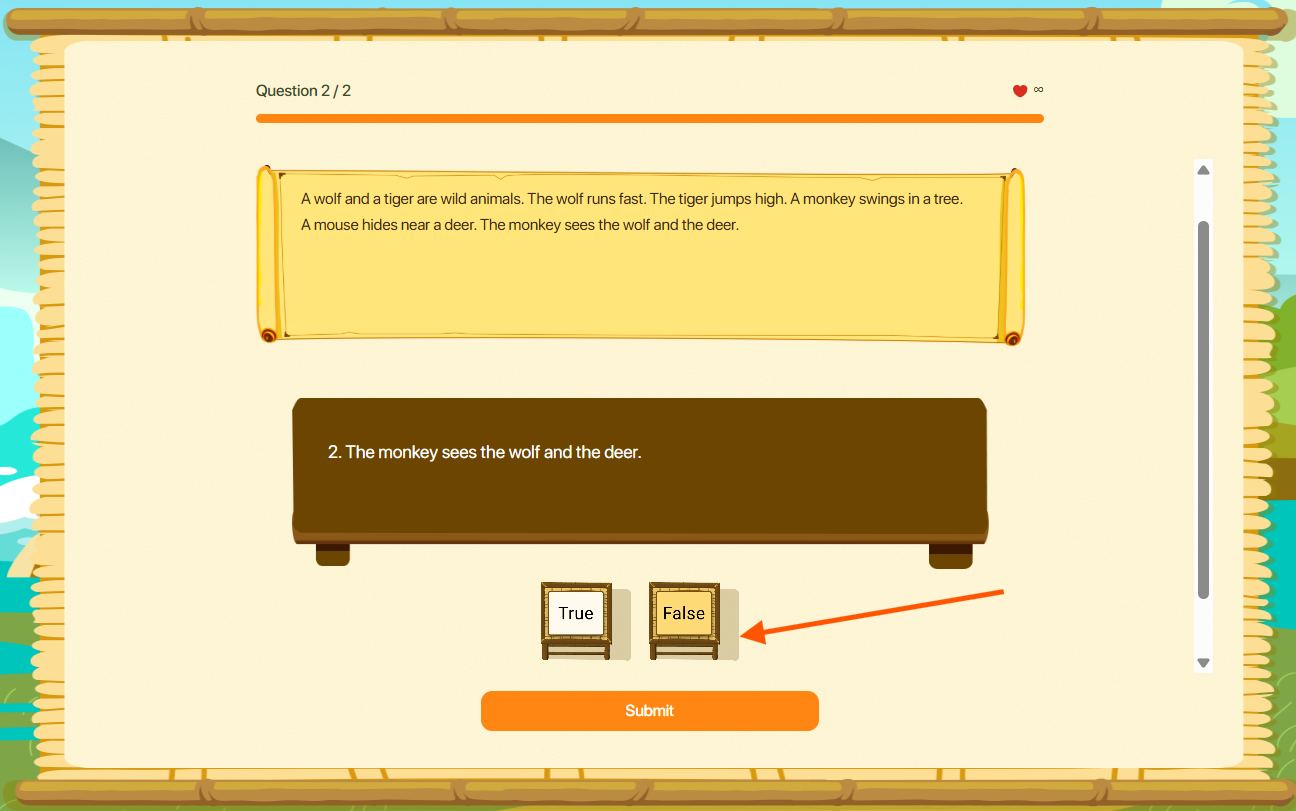
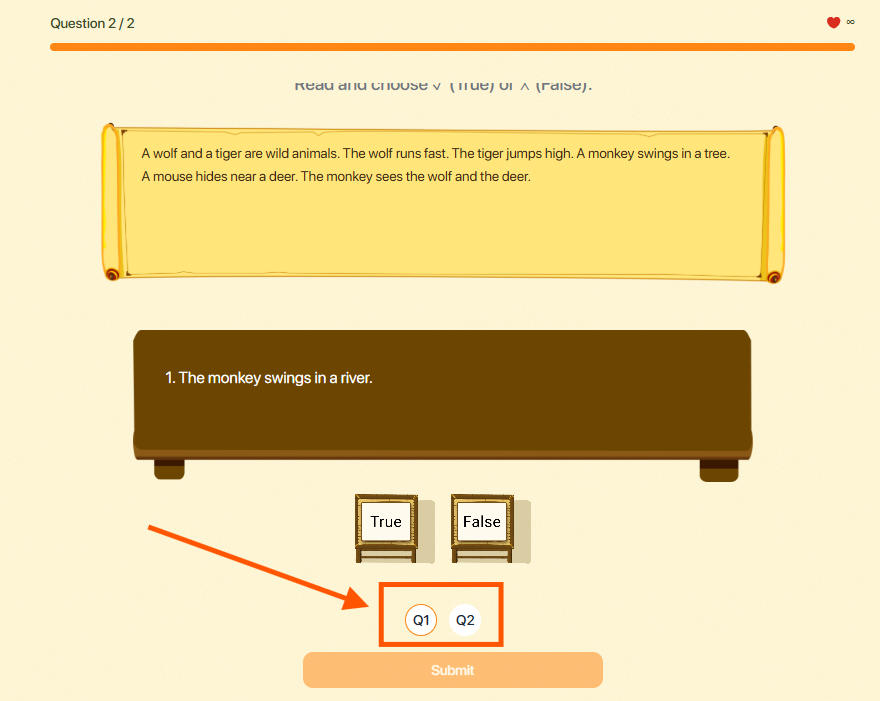
Reading (True or False): Read the passage and the questions displayed on the screen.
Listening (Multiple choice / Fill in the blank / Drag and drop): Click the button ![]() to listen to the sample audio file.
to listen to the sample audio file.
Listening (True or False): Read the passage and the questions displayed on the screen.
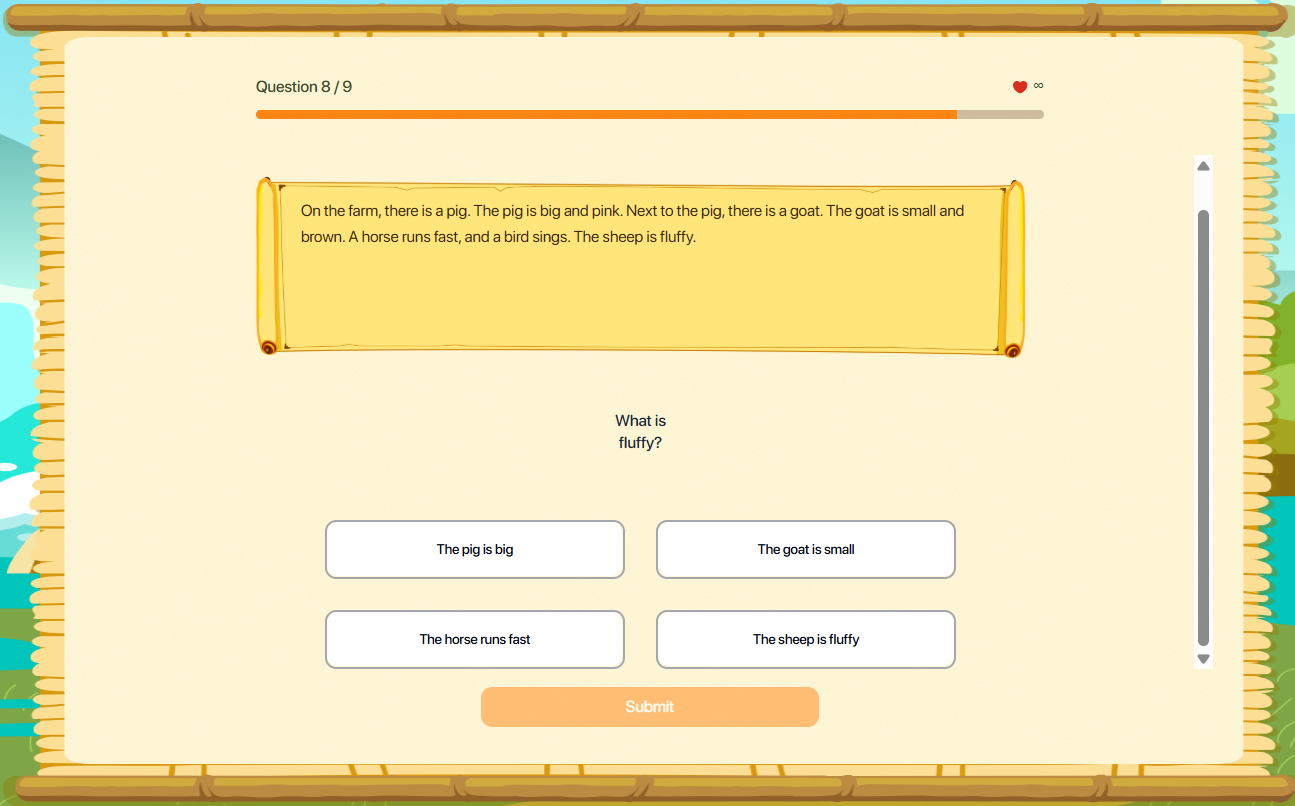
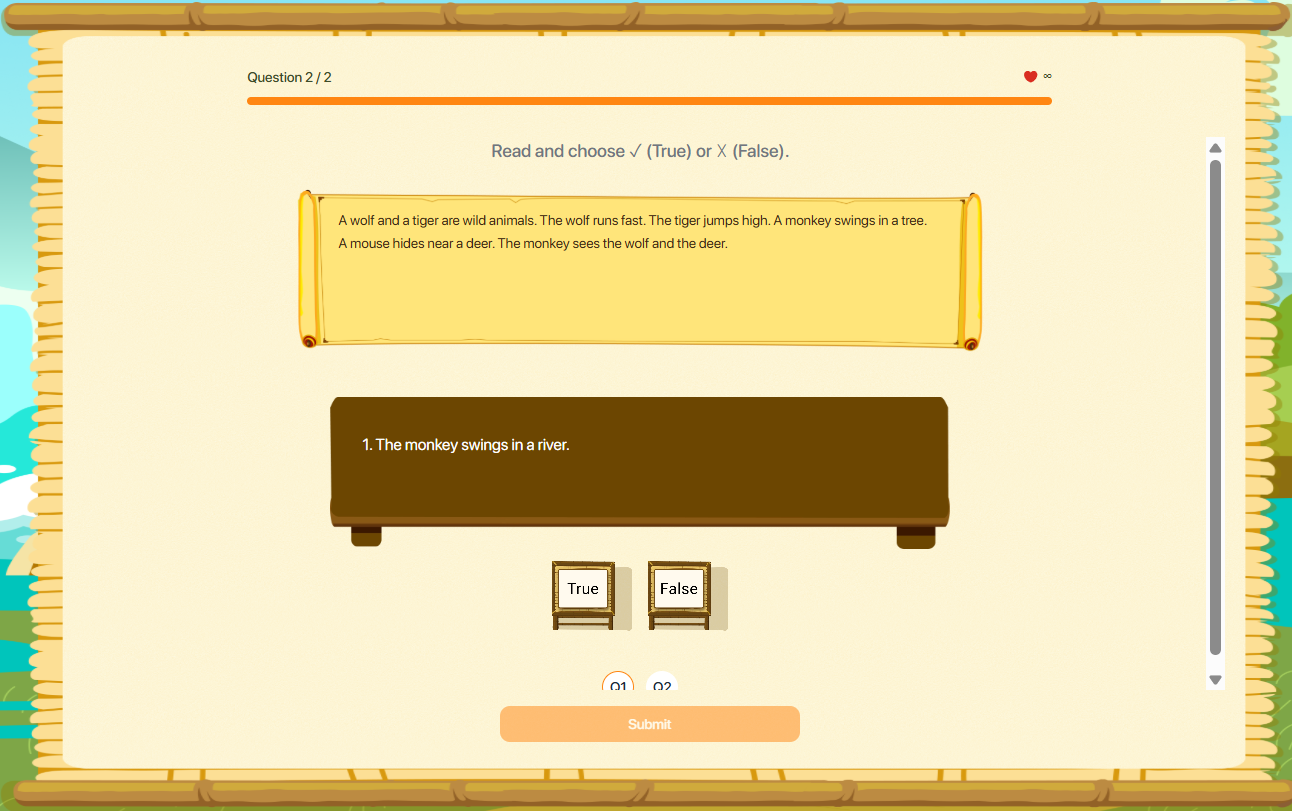
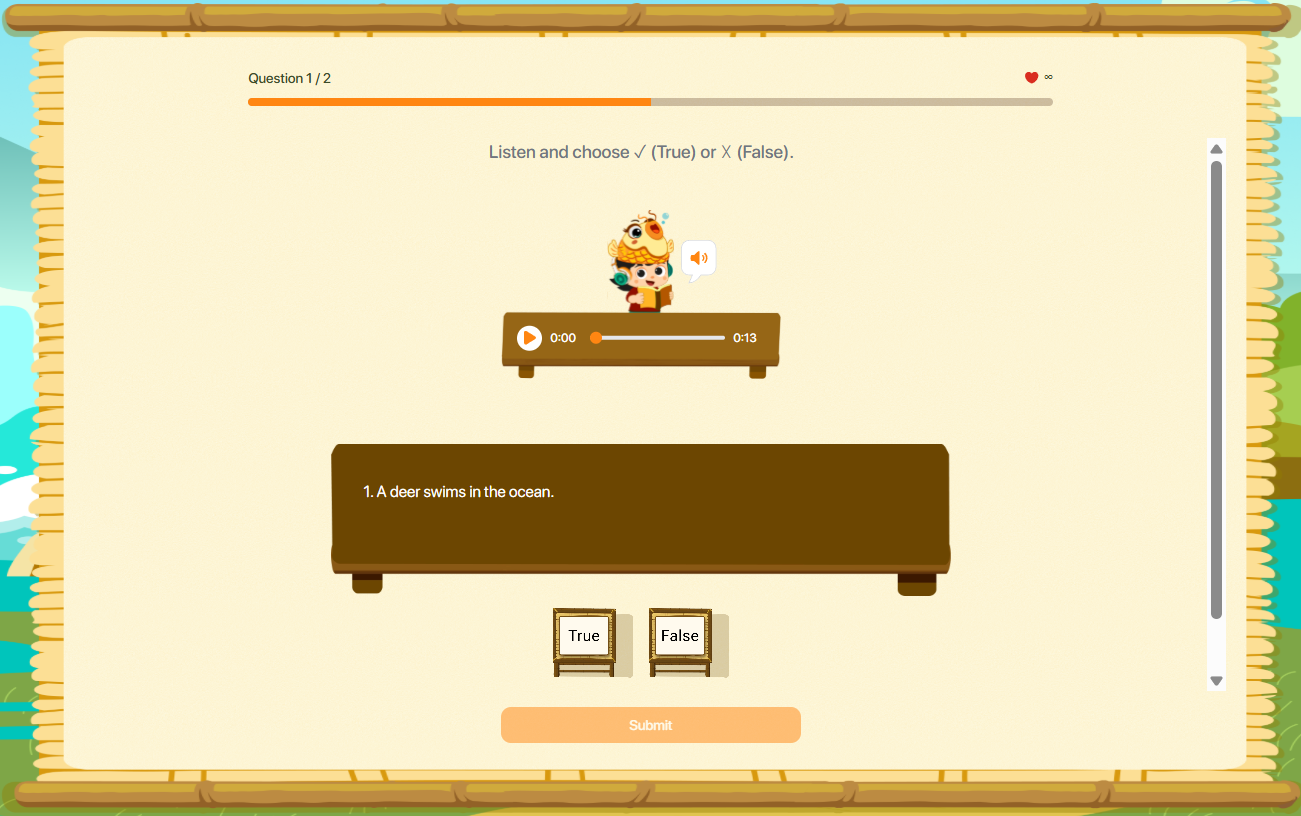
Step 2: For True/False questions, users read/listen to the passage and select True/False for each statement.
Note:
- In case you want to change your choice, please click on the selected box to deselect the answer, then reselect to rearrange it completely.
- If a question contains more than one statement, please select an answer for all statements. Users can click the button
 to navigate between different statements.
Step 3: Once completed, click the button to confirm your answer.
10. PRACTICE
Step 1: In the main screen, select the Practice area icon.

Step 2: In the Practice screen, users select the study area they wish to join.
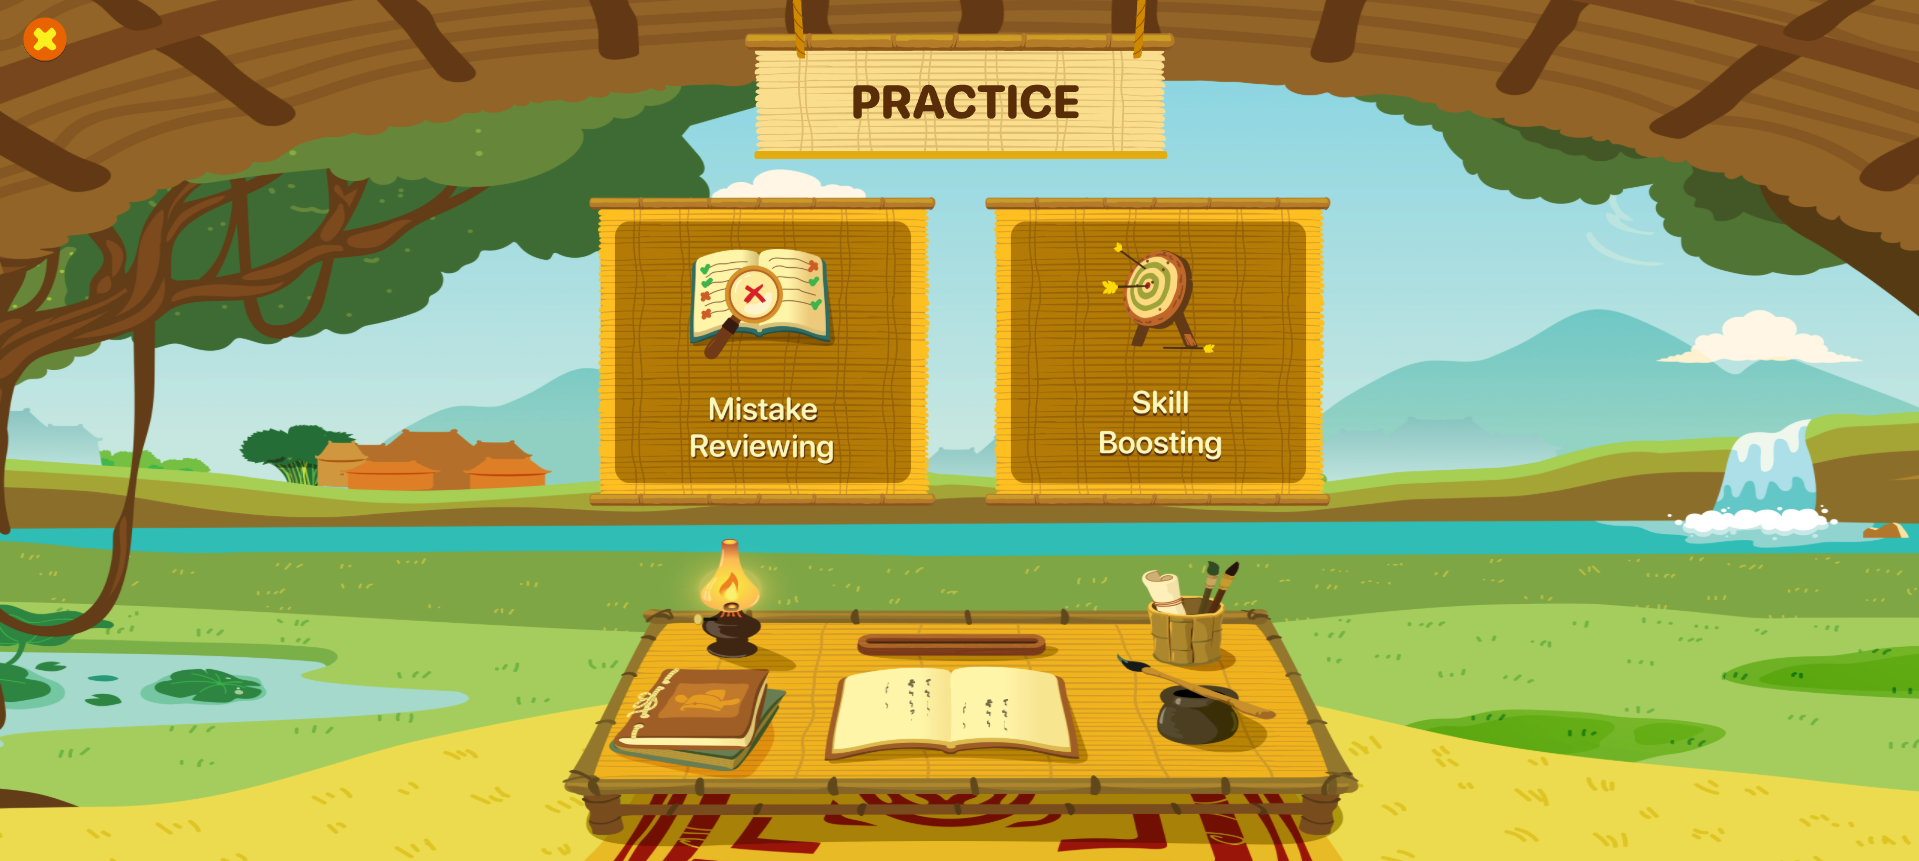
10.1. MISTAKES REVIEW
Step 1: Click on the icon 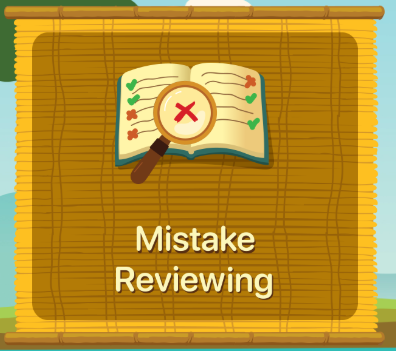 in the Mistakes Review area.
Step 2: In the display of Mistakes Review, the user performs operations to answer questions that they previously answered incorrectly in the Mission area.
10.2. SKILL BOOSTING
Step 1: Click on the icon 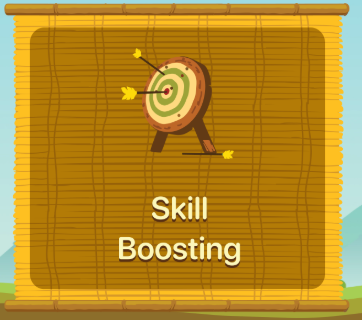 in the Skill Boosting area.
Step 2: In the Skill Boosting screen, the AI system will automatically provide appropriate types of exercises for learners to practice at an advanced level.