📖 USER INSTRUCTIONS
CHEPPY LMS FOR TEACHERS
Version 1.0 – Updated June 04, 2026
1. GENERAL OVERVIEW
1.1. INTRODUCTION
This document is developed to support teachers in accessing, navigating, and effectively utilizing the teaching features on the ELP (Educational Learning Platform), created by the Cheppy development team. The platform aims to enhance foreign language proficiency and promote digital transformation in education through the application of Artificial Intelligence (AI).
The platform is designed with gamification principles to make lessons more engaging. Students experience learning as if they are playing, while still achieving effective learning outcomes.
1.2. TERMINOLOGY GLOSSARY
The table below lists the terms used in the app under the gamification style, ensuring consistent understanding and usage by students, teachers, and parents.
| Pedagogical Term | In-App Term | Function |
|---|---|---|
| Unit/Lesson | Mission | Each Mission in the app corresponds to one topic, giving students a clear goal and learning journey. |
| Exercise | Stage | Each Mission contains multiple Stages. Each Stage includes questions on the same topic to complete the skill objectives and learning outcomes of the Mission. |
| Score | Score | The score after compl eting a Stage is calculated based on the number of correct answers out of the total number of questions. |
| EXP | Upon completing each mission, students receive corresponding experience points. These points are used to determine rank advancement or to earn academic achievements. | |
| Reward | Upon completing each mission, students also receive gem rewards to purchase costumes and accessories for their characters. | |
| Progress Leaderboard | Leaderboard | The system displays student rankings by class/grade based on metrics such as rewards and EXP, motivating students to maintain consistent study habits. |
Although the language changes, the lesson structure — skill objectives and learning outcomes — remain guaranteed under the supervision of the educational advisory team.
2. ACCOUNT ACCESS & SETUP
Step 1: Go to the website: https://beta.cheppy.ai.

Step 2: Click the language icon  to switch the display language between English and Vietnamese.
2.1. REGISTRATION
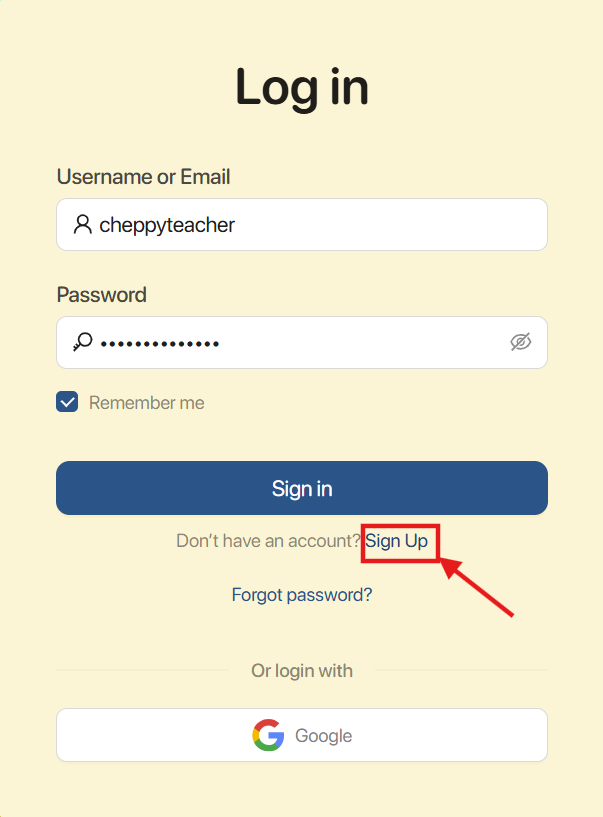
Step 1: Click “Sign up” to access the account creation screen.
Step 2: Fill in all required account information:
• Username: Your login name.
• Full Name: Your full name.
• Email: Your email address.
• Password: 8 to 16 characters, including at least 1 digit.
• Confirm Password: Re-enter your password.
Note: The Password and Confirm Password fields must match exactly.
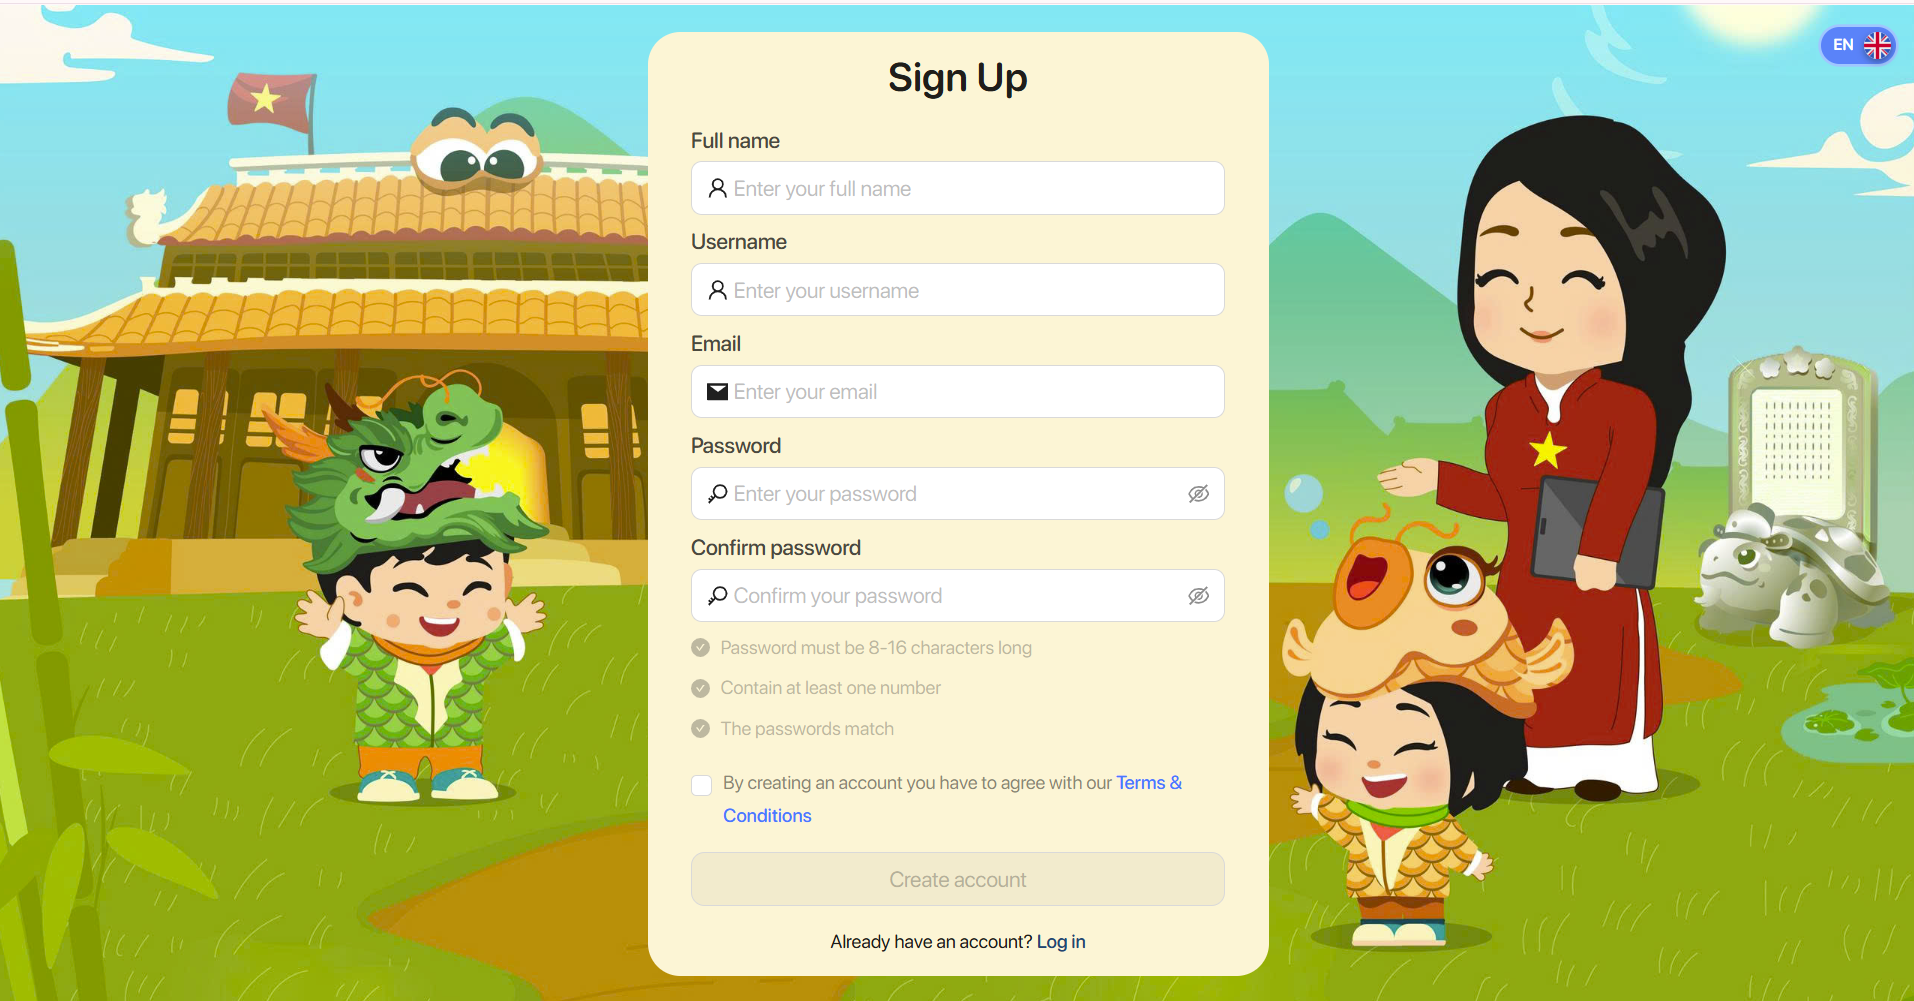
Step 3: After filling in all information, click the "Terms and Policy" link to read the platform's terms of use. If you agree to the terms, check the agreement box.

Step 4: Click “Sign up” to complete the registration process.
Note: After clicking Register, some information may be flagged as invalid. Please re-enter the required fields according to the specified rules.
2.2. LOGIN
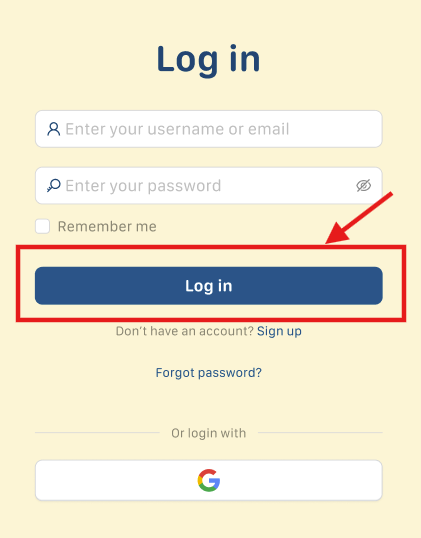
Step 1 : On the login screen, there are 2 ways to log in:
Method 1: Enter your account credentials manually:
- Username or Email: Your login name or email address.
- Password: Your password
Method 2: Log in quickly using your Google account.
Step 2: Click the Login button  to complete the sign-in process.
2.3. RESET PASSWORD
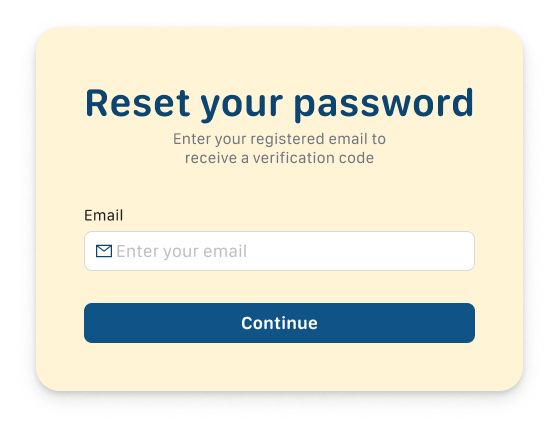
Step 1: If you have forgotten your password, click Forgot password?
Step 2: Enter your registered email address and click the Submit button.
![]()
Step 3: Check your personal inbox and enter the 6-digit verification code.
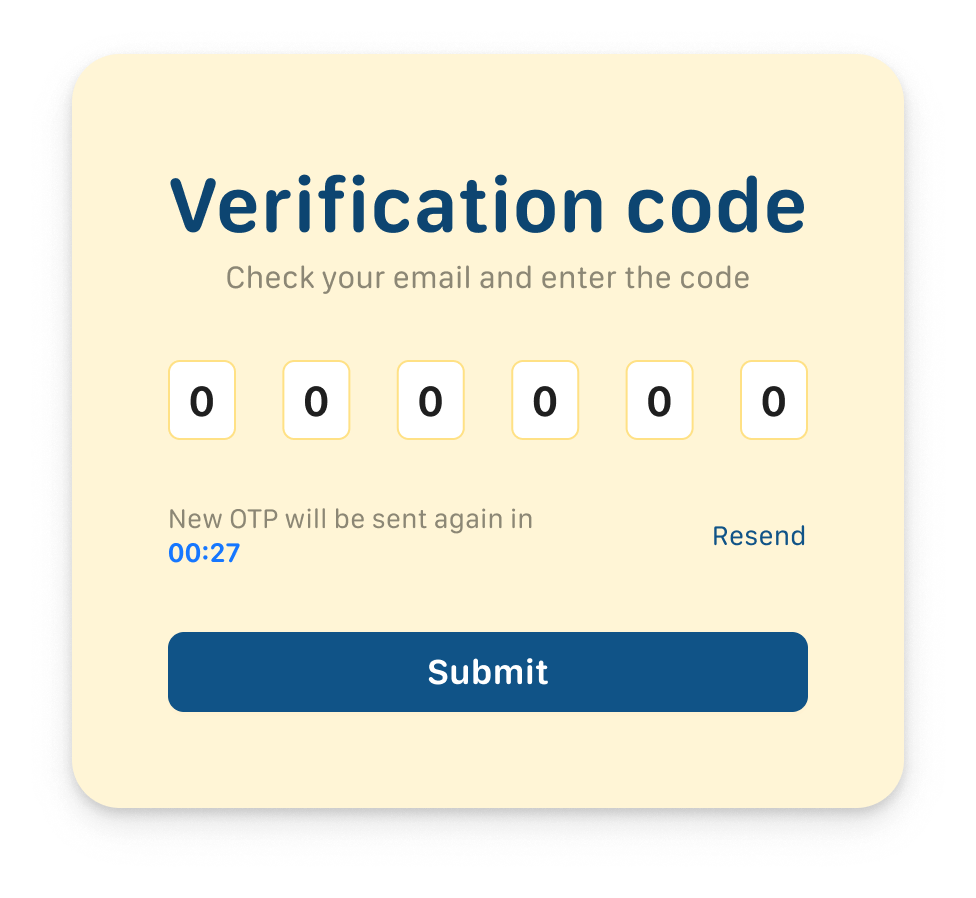
Note: If you do not receive the code or the code has expired, click the Resend button to request a new one.
Step 4: Click the Submit button  to verify the code.
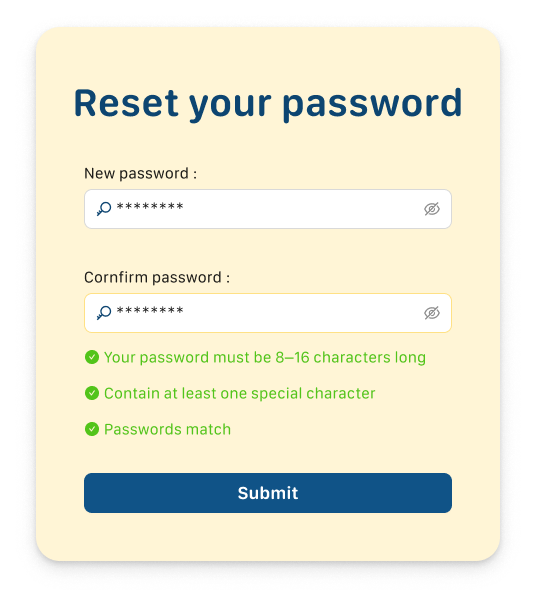
Step 5: Enter your new password and click the Submit button to complete the password reset.
2.4.SELECT AN ORGANIZATION INSTRUCTION
Step 1: On the main screen, select your current organization from the list.
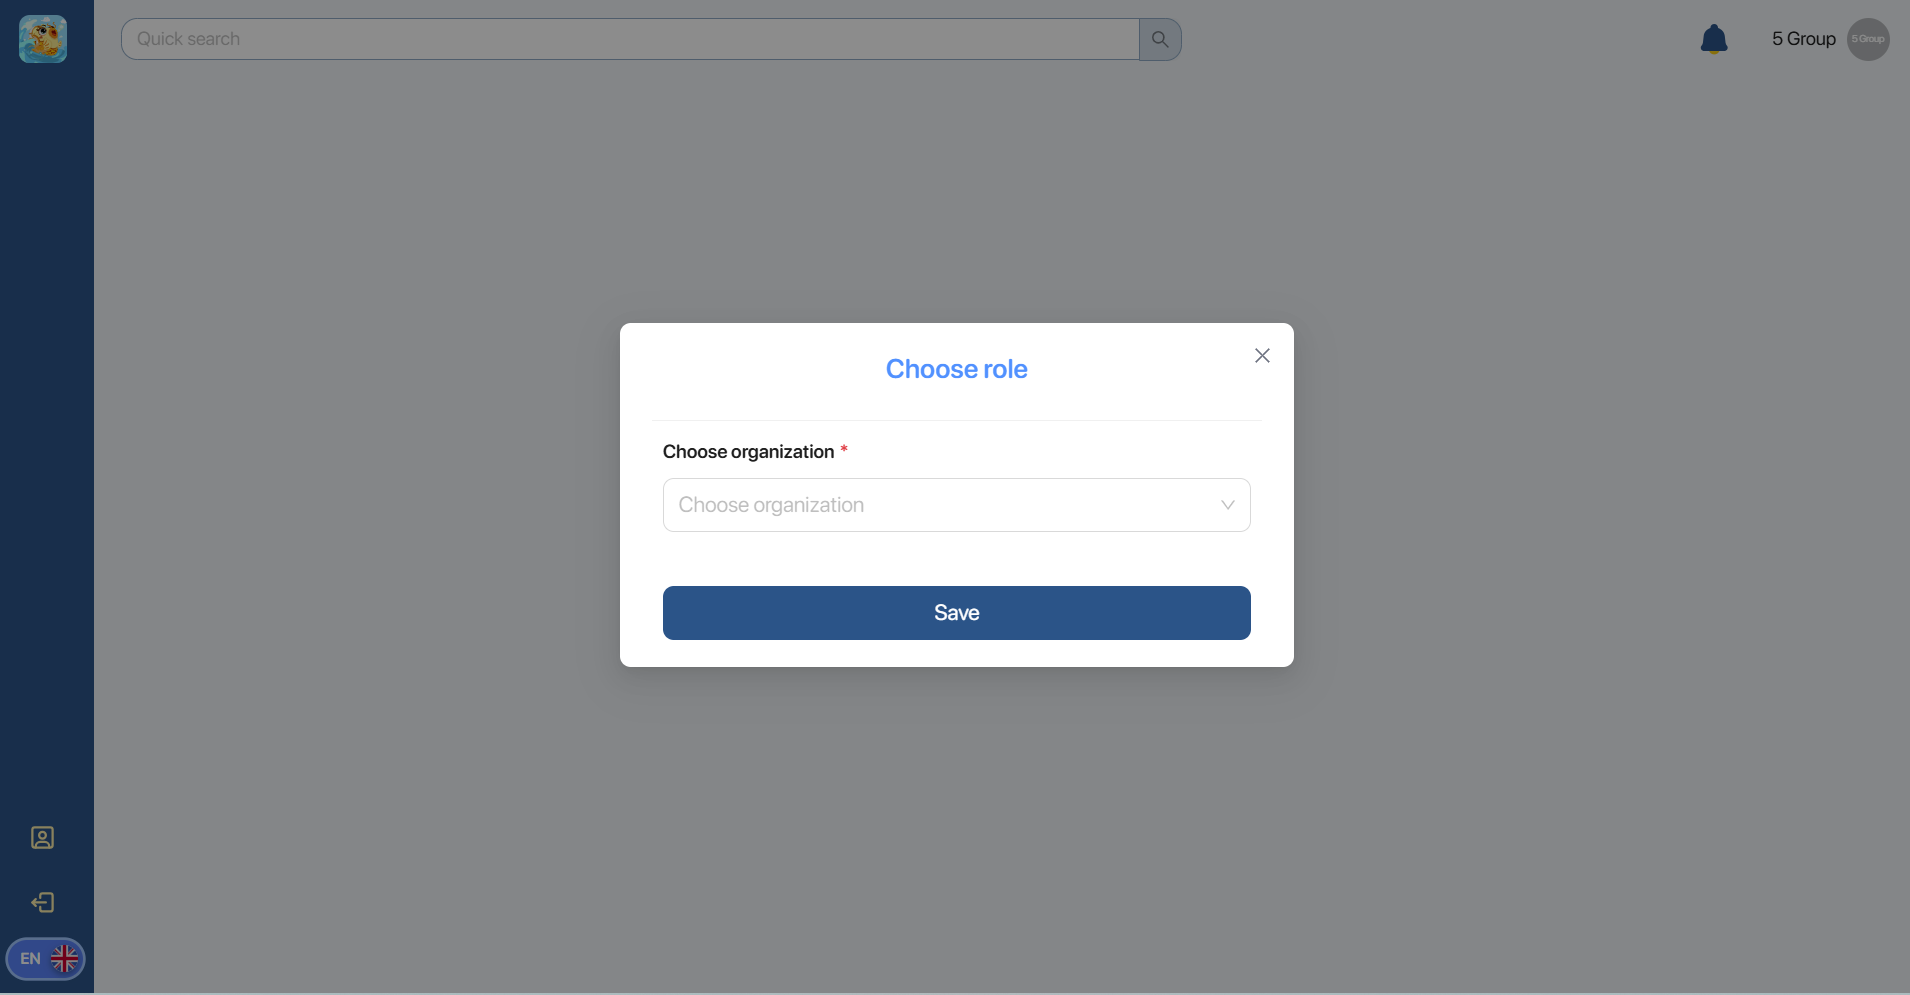
Step 2: Click the button ![]() to navigate to the Dashboard screen.
to navigate to the Dashboard screen.
3. DASHBOARD
Step 1. Click on the icon to change the display language to English–Vietnamese.
The navigation bar on the left has quick functions below:
| No. | Icons | Functions | Description/Instructions |
|---|---|---|---|
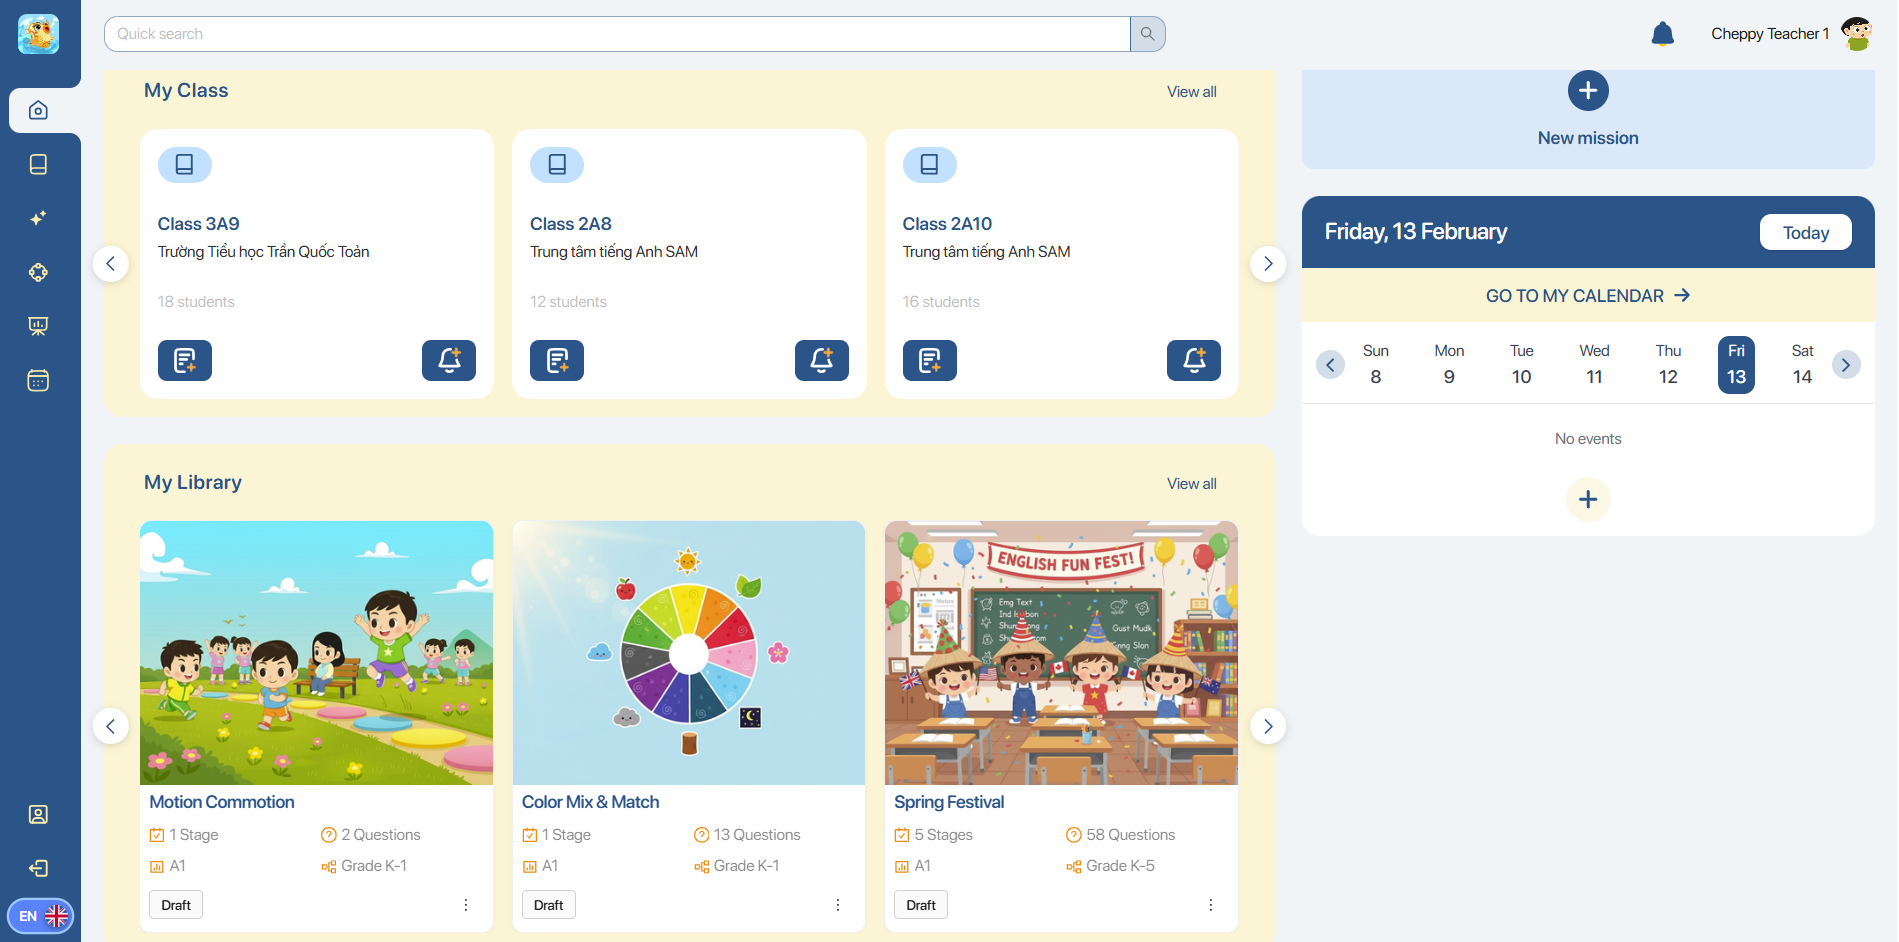
| 1 | Dashboard | Display overall Classes and Missions. | |
| 2 | My Class | Operate classes management and track the students’ results. | |
| 3 | My Library | Create, store, and manage Missions for students. | |
| 4 | Mission Gallery | Search Missions shared from communities. | |
| 5 | Mission Creation | Create Missions with AI assistance. | |
| 6 |  | My Calendar | Create and manage events and the deadline of Mission creation. |
| 7 | My Profile | Display the account’s information. | |
| 8 | Sign Out | Signing out. |
Step 2. In My class, users can view detailed information, including: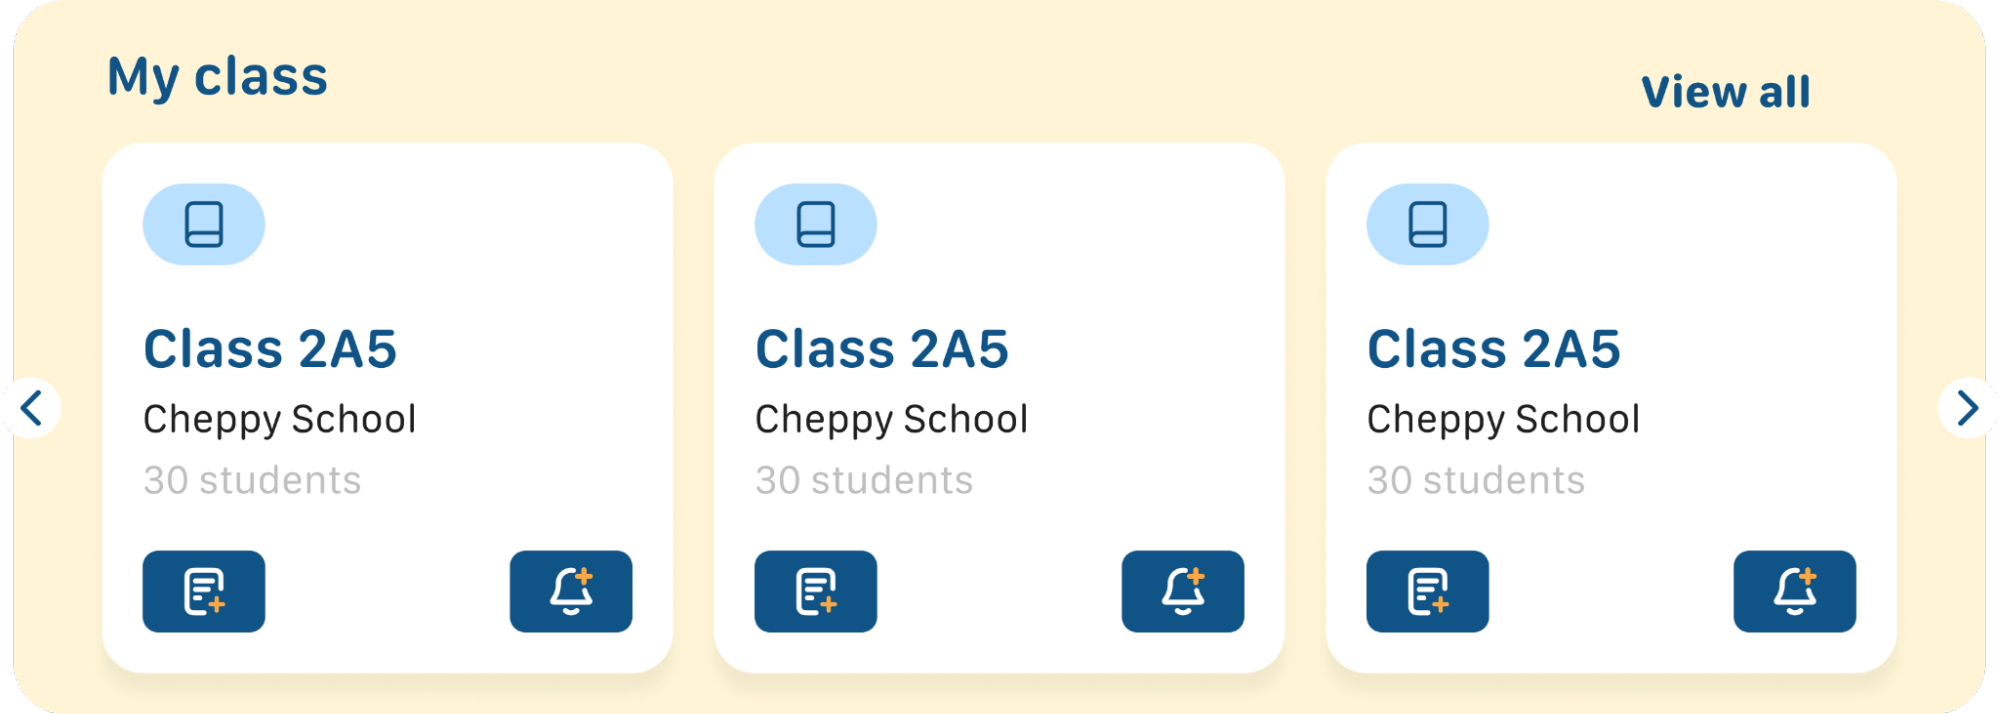
- Class name: Name of the class
- Institution name: Name of the institution
- Number of students: The number of students
Attention:
- To view information about a class, users click on the corresponding class.
- To view all classes, users click View all.
Step 3. In My Library, users can choose between Tabs to view Missions with their corresponding status.

| No. | Status | Instructions |
|---|---|---|
| 1 | Draft | Save as draft |
| 2 | Published | Click Publish to release |
| 3 | Shared with me | Access via the shared link |
Step 4. Click on  to create a new Mission for the class.
Bước 5. In the Calendar screen, under the right corner of the screen, users click on the  button to view the current Missions list.
Note: To view the contents of previous or following weeks, users click on the left – right arrows.
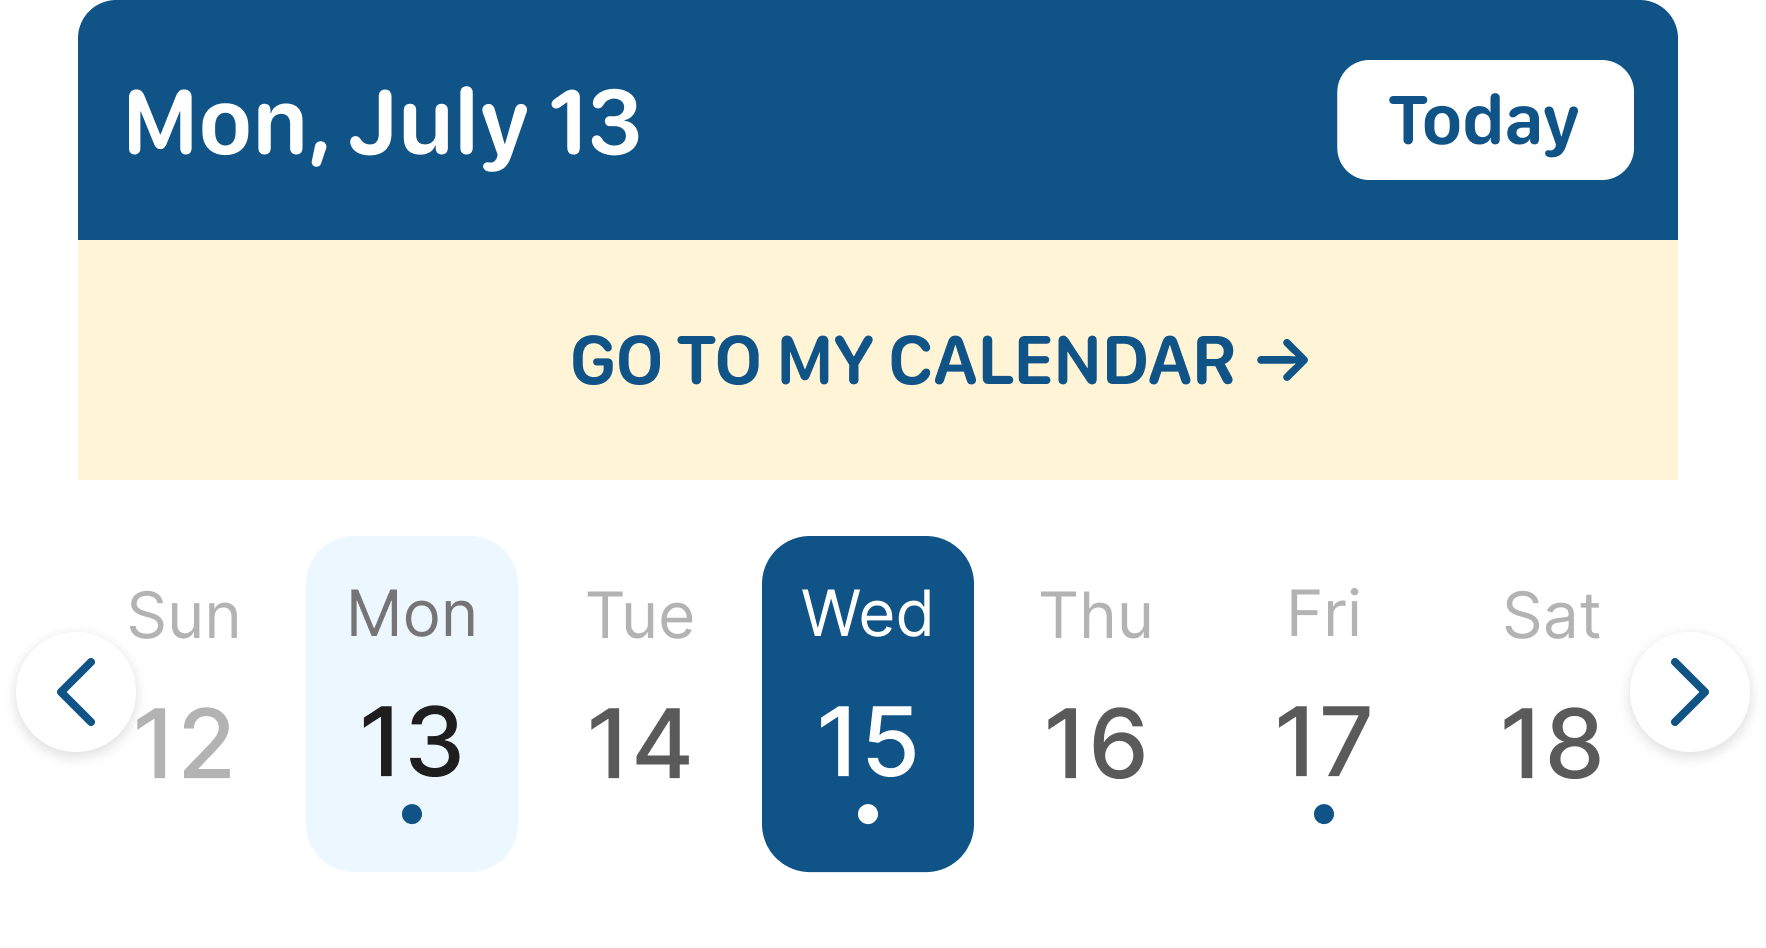
Step 6. Click on the  button to transfer to the My Calendar display.
Step 7. Click on the  button to go to the display of creating new events for selected dates.

4. MISSION CREATION
4.1.CREATE A MANUAL MISSION
Step 1: In the navigation bar on the left, click on 
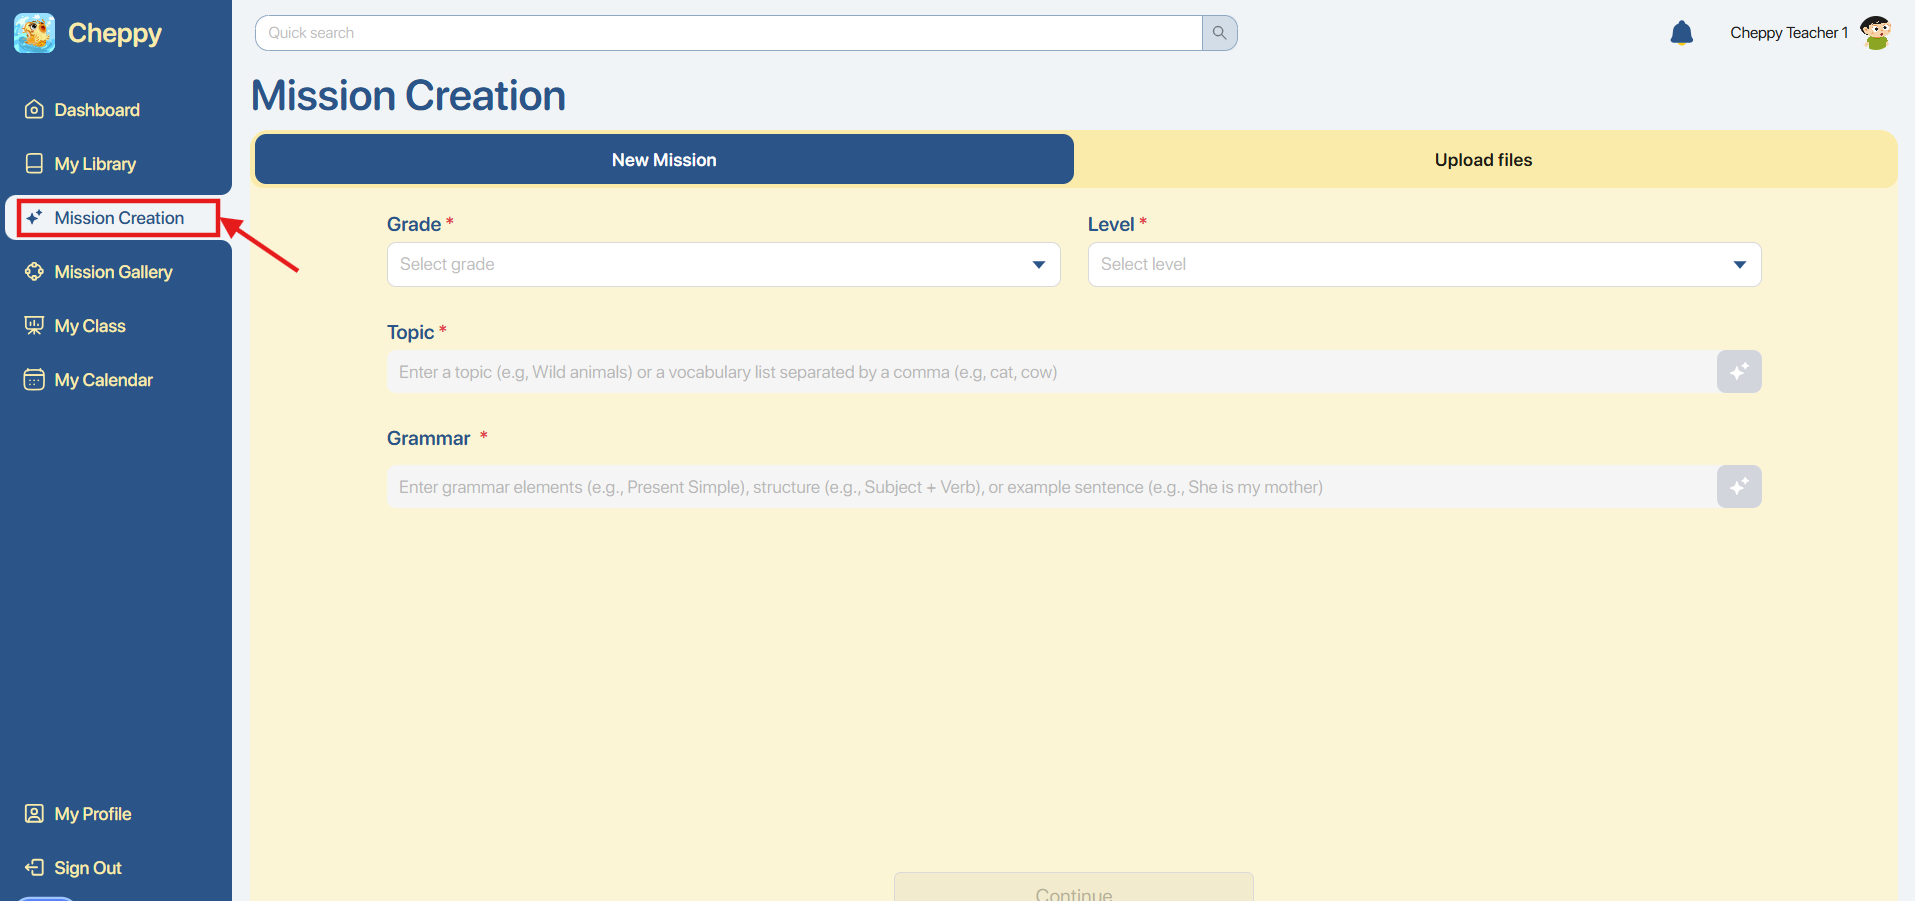
Step 2: In the display, users choose the corresponding Grade and Level. 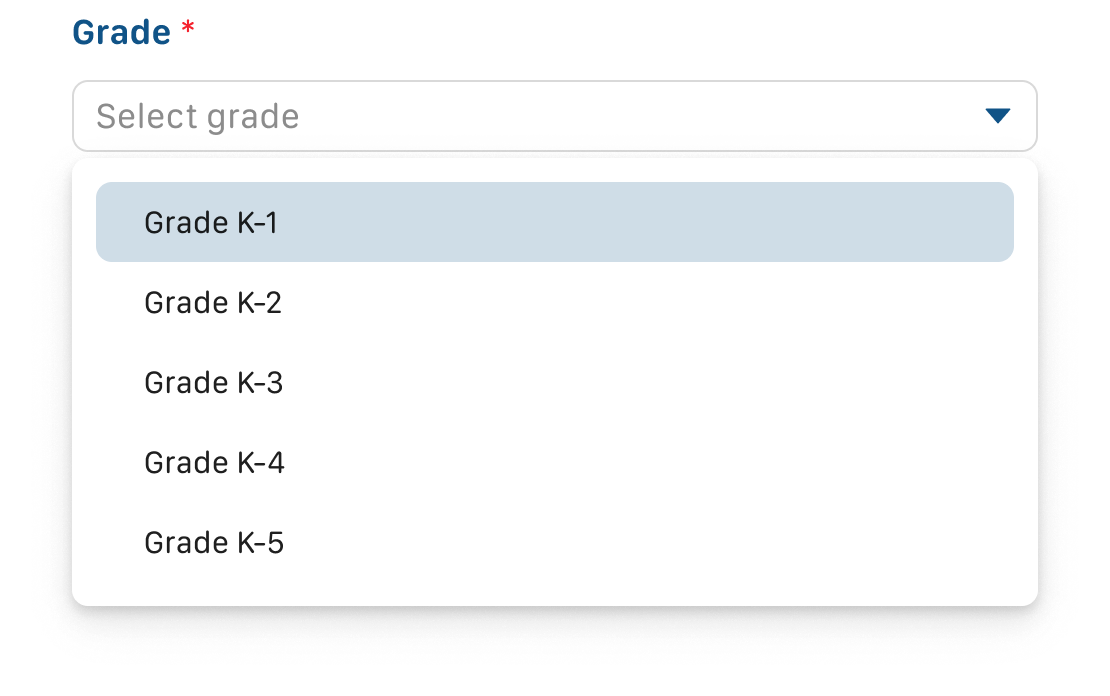
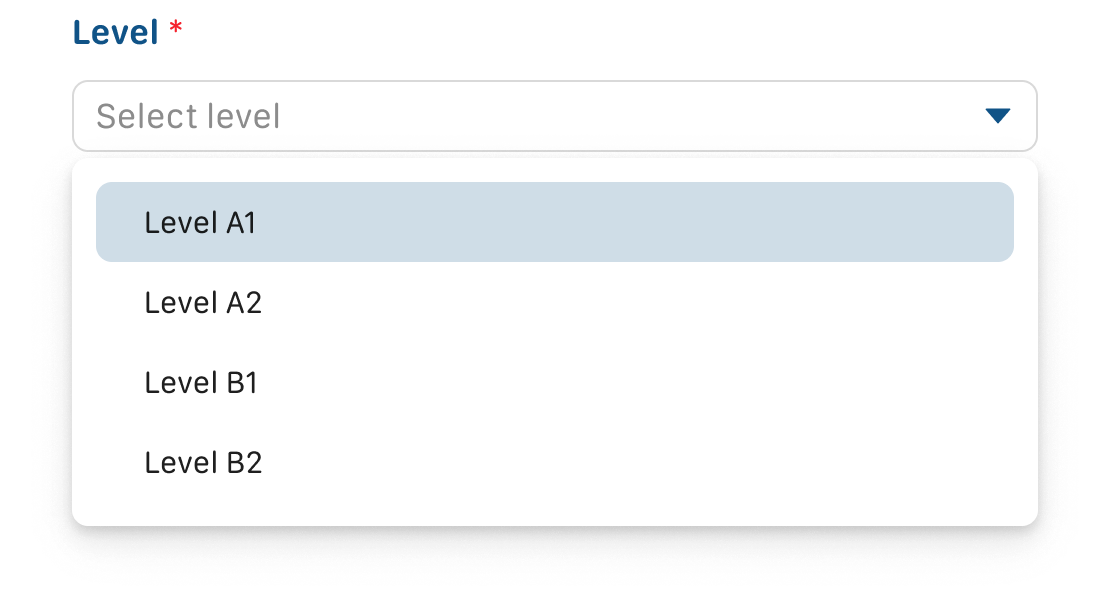
Note: The system will automatically limit Grade and Level selections to ensure a Mission is suitable for the students’ level, as below:
- If the users choose Grade first:
- With K1, K2, K3, the system only allows users to select Level A1.
- With K4, K5, users can select Level A1 or A2.
- If the users choose Level first:
- Selecting A1: users can select any Grade from K1 to K5.
- Selecting A2: the system only allows users to select Grade K4 or K5.
Step 3: In the Topic box, there are 3 ways users can find a suitable Topic for a Mission.
Method 1. Enter the name of the Topic, and the system will provide a recommended list of Topics along with Subtopics related to the keywords.
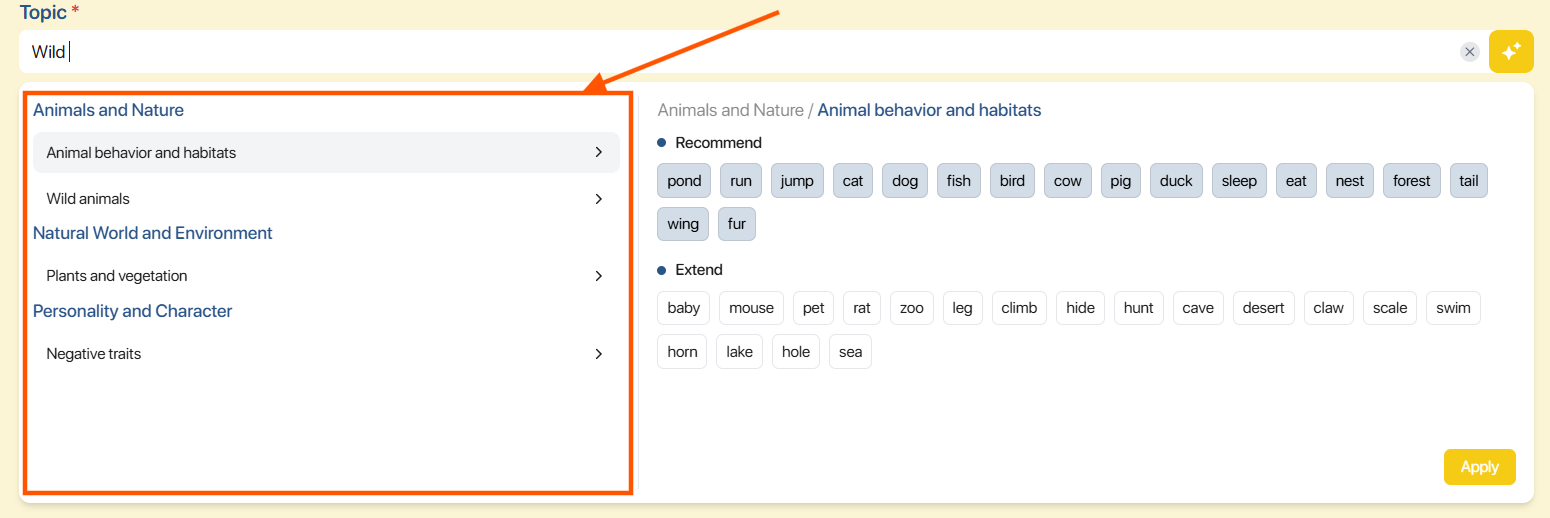
Note: Users can click on the name of Subtopics in the list to select properly.
Method 2. Fill in or copy the vocabulary list, and the system will display related Topics and Subtopics.
Method 3. Click on the  icon in the right corner of the searching Topic bar to get AI system assistance to create corresponding Topics and Vocabularies.

Note: In case there are no suitable Topics after filling in the keywords, click on the search box or the icon to get assistance from the AI system to create corresponding Vocabularies and Topics. 
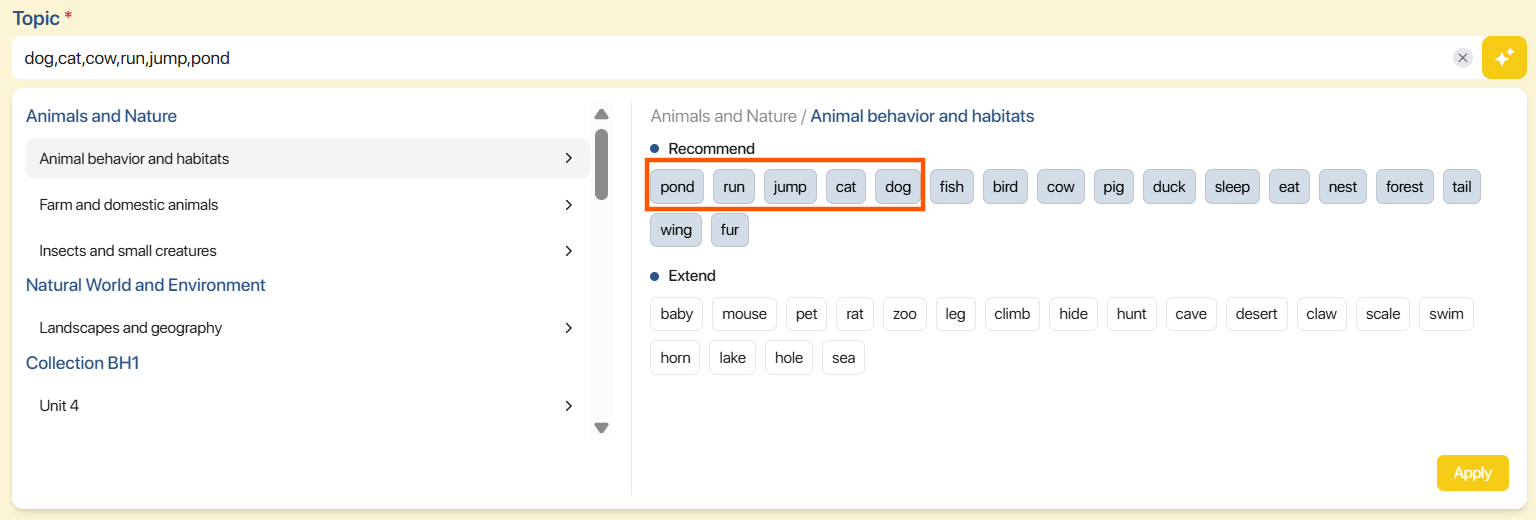
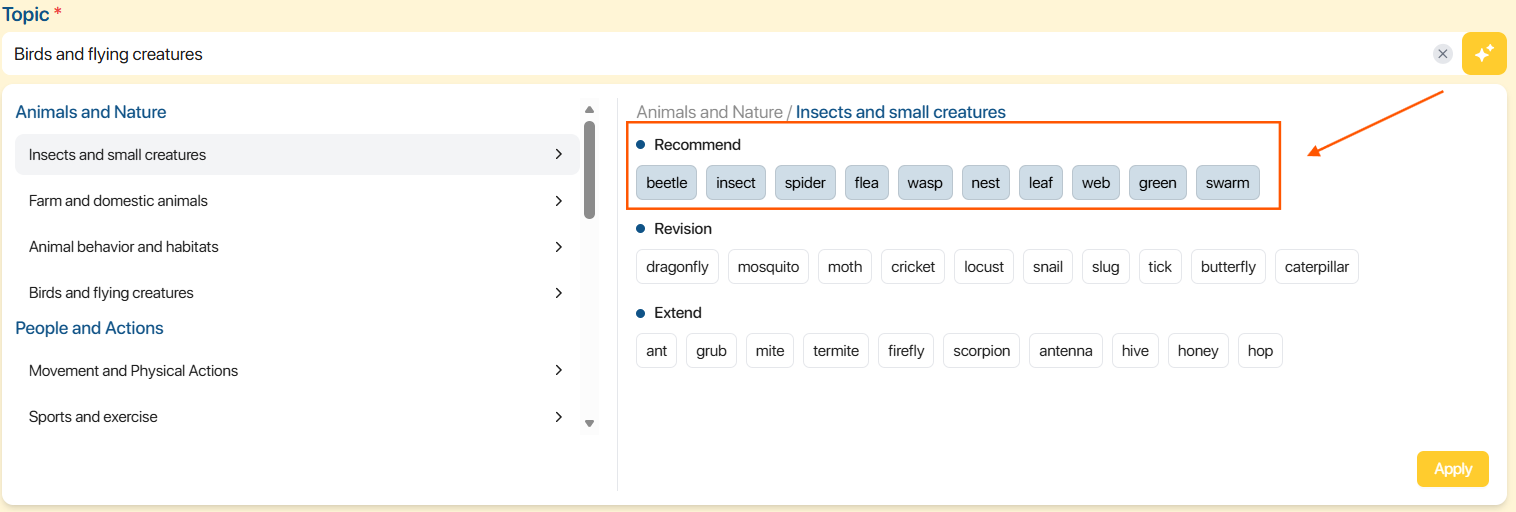
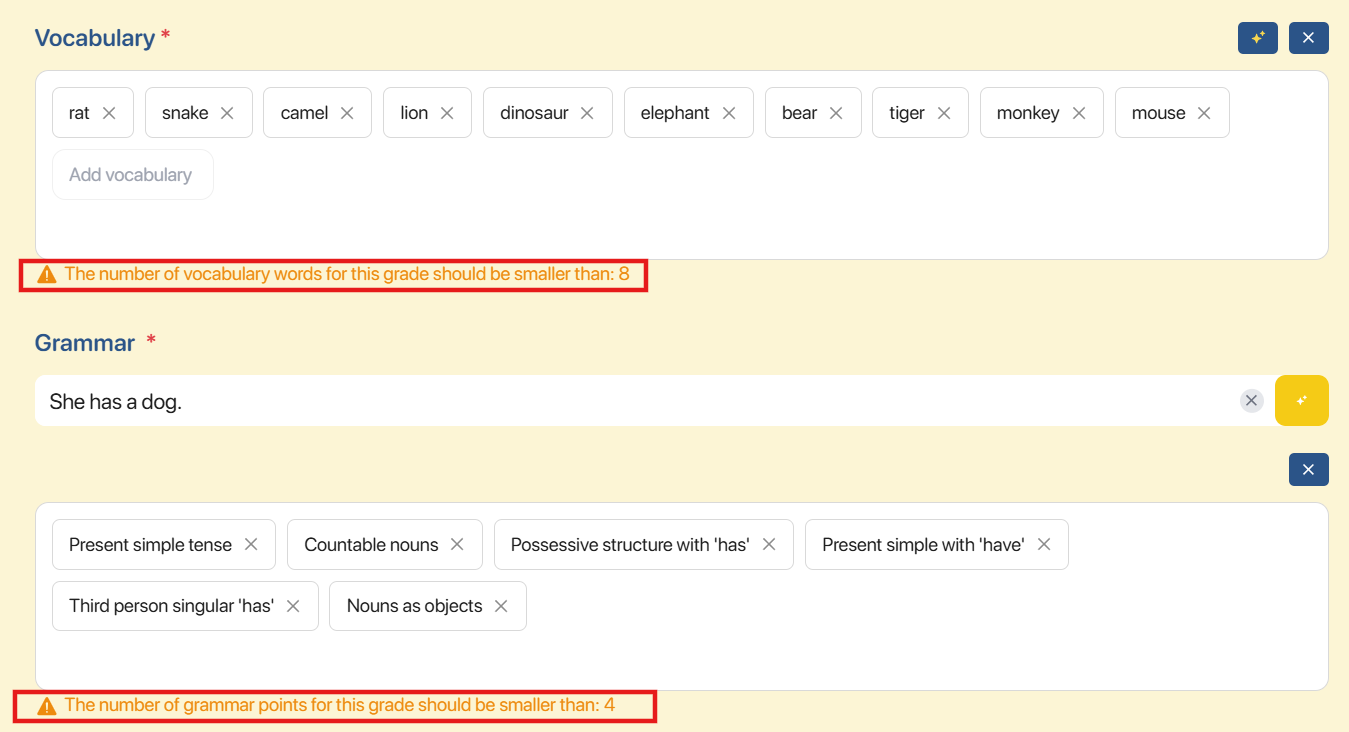
Step 4: For each topic, users can view a list of vocabulary words divided into three groups, including:
- Recommend: Display vocabulary that matches the selected Grade.
Note: By default, all words are pre-selected. Users can select or deselect words.
- Revision: Display vocabulary from a Grade that is one level lower than the selected level (if applicable).
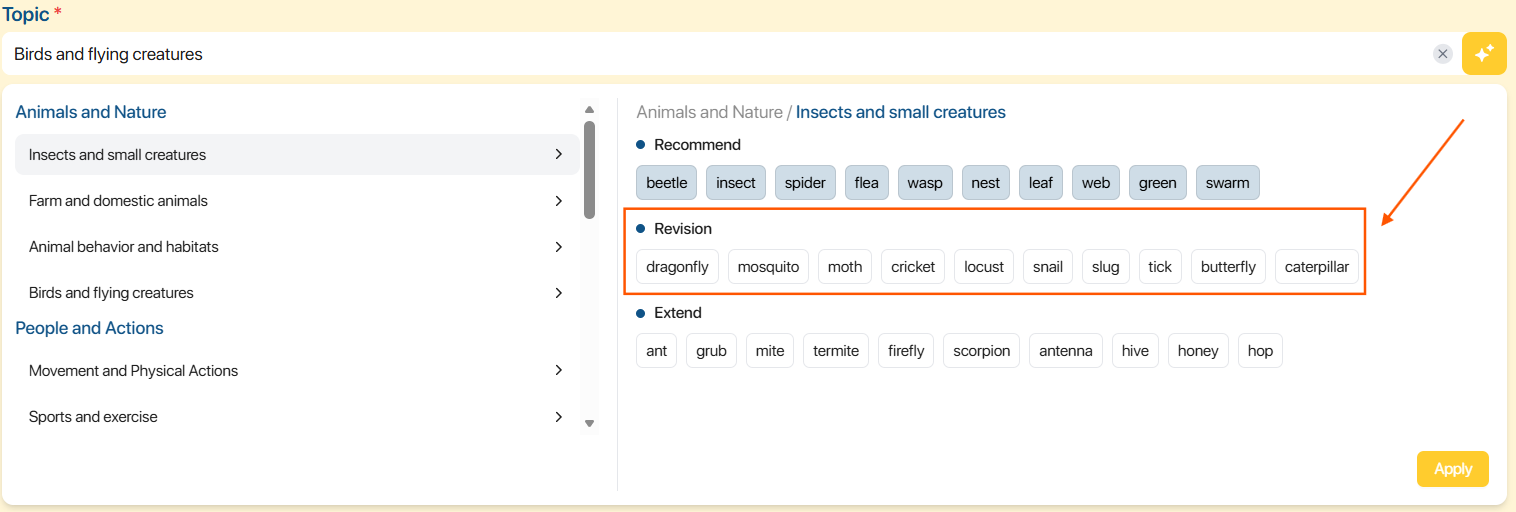
- Expand: Display vocabulary from a Grade that is one level higher than the selected Grade (if applicable).
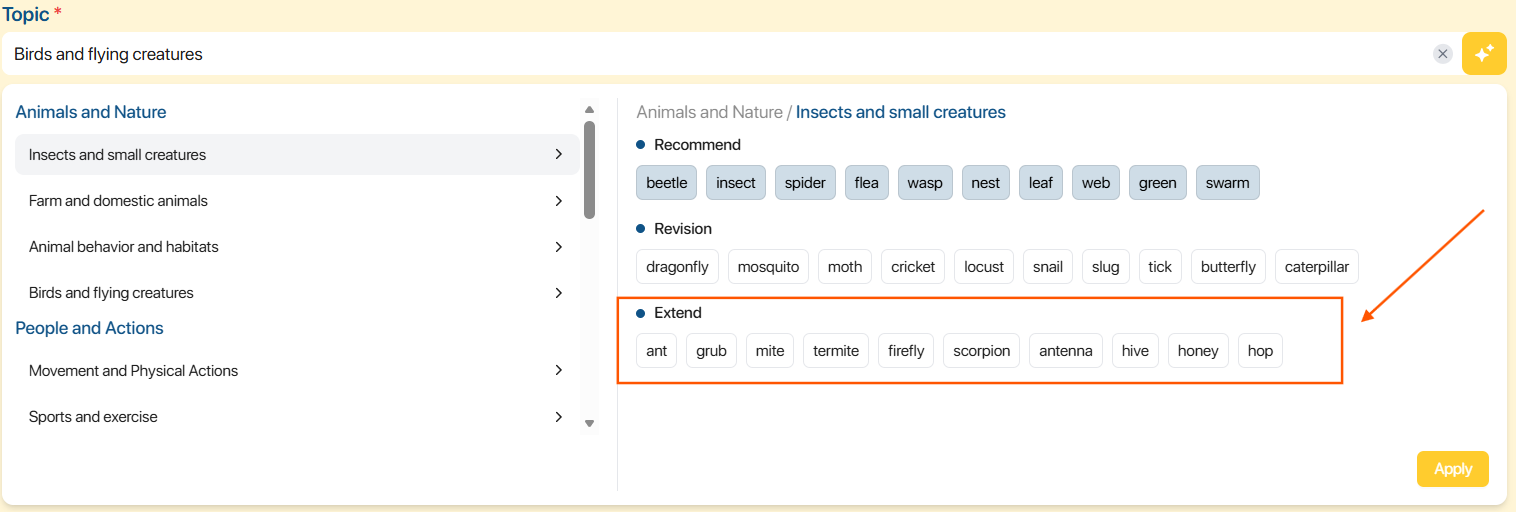
Note: Users can click on each word to select or deselect.
Step 5: After finishing Mission’s vocabulary selection, users click on the button to have the system display the added list in the Vocabulary box.
Note: Users click on the ![]() icon to delete the entered content.
icon to delete the entered content.
Step 6: After applying the list, there are two ways users can add more vocabulary, as below:
Method 1: Click on the  button to add new vocabulary to the list.
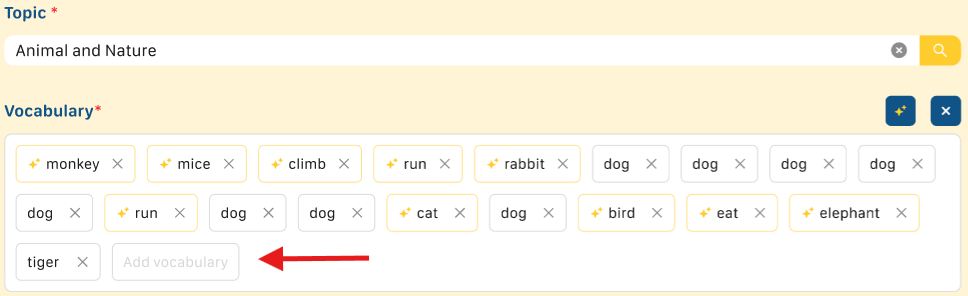
Method 2: Click on the  icon to have the AI system suggest more new vocabulary to the list.

Step 6: Instructions to delete vocabulary in the Vocabulary box, as below:
- To delete 1 word in the list, click on the
 icon next to that word
- To delete the entire vocabulary list, users click on the
 button.

Note: In case users apply a new Topic, the system will delete the entire vocabulary list of the old Topic and replace it with the new vocabulary list of the new Topic.
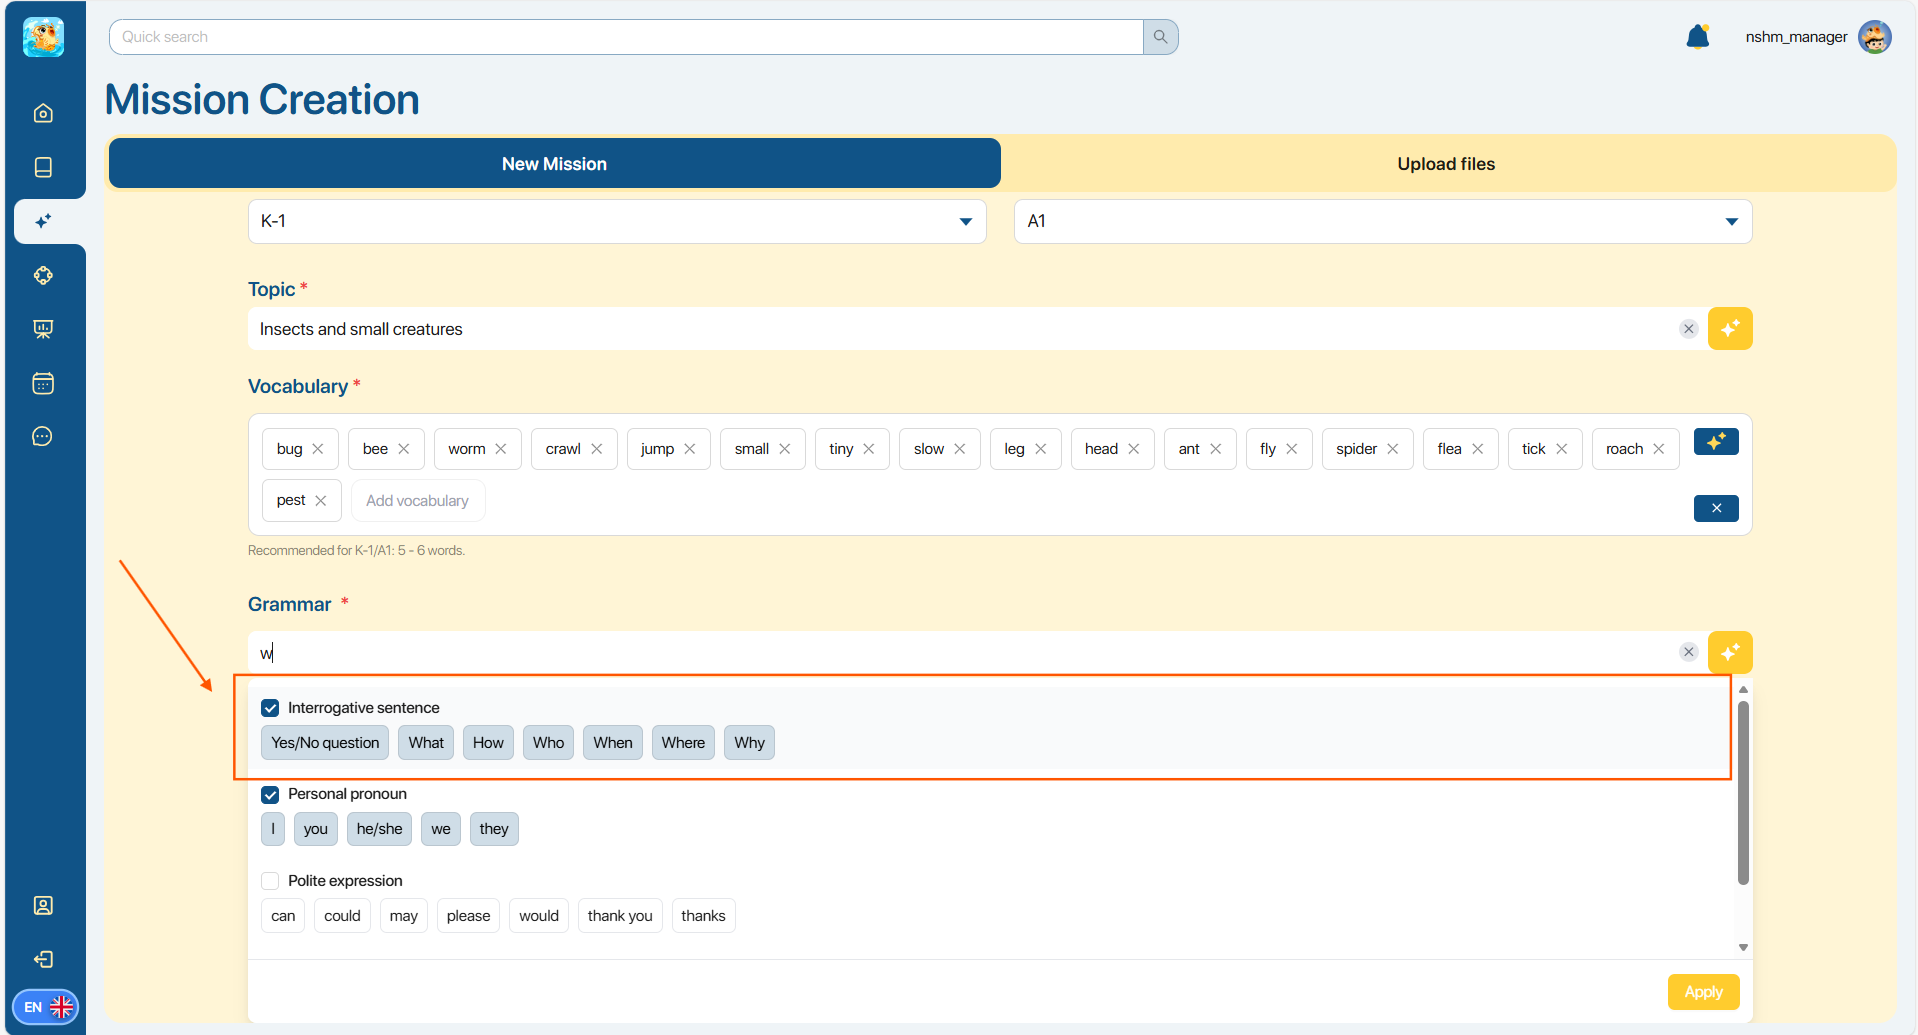
Step 7: In the Grammar box, there are three ways for users to find suitable Grammar for the Mission.
Method 1. Enter the name of the grammar topic (for example: “Present Simple”)
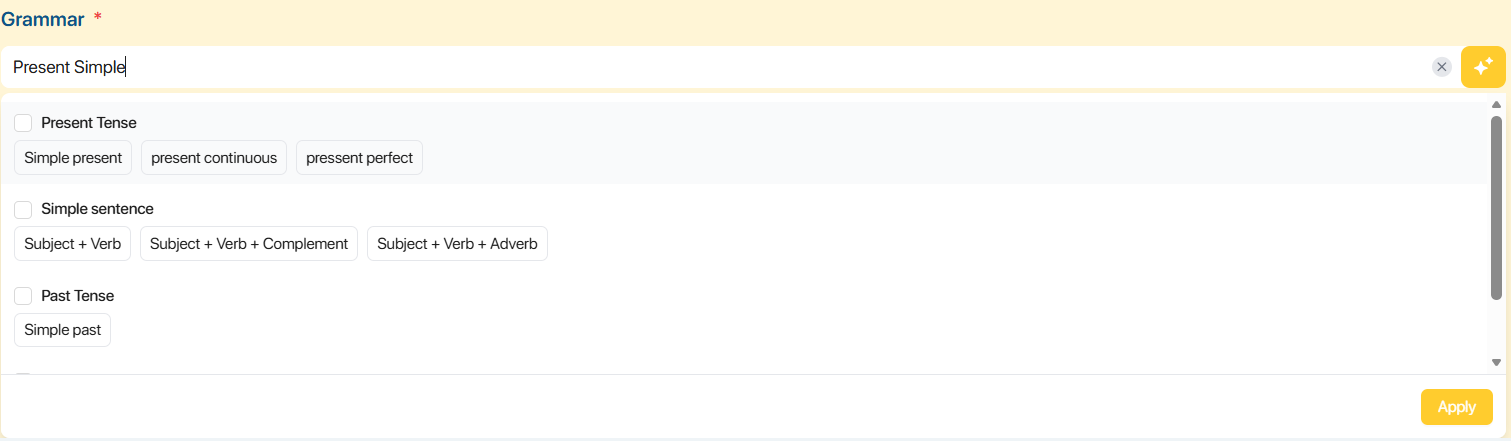
Method 2. Enter the grammatical structure (for example: “There is, there are”)
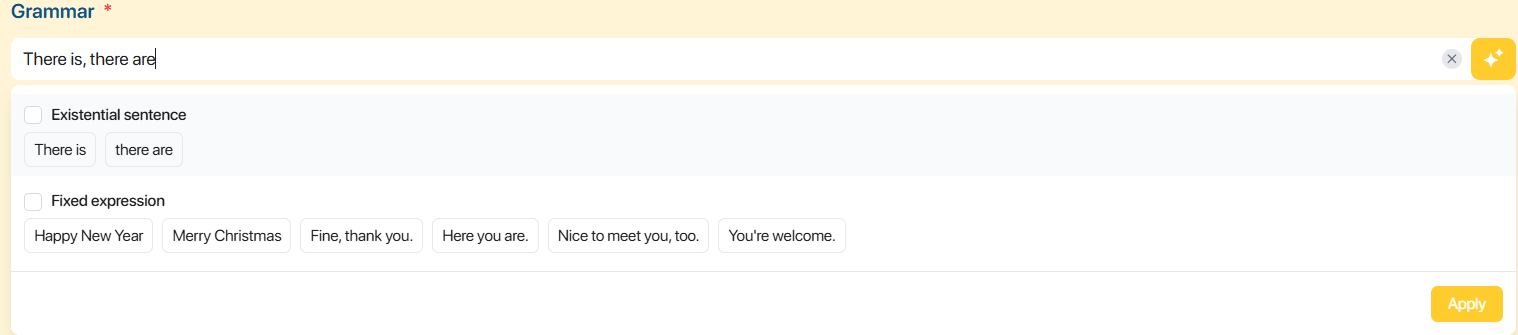
Method 3. Enter an example sentence containing the grammar (for example: “She has two dogs and a cat.”)
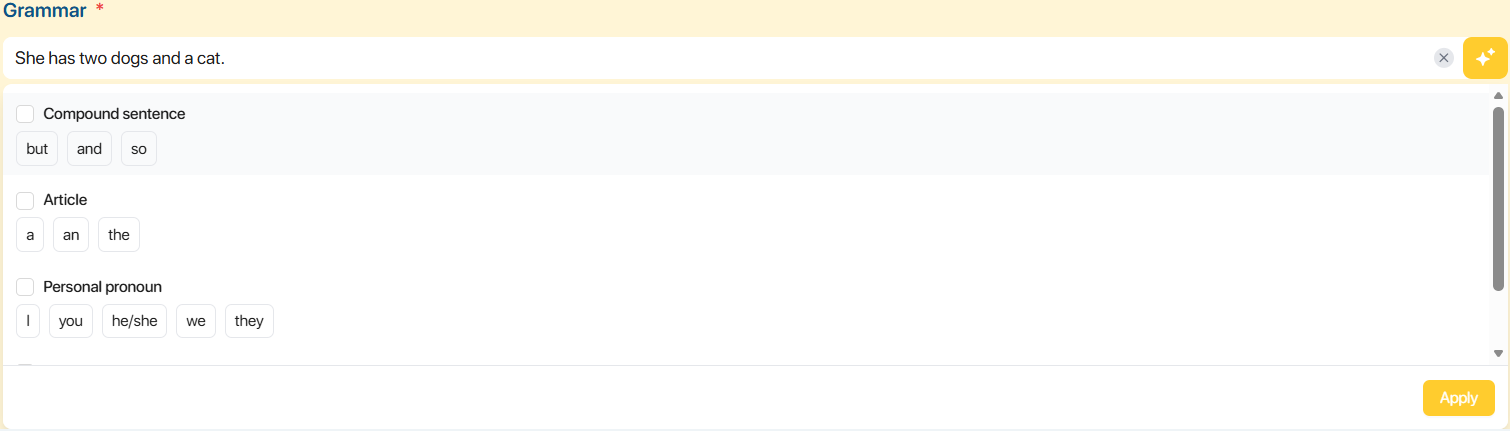
Note: In case where entering the keywords but no matching Grammar results are found, click on the icon to have the AI system assist in finding Grammar.
Step 8: Tick to select the Grammar in the displayed list and click on the  button to have the system show the added list in the Grammar box.
Step 9: Instructions for users to delete in the Grammar box, as below:
- To delete a grammar topic from the list, click on the button next to the name of the grammar.

- To delete the entire grammar list, users click on the button.

Note: To help create Missions that match students' level and grade, the system suggests the corresponding amount of Vocabulary and Grammar.
Step 10: After finishing filling in the above information, users click on the  button to enter the display to create the Stage (assignments).
4.2. CREATE A MISSION WITH A PDF/DOCX FILE
Step 1: In the Mission Creation display, users click on the  tab to create a Mission from a learning materials file.
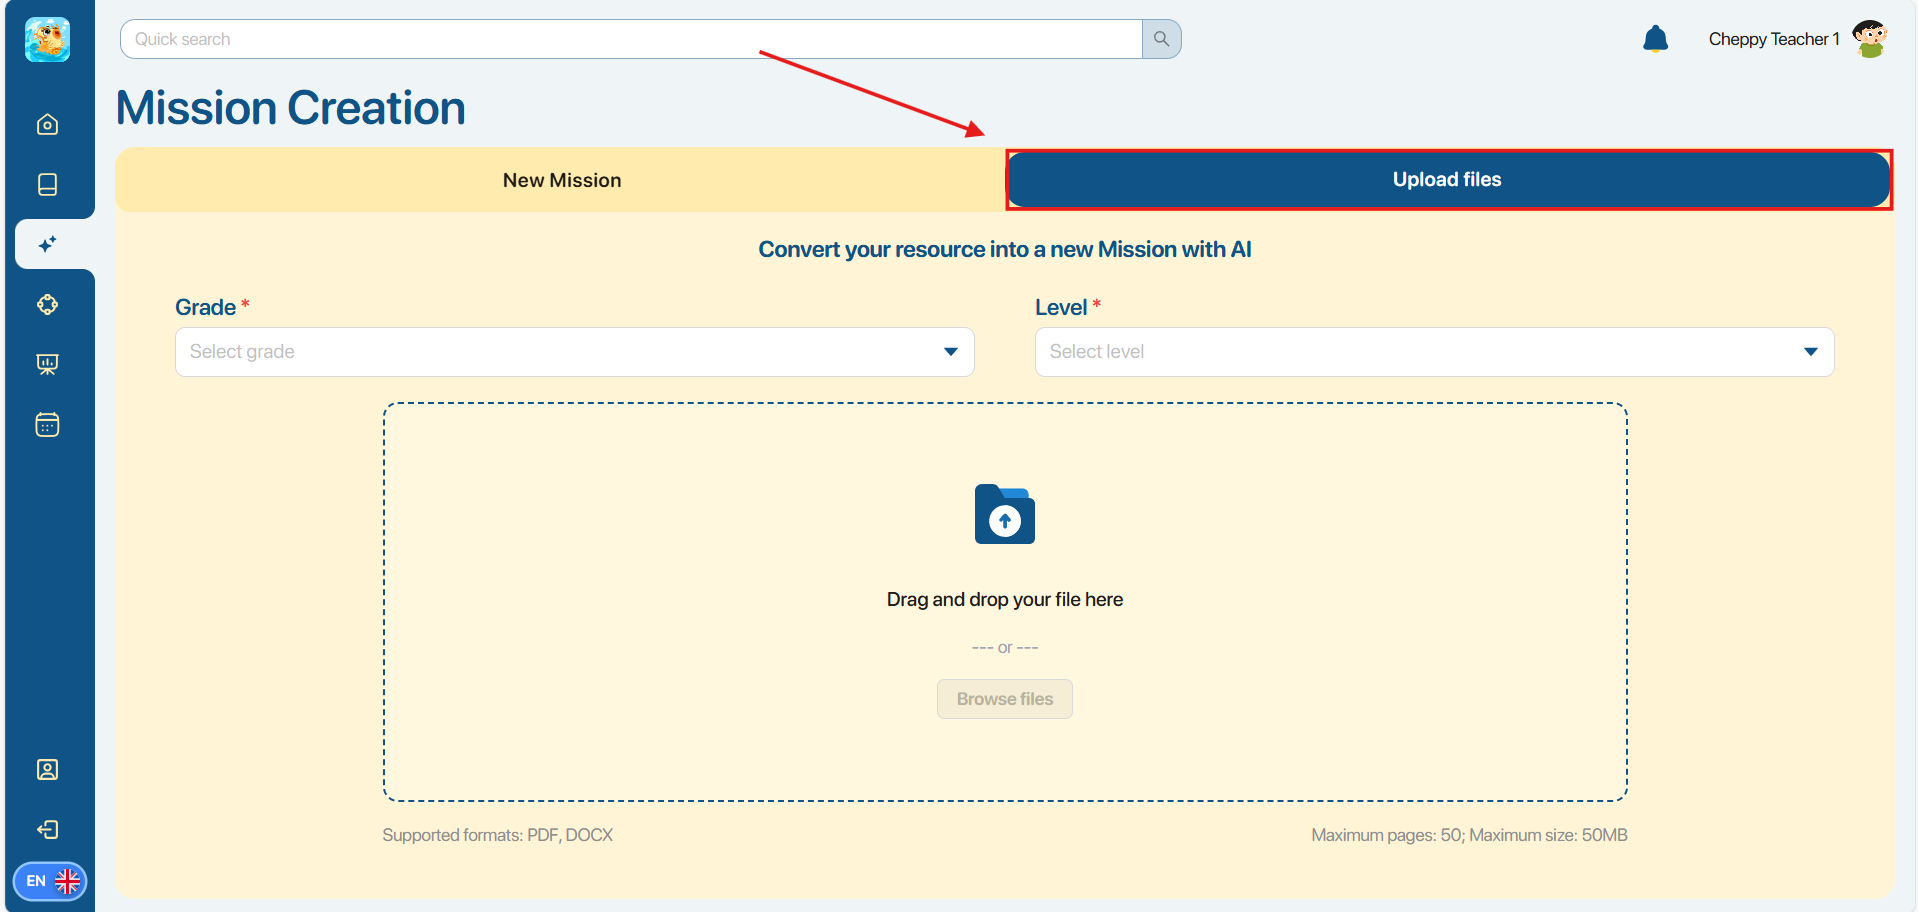
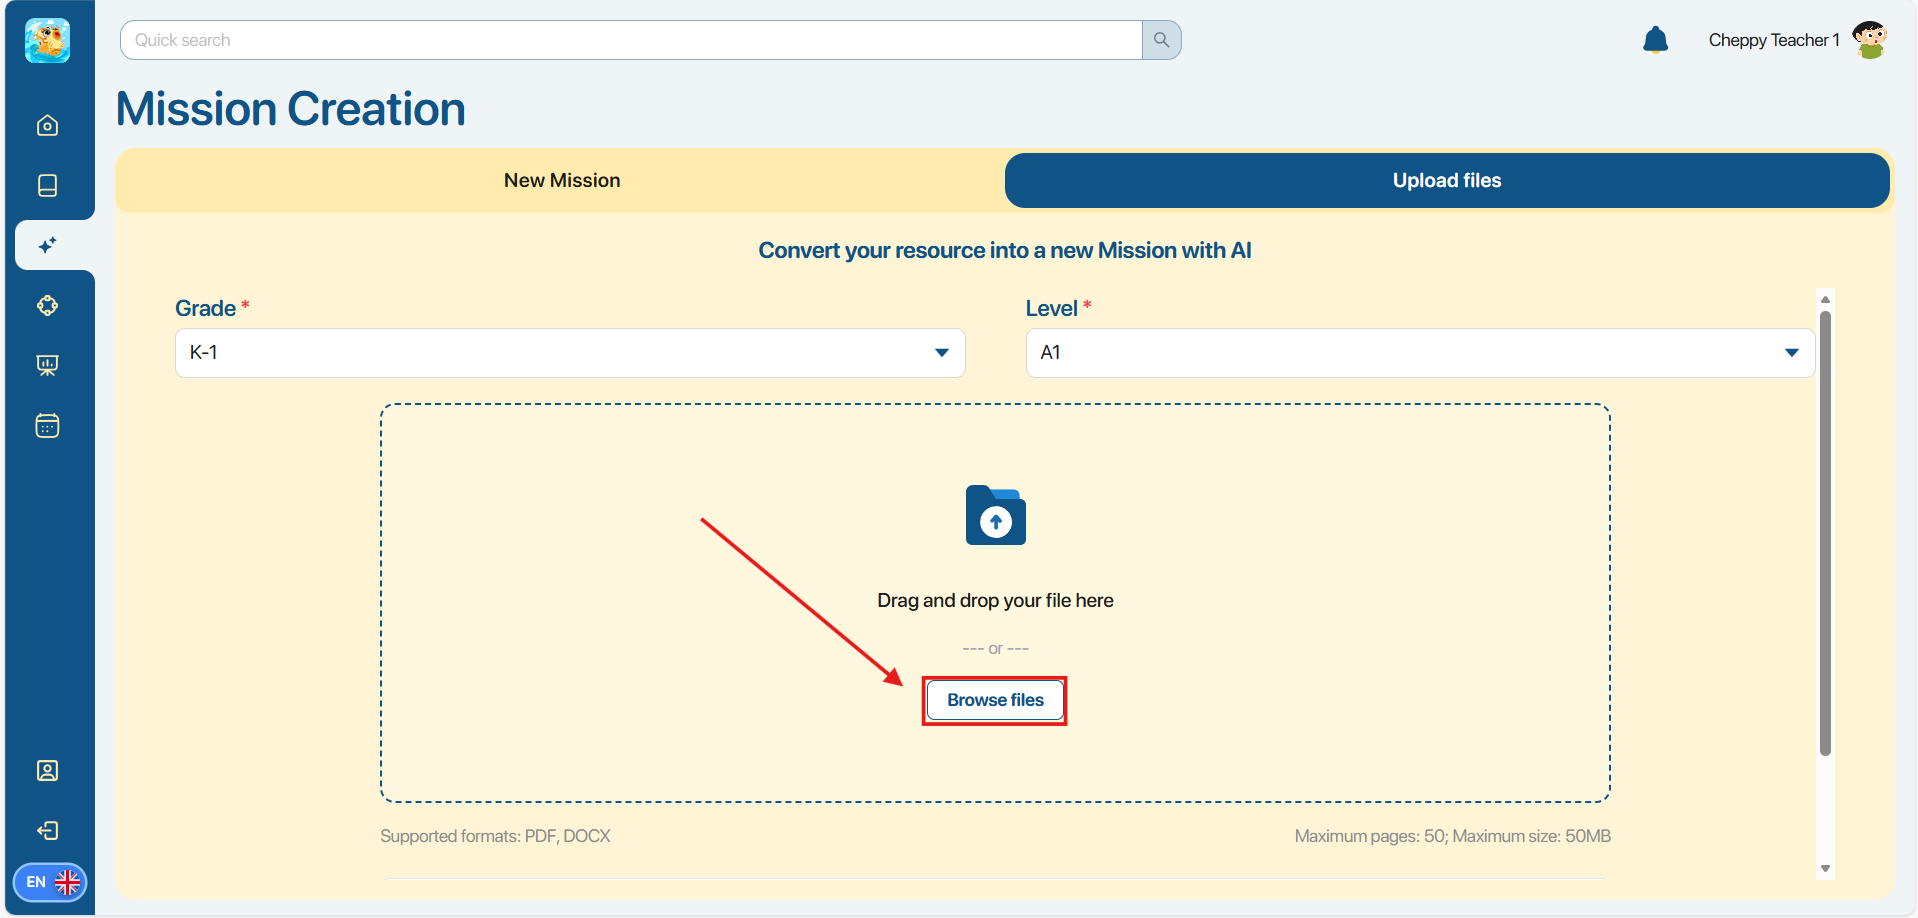
Step 2: In the Upload files display, users select the corresponding Grade and Level.
Note: Users can upload a file after selecting Grade and Level.
Step 3: In the upload file display, users have two ways:
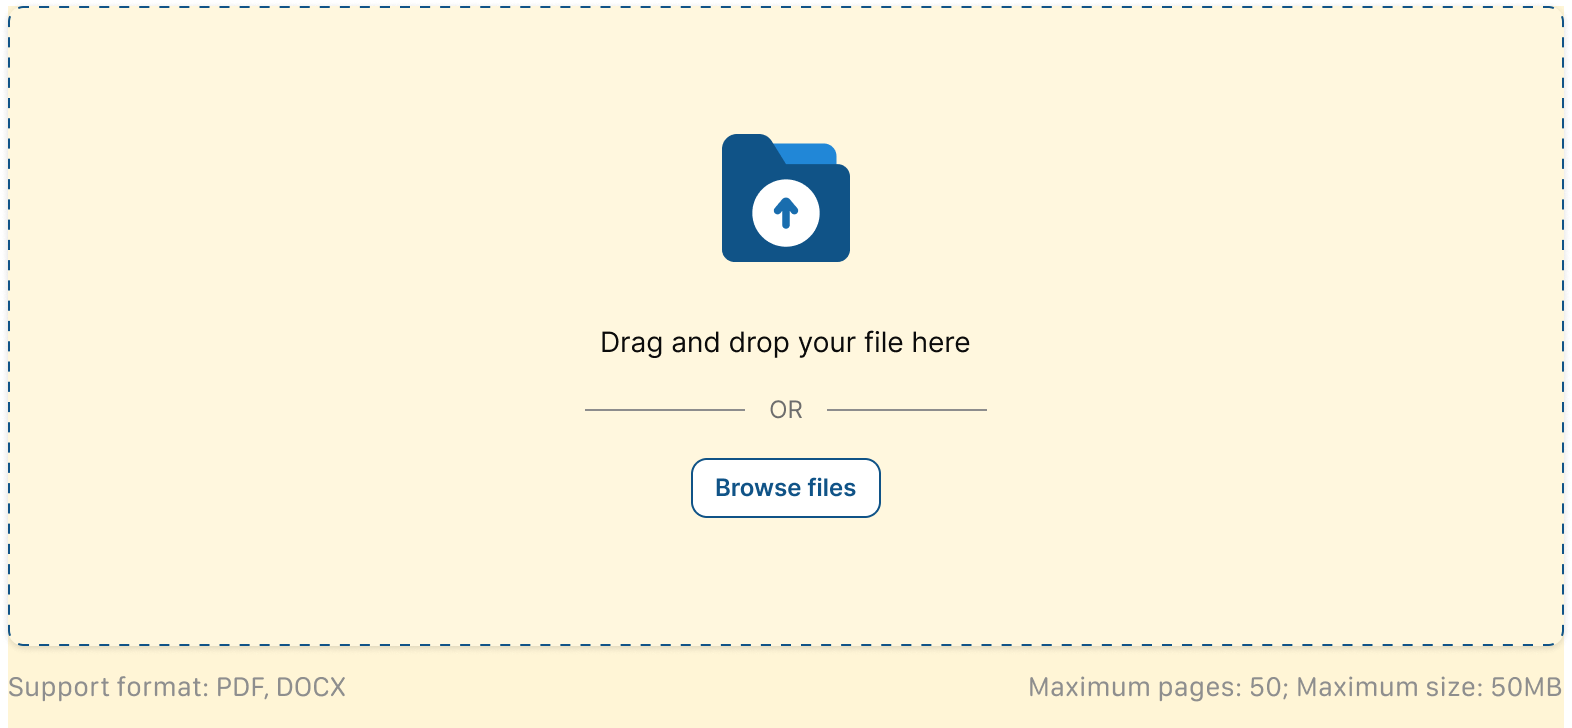
Method 1. Drag and drop the PDF/DOCX file into the file upload area.

Method 2. Click on the  button to select a file from the user’s device.
Note: Our system can only support uploading files with PDF, DOCX formats, with a maximum of 50 pages and a capacity not exceeding 50 MB.
Step 4: After the file is successfully uploaded, the system shows a preview display of the file content. The user checks the desired pages to use in creating questions.
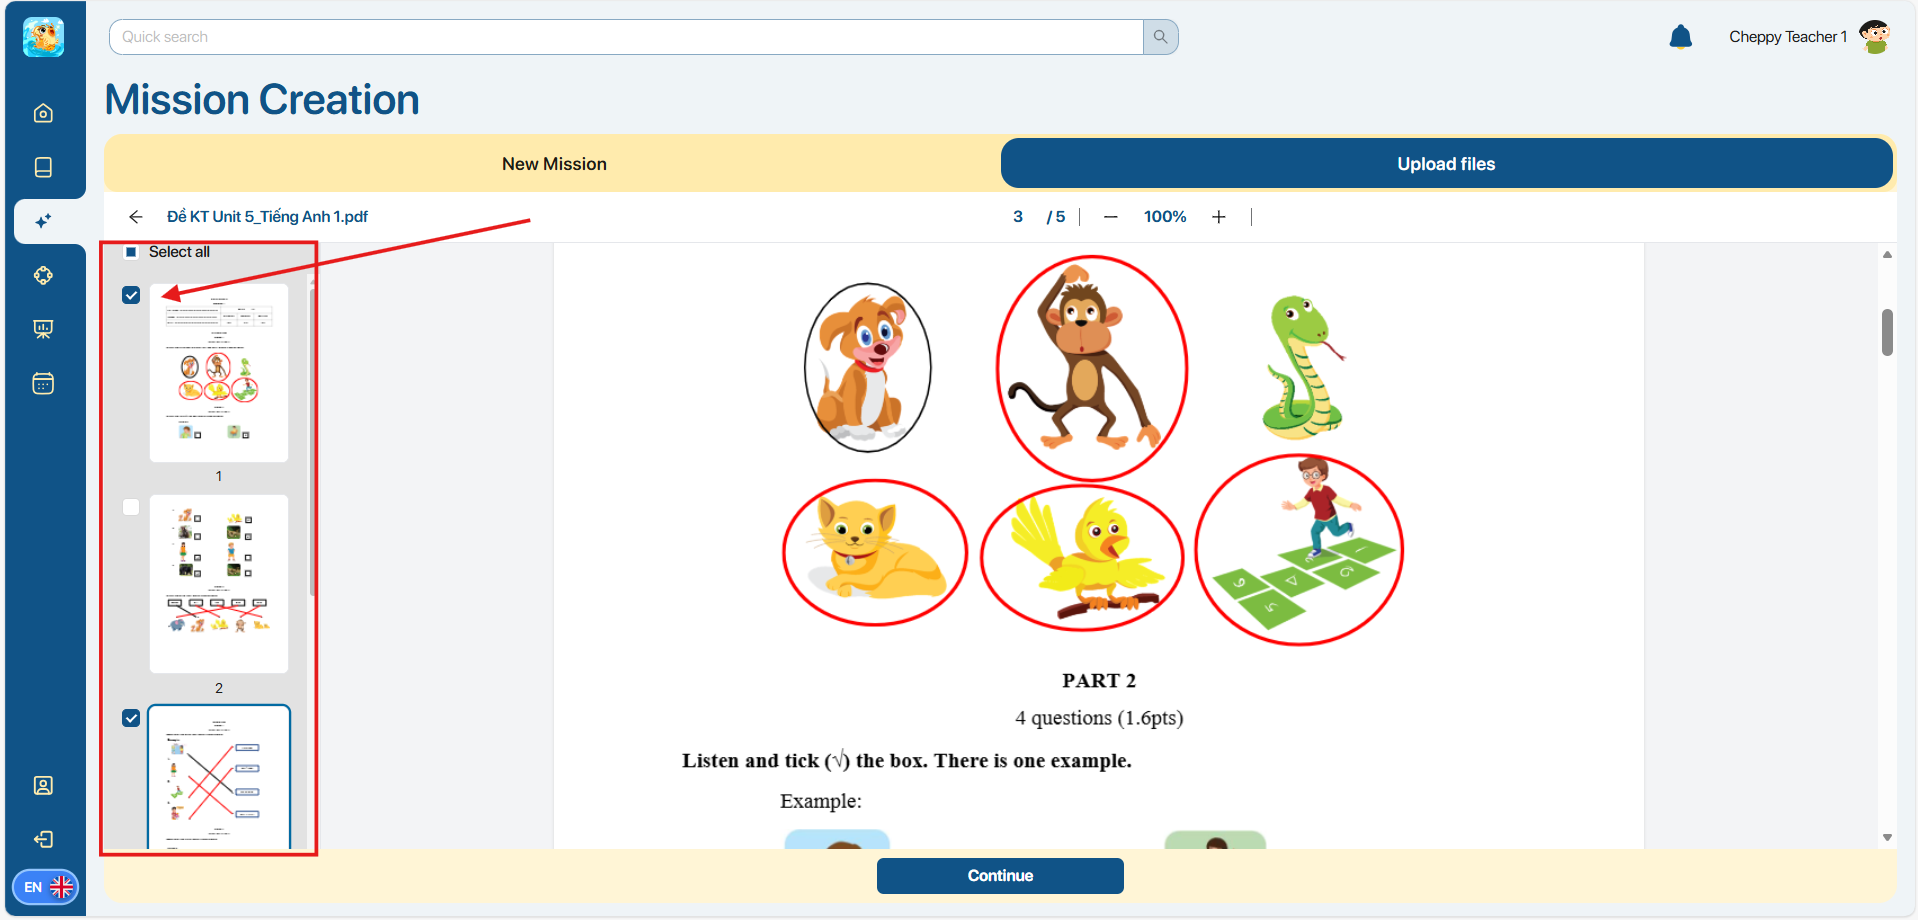
Note: The system can only process and make questions with selected pages by the users.
Step 5: The users click on the  button to have the AI system automatically generate assignments corresponding to the selected content.
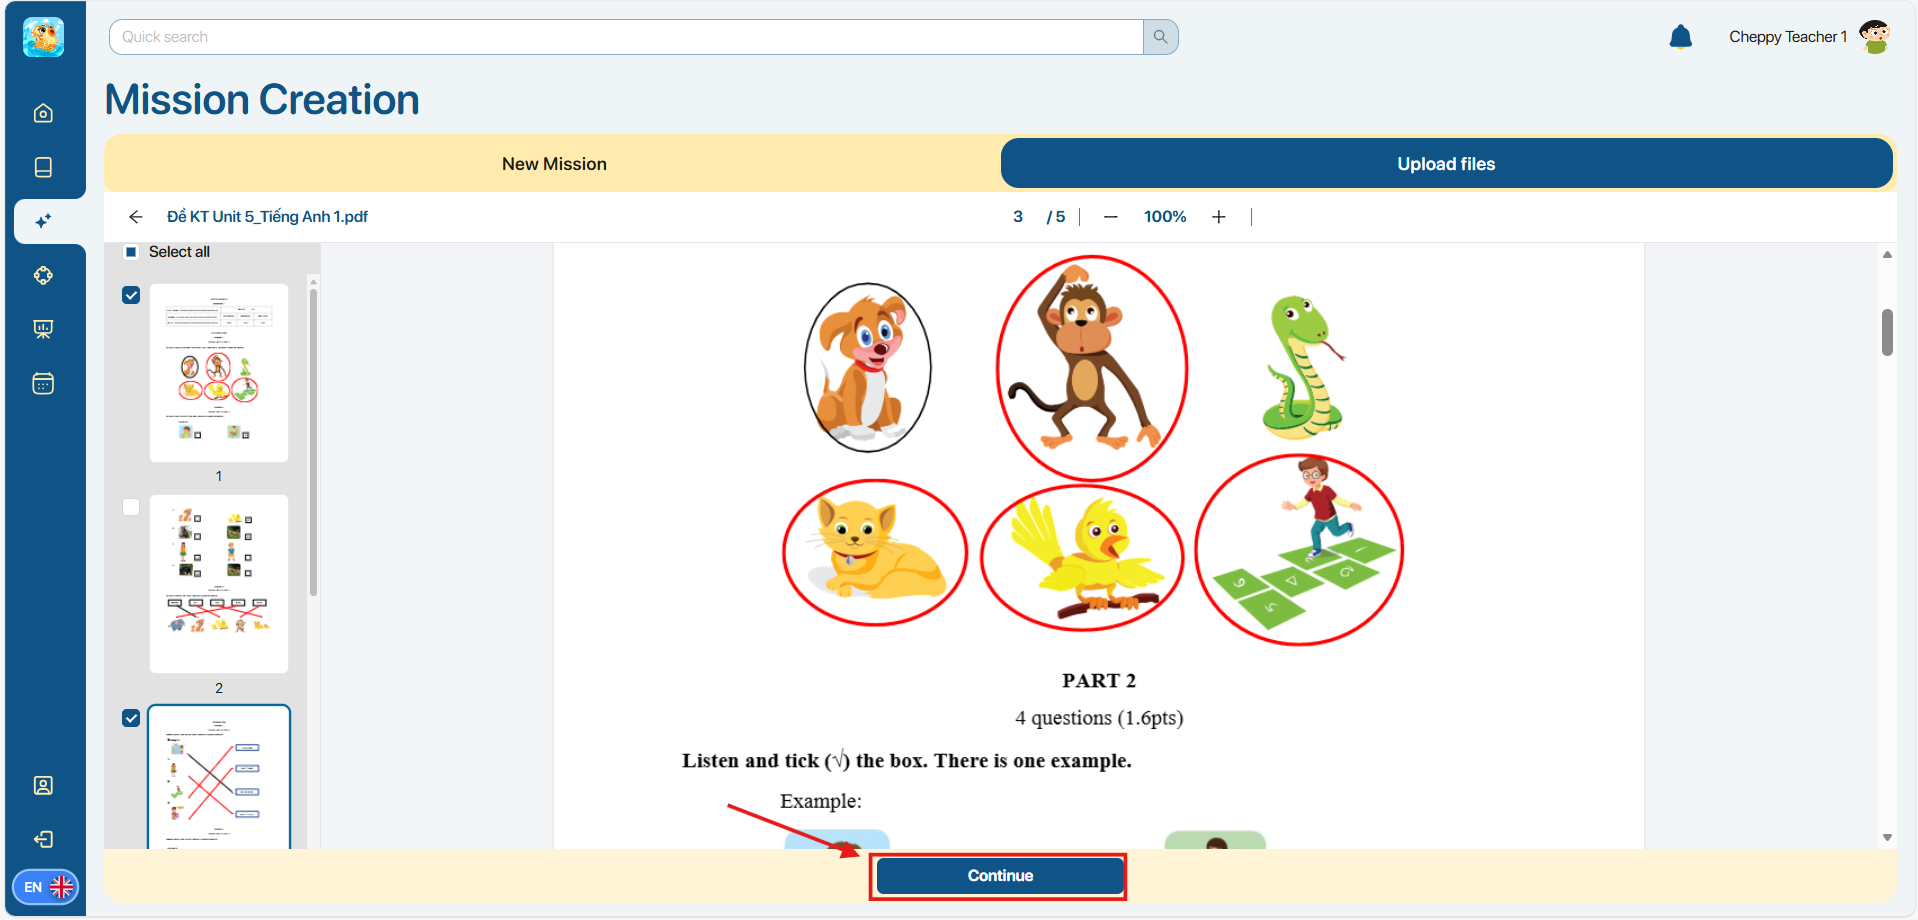
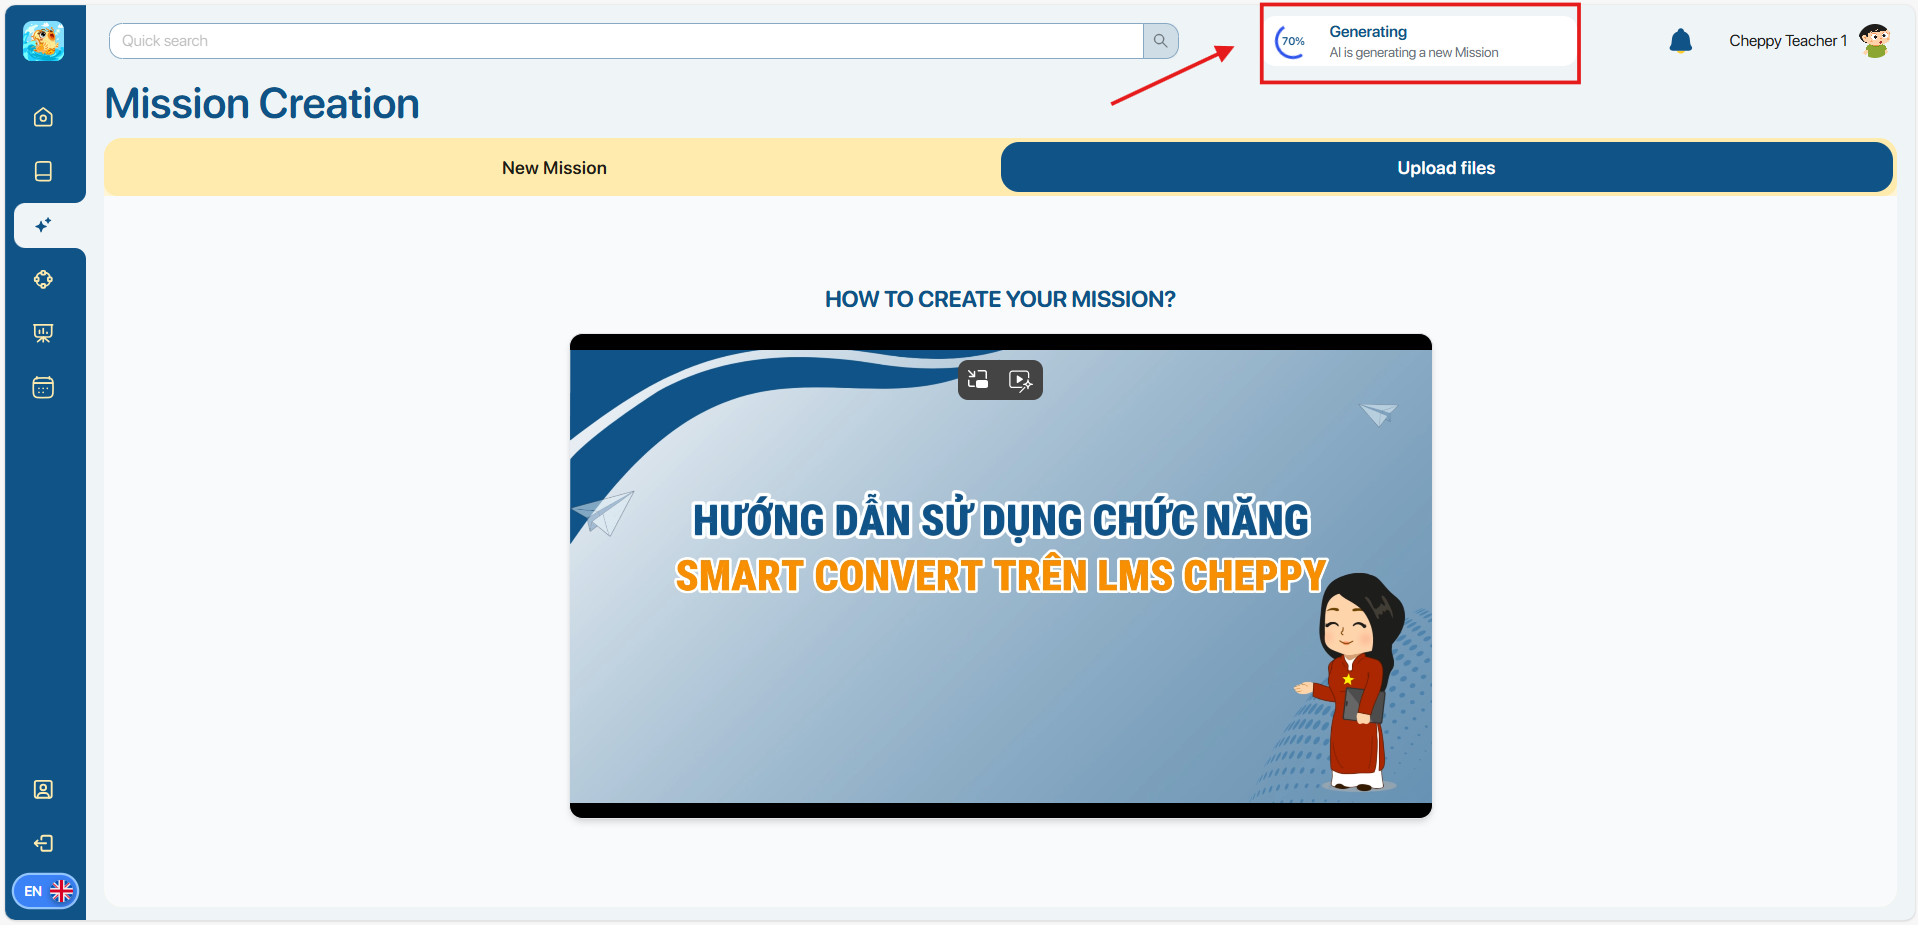
Step 6: After clicking the button, the system displays a video titled "How to use the Smart convert function on Cheppy LMS" while the AI system is generating question content.
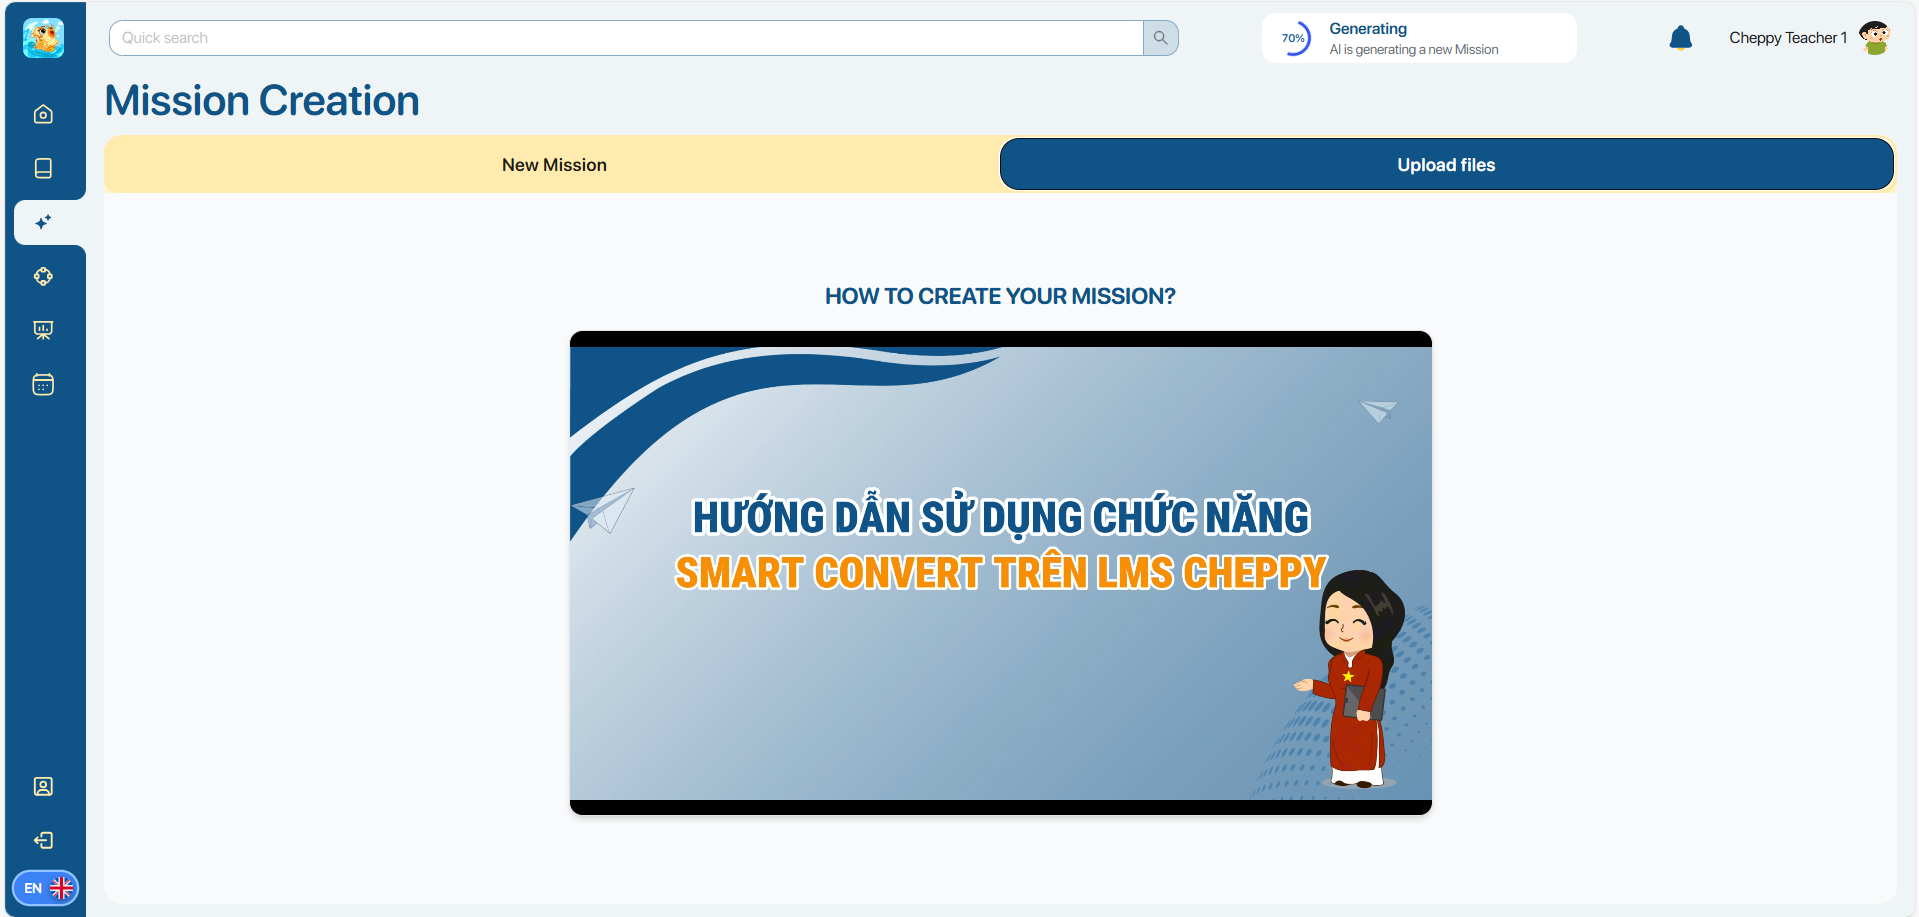
Note: While the AI is creating assignments, users can still perform other tasks on the platform. The progress of assignment creation is displayed via a progress bar in the upper right corner.
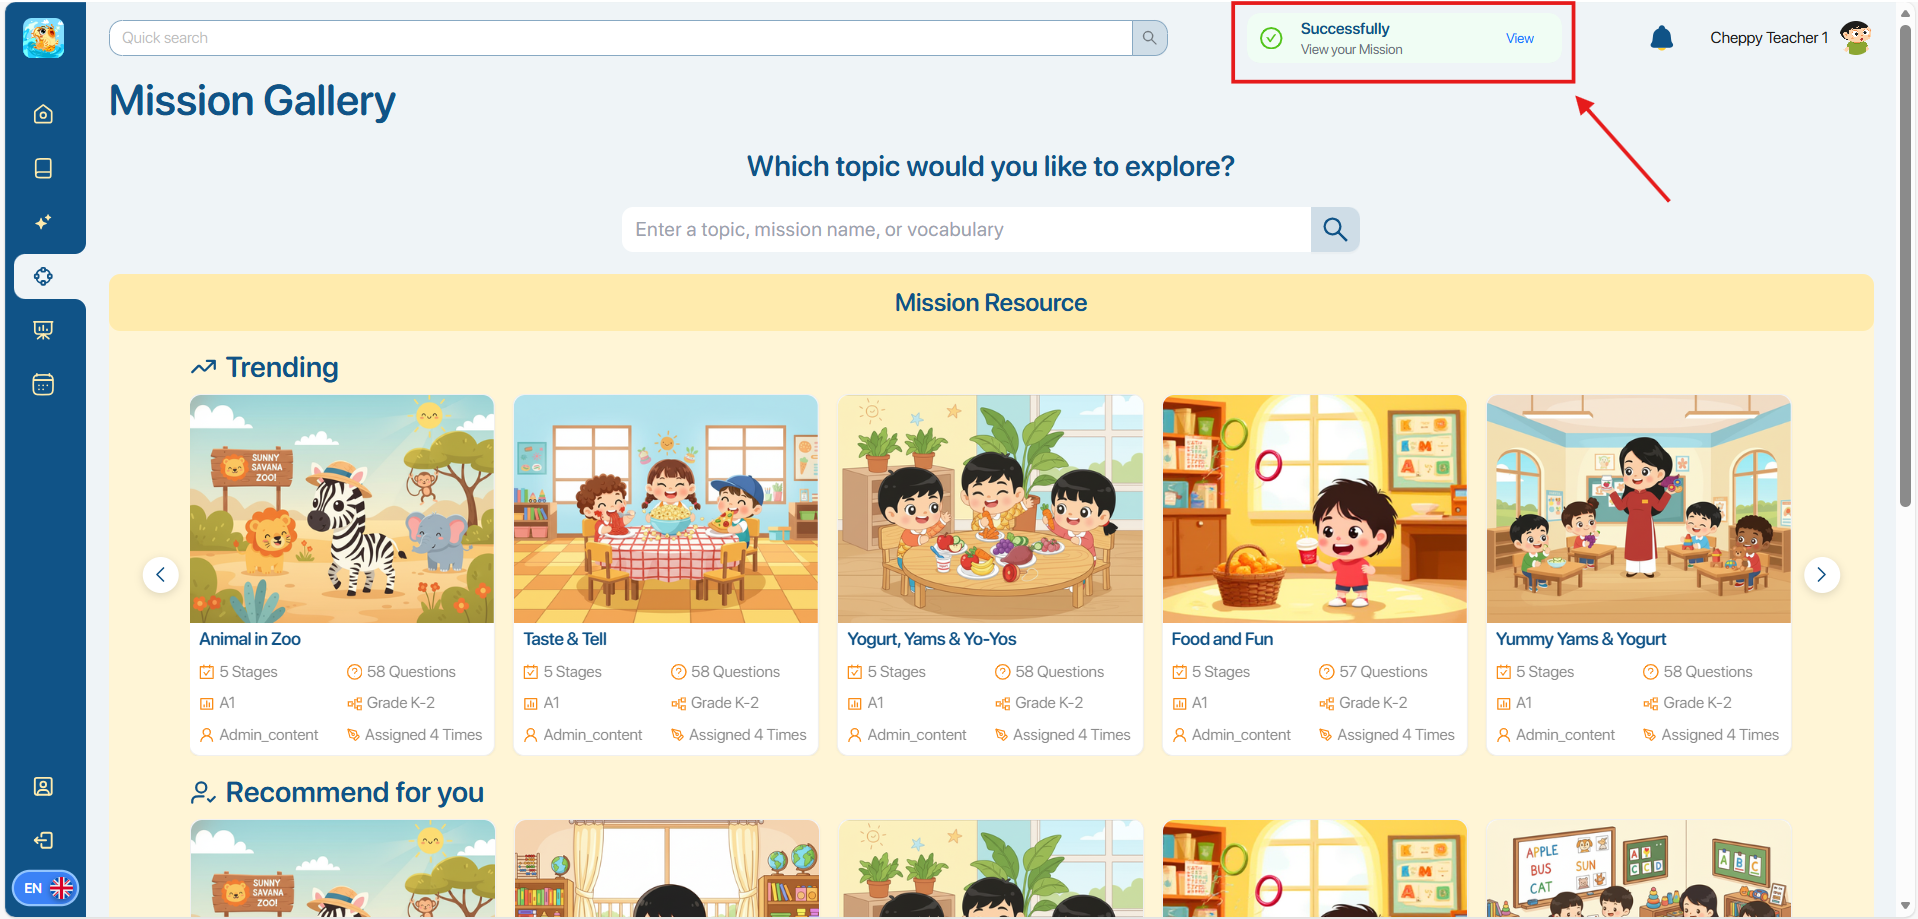
Step 7: After the system finishes the progress of generating questions and shows a success message, users click on the  button on the upper right of the screen to move to the question Preview display.
Step 8: In the content Preview screen, the system displays the content of questions generated from the uploaded file, including:
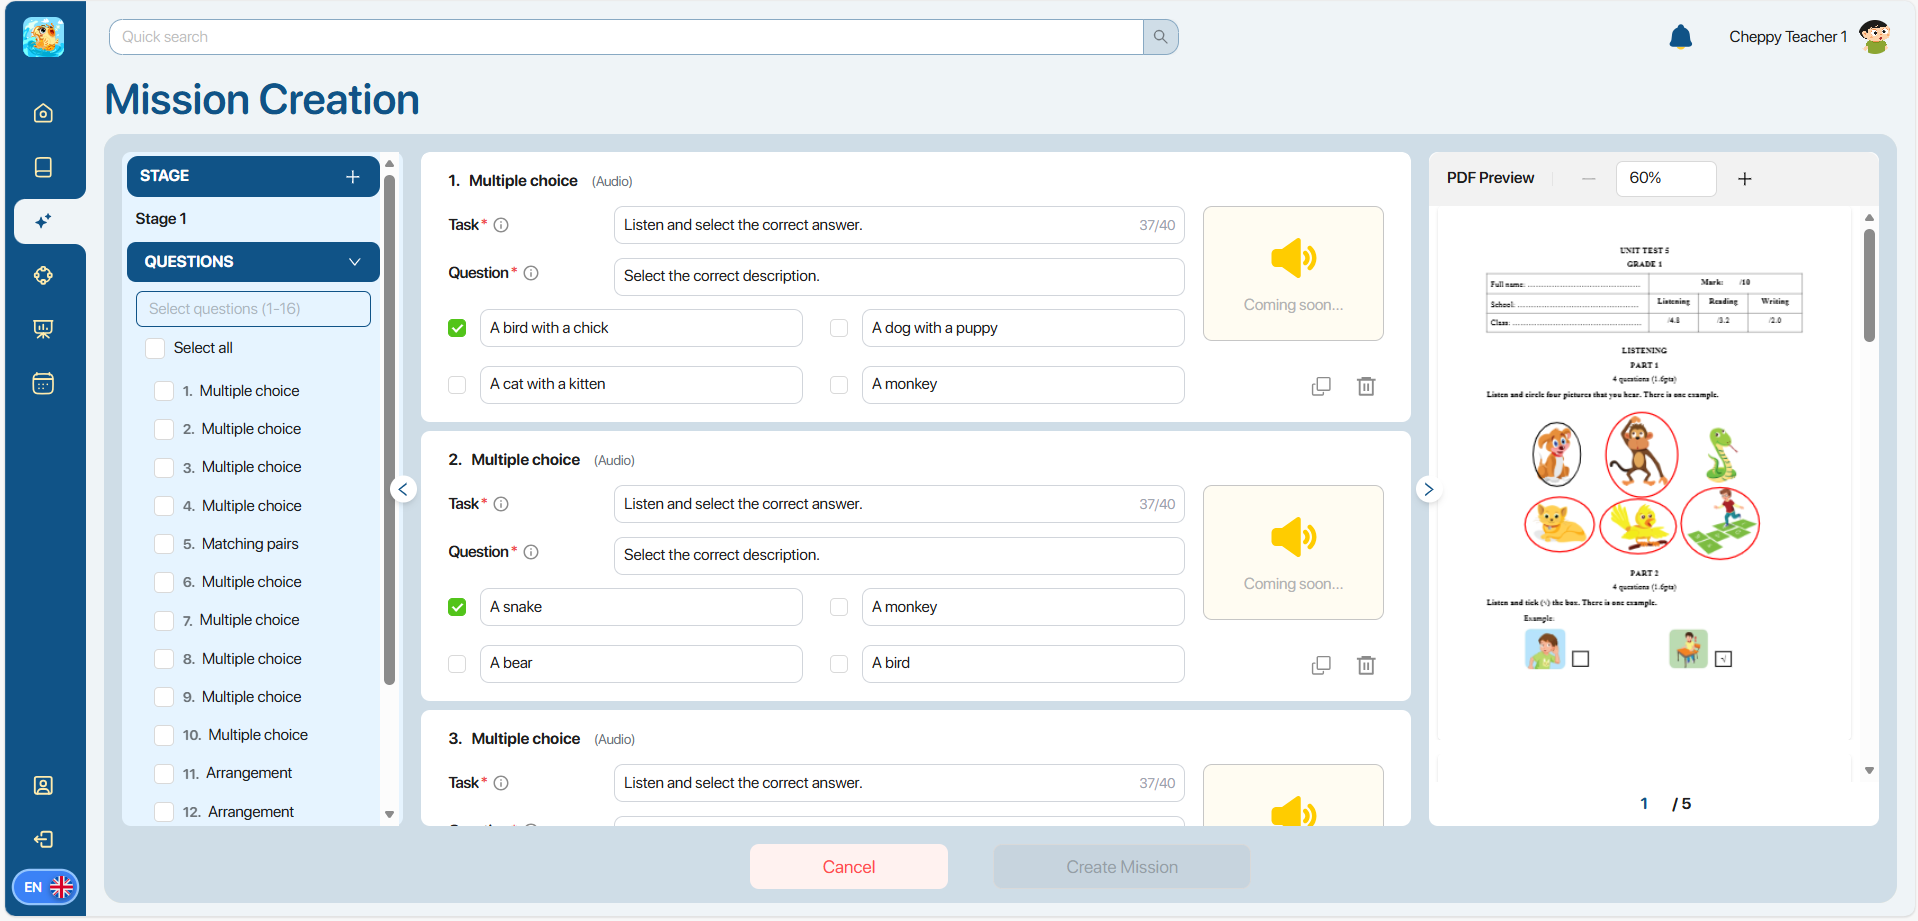
| No. | Functions | Description/Instruction |
|---|---|---|
| 1 |  | Auto Arrange (Sắp xếp tự động)Instead of manually arranging and dividing the questions, users can click on the button above the Stage list to automatically divide the questions.Step 1: When the Auto Arrange button is pressed, the system displays two options for question arrangement criteria, including: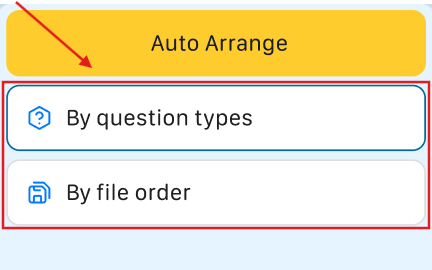 By Question Types: Arrange the questions by question type.By PDF Order: Arrange the questions by the order of the original files. Step 2: Users select one of two criteria on the screen, and the system automatically divides all questions into Stages and displays them on the screen. By Question Types: Arrange the questions by question type.By PDF Order: Arrange the questions by the order of the original files. Step 2: Users select one of two criteria on the screen, and the system automatically divides all questions into Stages and displays them on the screen.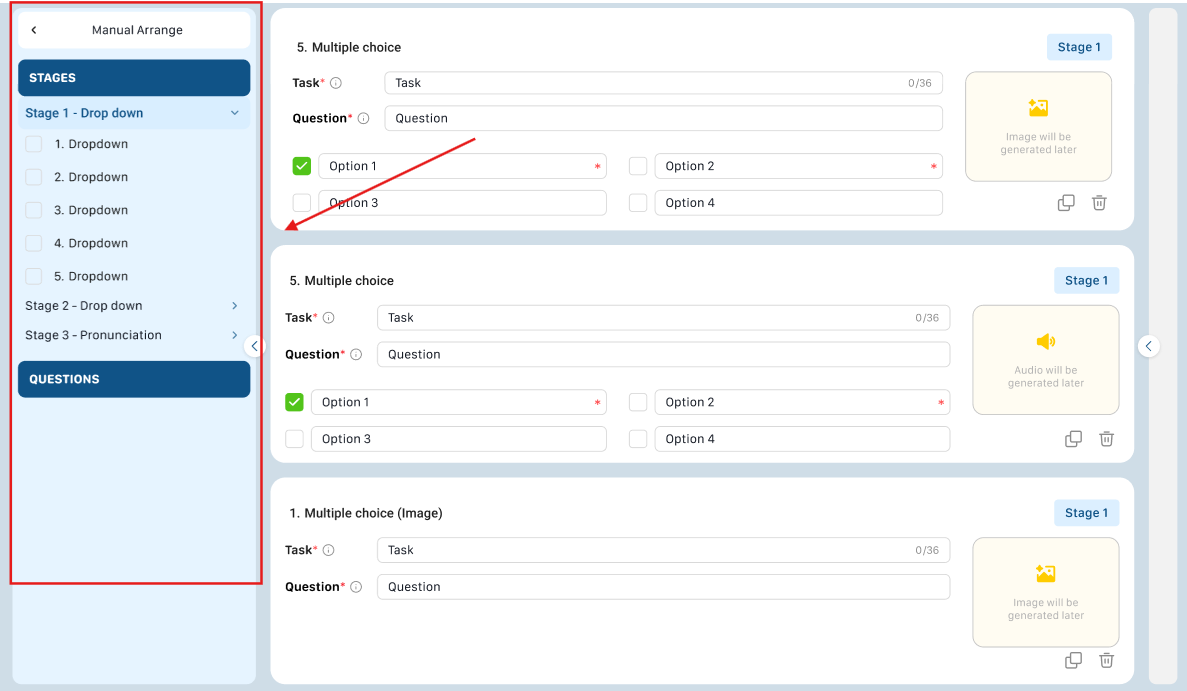 Note: Users can still drag/drop, change the question, or the Stage if needed. The Stage’s name is made by the selected criteria. Note: Users can still drag/drop, change the question, or the Stage if needed. The Stage’s name is made by the selected criteria.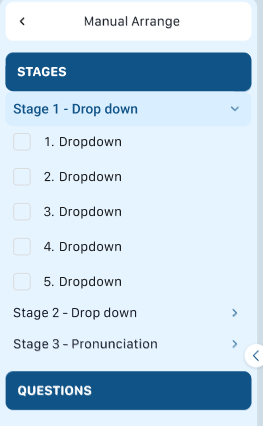 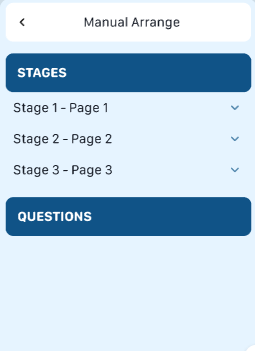 |
| 2 |  | Stage (Assignments)The system automatically generates the first Stage’s name as “Stage 1”.To create a new Stage, users click on the  To delete a Stage, users click on the To delete a Stage, users click on the  button in the corresponding Stage. button in the corresponding Stage. Note: The list of questions from the deleted stage will be displayed in the Questions section.To view the questions in a stage, users select the desired stage, and the system will display the list of questions for that stage. Note: The list of questions from the deleted stage will be displayed in the Questions section.To view the questions in a stage, users select the desired stage, and the system will display the list of questions for that stage. |
| 3 | 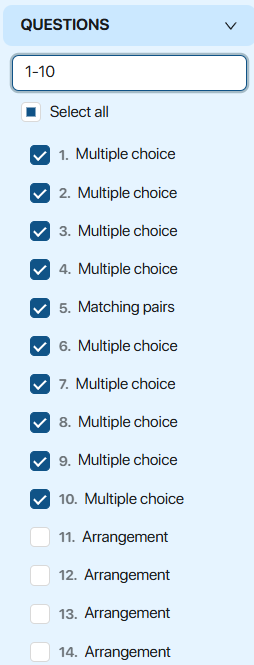 | Questions (Questions list)By default, the system displays all questions generated by the AI from the file content.To divide questions into stages, users select one or more questions and drag and drop them into the desired stage.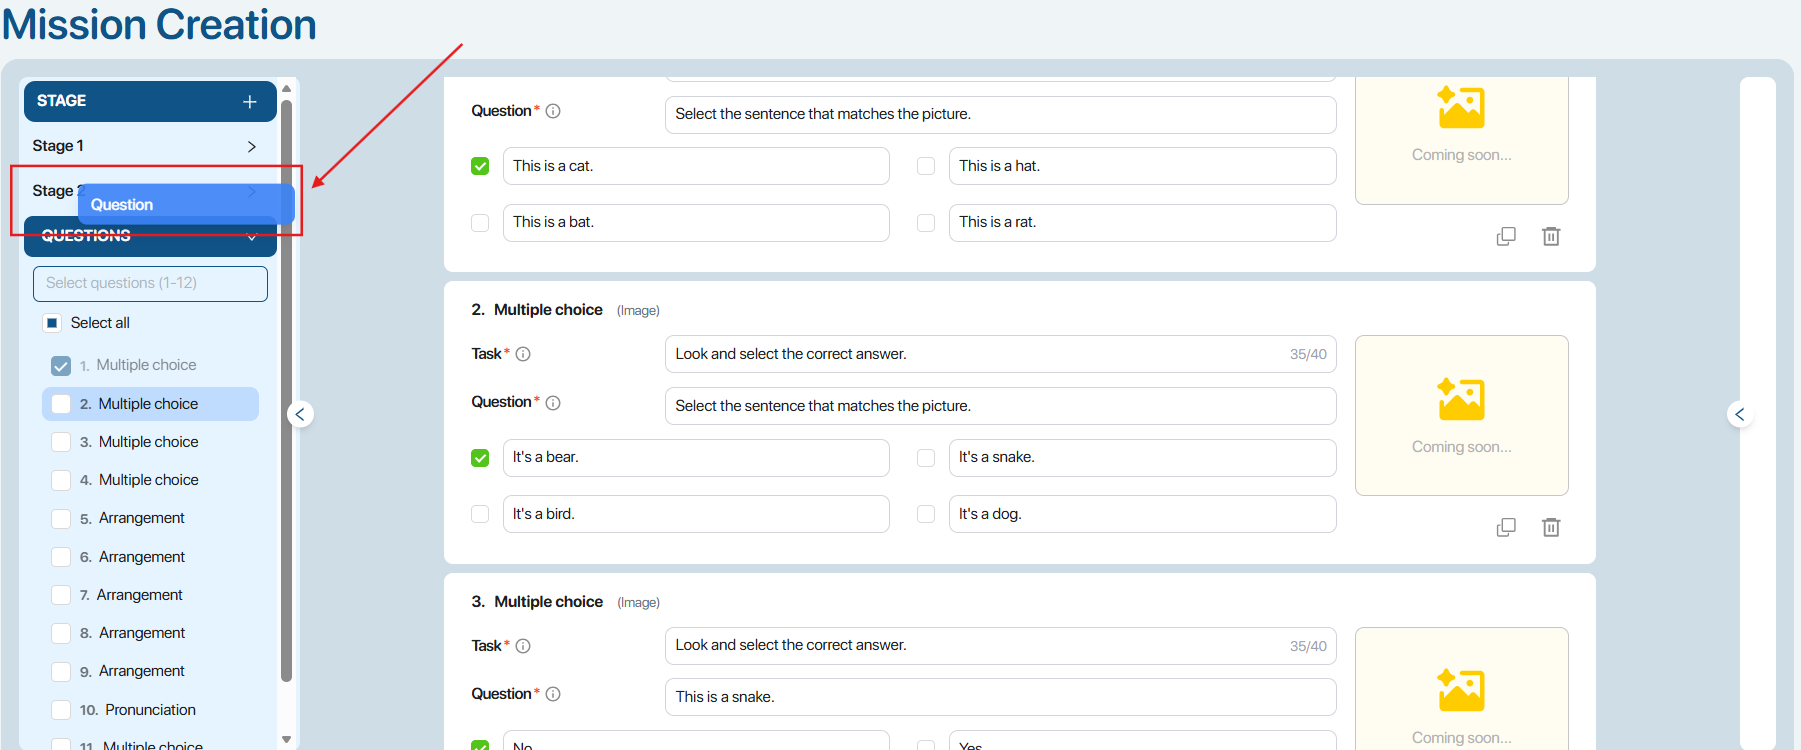 Users can select and drag questions from the current Stage to another Stage or back to the Questions area. Users can select and drag questions from the current Stage to another Stage or back to the Questions area.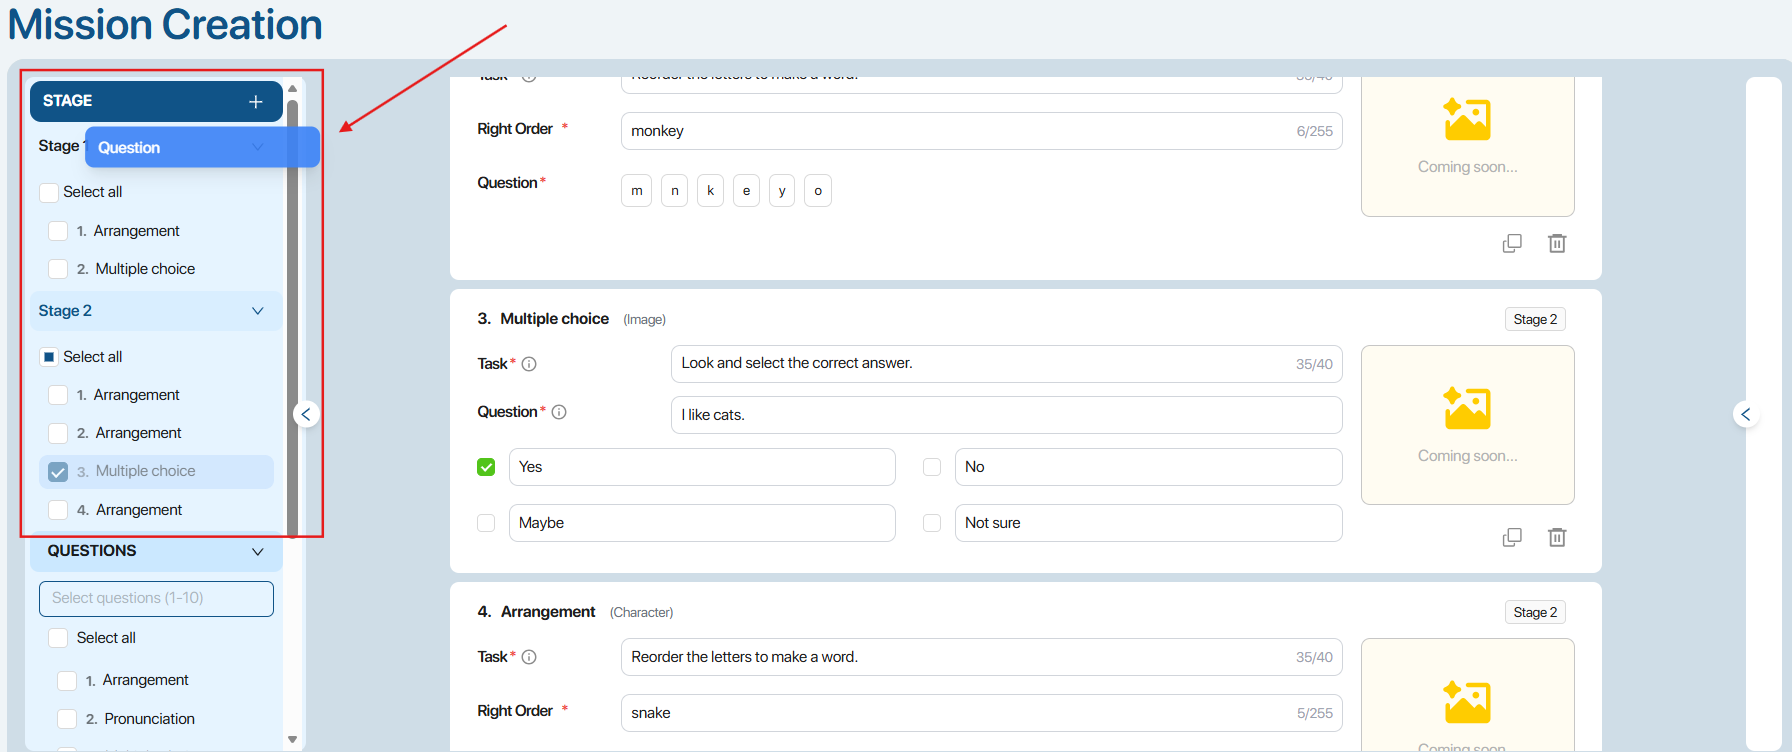 To quickly select multiple questions, users can enter a range of questions (e.g., 1-10), and the system will automatically select all questions within that range. To quickly select multiple questions, users can enter a range of questions (e.g., 1-10), and the system will automatically select all questions within that range. |
| 4 | 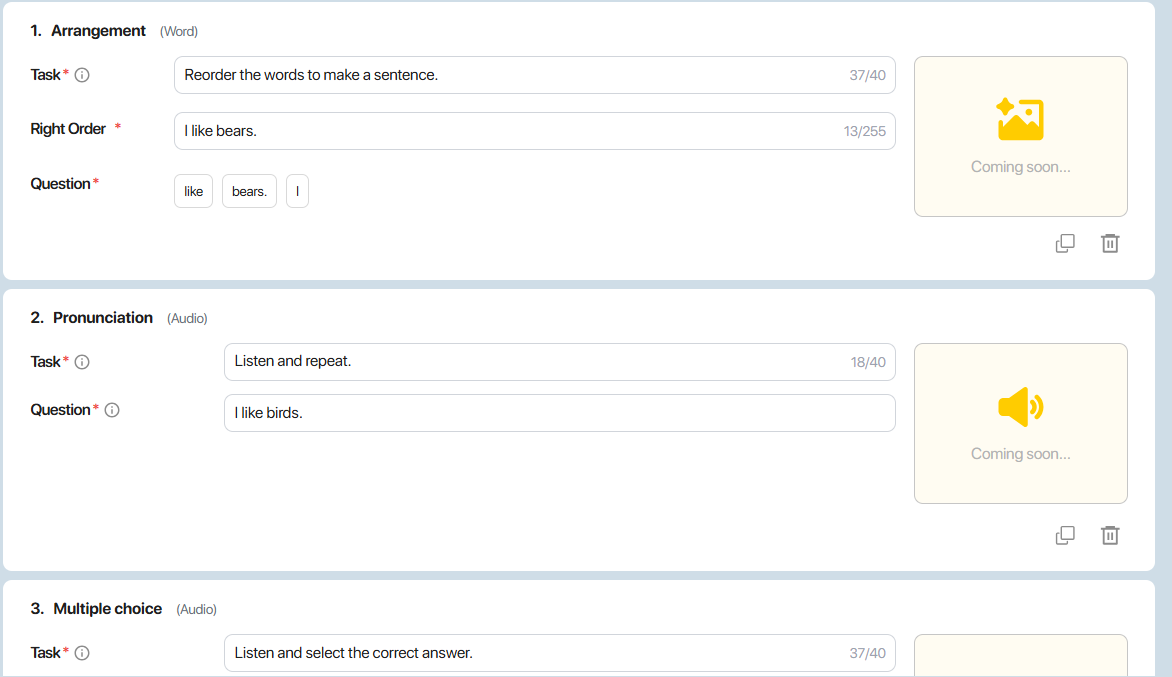 | Question contentWhen users select a question, the system displays the details of that question.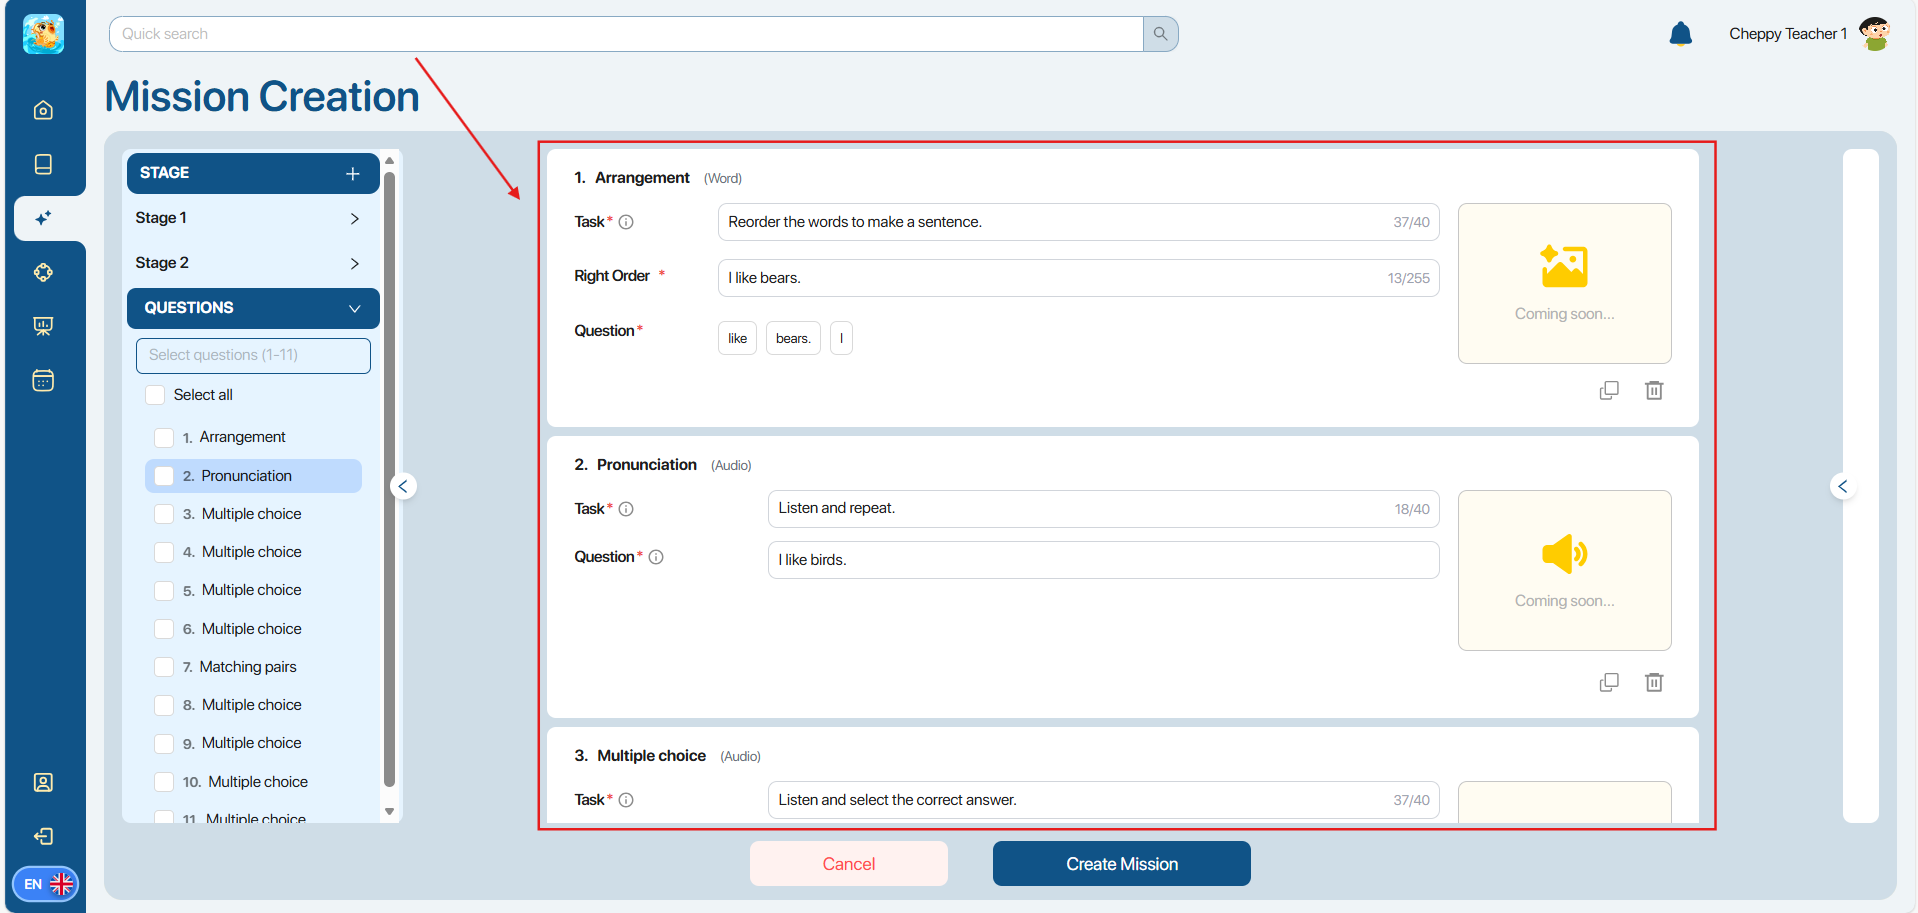 Note: Users can edit the question content directly on the screen display. Note: Users can edit the question content directly on the screen display. |
| 5 | 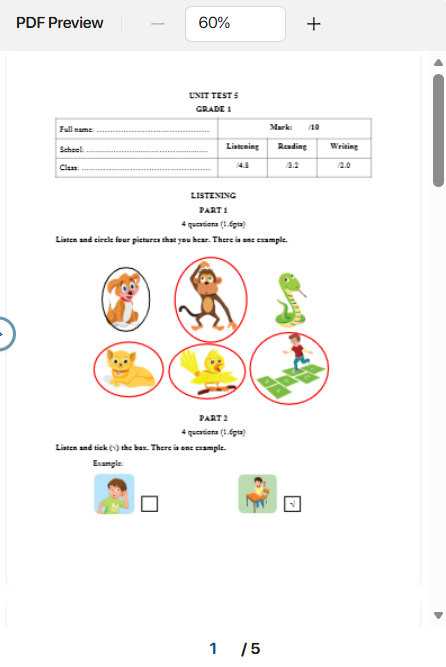 | File contentUsers click on the  button to allow the system to display the file content that the user selected in the Upload file step on the right side of the screen.Note: Users can compare the original content of the file with the questions generated by the system to ensure accuracy and relevance. button to allow the system to display the file content that the user selected in the Upload file step on the right side of the screen.Note: Users can compare the original content of the file with the questions generated by the system to ensure accuracy and relevance. |
Step 9: After completing the question division and content editing, users click on the \  button to create a new Mission.
Note: Conditions to click on thebutton include:
- There must be at least one Stage.
- Each stage must have at least one question.
- All questions are valid and have the correct answers selected.
Step 10: After successfully creating a Mission, the system displays a success message. The user taps the message displayed on the screen to view the Stage (Assignment) screen.

Note: Users can still view the details of the newly created Mission in the My Library display without clicking on it in the previous notification.
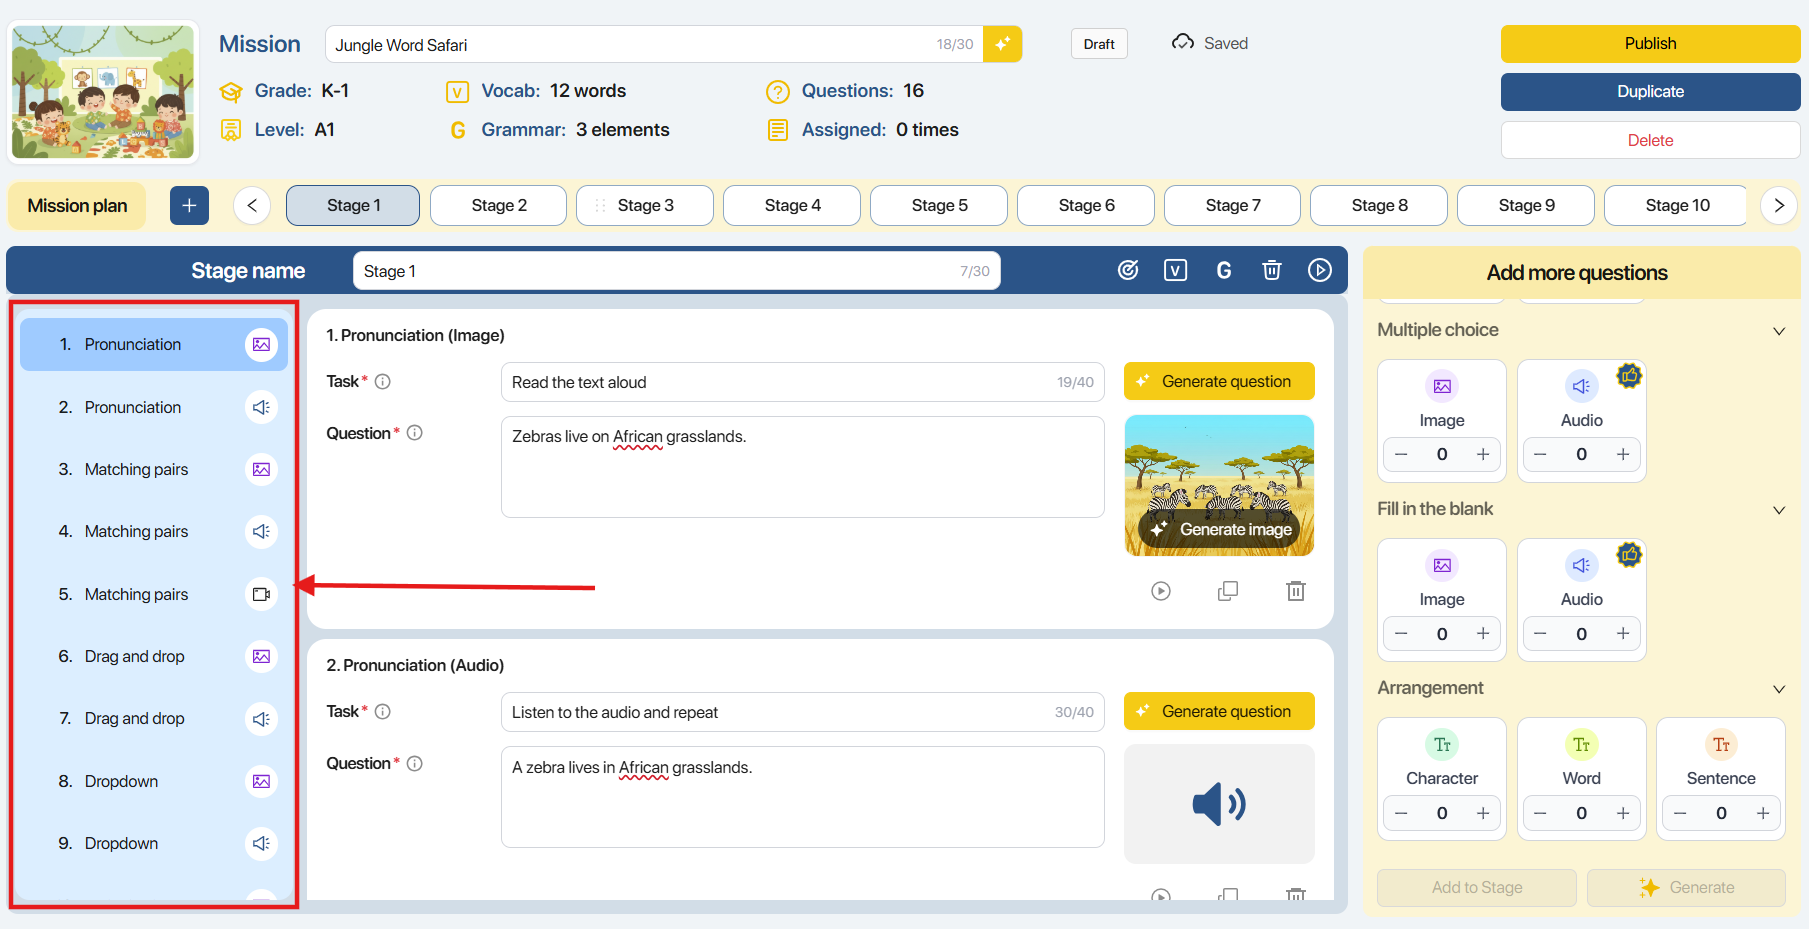
4.3. CREATE A STAGE
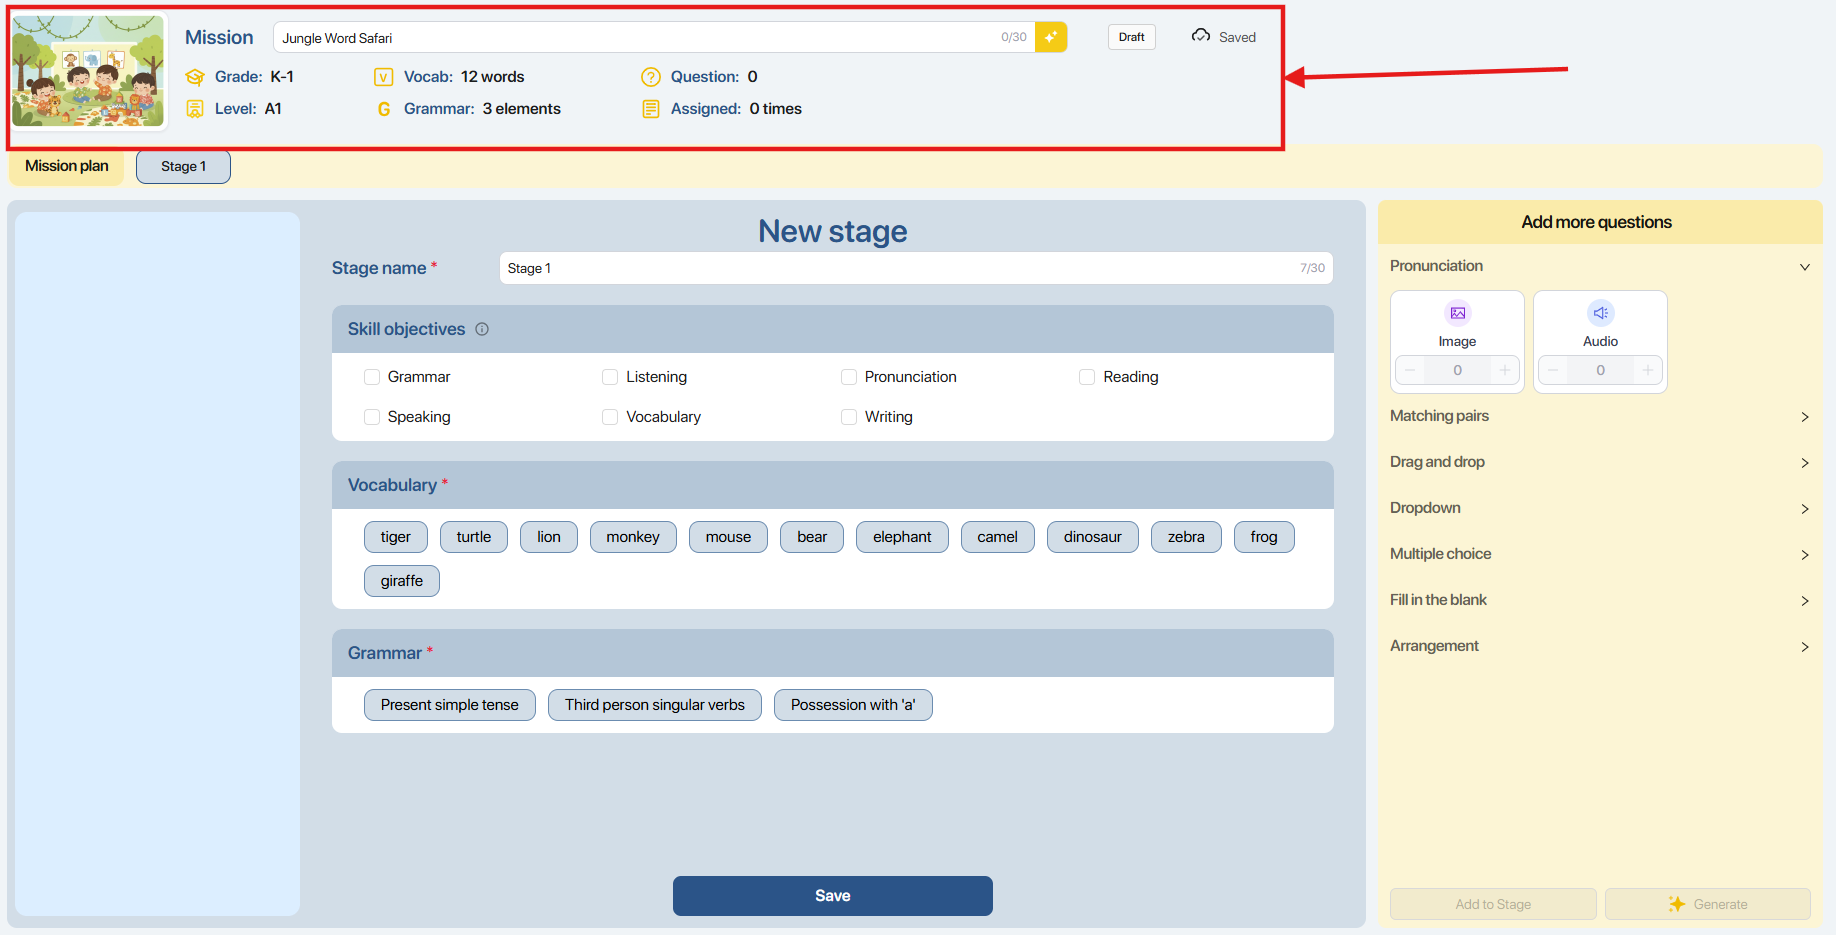
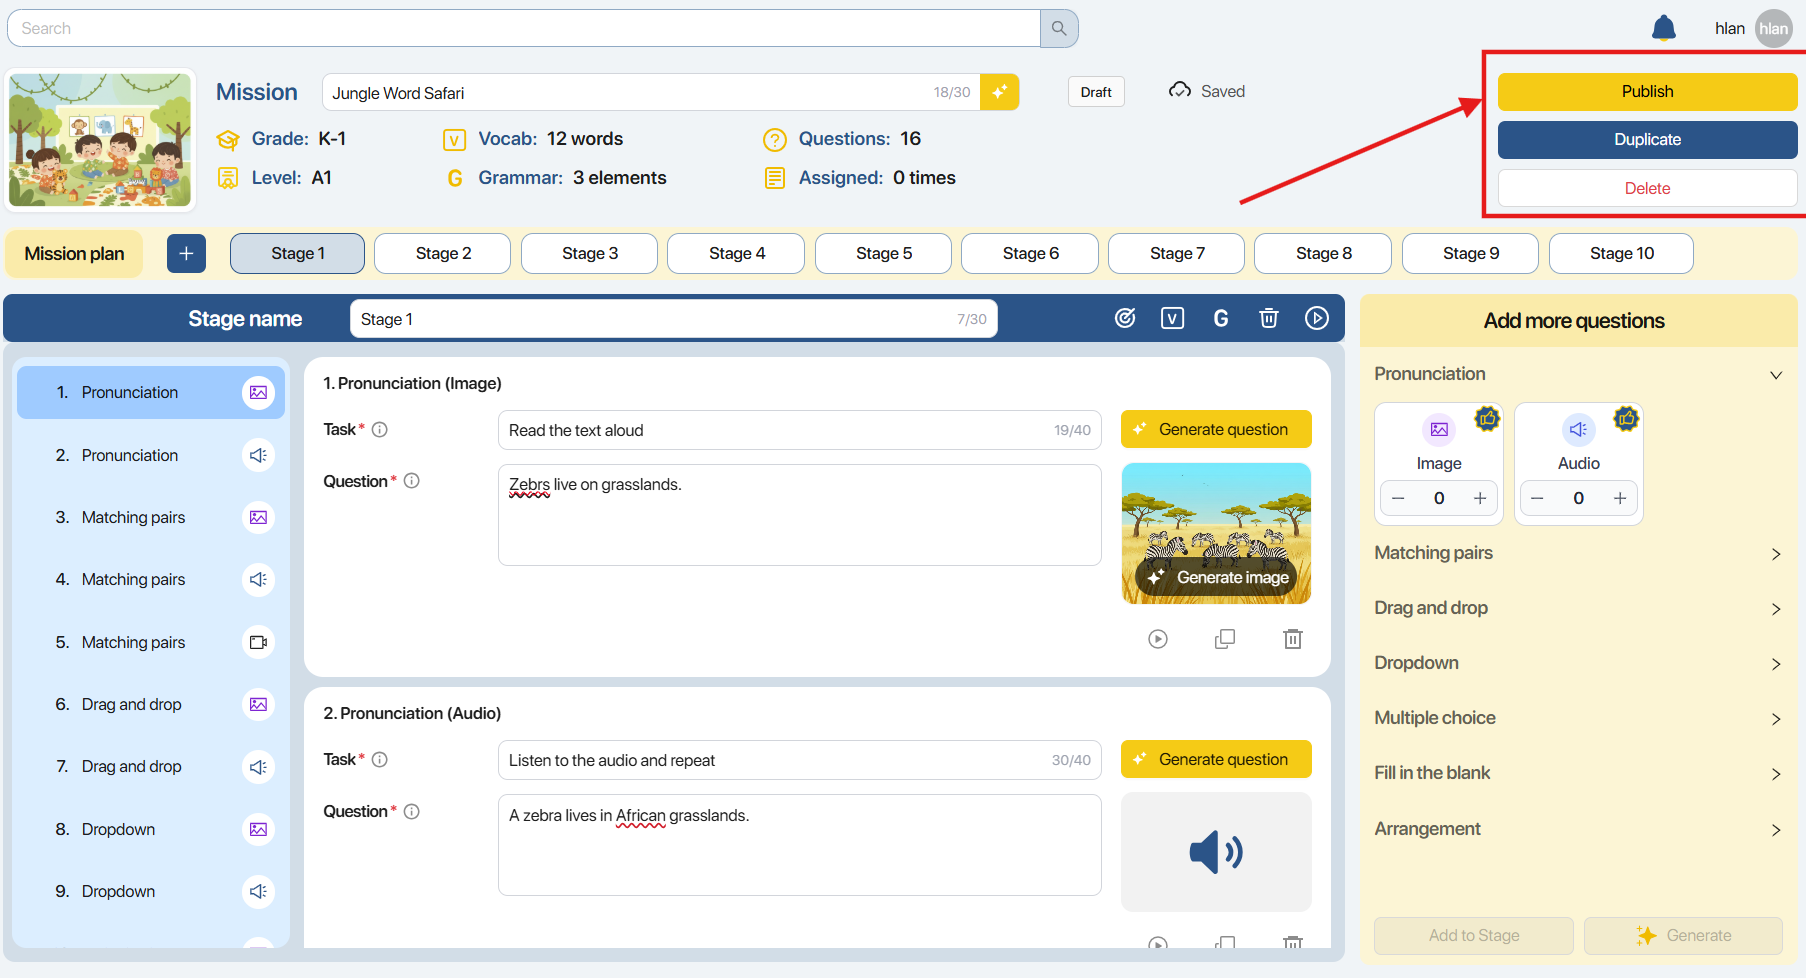
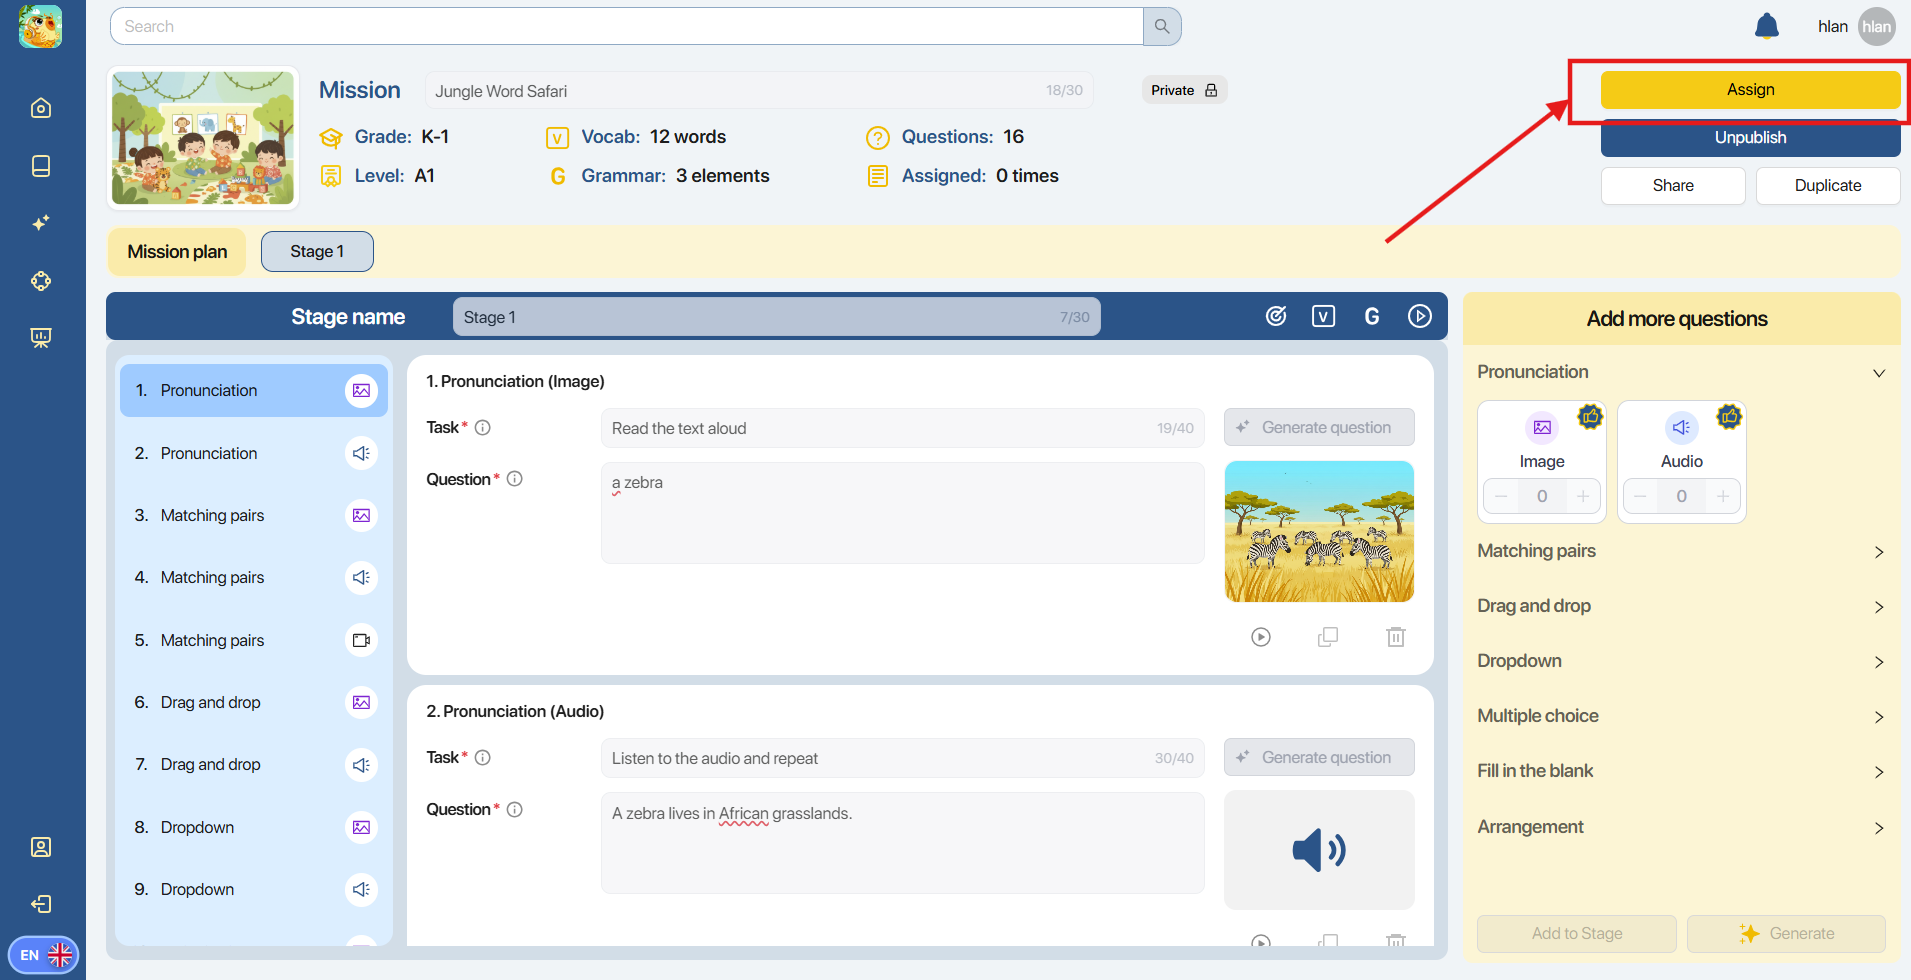
Step 1: In the display of Stage creation, users can view Mission information in the upper left corner of the screen, including:
| No. | Icon | Description/Instruction |
|---|---|---|
| 1 |  | Thumbnail (Illustration image)After creating a Mission, the AI system will automatically generate a Thumbnail. Note: Users can further customize thumbnails as follows: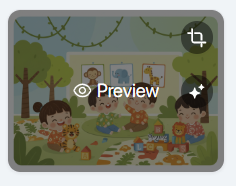 To see a preview, click on the To see a preview, click on the |
| 2 |  | Mission name (Make a name for a Mission)Note: Users can further customize Mission as follows:.- Enter manually to change Mission’s name. Or click on the  icon to have AI generate a new name Mission names are limited to 30 characters to fit the screen on the Cheppy app. icon to have AI generate a new name Mission names are limited to 30 characters to fit the screen on the Cheppy app. |
| 3 |  | Grade (Grade level) |
| 4 |  | Level (Learner level) |
| 5 |  | Vocab (Topic vocabulary list)Users navigate their mouse over the Vocabulary area to view the list of vocabulary words for the Mission. 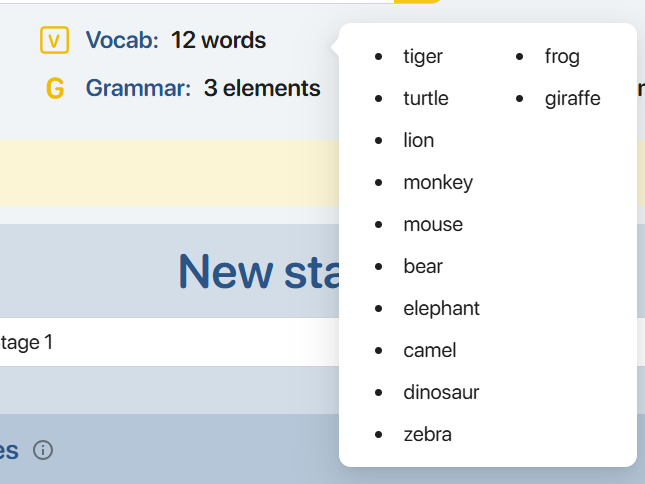 |
| 6 |  | Grammar (Main Grammar)Users navigate their mouse over the Grammar area to view the list of Grammar for the Mission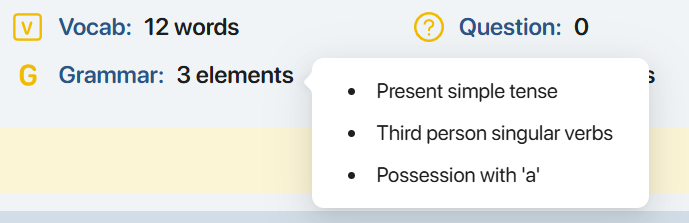 |
| 7 | Question (The number of questions) | |
| 8 |  | Assigned (Number of assignments given ) |
| 9 |  | Status (Mission status) |
| 10 | Saved (Latest changes were saved) | |
| 11 |  | Saving (Latest changes are in the process of saving) |
Step 2: In the display of Add New Stage, the user enters the information for the Stage.
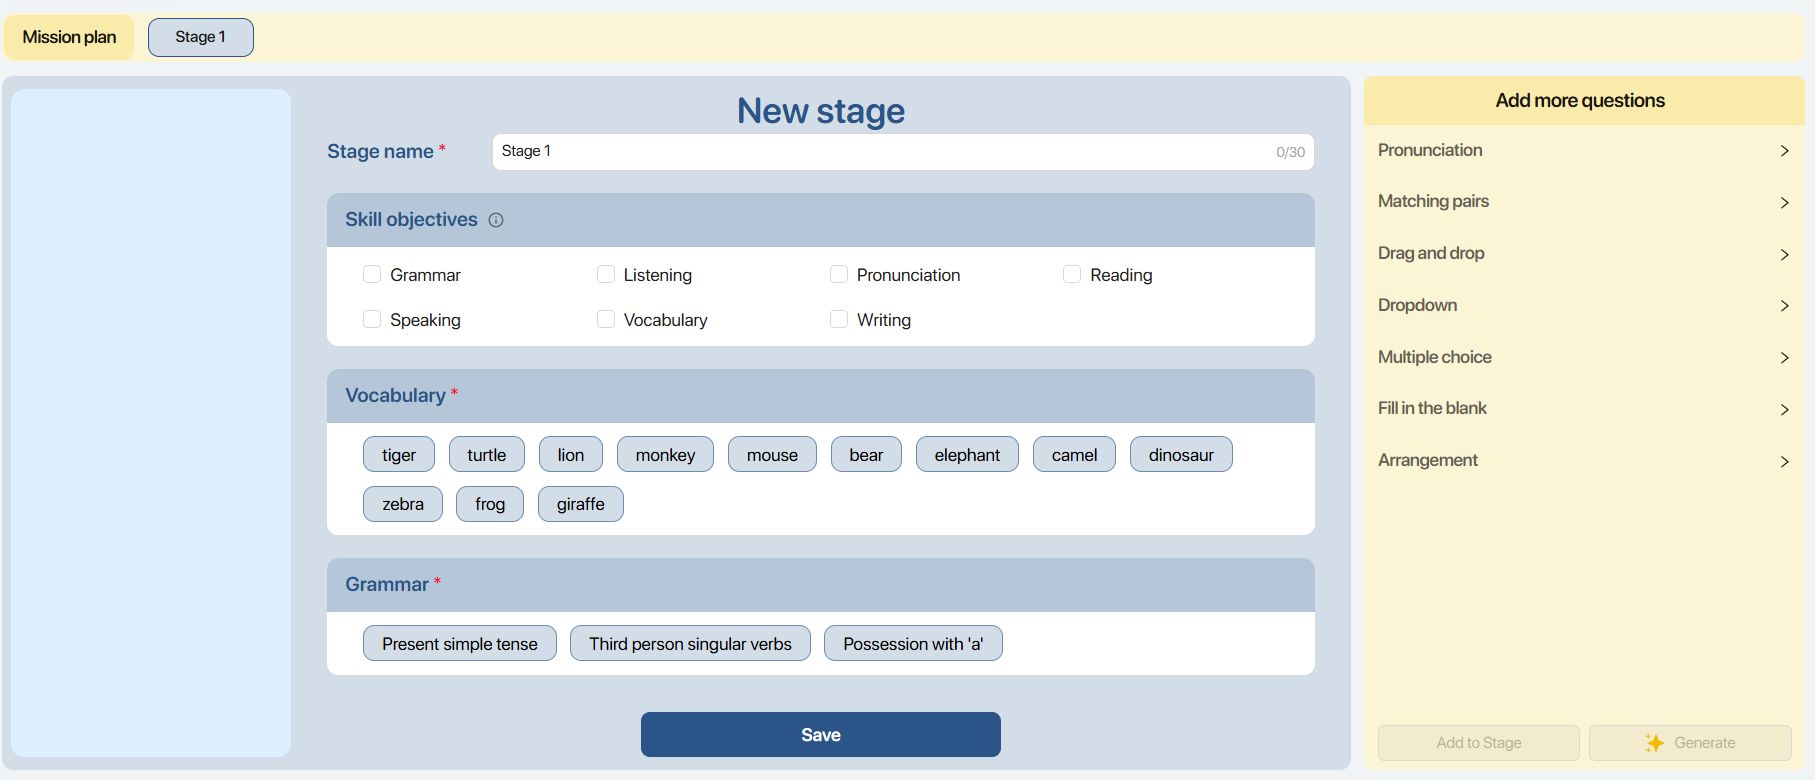
| No | Information | Description |
|---|---|---|
| 1 |  | Stage name The system automatically sets the default name of the first stage to “Stage 1”. Users can manually edit the stage’s name. The Stage name is limited to 30 characters to fit the Cheppy app’s screen. |
| 2 |  | Skill objectivesWhen users select a Stage’s skill objectives, the system will suggest appropriate exercise types for that chosen skill.Selecting skill objectives is not mandatory. |
 | Vocabulary Clicking on a vocabulary word will deselect it from the Stage’s list. : Deselected : Deselected  : Selected : Selected | |
| 3 |  | GrammarClicking on a grammar topic will deselect it from the Stage’s list. |
Bước 3: Click on  to confirm Stage information.
Note: On the stage list bar, users interact as follows.
- To add new Stage for the Mission, click on


- In case there are multiple Stages, click the left/right arrow button to view and interact with the Stages.

4.4. CREATE QUESTIONS
Step 1: After creating a new Stage, click the corresponding icons to view detailed Stage information.
![]()
| No. | Icon | Information |
|---|---|---|
| 1 |  | Skill objectivesUsers can select additional target skills for the Stage. 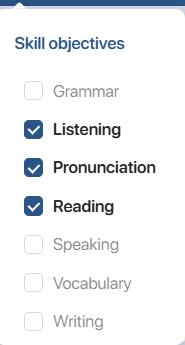 |
| 2 |  | Preview Stage Users can answer the generated questions and click the navigation buttons to move to the previous or next question. 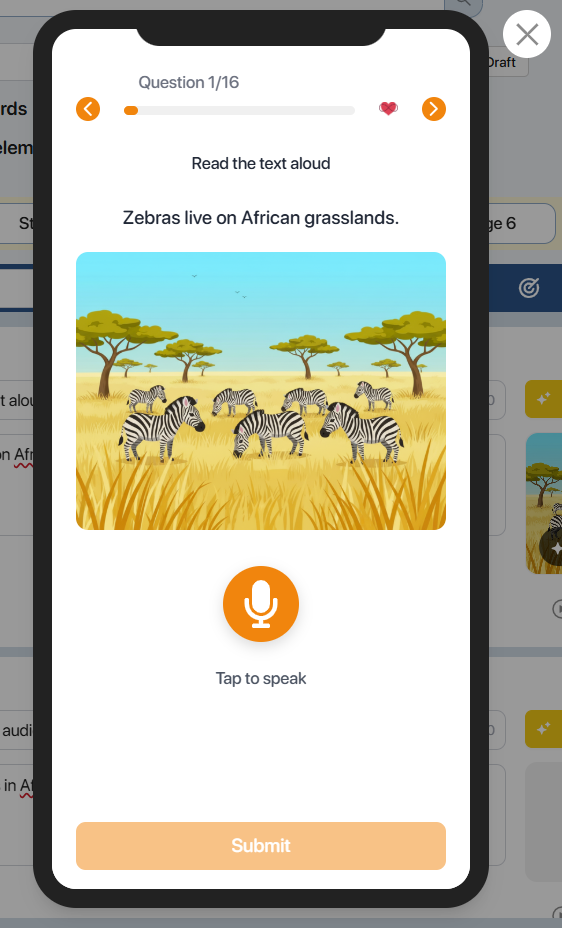 |
| 3 |  | Vocabulary 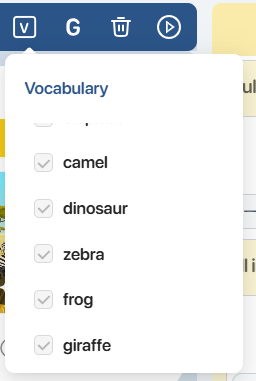 |
| 4 |  | Grammar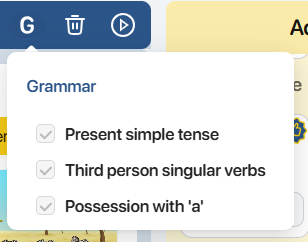 |
| 5 |  | Delete Stage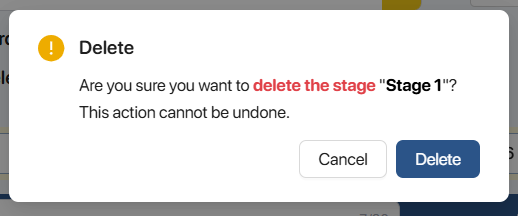 Click the icon Click the icon  to confirm deleting the Stage, or click to confirm deleting the Stage, or click |
Step 2: In the Add More Questions panel on the right side of the screen, users can configure the following information:
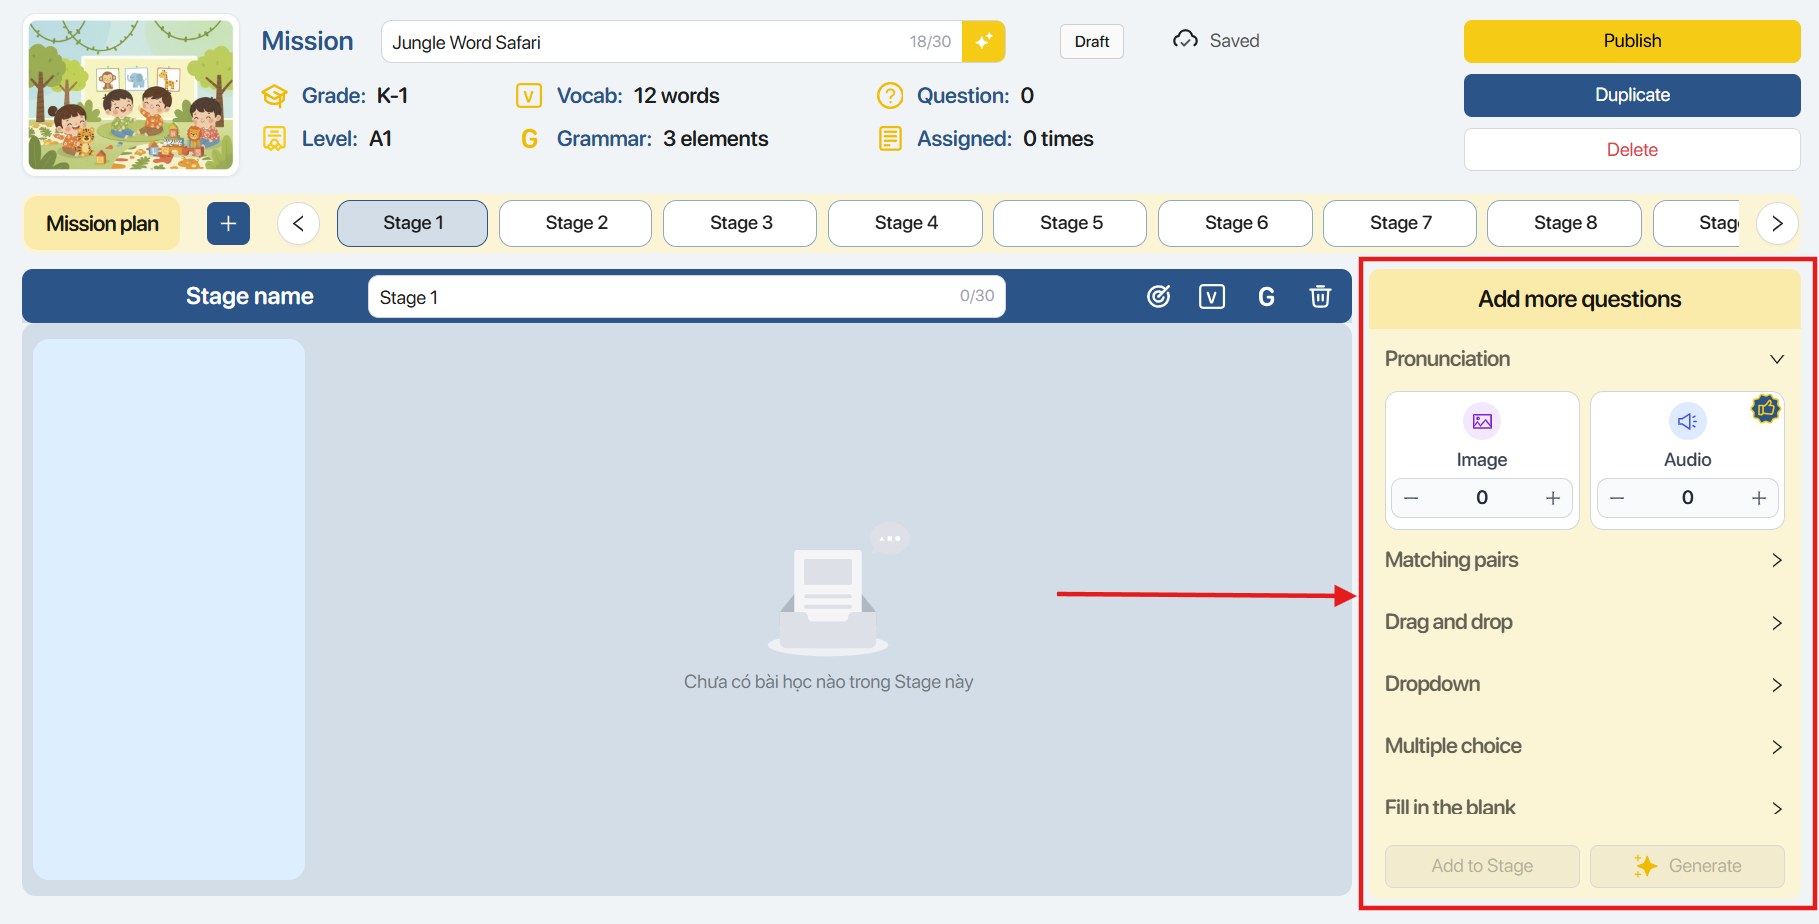
| No. | Information | Description |
|---|---|---|
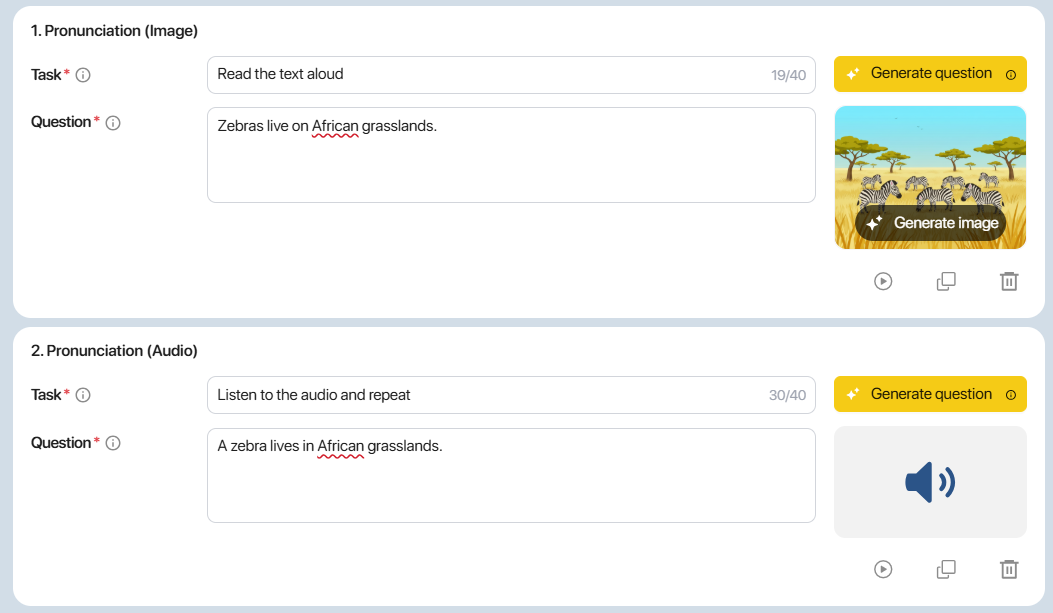
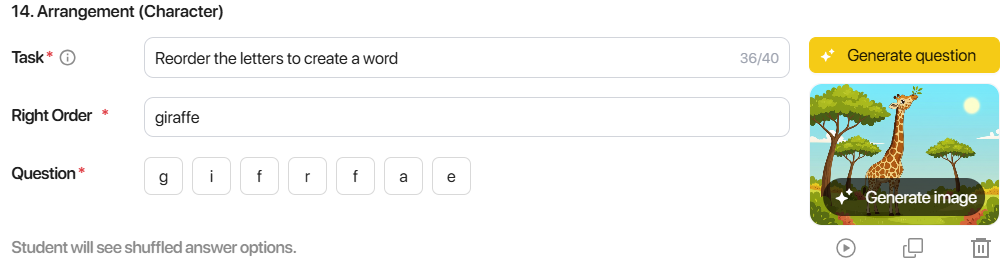
| 1 | 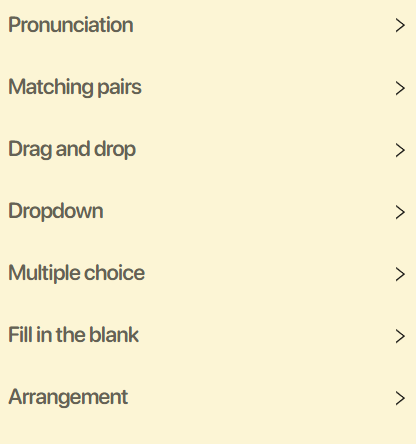 | Pronunciation: Pronunciation exercises graded by AI.Matching Pair: Exercises that require learners to match corresponding pairs. Drag and Drop: Exercises that require learners to drag and drop the correct answers into the blanks.Dropdown: Exercises that require learners to select an answer from a dropdown list. Multiple Choice: Multiple-choice exercises. Fill the Blank: Exercises that require learners to fill in the blanks with the correct answers. Arrangement: Exercises that require learners to arrange the given answers into the correct positions. |
| 2 | 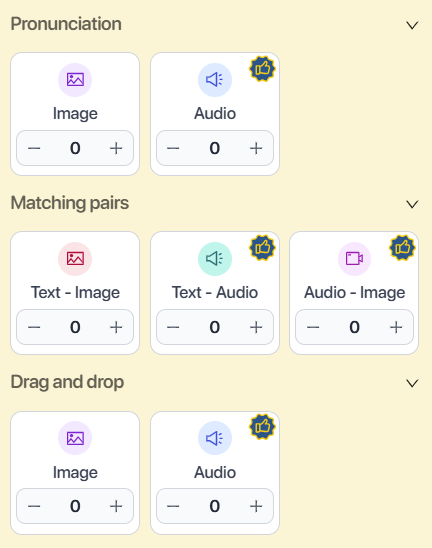 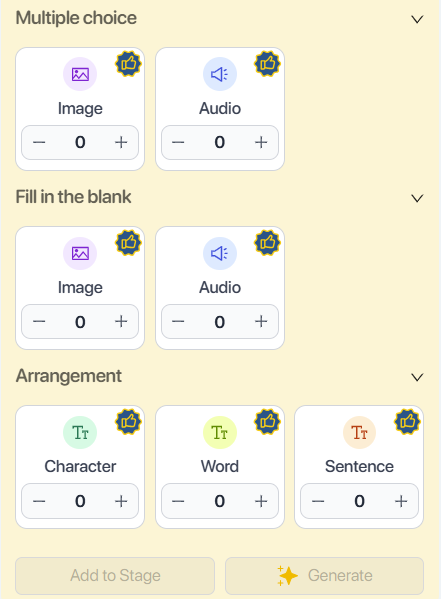 | Image Type |
| 3 | Click | |
| 4 |  | The system suggests suitable exercise types for the Mission based on the selected Skill Objectives, Grade Level, and Proficiency Level. |
| 5 |  | Add the selected number of questions to the Stage. 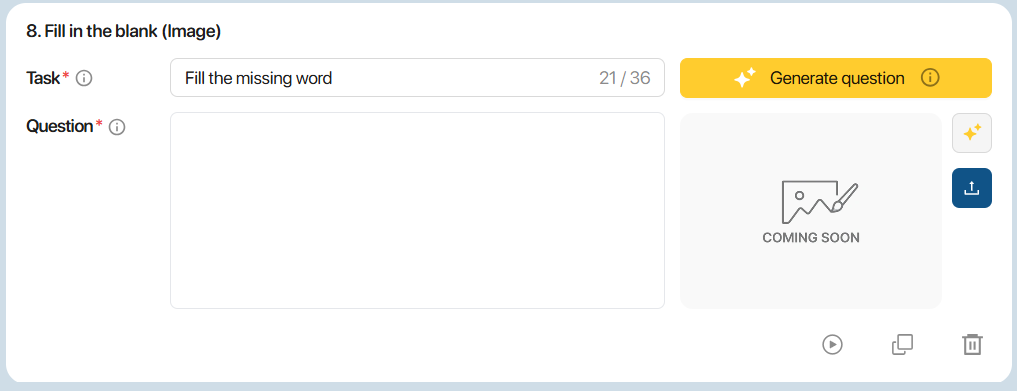 |
| 6 |  | Add the selected number of questions, along with AI-generated content and corresponding images or audio, to the Stage. 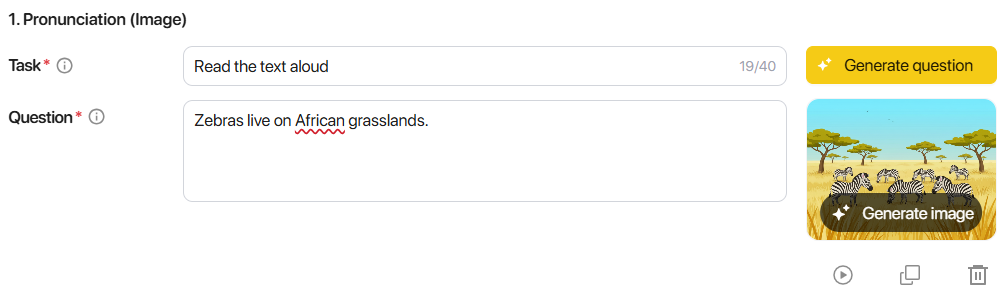 |
Step 2: After questions have been added to the Stage, the question list panel on the left side of the screen allows users to quickly manage and navigate through the questions.
Note :
- Click a question to quickly navigate to its detailed content.
- Click a question marked with the icon
 to add supplementary information.
 - Drag and drop the icon
 to change the position and order of questions within the Stage.
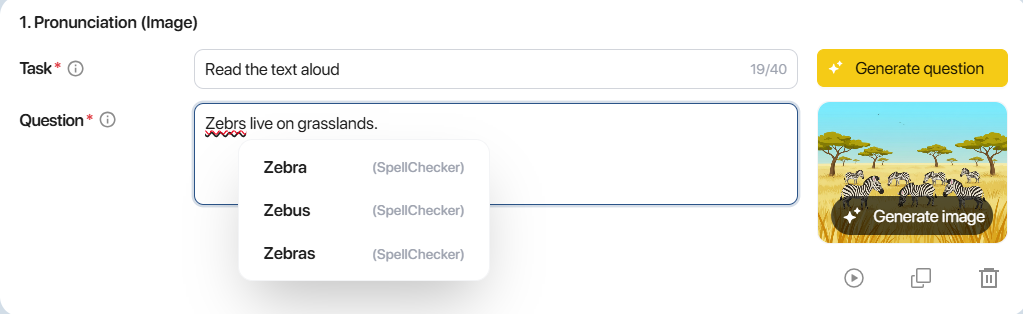
Step 3: On the question editing screen, users can modify the content, images, and audio associated with the question.
| STT | Icon | Interaction |
|---|---|---|
| 1 |  | Generate Question AI-assisted question generation that creates content, images/audio, and question materials aligned with the selected Grade, Level, Vocabulary, Grammar, Skill Objectives, and Question Types. |
| 2 |  | Task Users can enter or modify the instructions to customize the generated content. Note: The instruction text is limited to 40 characters to ensure compatibility with the Cheppy app screen. |
| 3 |  | Question Question content |
| 4 | Information Hover over the icon to view detailed information about the feature. | |
| 5 |  | Preview Question Preview the generated question as it will appear in the Cheppy app screen. |
| 6 |  | Duplicate Create a copy of the selected question. |
| 7 |  | DeleteRemove the generated question. |
All exercise types include the functions described in the summary table above. For certain exercise types, the system also provides additional features and corresponding actions.
Step 4: For the Matching Pairs exercise type, click the icon ![]() next to each pair to have the AI generate new content along with corresponding images/audio.
next to each pair to have the AI generate new content along with corresponding images/audio.

Step 5: For the Drag and Drop, Fill in the Blank, and Drop-down exercise types, highlight or double-click the word or phrase that you want to turn into a blank, then click the button. 
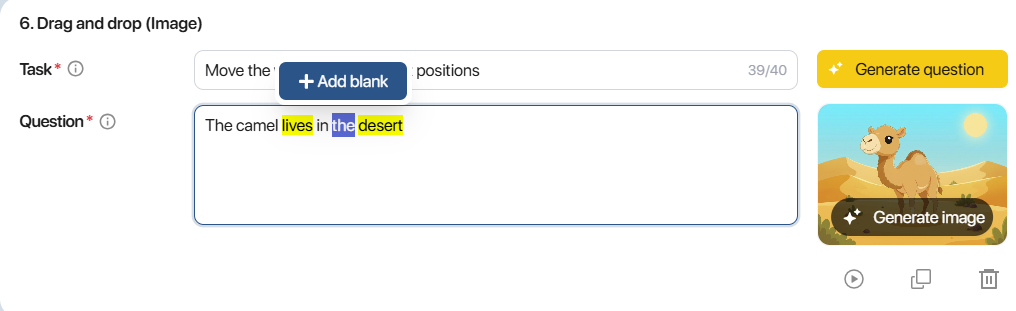
To remove a blank, highlight or double-click the word or phrase that has been turned into a blank, then click the button. 
Note : For the Drop-down exercise type, the word or phrase selected as a blank is automatically treated as the correct answer.
- Click the icon ![]() to add additional answer choices.
to add additional answer choices.

- Click the icon ![]() to remove the selected blank.
to remove the selected blank.

- Double-click on the selection cells to change their contents.

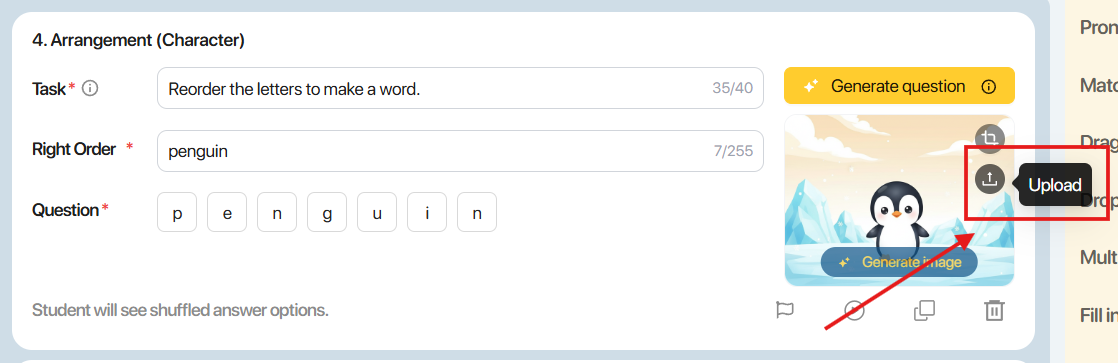
Step 6: For the Arrangement (Character) format, enter the word in the correct order into the Right order box.
For the Arrangement (Word) format, enter the phrase or sentence in the correct order into the Right order box.
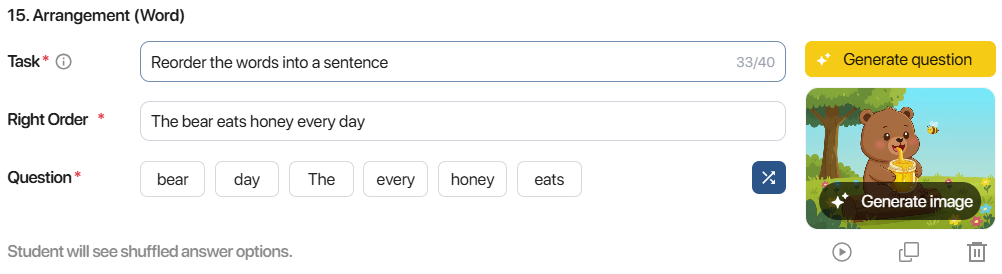
For the Arrangement (Dialogue) format, enter the sentences according to the correct order of the dialogue into the Right order box.
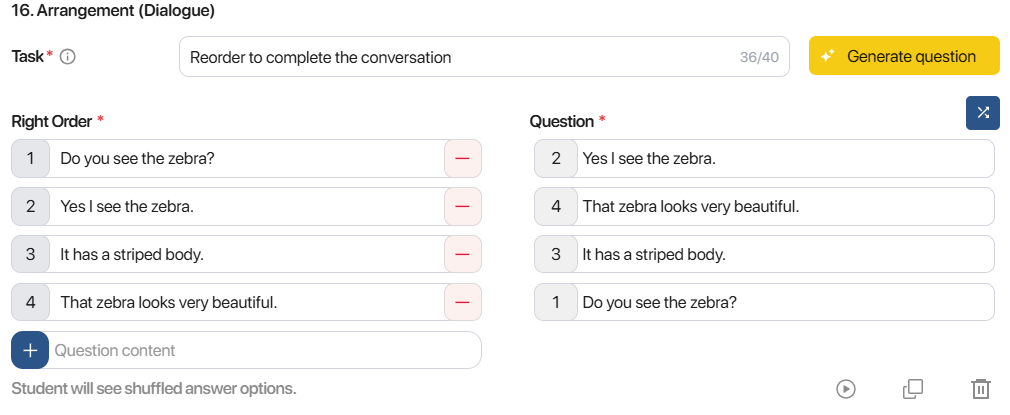
Note:
- Click on
 (add) and
  (delete) created sentences.
 - Click on
 to shuffle the order of the question content.
Step 7: For the Multiple choice format, click on ![]() to select the correct answer.
to select the correct answer.
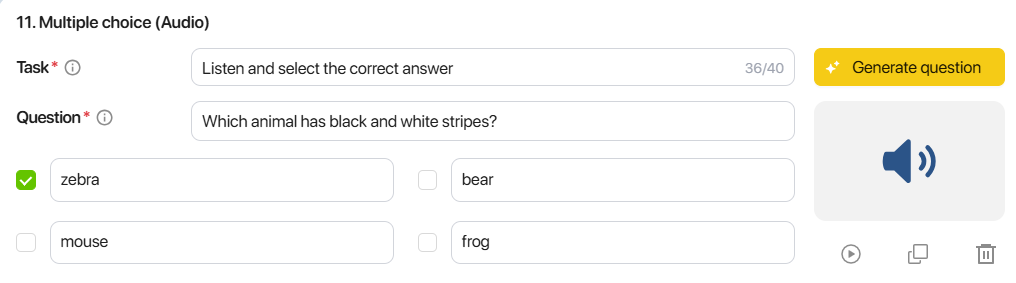
Note: At least two options need to be created.
Step 8: For the Comprehension (Multiple choice) format, enter the words in the correct order into the Right order box.
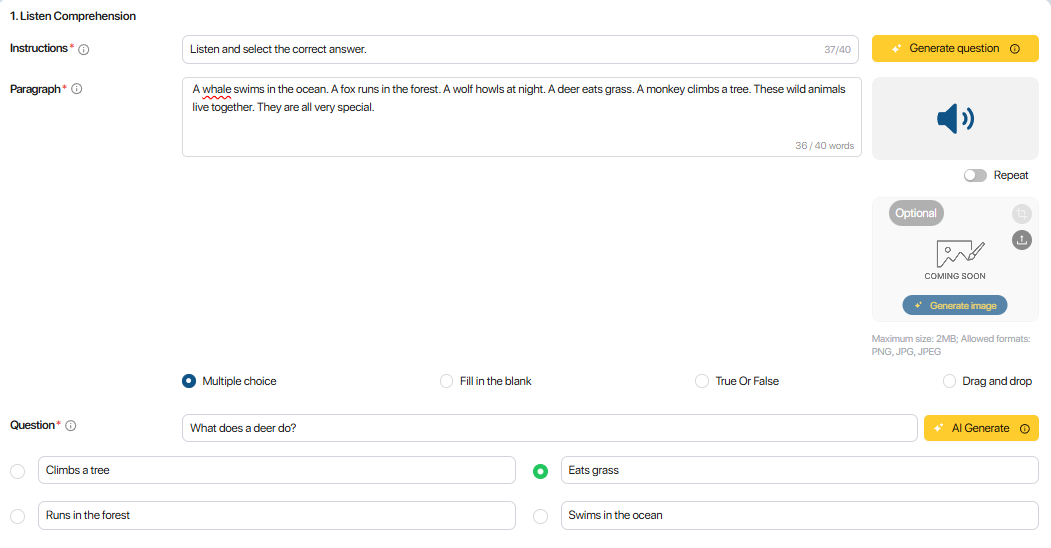
For the Comprehension (Fill in the blank, Drag and drop) format, click on ![]() to generate questions, then highlight or double-click the word or phrase where users want to create a blank and click on
to generate questions, then highlight or double-click the word or phrase where users want to create a blank and click on
 .
.
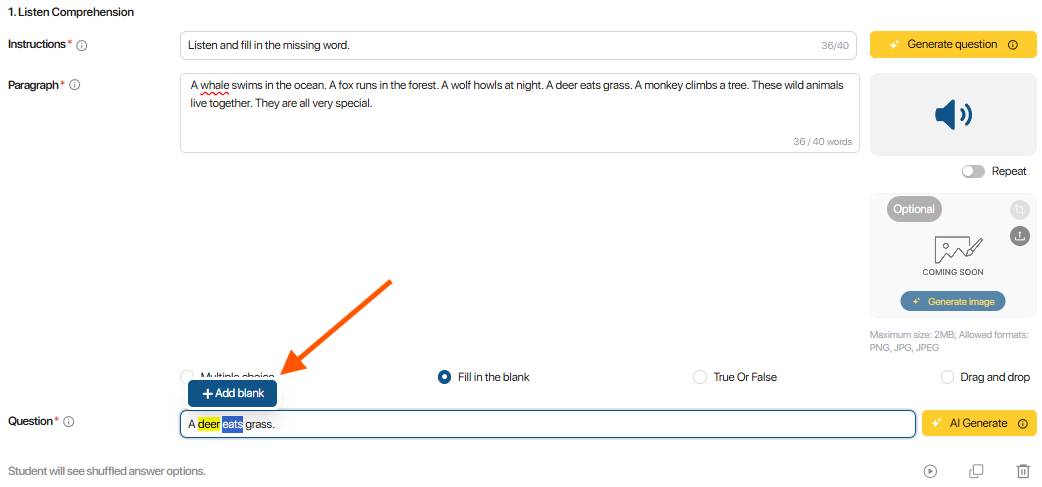
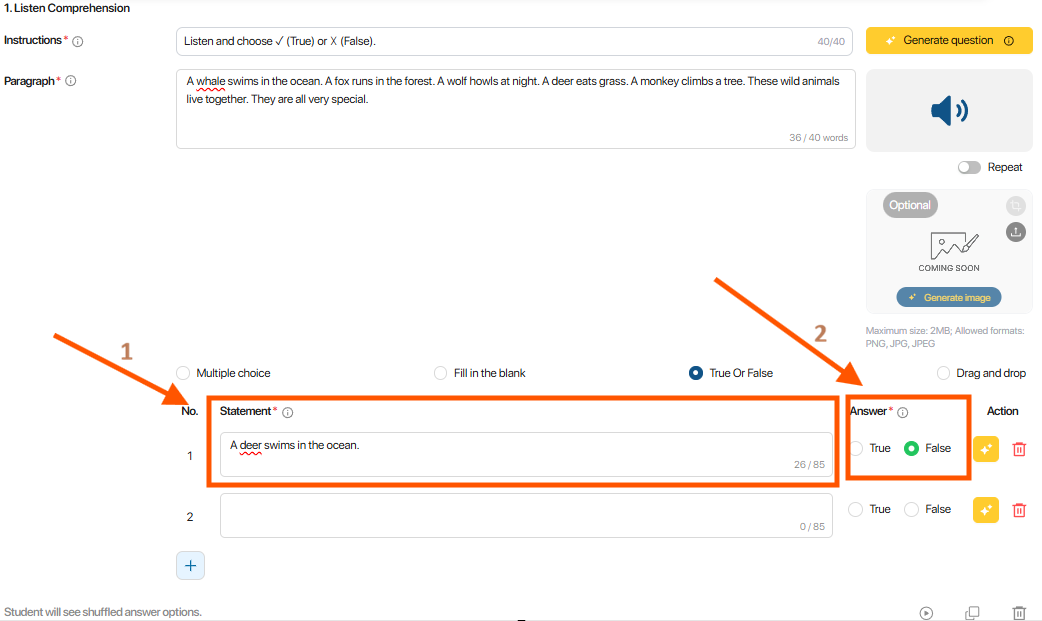
For the Comprehension (True or False) format, enter the Statement, then select True/False.
4.5. CREATE AN IMAGE
Step 1: For question types that use an Image, click the AI icon  to let the AI system generate an image appropriate to the question content.
 Note: If you want to upload your own photo, click button
 ![]()
Step 2: Click on the image to view392 in detail.
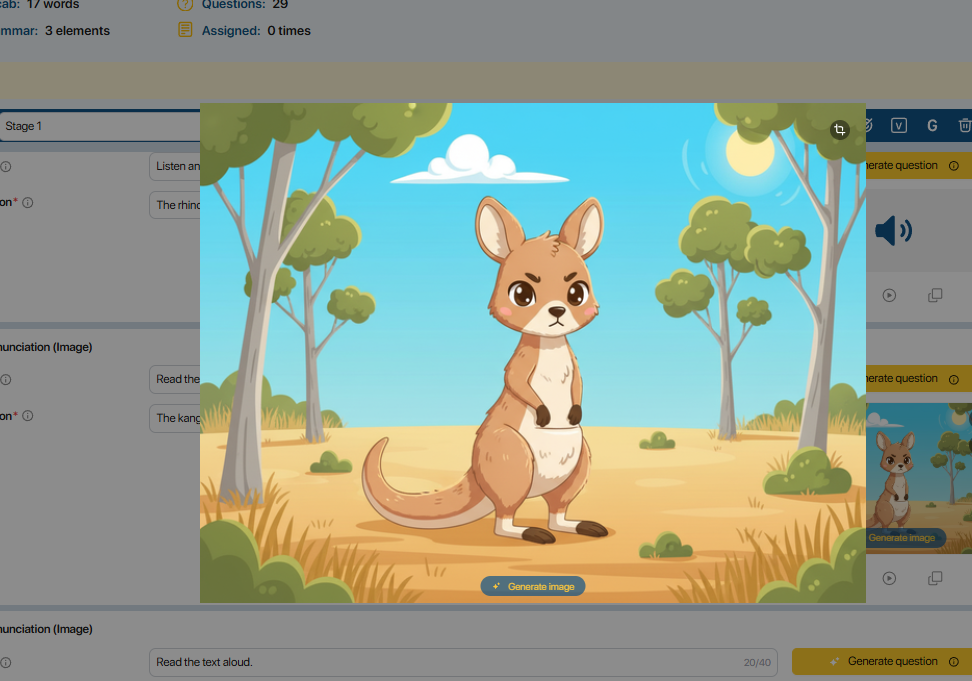
Step 3: Click the crop icon ![]() to crop the image to a suitable frame.
to crop the image to a suitable frame.
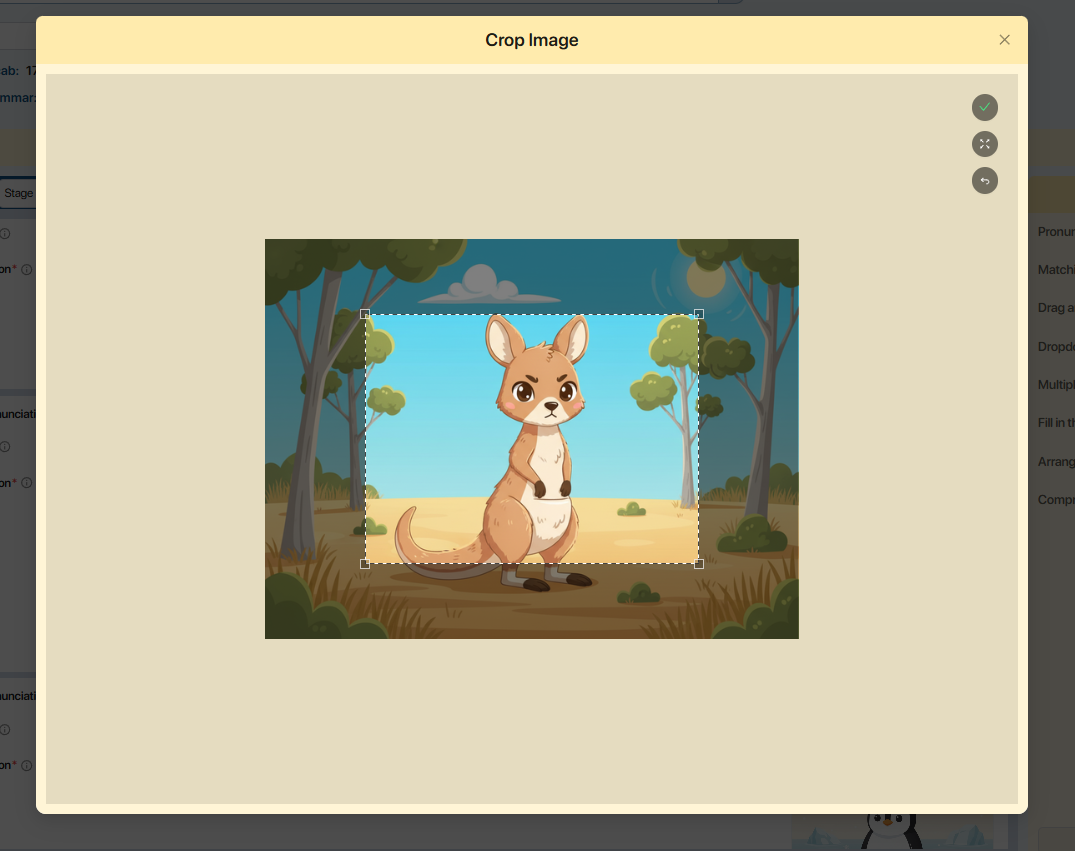
- Click Save  to keep the selected crop.
- Click Restore![]() to revert to the original image frame.
to revert to the original image frame.
- Click Cancel![]() to discard the action.
to discard the action.
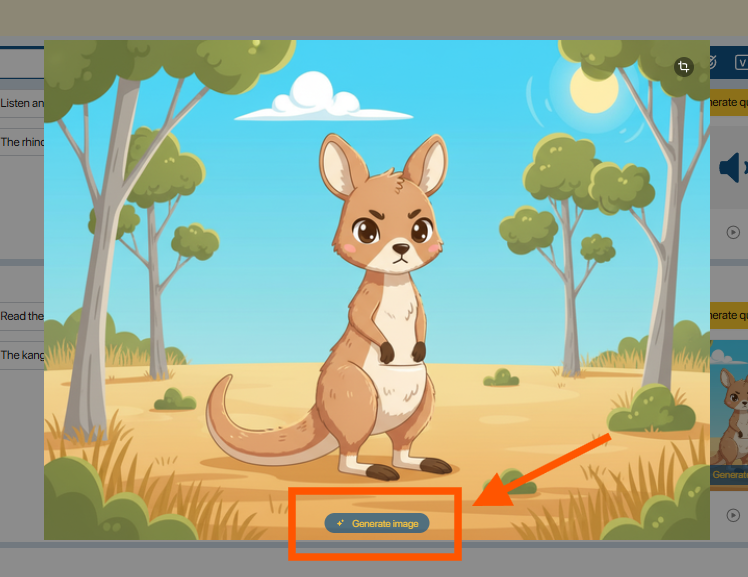
Step 4: Click the Generate Image button![]() to generate a new image from a new prompt.
to generate a new image from a new prompt.
Step 5: Edit the prompt as needed and click Generate.![]()
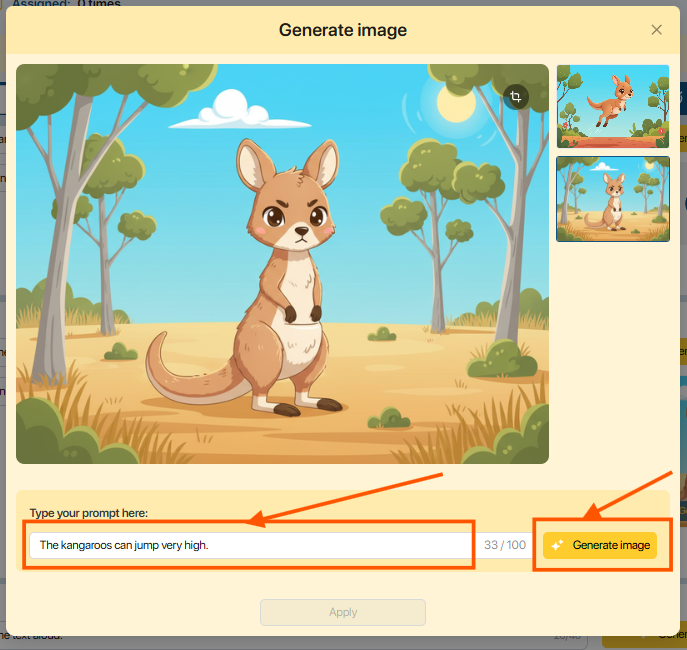
Note: Images generated from previous prompts will be saved on the right side of the current image.
Step 5: Click the button ![]() to apply the new image to the corresponding question, or click Cancel
to apply the new image to the corresponding question, or click Cancel ![]() to discard.
to discard.
4.6. CREATE AUDIO
Step 1: For question types that use Audio, click the icon ![]() to let the AI system generate an audio file appropriate to the question content.
to let the AI system generate an audio file appropriate to the question content.

Step 2: Click the Play icon to listen to the audio generated by the AI.
Note: If the question content is changed, click the icon![]() to create a new audio file.
to create a new audio file.
4.7. SPELLING AND GRAMMAR ERROR CORRECTION
Step 1: To assist users in creating exercise content, the system integrates an English spelling and grammar error detection feature. Click on any red-underlined word to view the suggested correction
- Spelling correction suggestion:
- Grammar correction suggestion:
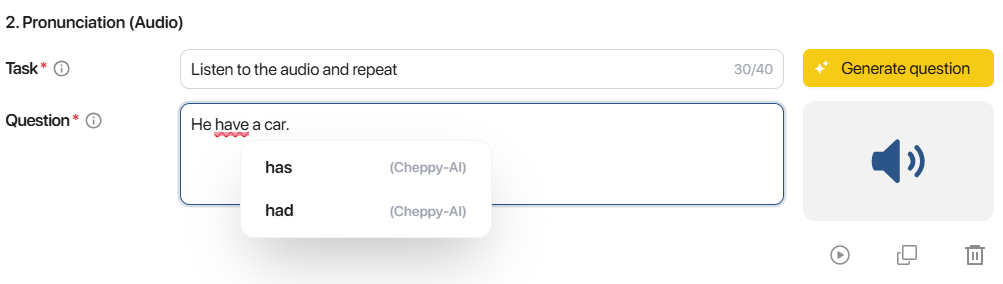
Step 2: From the list of suggested words, select the correct option. The system will automatically replace the original word with the selected one.
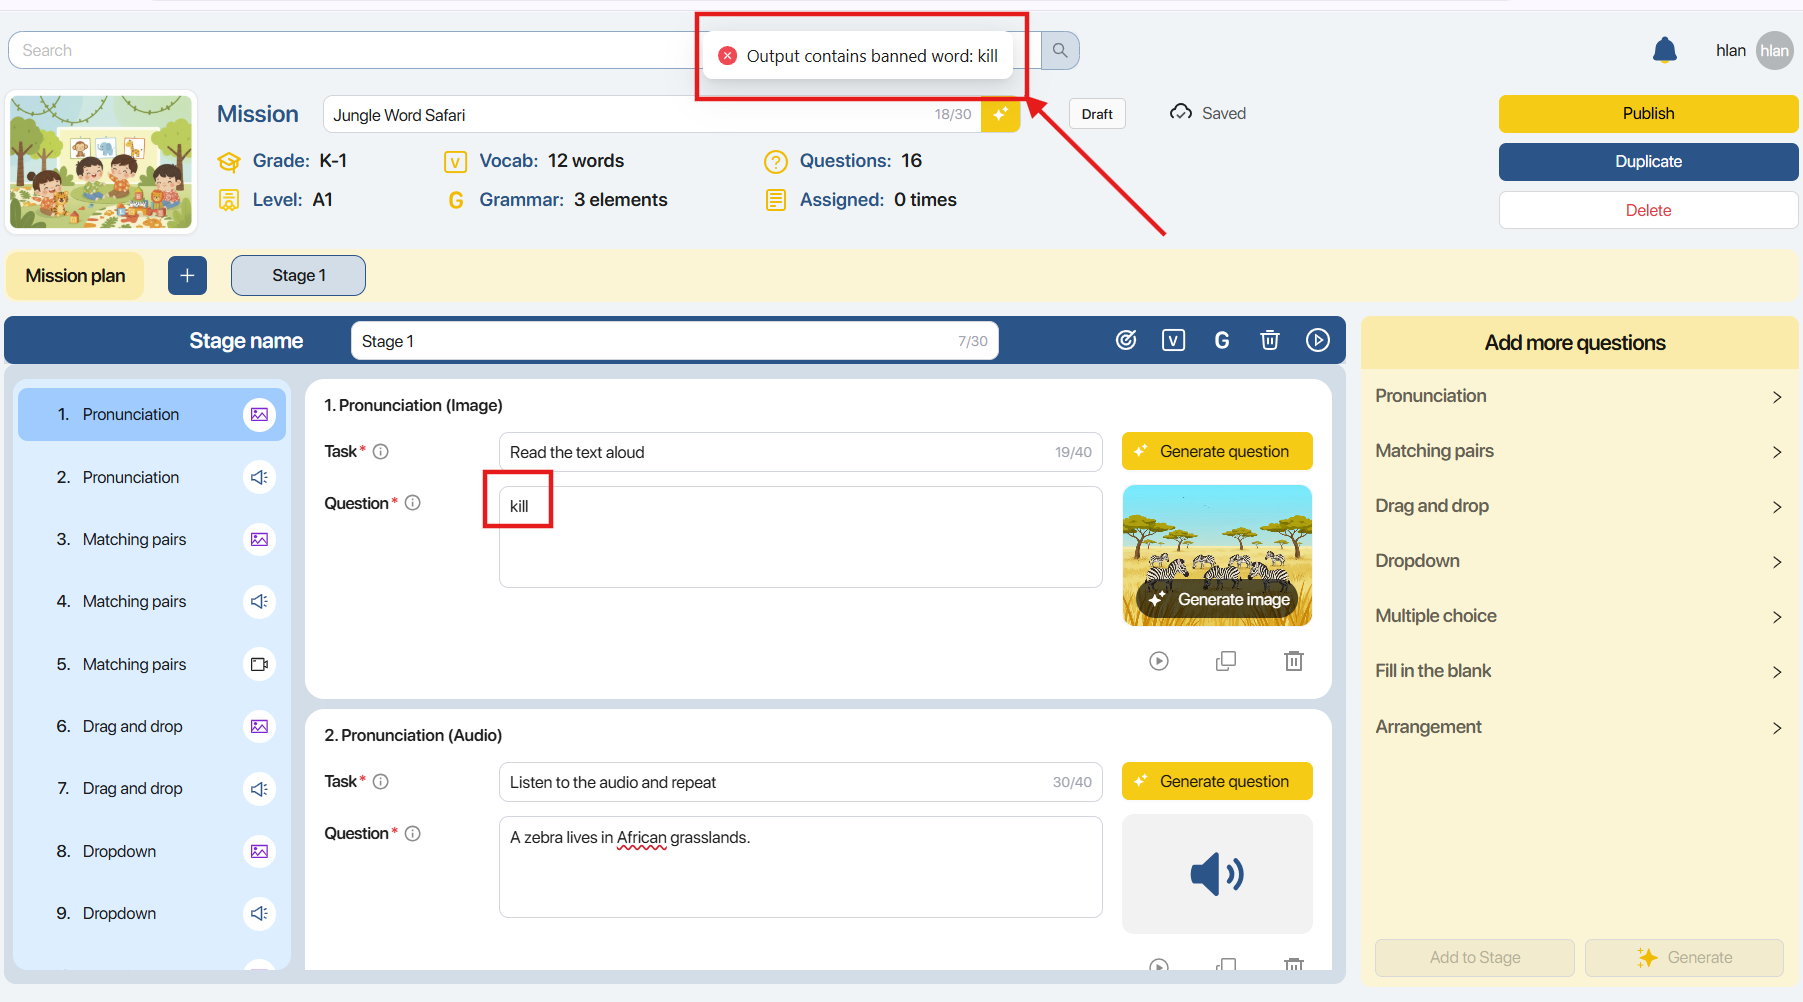
4.8. PUBLISH MISSION INSTRUCTIONS
Step 1: On the Stage creation screen, click the Publish button in the upper-right corner of the screen to publish the Mission
Step 2: Once clicked, the system will automatically review the content of all questions created within the Mission
Note: If any question is found to contain inappropriate content, please edit it before proceeding with publishing.
Step 3: On the Publish Confirmation screen, review the Mission information, including:
- Mission Name: The name of the Mission.
- Grade: The target grade level.
- Level: The proficiency level.
- Thumbnail: The cover illustration.
Step 4: Select a sharing mode for the Mission:
- Private: Only the creator can view, edit, and assign the Mission to a class.
- Share Public: The Mission is shared publicly with the community on Mission Explore. Other users can view, edit, and assign a copy of the Mission to their own classes.
- Share to Person: The Mission is shared privately with specific authorized users. Recipients receive a copy of the Mission and can view, edit, and assign it to their classes..
For Share to Person mode, enter the Username or Email of another user within the organization to share the Mission with.
Note: To ensure the security of learning materials, the administrator of the organization may configure settings to restrict the Share Public or Share to Person modes.
Step 5: Click the Continue button to change the status of the Mission. Alternatively, click Back
 to return to the Stage creation screen — the Mission will be saved in Draft status
4.9. UNPUBLISH MISSION
To edit the content of a Mission that has been Published, perform the following steps:
| No | Status | Action to revert to Draft status |
|---|---|---|
| 1 | Private & Not yet assigned  | Click the  |
| 2 | Private & Already assigned | Click the Method 1: Create a duplicate of the Mission.  Method 2: Unassign the assigned Mission. Method 2: Unassign the assigned Mission.  Detailed instructions for the Unassign action can be found in section 5.2 Detailed instructions for the Unassign action can be found in section 5.2 |
| 3 | Shared with others & Not yet assigned | Click the |
| 4 | Shared publicly & Not yet assigned | Click the |
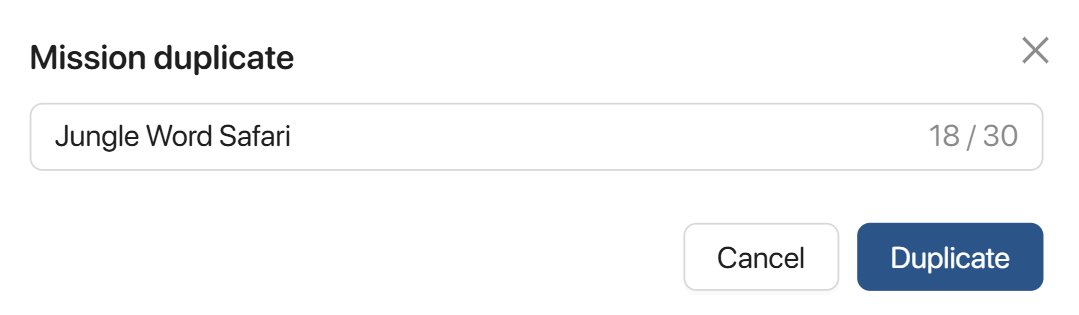
4.10. DUPLICATE MISSION
Step 1: In the Stage creation screen, click the ![]() located at the top right corner of the screen to create a copy of the Mission.
located at the top right corner of the screen to create a copy of the Mission.
Step 2: Enter the name for the new Mission copy and click the 
Alternatively, click ![]() to abort the process.
to abort the process.
5. MY LIBRARY
Step 1. On the left taskbar, the user clicks the My Library icon to switch to the My Library screen.

Step 2. In the left navigation bar of the My Library screen, the user views the Mission categories, including:
| No. | Category | Status | Description |
|---|---|---|---|
| 1 | Created by me | All | All |
| 2 | Draft | Draft | |
| 3 | Published | Private | Private |
| Public | Public | ||
| Share with others | Share with others | ||
| 4 | Shared with me | Shared with me | |
| 5 | From community | From community | |
| 6 | Trash | Deleted | |
| 7 | Tags | Favorite | Favorite |
| 8 | Add new tag | Add new tag |
Step 3. In the search bar area, the user interacts with the filters to search for Missions.

| No. | Function | Description |
|---|---|---|
| 1 | Search mission | Search for Mission name |
| 2 | Level | Select the Mission's CEFR proficiency level 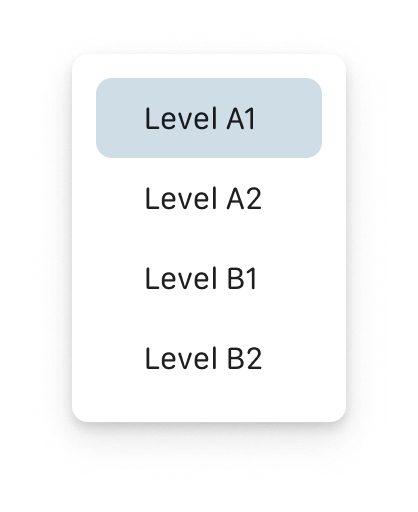 |
| 3 | Grade | Select the Mission's Grade level 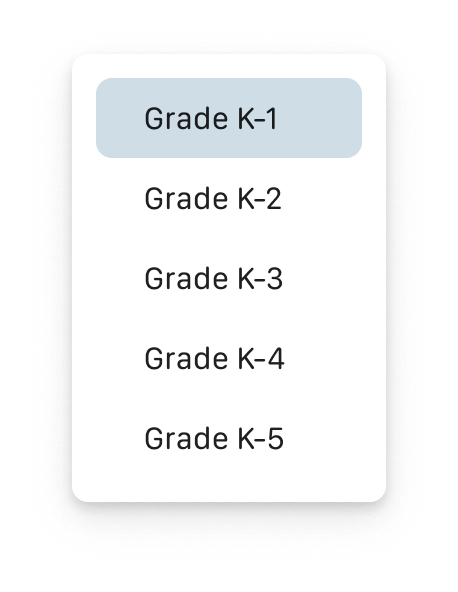 |
| 4 | Status | Select the Mission's Status  |
| 5 | Sort | Choose to sort the list by update time or by Mission name 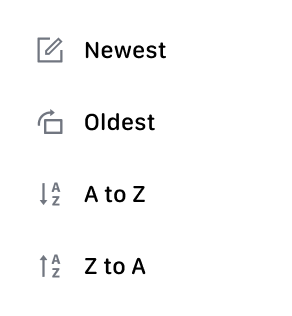 |
| 6 |  | Choose display mode by Grid view or List view |
5.1. TAG MISSIONS
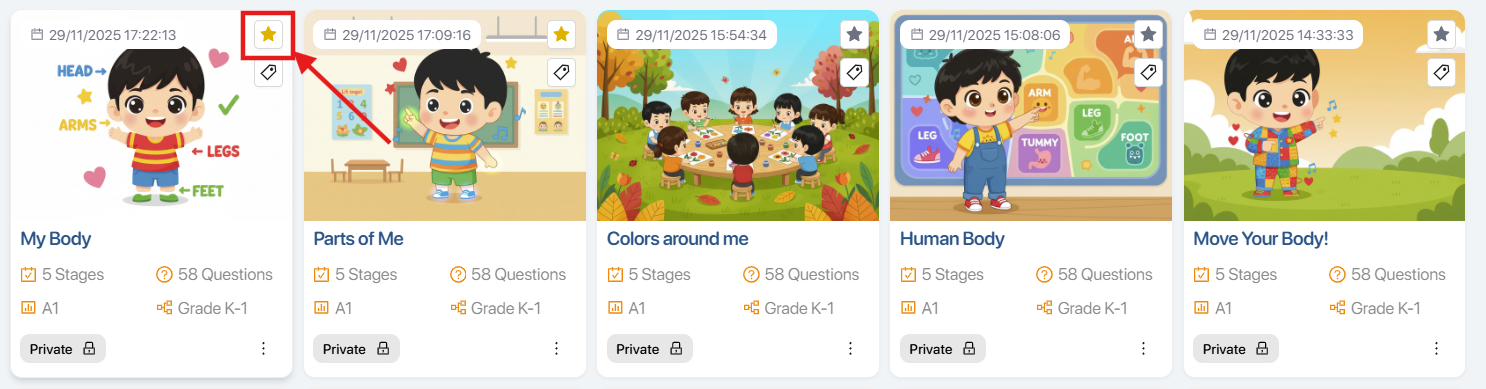
Step 1. To add Missions to Favorite, the user selects the icon  on the Mission card.
After the operation, the Missions will be added to Favorite in the Tags area.
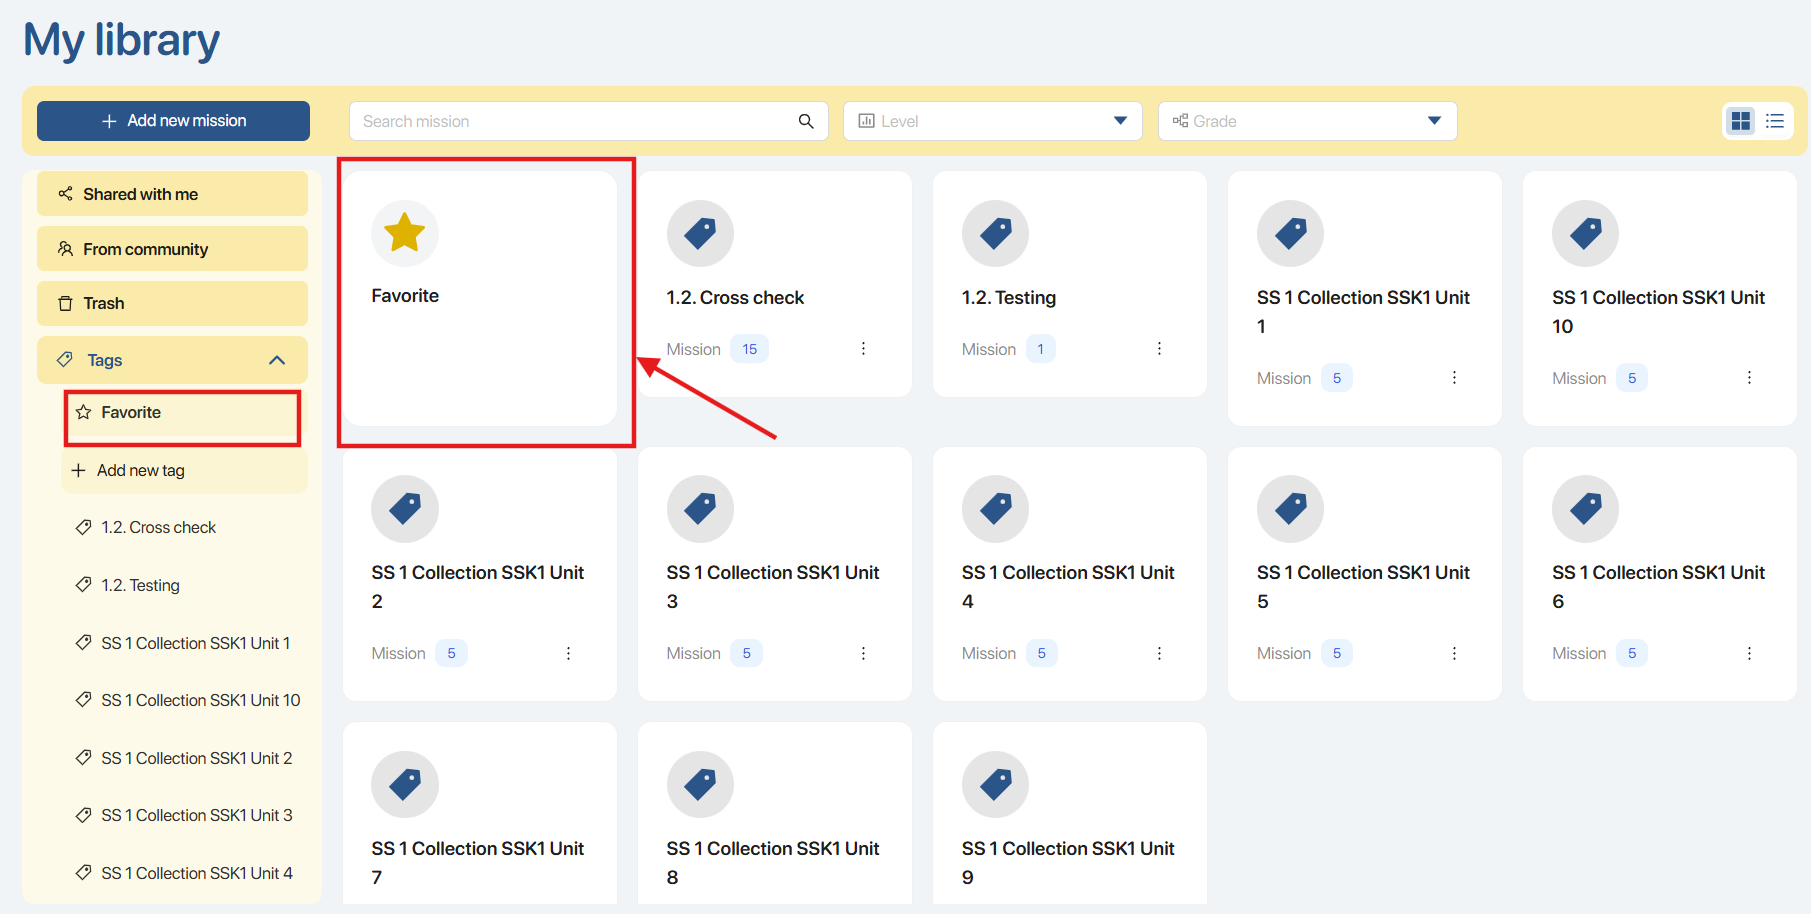
Simultaneously, the Missions will be displayed at the top of the list.
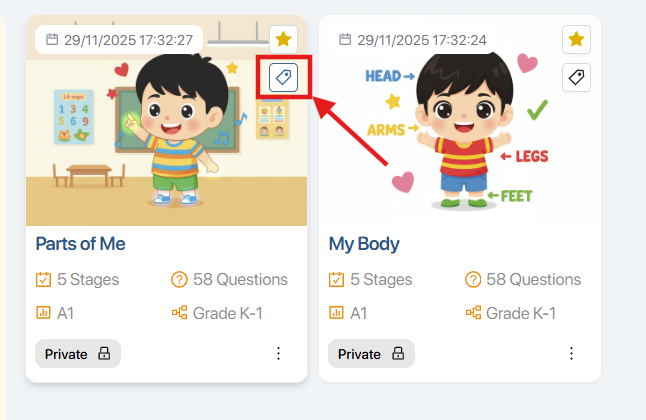
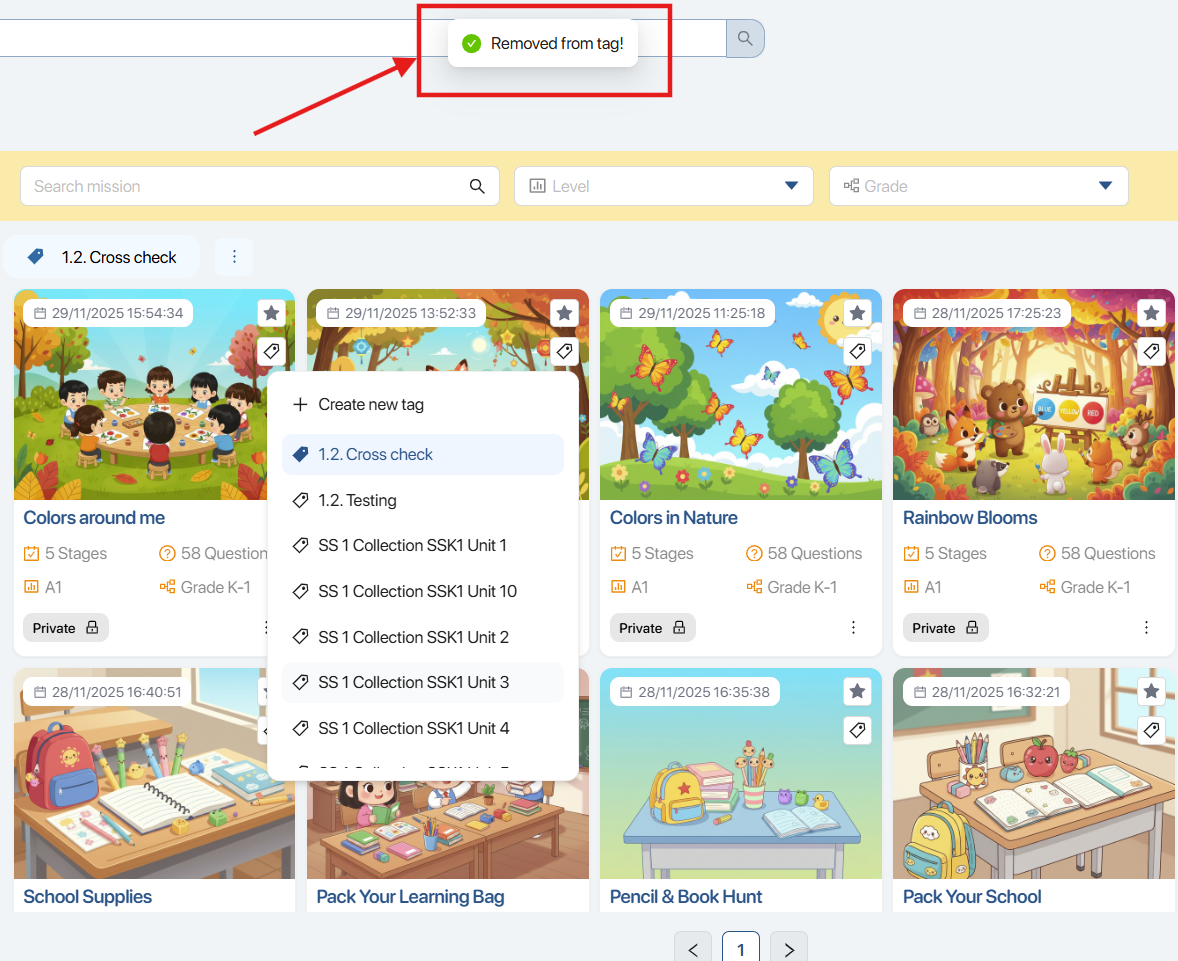
Step 2. To attach a Tag to a Mission, the user selects the icon ![]() .
.
Step 3. Click the box ![]() to add a new Tag.
to add a new Tag.
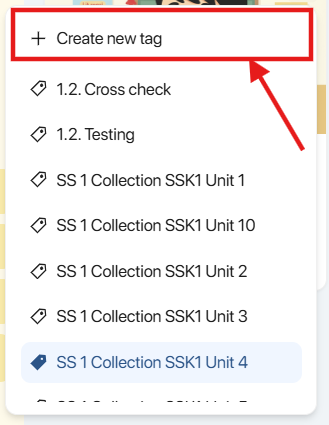
Step 4. The user fills in the name of the new Tag in the box  and clicks the icon
 ![]() or presses Enter on the keyboard to confirm creating the new tag.
or presses Enter on the keyboard to confirm creating the new tag.
Note: On the toolbar on the left side of the screen, users can perform the same action to create a new Tag by clicking the icon ![]() and entering the new Tag name.
and entering the new Tag name.

Step 5. After successfully creating the new Tag, users can view the list and select the Tag for the corresponding Mission.
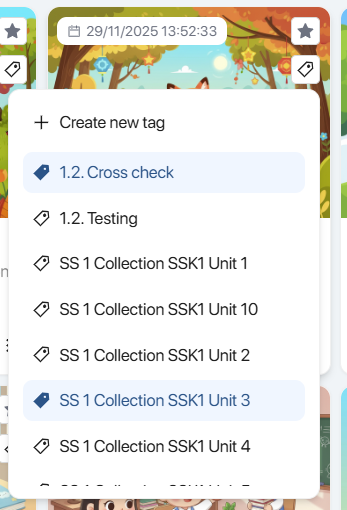
Note: A Mission can be attached to multiple Tags to help users classify and search more quickly.
To remove a Tag, users click on the attached Tag. The system will automatically update and display a success notification.
Step 6. To view created Tags, click the icon  on the toolbar on the left side of the screen.
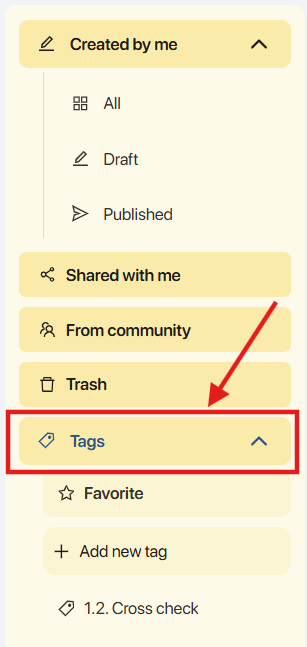
Step 7. In the Tags list screen, users can view the following information:
- Name: The name of the tag.
- Number of missions: The number of Missions attached to the tag.
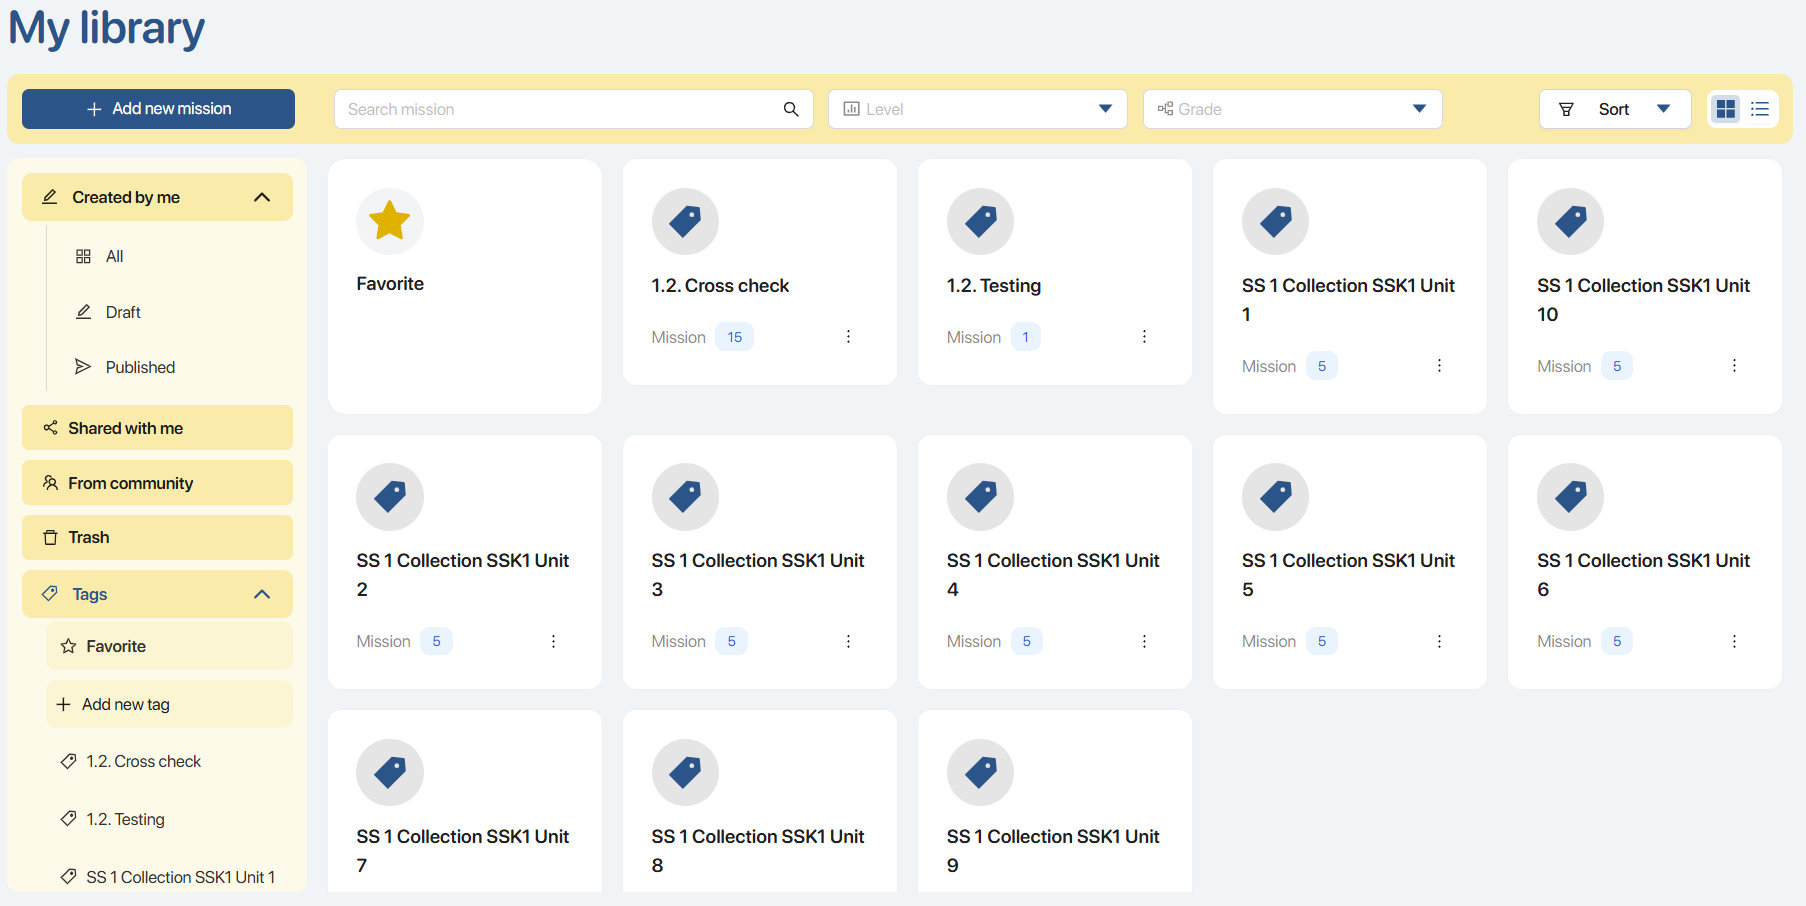
Step 8. Click the icon ![]() on the Tag to display the available operation options, including:
on the Tag to display the available operation options, including:
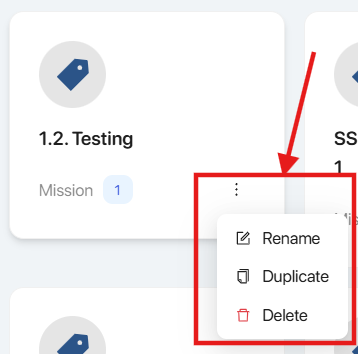
| No. | Function | Operation |
|---|---|---|
| 1 |  | Change Tag Name  After entering the Tag name, users click the icon After entering the Tag name, users click the icon |
| 2 |  | Duplicate Tag 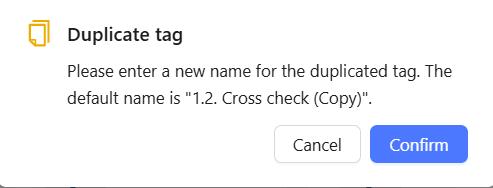 Users click the icon Users click the icon |
| 3 |  | Delete Tag 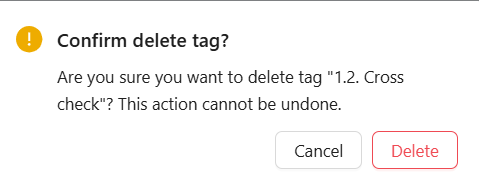 Users click the icon Users click the icon  to delete the Tag or click to delete the Tag or click |
5.2.ASSIGN MISSION
Step 1. There are three ways for users to assign a Mission to a class:
Method 1. In the Generate Mission screen, click the button 
Method 2. In the My Library screen, click the icon ![]() on the Mission card and select the option
on the Mission card and select the option 
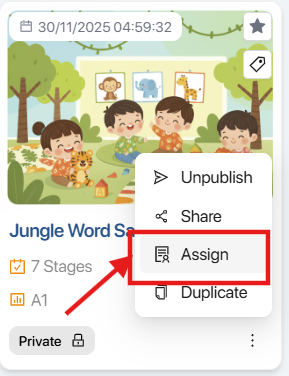
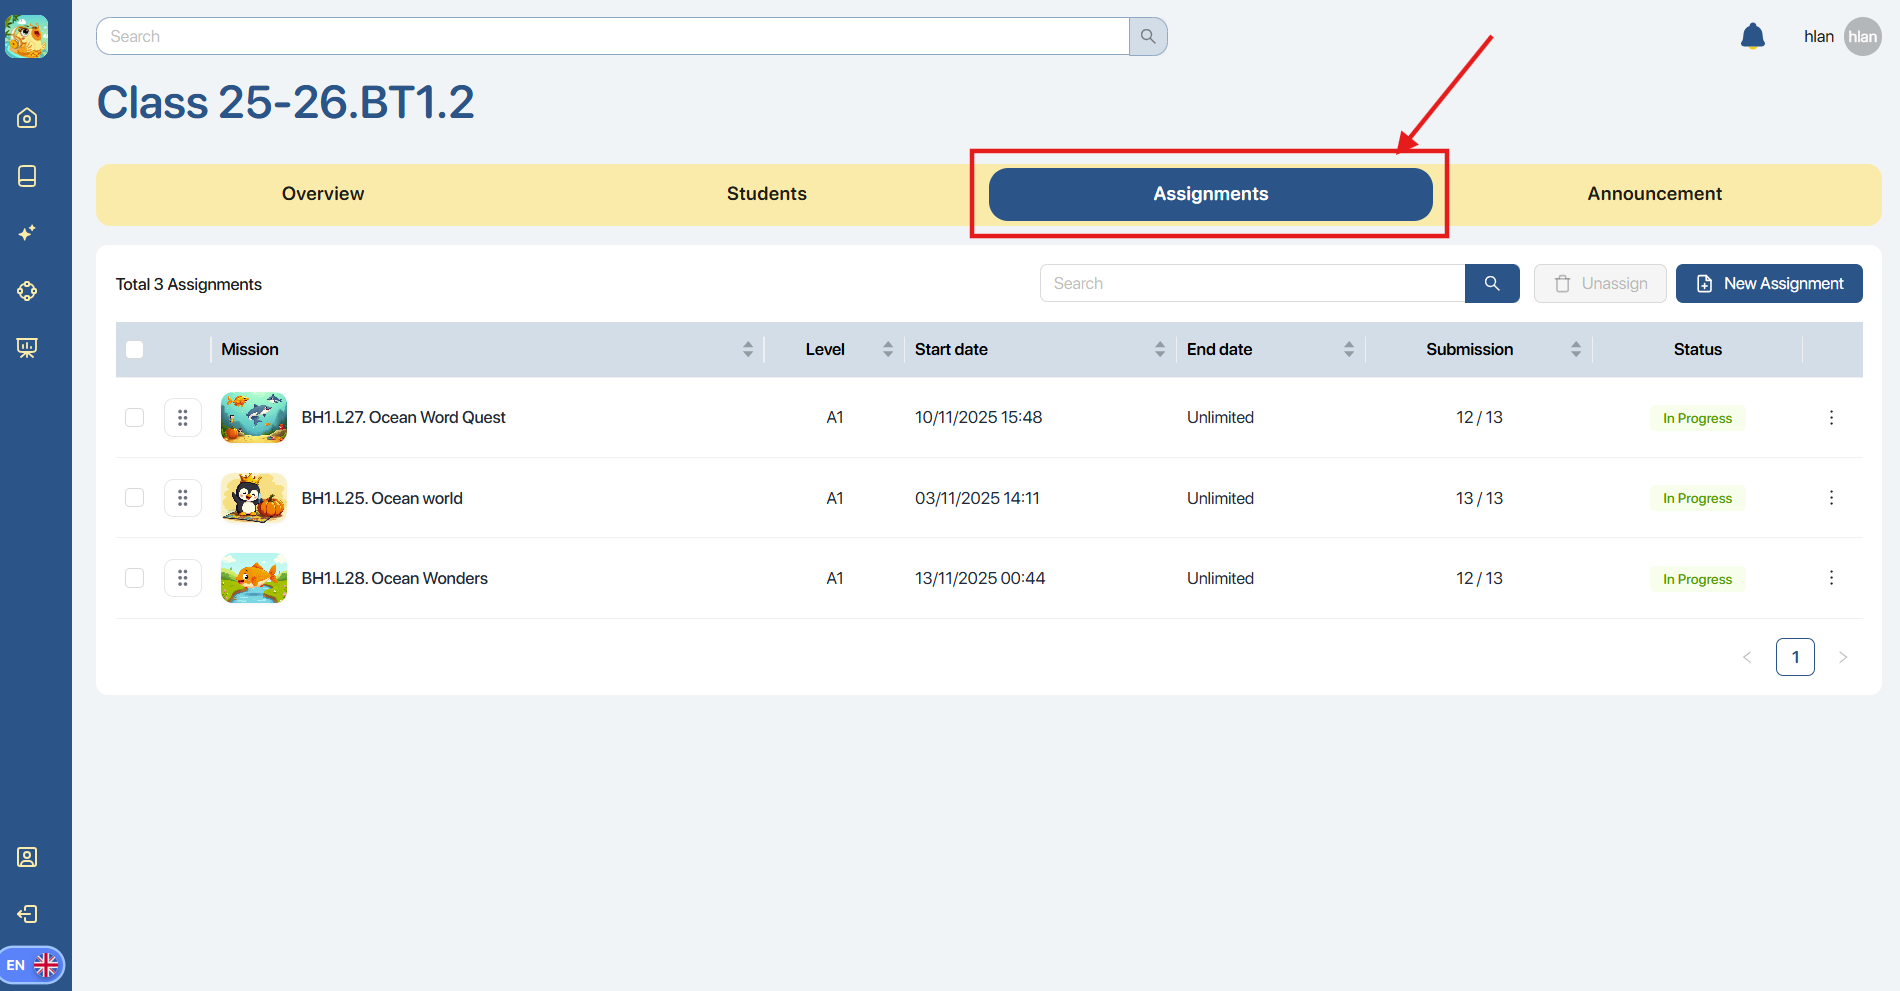
Method 3. In the Manage Class screen, select the class and click the tab 
Step 2. In the Mission assignment screen, select the Class. Then, click the button 
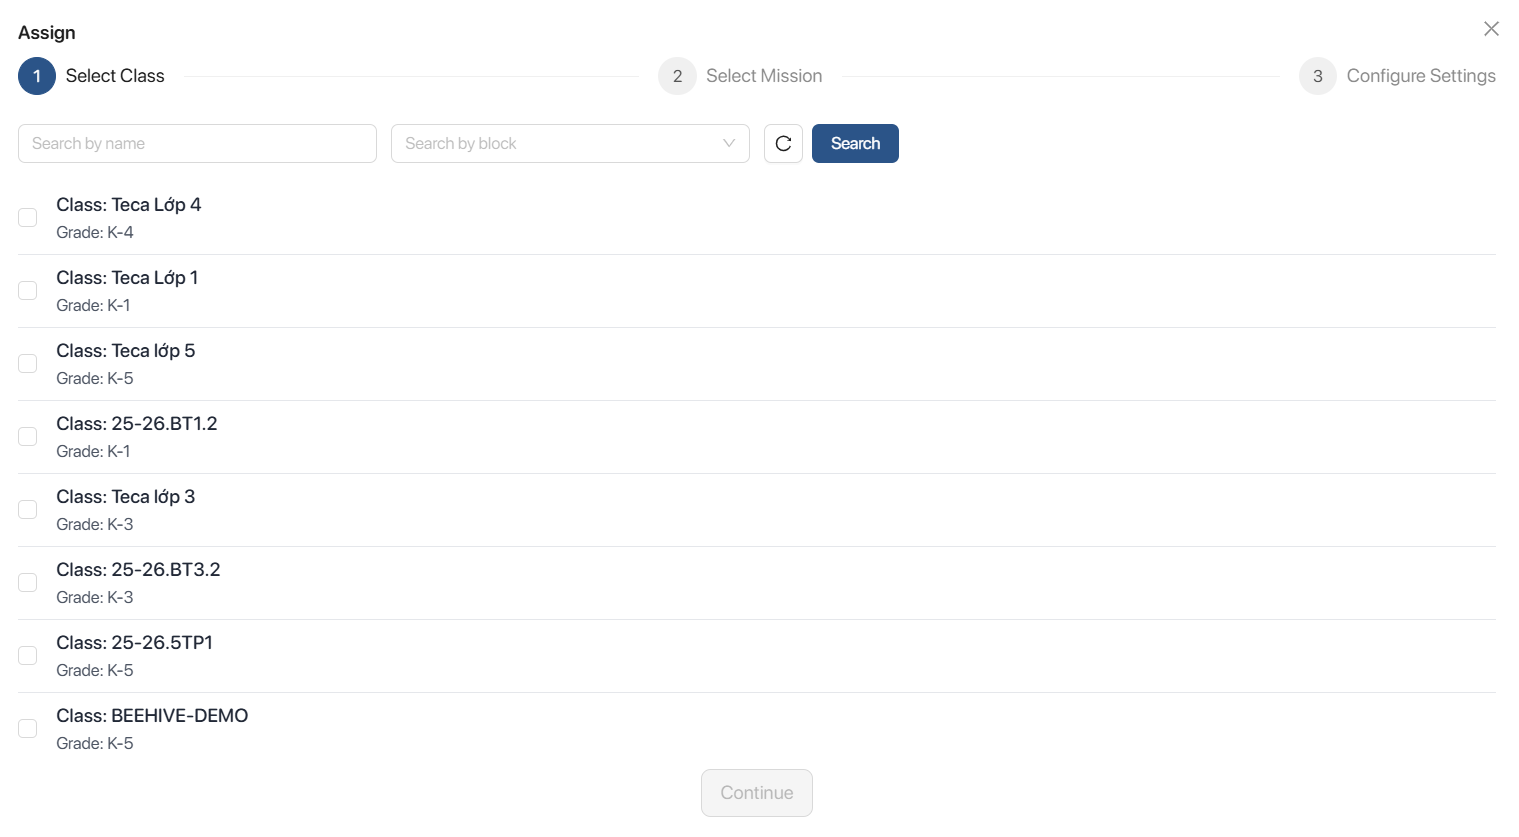
Note: Multiple classes can be selected to assign the same Mission.
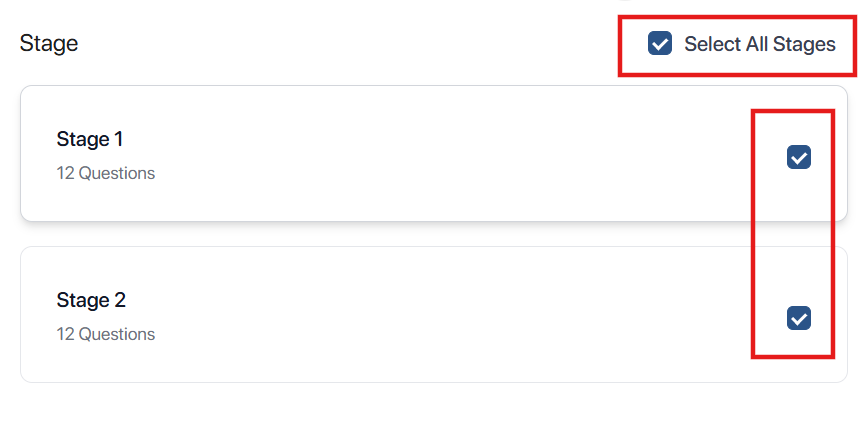
Step 3. After selecting the Class, the system displays the Mission information and the corresponding number of Stages.
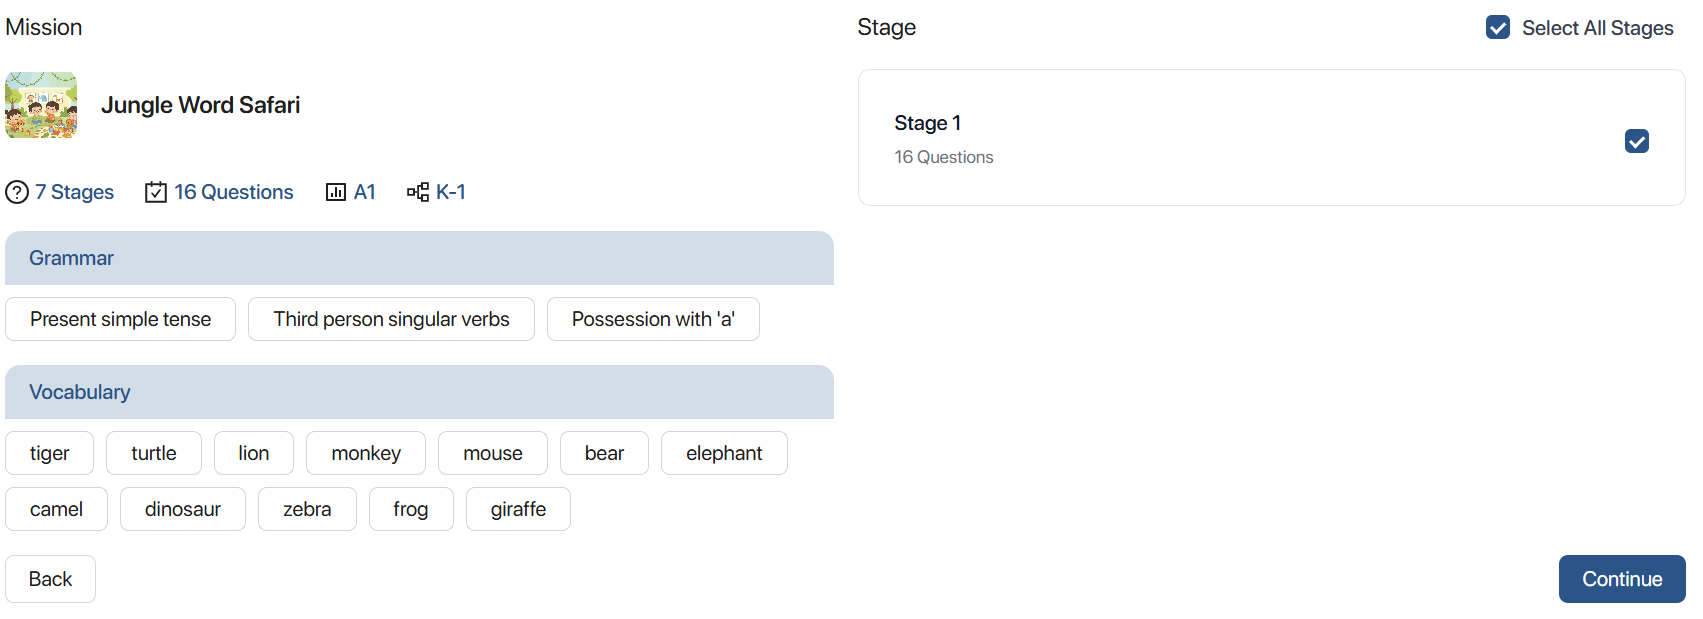
- To select all Stages of the Mission, check the box

- To select specific Stages in the Mission, check the box
 next to the corresponding Stage name.
Step 4. After selecting the Stages, the system displays the Mission assignment settings screen, which includes:

| No. | Information | Description |
|---|---|---|
| 1 | Start Date | Start Date Corresponds to the time when the Mission begins displaying on the student application. |
| 2 | End Date | End DateCorresponds to the time when the Mission displays as "Expired" on the student application. |
| 3 | Duration(Minutes) | Duration (in minutes) Time allowed to complete the mission. |
| 4 | Attempt limit | Number of times students are allowed to redo the mission. |
| 6 | Mistake limit | Maximum number of allowed errors before the lesson ends Converted into the number of hearts on the student application |
| 7 | Shuffle questions | Shuffle questionsToggle option (on/off). |
| 8 | Shuffle question options | Shuffle question optionsToggle option (on/off). |
| 9 | Apply to All | Quick apply for all Stages. |
Step 5. View the assignment information for the Stages after applying for all 

Step 6. Click the button  to successfully assign the Mission, or click the button
  to review the Mission information.
Note:
- To hide the Mission on the student application screen, click the button

- To show the Mission back in the assigned list on the student application screen, click the button

- To delete the assigned lesson, click the button

6. MISSION GALLERY
Step 1. At the navigation bar on the left, the user clicks the Mission Gallery icon.
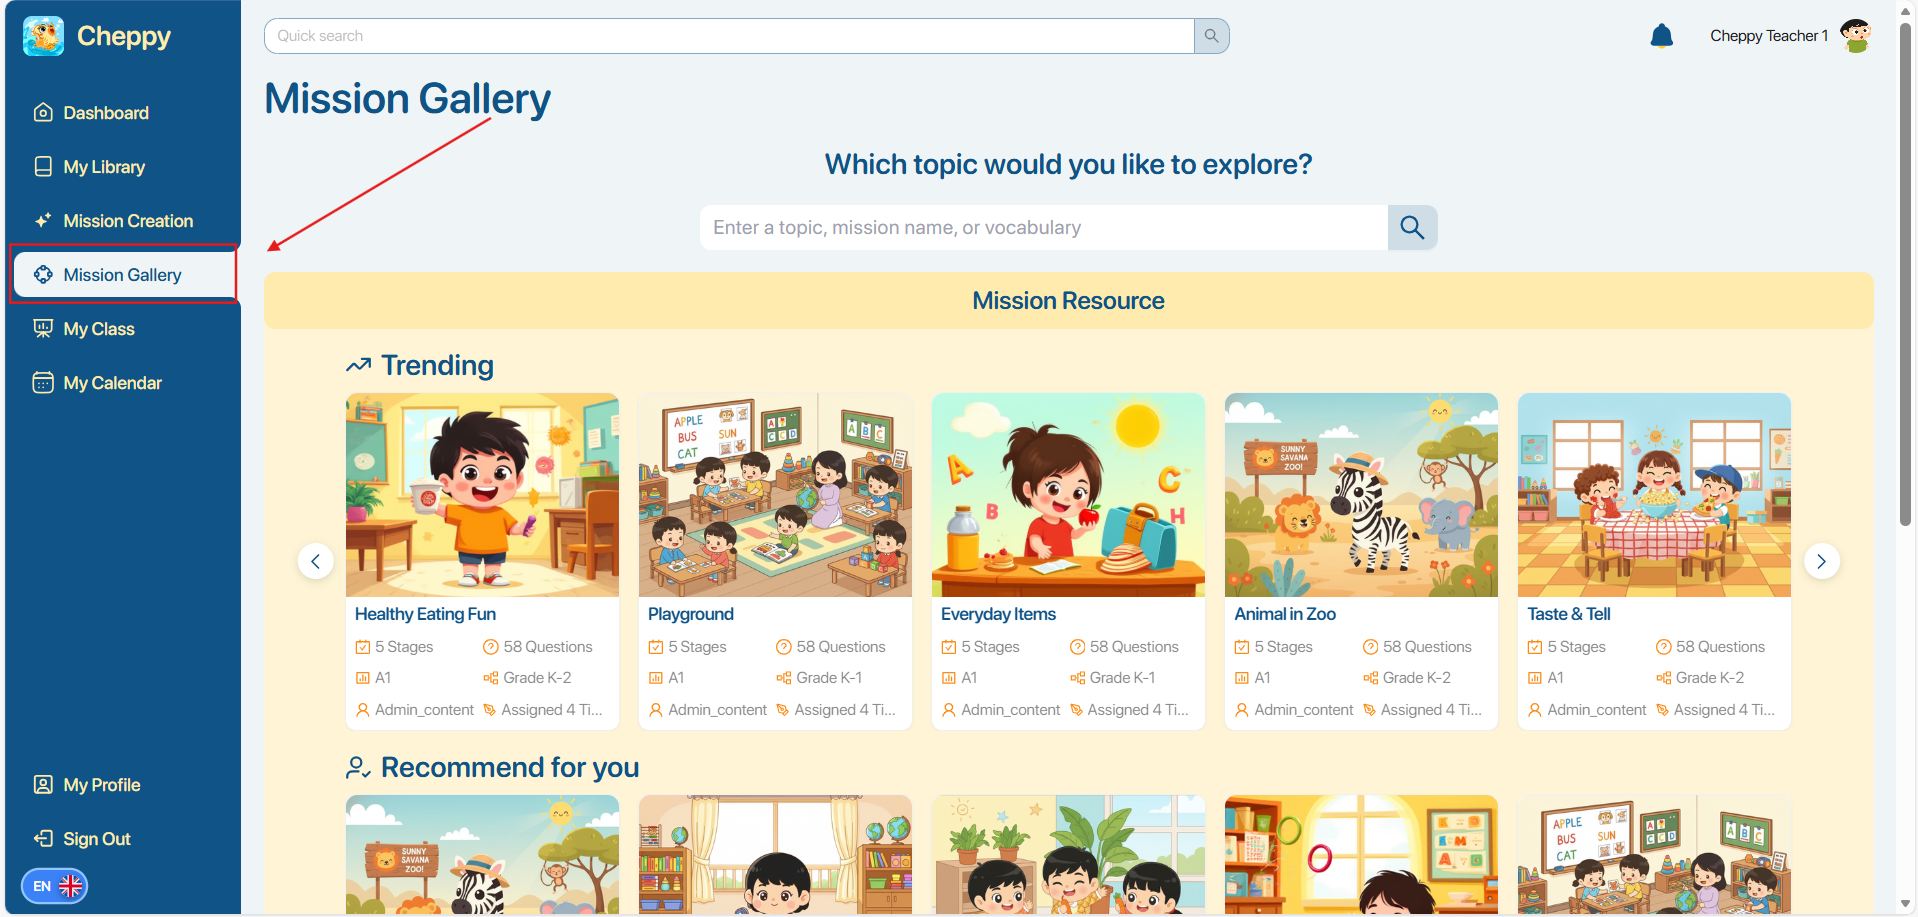
Step 2. Within the Mission Explore screen, select the directional arrow icon


to navigate through various Mission categories, including:
- Trending missions: Highlights highly popular learning activities.
- Recommend for you: Displays personalized Mission suggestions curated for you.
Step 3. Within the search field, input the specific Topic of the Mission you are looking for.
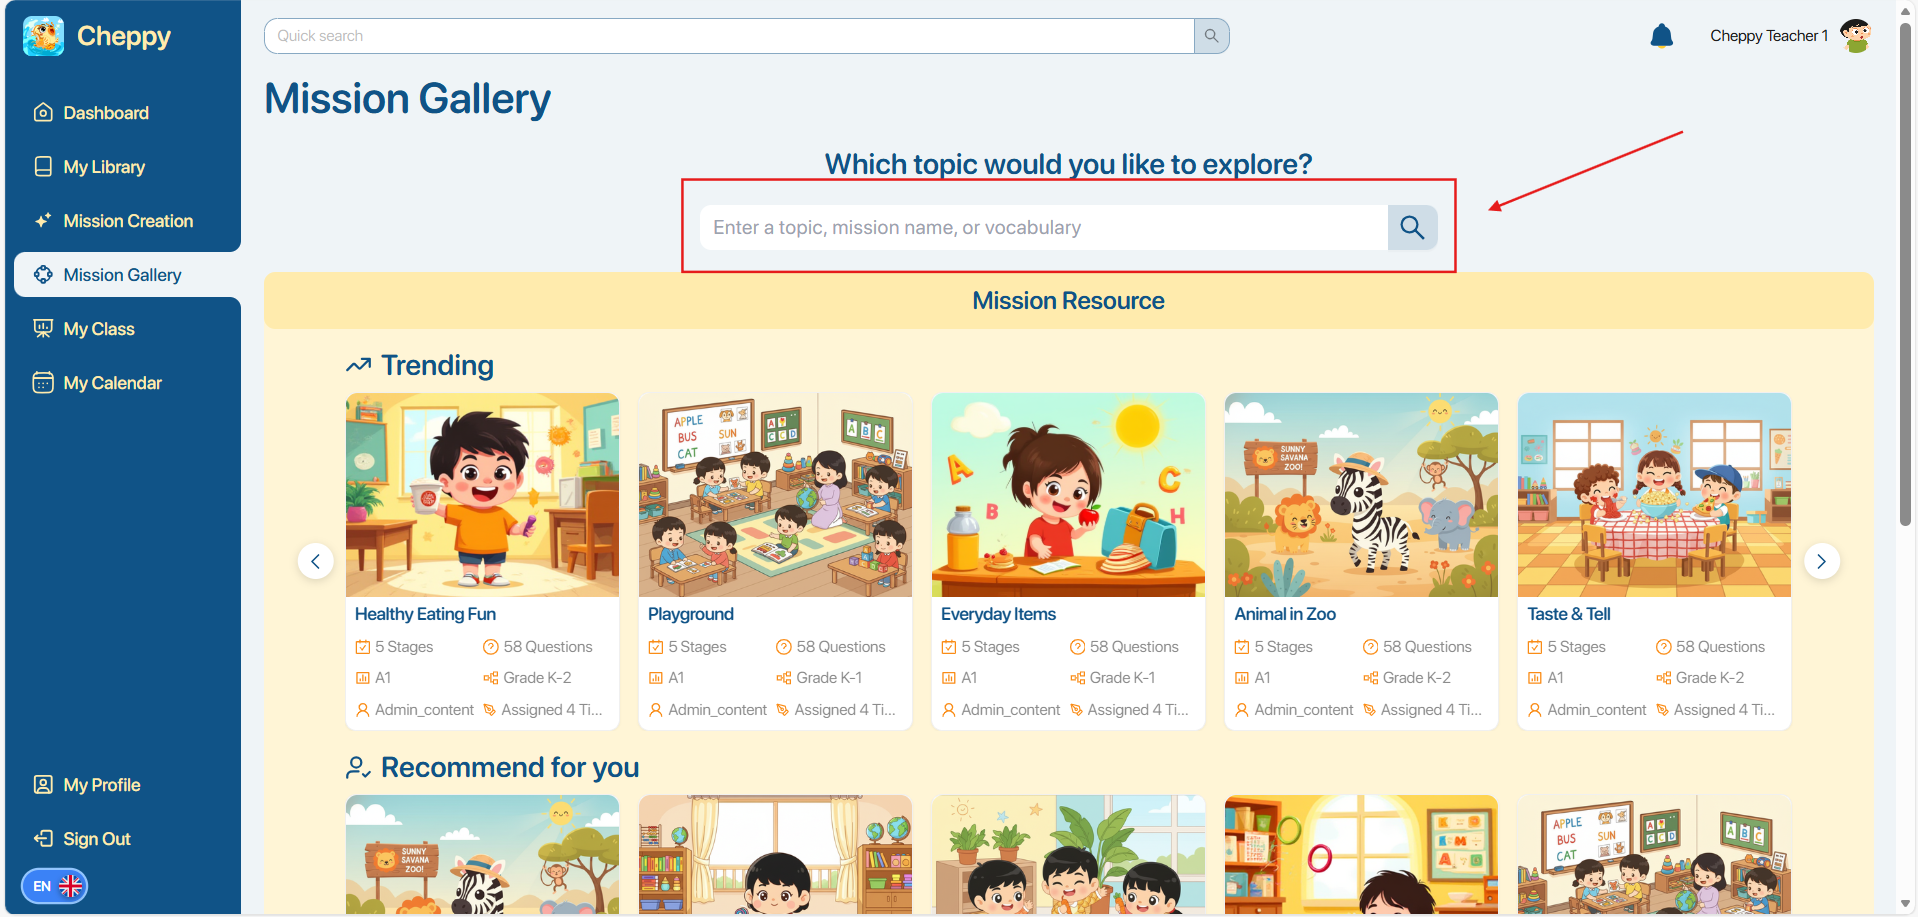
Step 4. Once the Topic is entered, refine your results using the following filters:
- Grade: Student grade level
- Level: Language proficiency
- No. of Stage: Total number of Stages
- Estimated time: Time required to complete
- Question types: Format of the exercises
- Sort by: Advanced sorting criteria
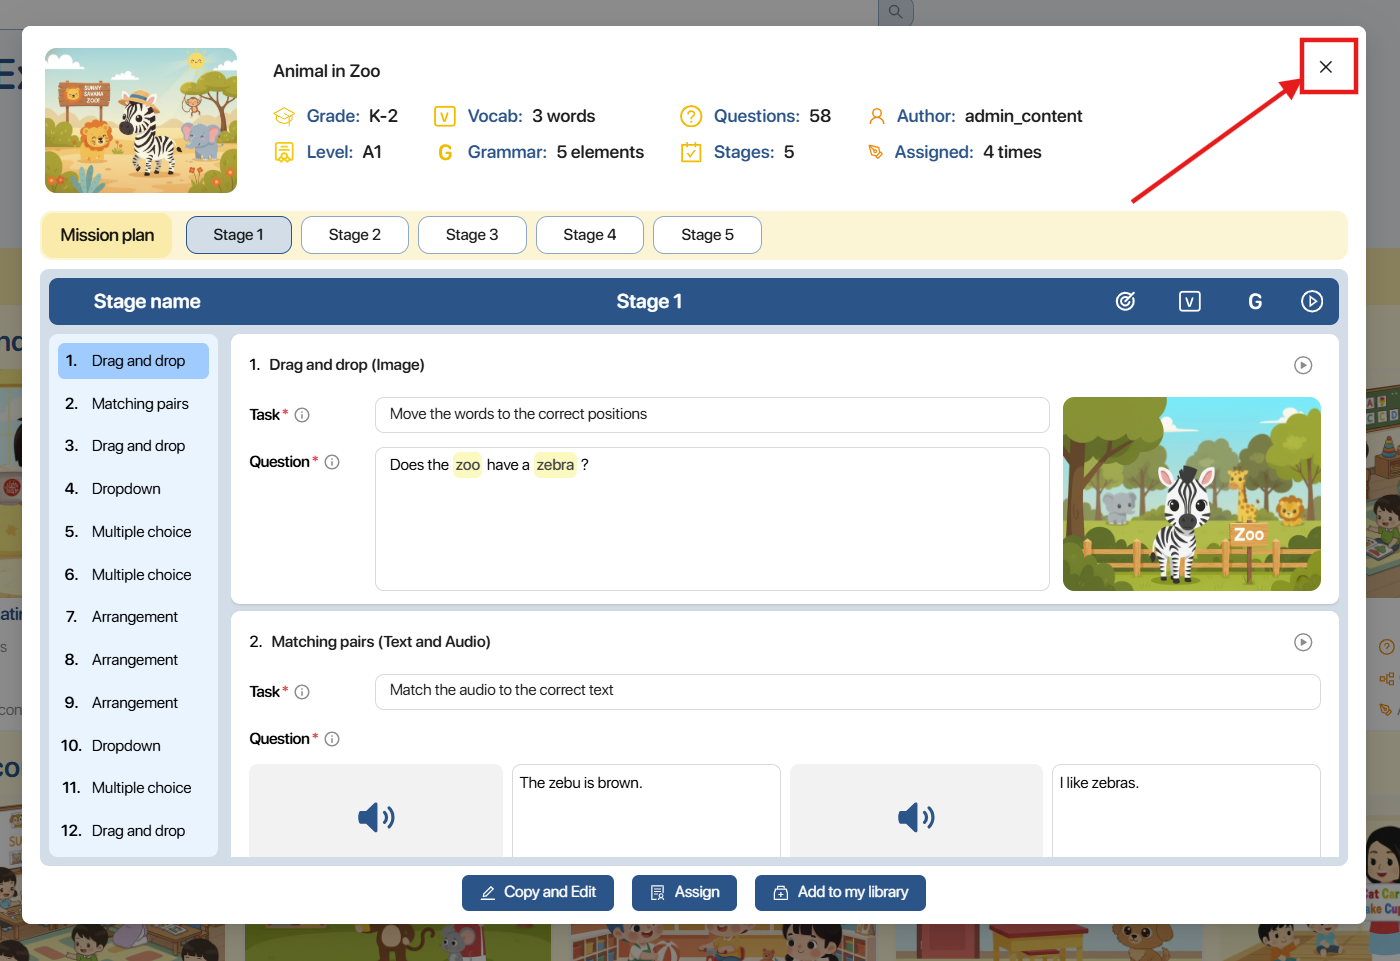
Step 5. Select a Mission to view its general summary and the specifics of its associated Stages.
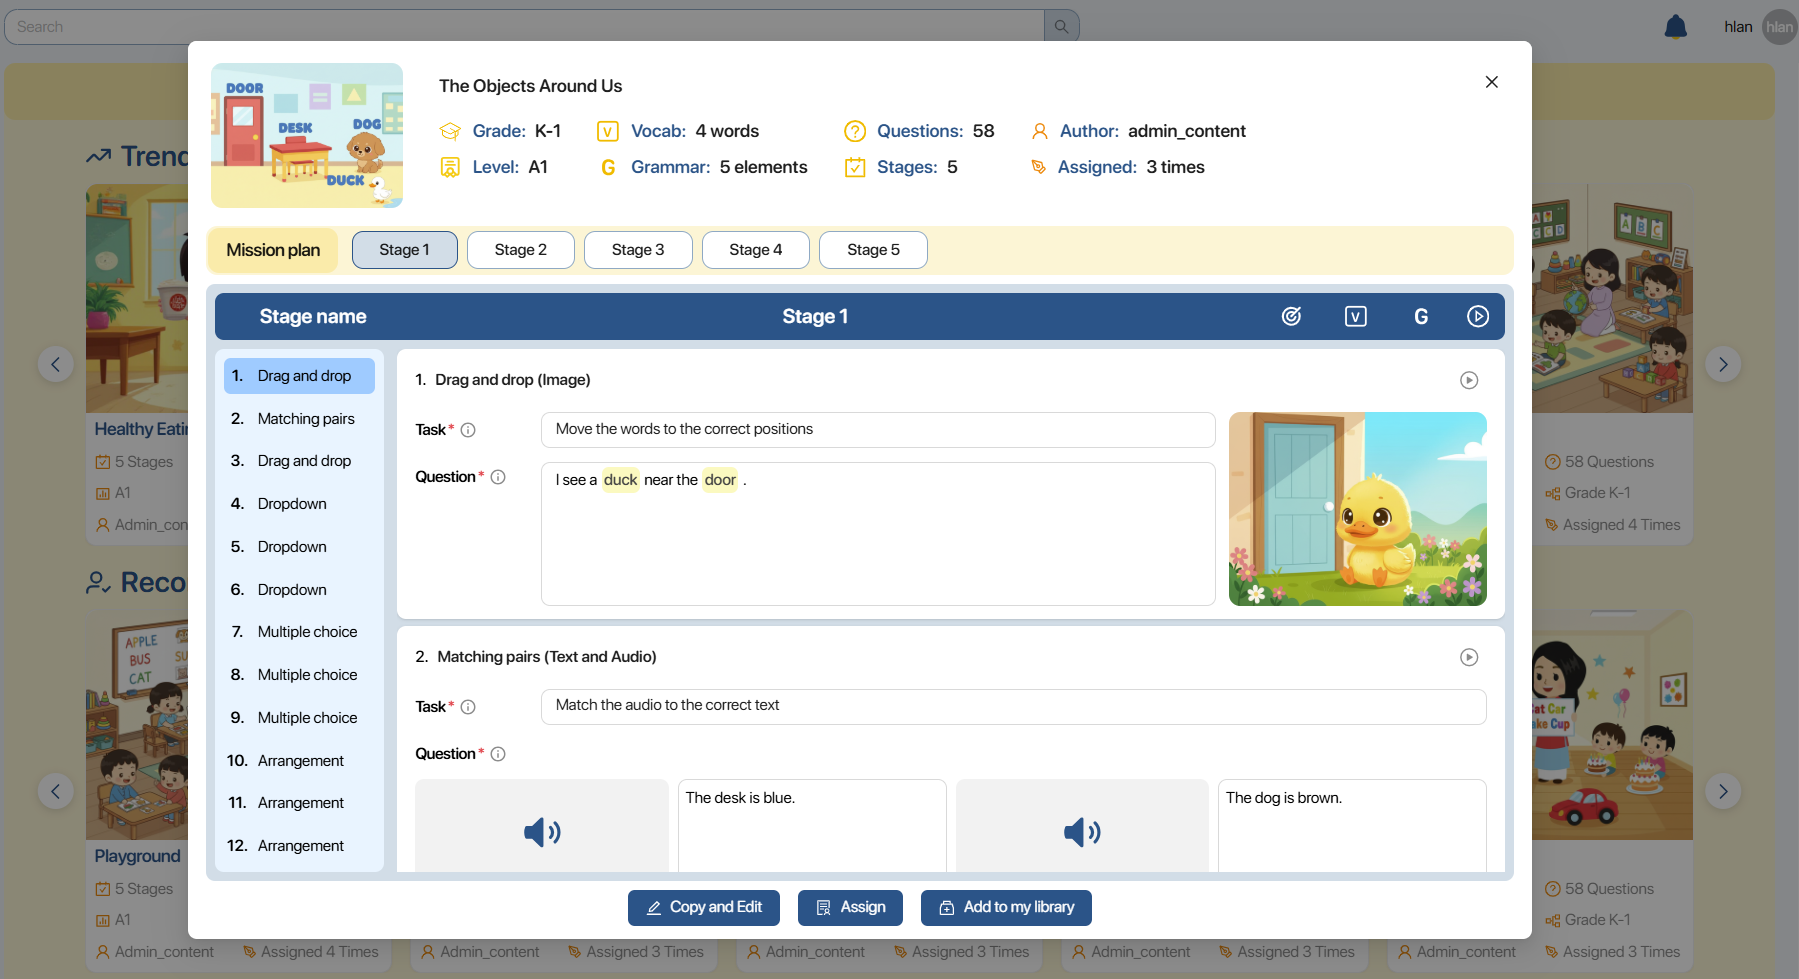
Step 6. While in the Mission preview, you can utilize the following functions:
- To duplicate and modify the content, click

- To assign this Mission to students, click

- To save the Mission for future use, click

Step 7. Click the ![]() icon to close the preview and exit the screen.
icon to close the preview and exit the screen.
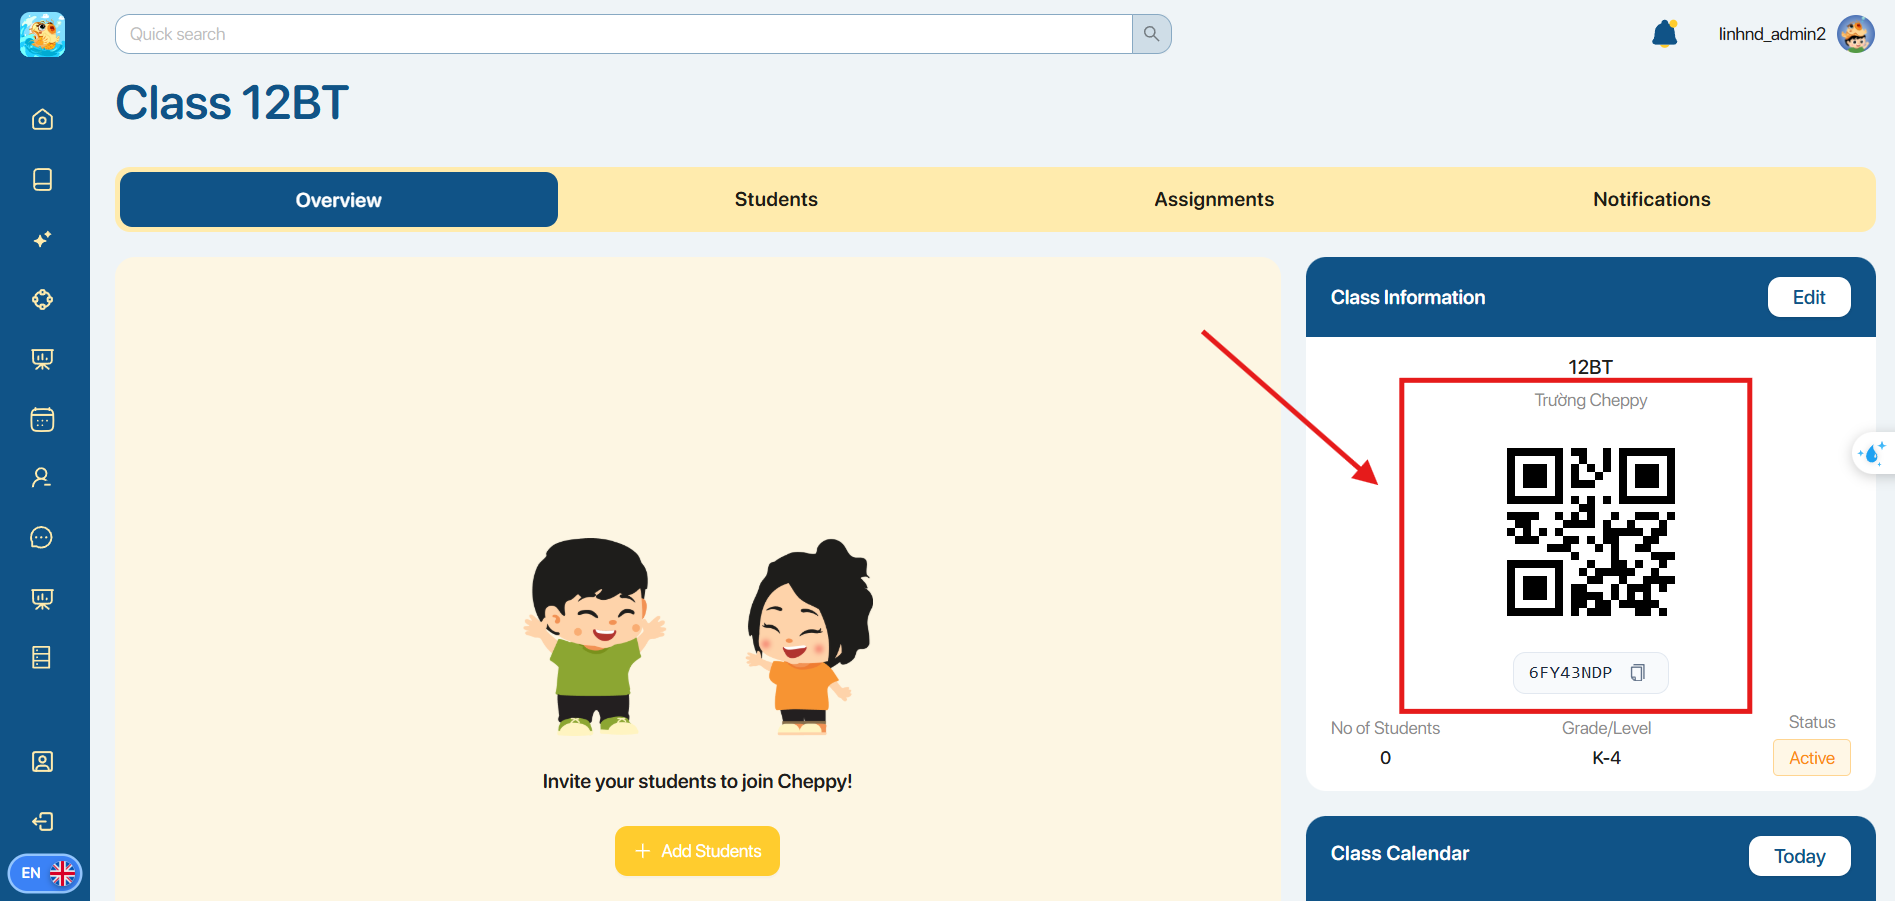
7. MY CLASS
Step 1. On the left navigation bar, the user clicks the My Class icon.
Step 2. In the search bar area, the user interacts with the filters to find the Class.

| No. | Function | Description |
|---|---|---|
| 1 | Quick search class name | Search for Class name. |
| 2 | Status | Select Class Status.  |
| 3 | | Select the display mode: Grid view or List view. |
Step 3. Click the icon ![]() on the chosen class, after which the screen reveals these available functional commands:
on the chosen class, after which the screen reveals these available functional commands:
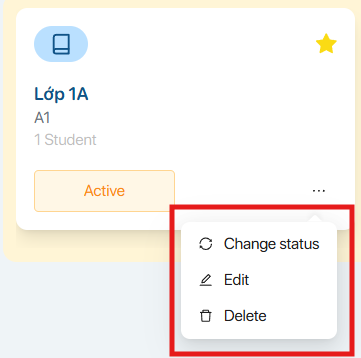
| No. | Function | Operation |
|---|---|---|
| 1 | Change Status 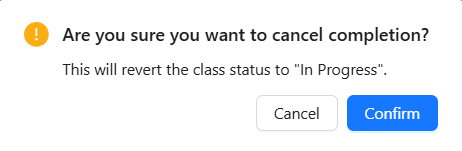 The user selects the icon The user selects the icon | |
| 2 | Edit Class Information 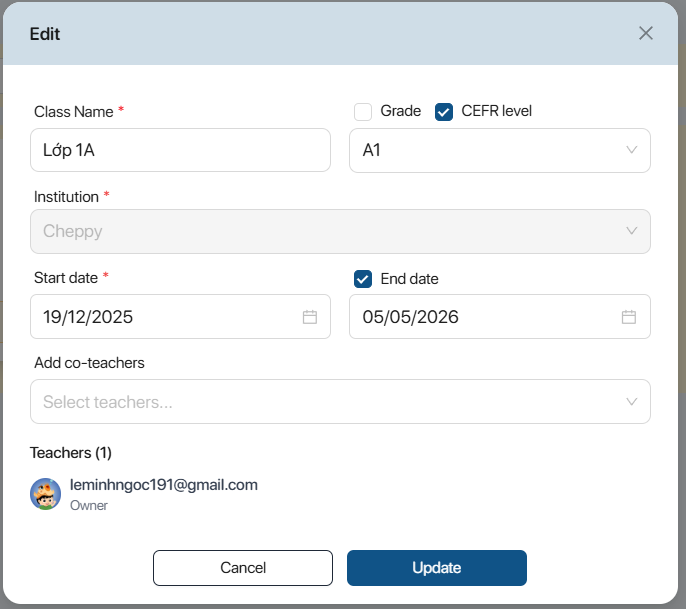 The user edits the necessary information and selects the icon The user edits the necessary information and selects the icon | |
| 3 | | Delete Class The user clicks the icon to delete the Class or clicks the icon The user clicks the icon to delete the Class or clicks the icon |
7.1. CREATE A NEW CLASS
Step 1. The user selects the button ![]() .
.
Step 2. On the New class screen, enter the complete class information, including:
- Class Name: Enter the class name
- Grade/CEFR level: Enter the Grade/Proficiency Level
- Institution: Select the institution
- Start date: Select the class start date
- End date: Select the class end date
- Add co-teachers: Add co-teachers
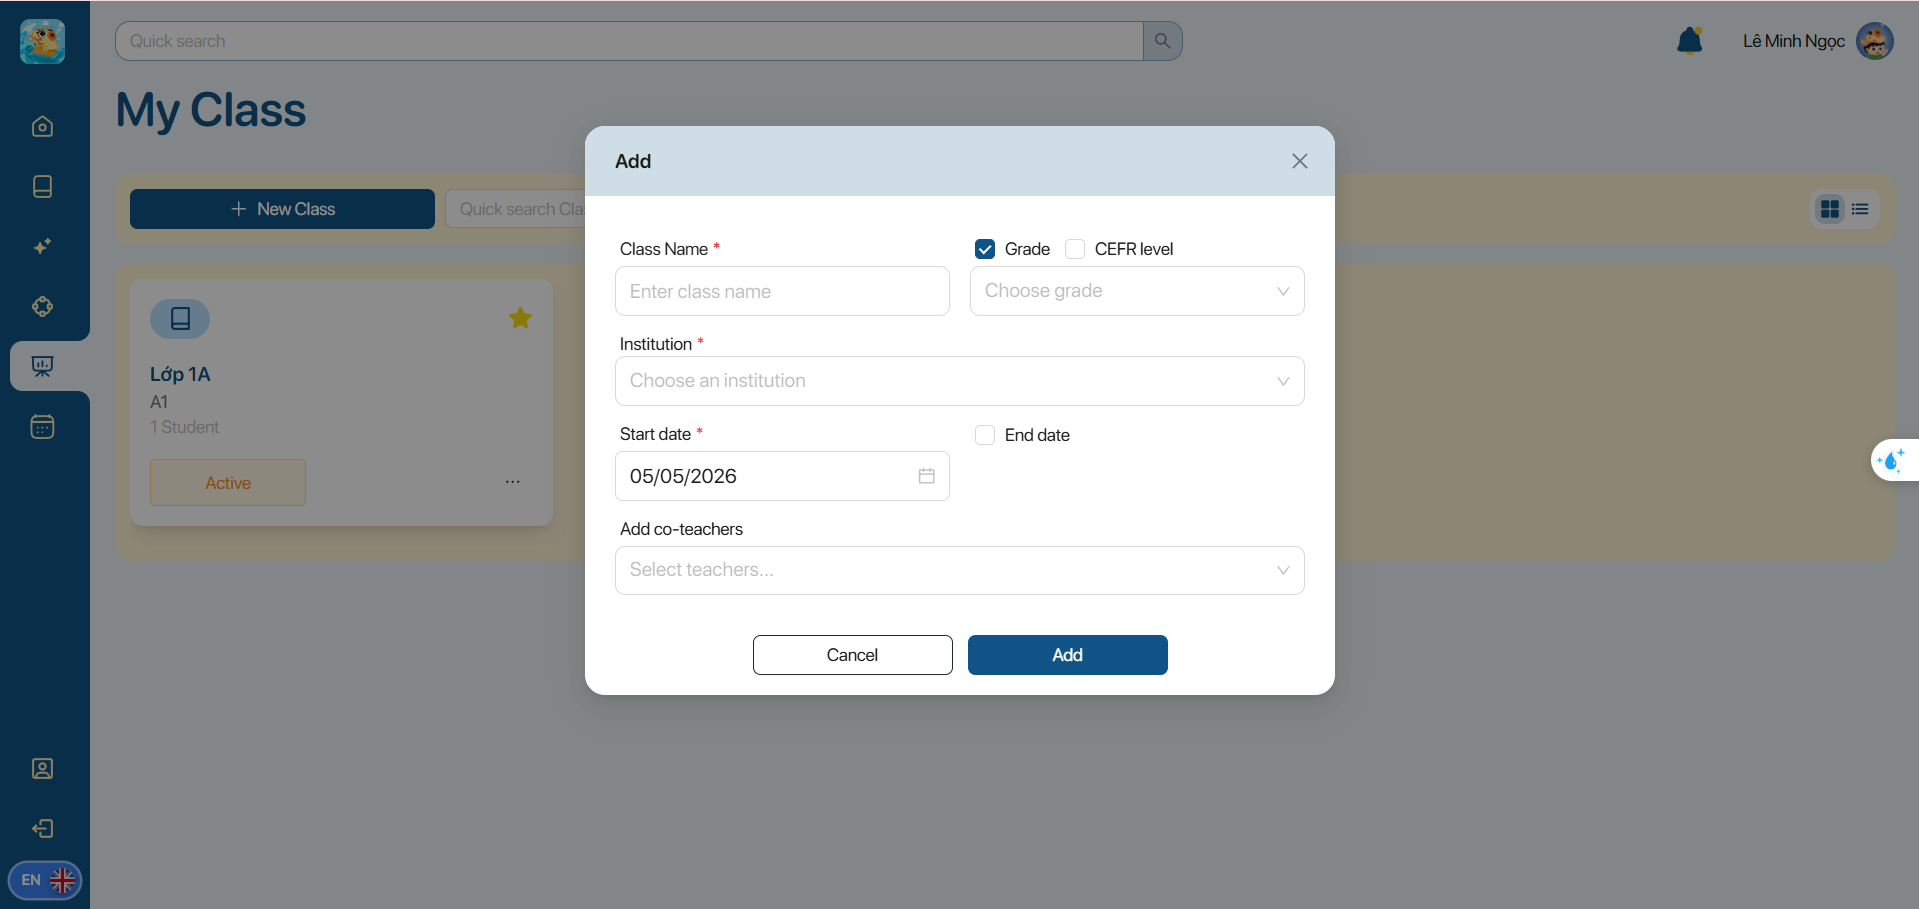 Note: If the user does not select the End date, the class will default to having no end date.
Step 3. To add co-teachers to the class, the user searches for the teacher's username/email in the system and selects the corresponding teacher account.
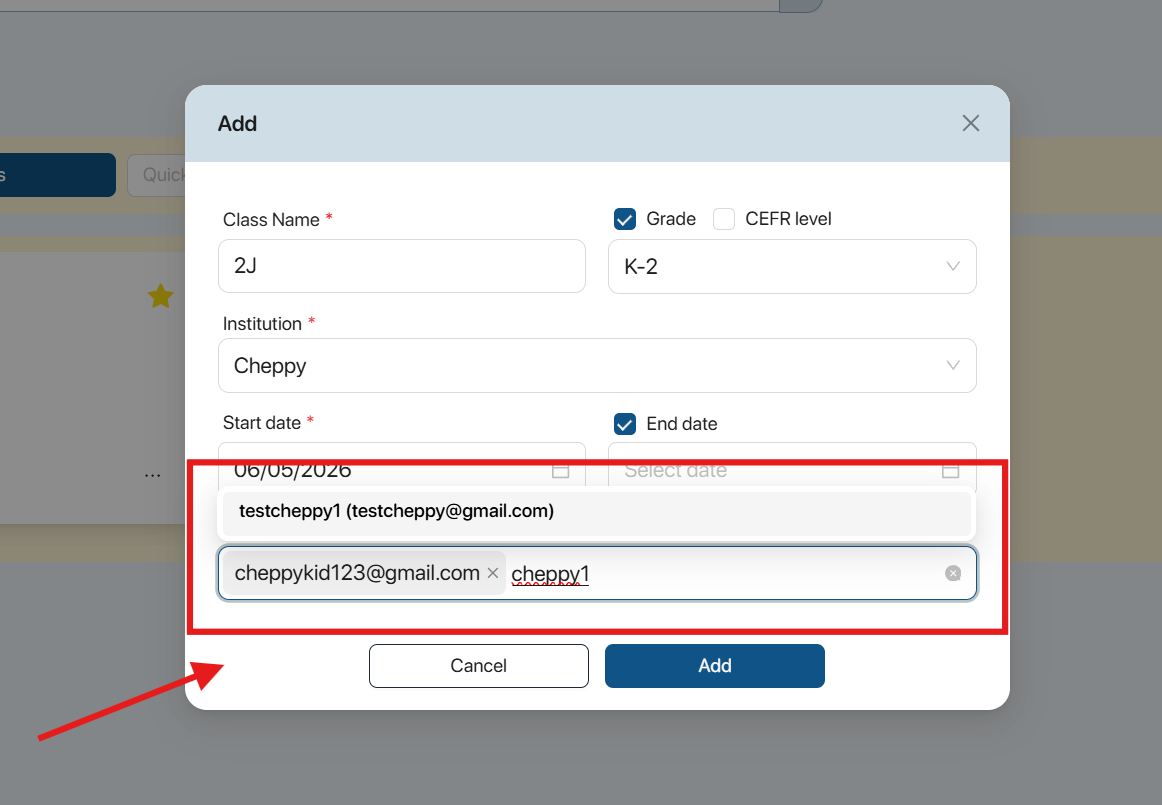
Note: The user can add more than 1 co-teacher.
Step 4. The user selects the button ![]() to confirm the creation of the new class.
to confirm the creation of the new class.
7.2. ADD STUDENTS TO A CLASS
Step 1. The user selects a class to add students to.
Step 2. The user can add students to the class using one of the following methods:
Method 1: Provide the class QR code for students to join the class.
After successfully joining, the system will automatically update and display the new student's information in the student list.
Method 2: Add students by creating new accounts
Step 2.1 In the Students section, the user selects the icon ![]()
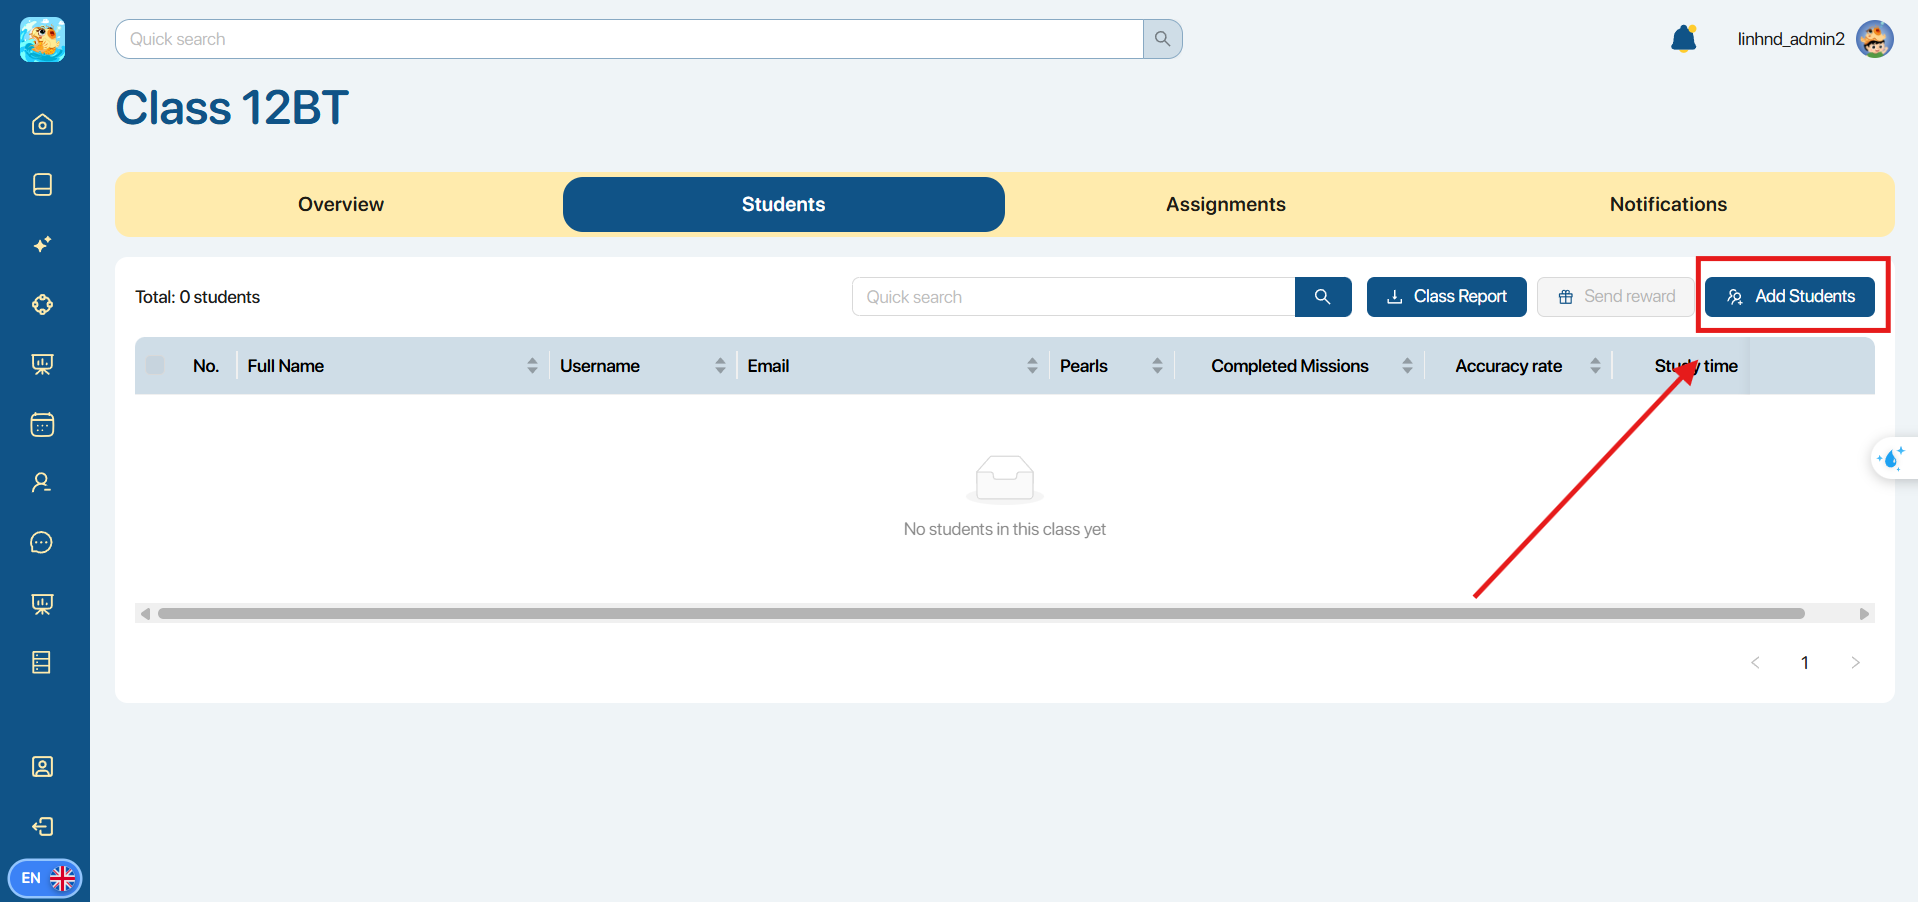
Step 2.2 In the Add Student popup, select Create new account.
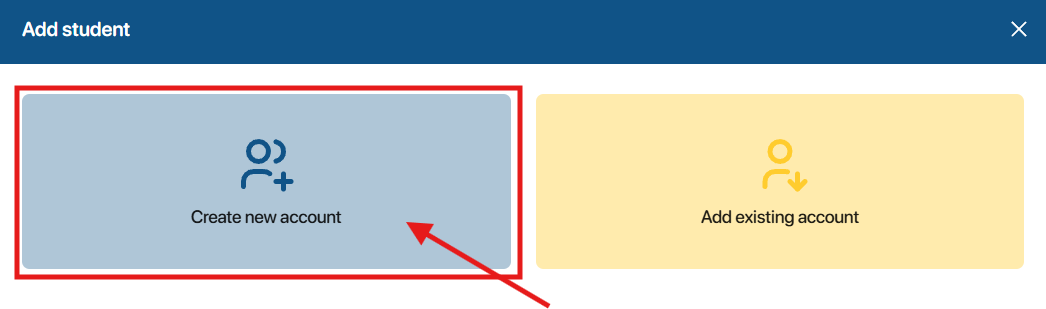
Step 2.3 Here, the user can manually enter or upload a list of students
- Manually enter the student list: The user enters complete information, including the student's full name and the parent's email address.
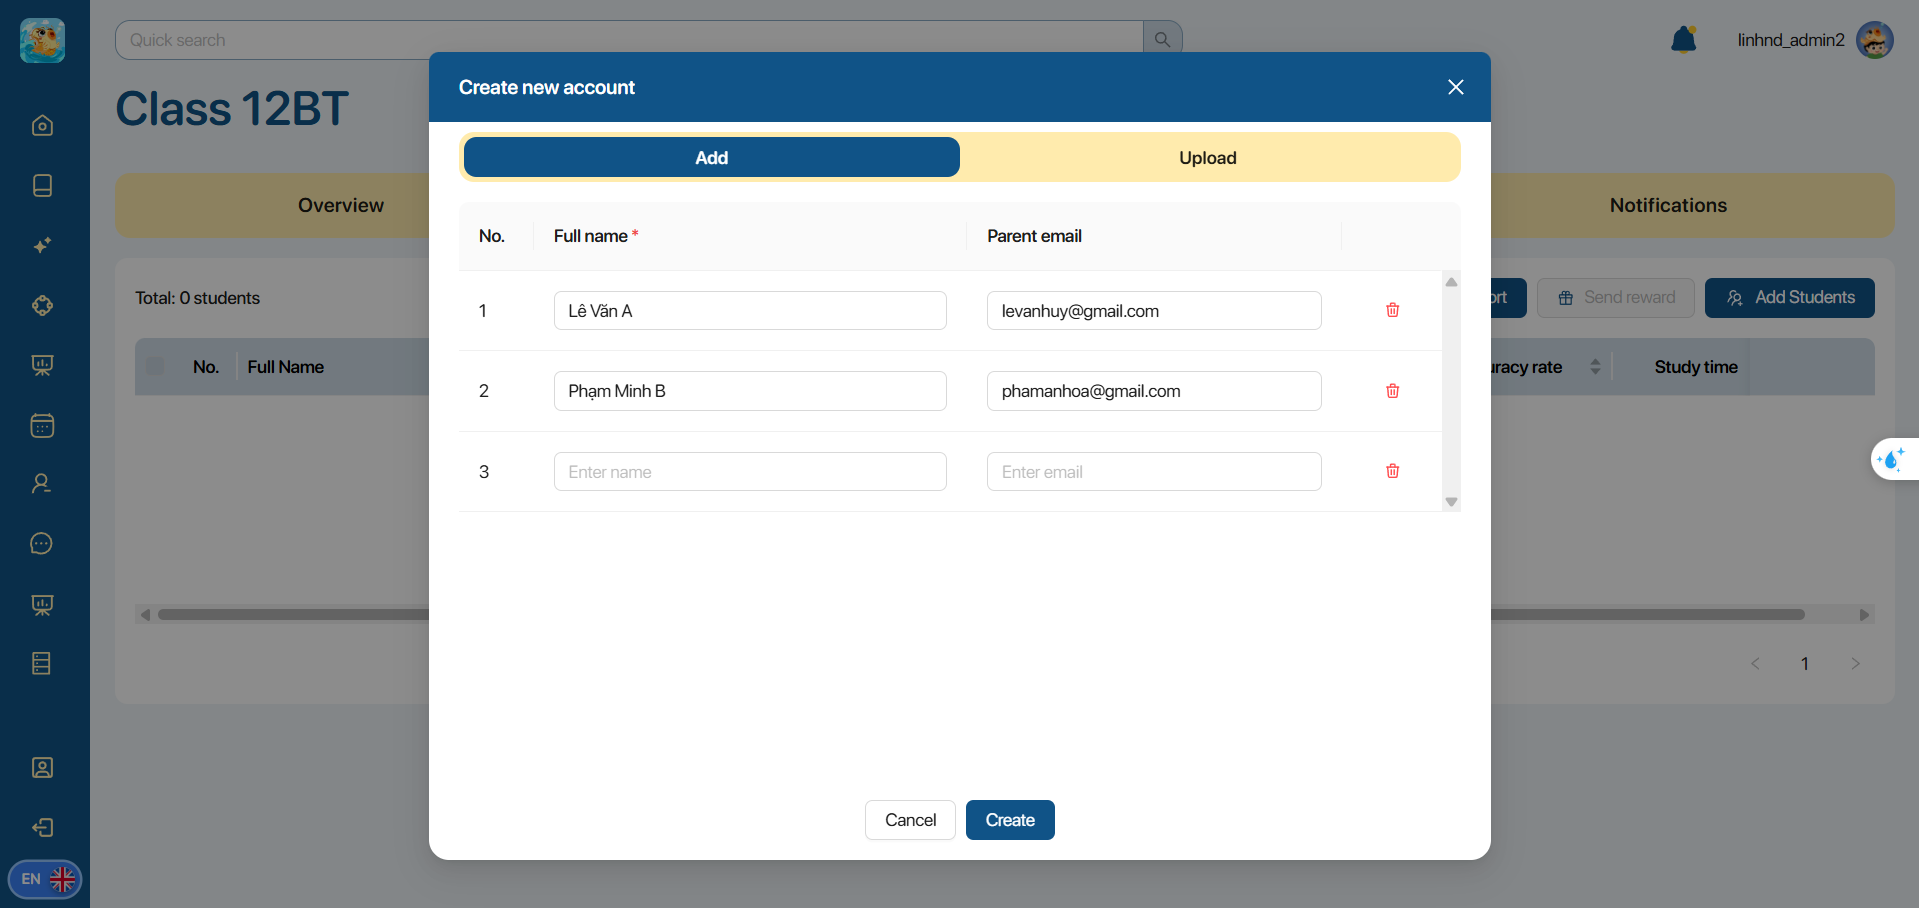
- Upload the student list file: In the CSV, XLS, XLSX file upload area, the user can drag/drop the file into the upload area or select a file from the computer by clicking the Select or drag and drop file here area.
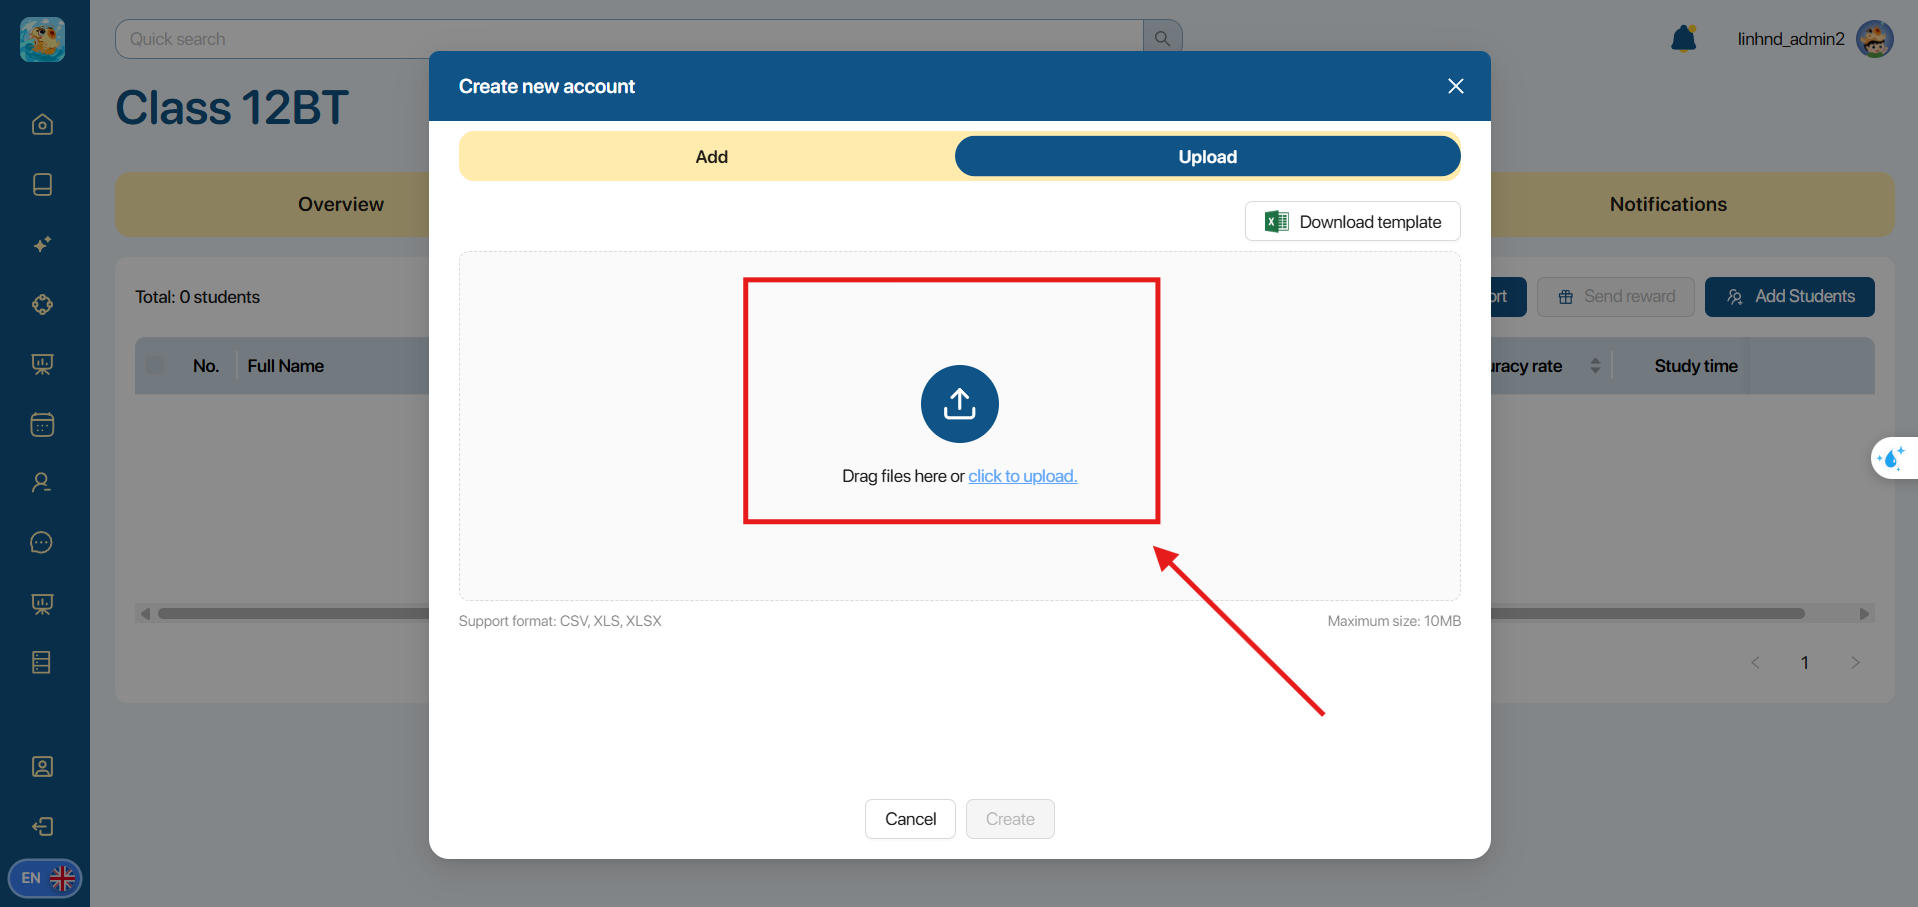
Note:
- If the user wants to download a sample list file, click the icon

- The system supports file uploads in CSV, XLS, XLSX formats, with a maximum size of 10MB.
Step 2.3 Click the button ![]() to confirm adding students to the class.
to confirm adding students to the class.
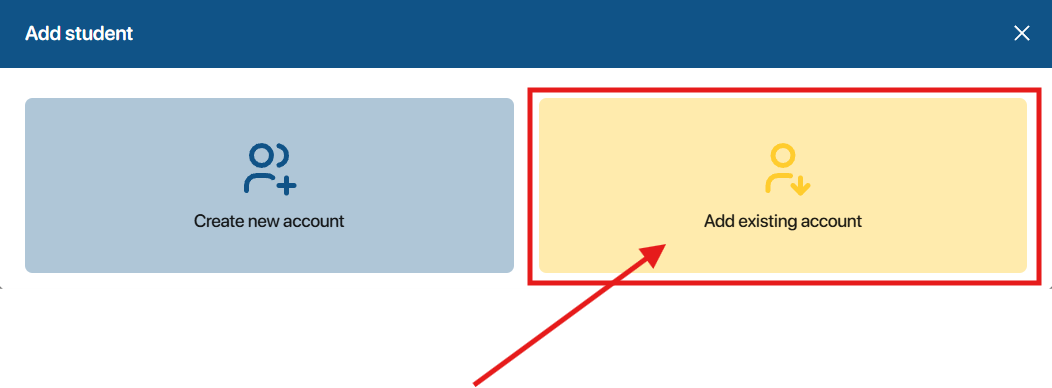
Method 3: Add students from existing accounts
Step 3.1 In the Students section, the user selects the icon ![]()
Step 3.2 In the Add Student popup, select Add existing account.
Step 3.3 Enter the username or email of the student account to search
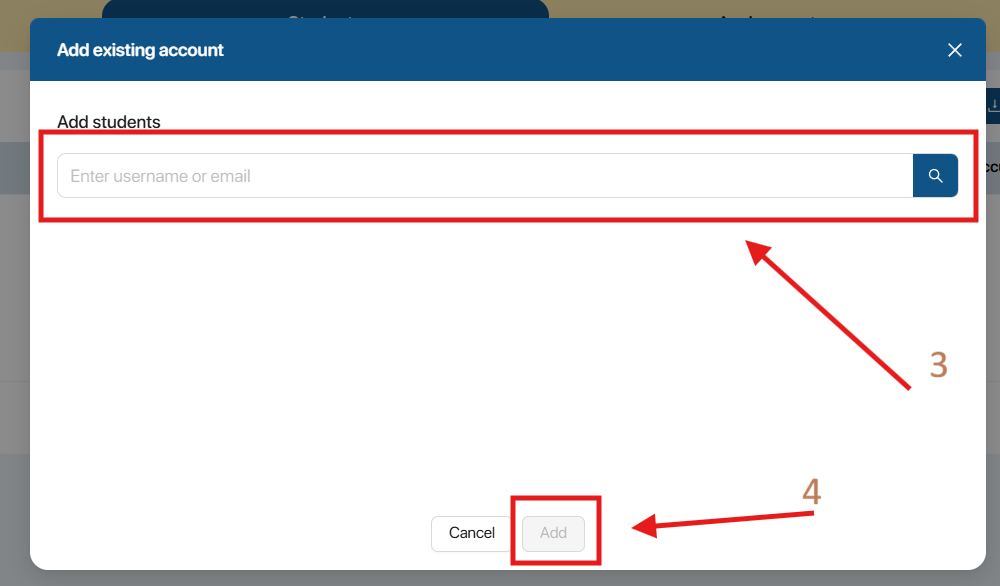
Step 3.4 Click the button ![]() to confirm adding students to the class.
to confirm adding students to the class.
7.3. MANAGE STUDENTS
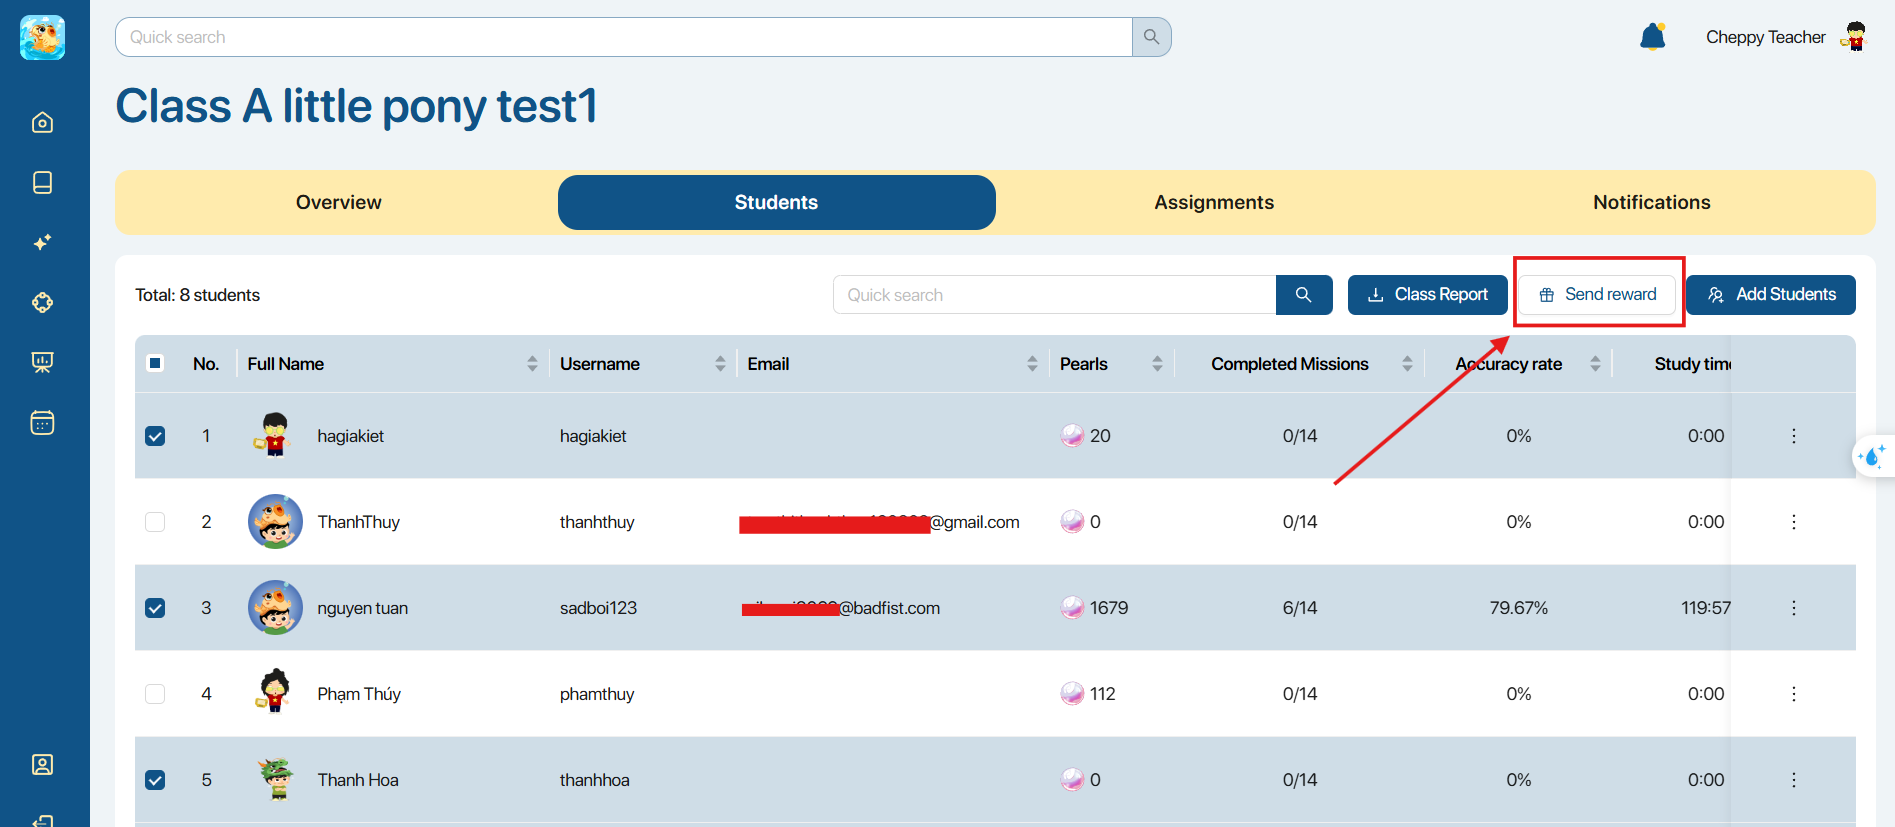
Step 1. From the top navigation bar, the user selects Students.
Step 2. In the search area, the user can search for a student or download a class report.

Step 3. To award gems to multiple students, the user selects students in the list and clicks the icon ![]() .
.
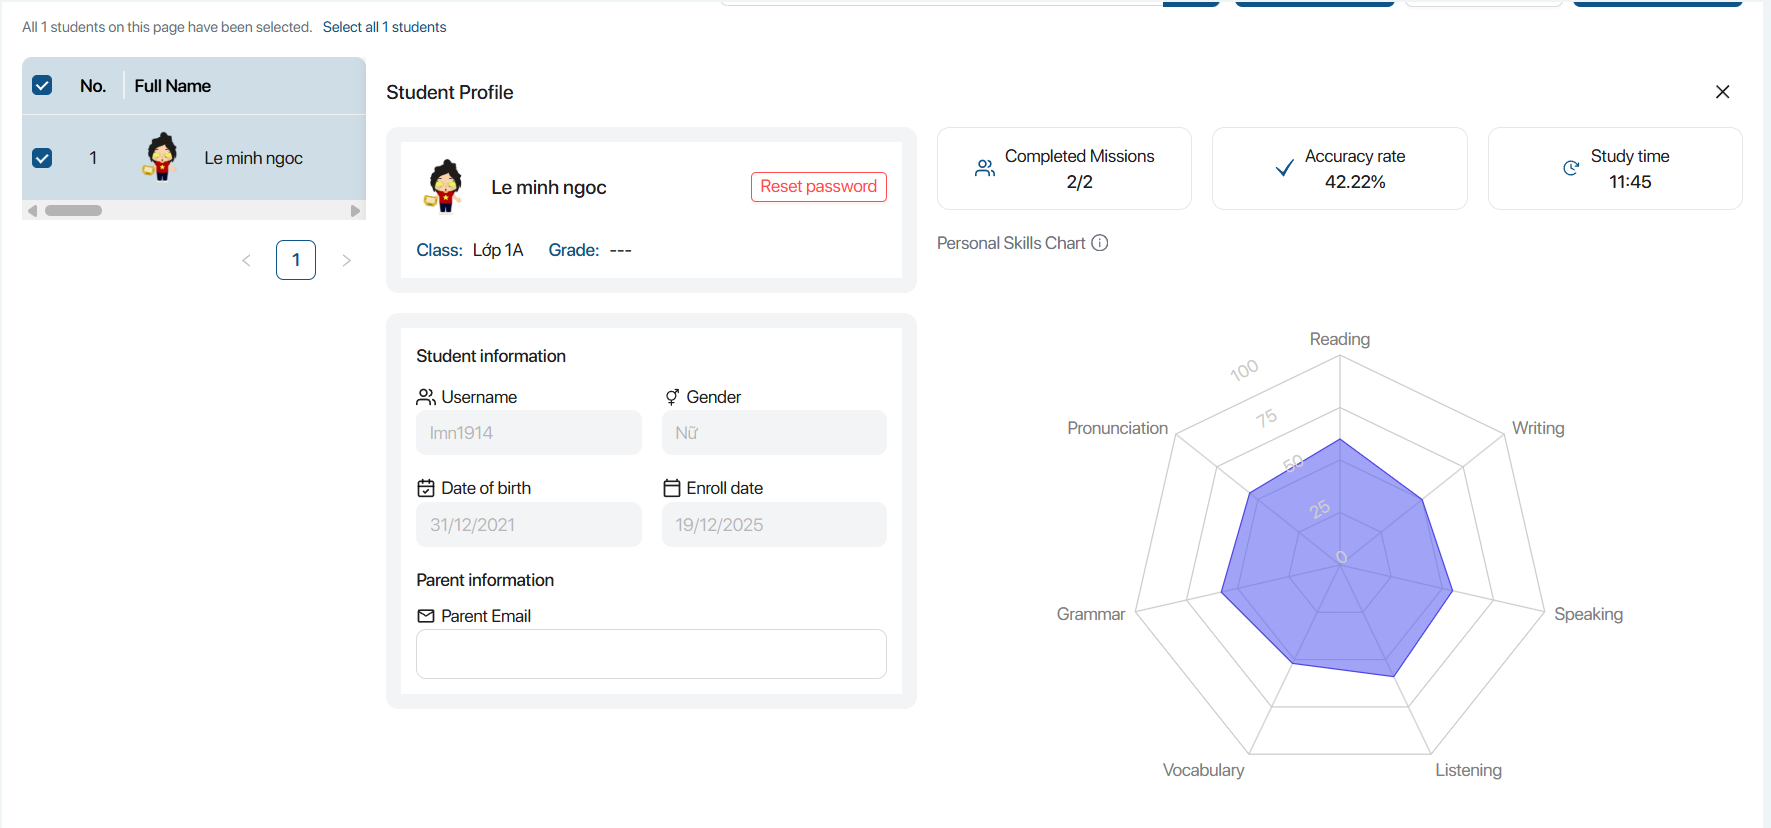
Step 4. When clicking on any student, the screen displays that student's detailed profile, including:
- Personal information
- Number of Missions completed
- Accuracy rate
- Study time
- Individual skill chart for: Reading, Writing, Speaking, Listening, Vocabulary, Grammar, Pronunciation
Step 5. Click the icon ![]() on each Assignment, and the screen will display the following operation options:
on each Assignment, and the screen will display the following operation options:

| No. | Function | Operation |
|---|---|---|
| 1 | View results The screen displays a comparison table of results among students. Users can view the following information: Mission: Mission name Level: Proficiency Schedule date: Start date Deadline: Due date Highest score: Highest score Completed time: Completion time Time taken: Time spent on the exercise  Note: The user clicks the x icon to exit the results viewing tab. Note: The user clicks the x icon to exit the results viewing tab. | |
| 2 | Award gemsMethod 1: Enter the number of gems or use the increase/decrease button. Method 2: Quick select quantity: 10/20/50. 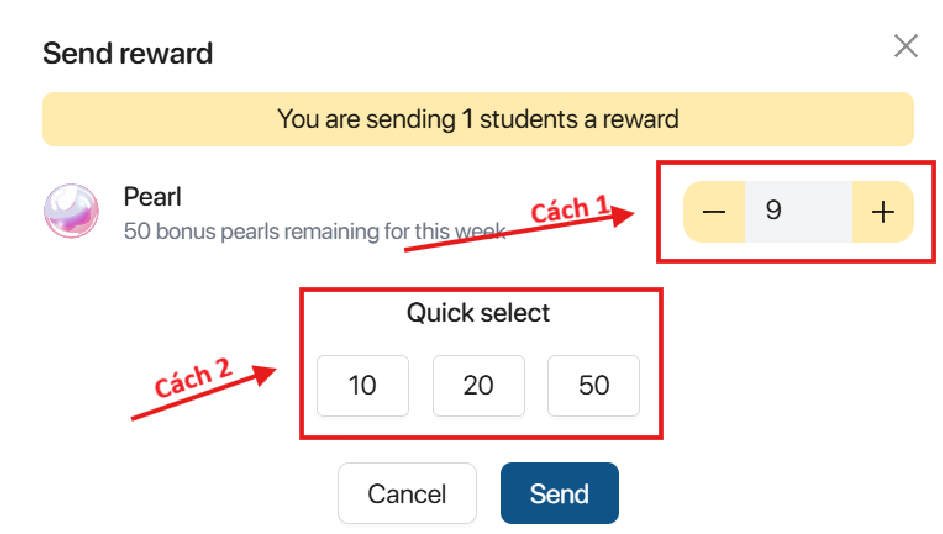 | |
| 3 | Delete student Select the icon 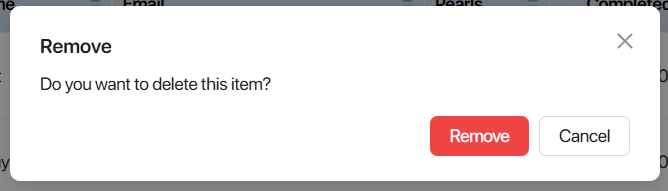 |
7.4. ADD ASSIGNMENTS IN A CLASS
Step 1. From the Assignments screen, the user selects the button ![]()
Step 2. Select a Mission to assign to the class and click the button ![]()
Step 3. Select the Stages you wish to assign from the chosen Mission and click the button ![]()
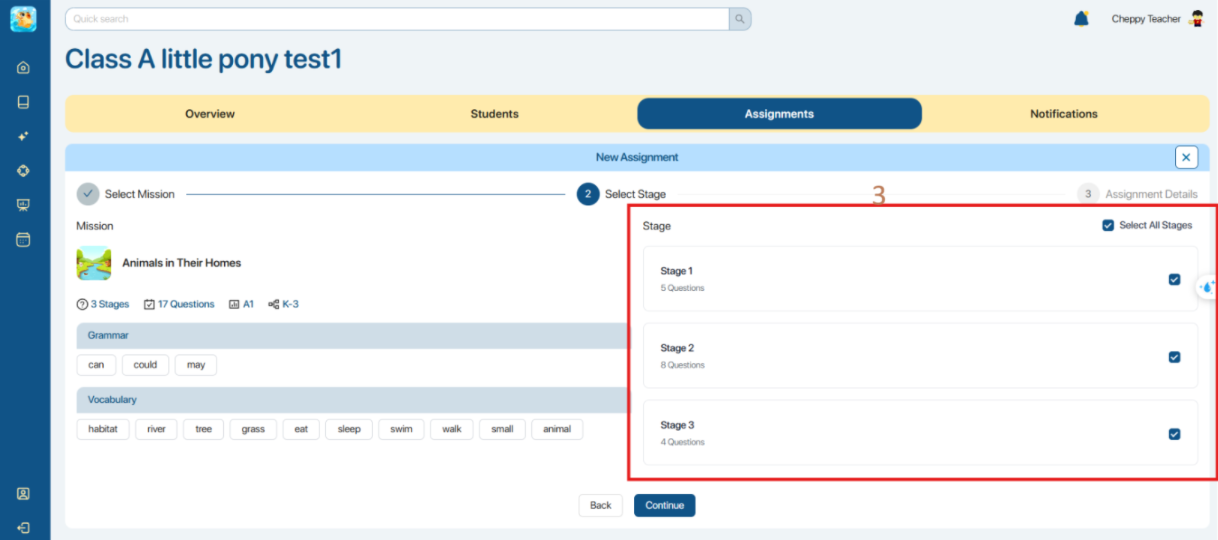
Note:
- The system selects all Stages by default.
- The user must select at least one Stage to add the Assignment.
Step 4. To configure the Stages within the Assignments, the user can use two methods:
Method 1: Use a common settings set and apply it to all Stages. The user selects the items they want to configure and enters the information for that item. The settings categories are:
- Start date: The time when students begin the Mission.
- End date: The deadline for completing the Mission.
- Duration: Maximum time allowed for each attempt.
- Attempt limit: The allowed number of attempts.
- Mistake limit: The allowed number of incorrect answers.
- Shuffle question: Enable/disable shuffling the order of questions.
- Shuffle answer: Enable/disable shuffling the order of answers.
The user clicks the button ![]() to confirm applying the settings to all Stages.
to confirm applying the settings to all Stages.
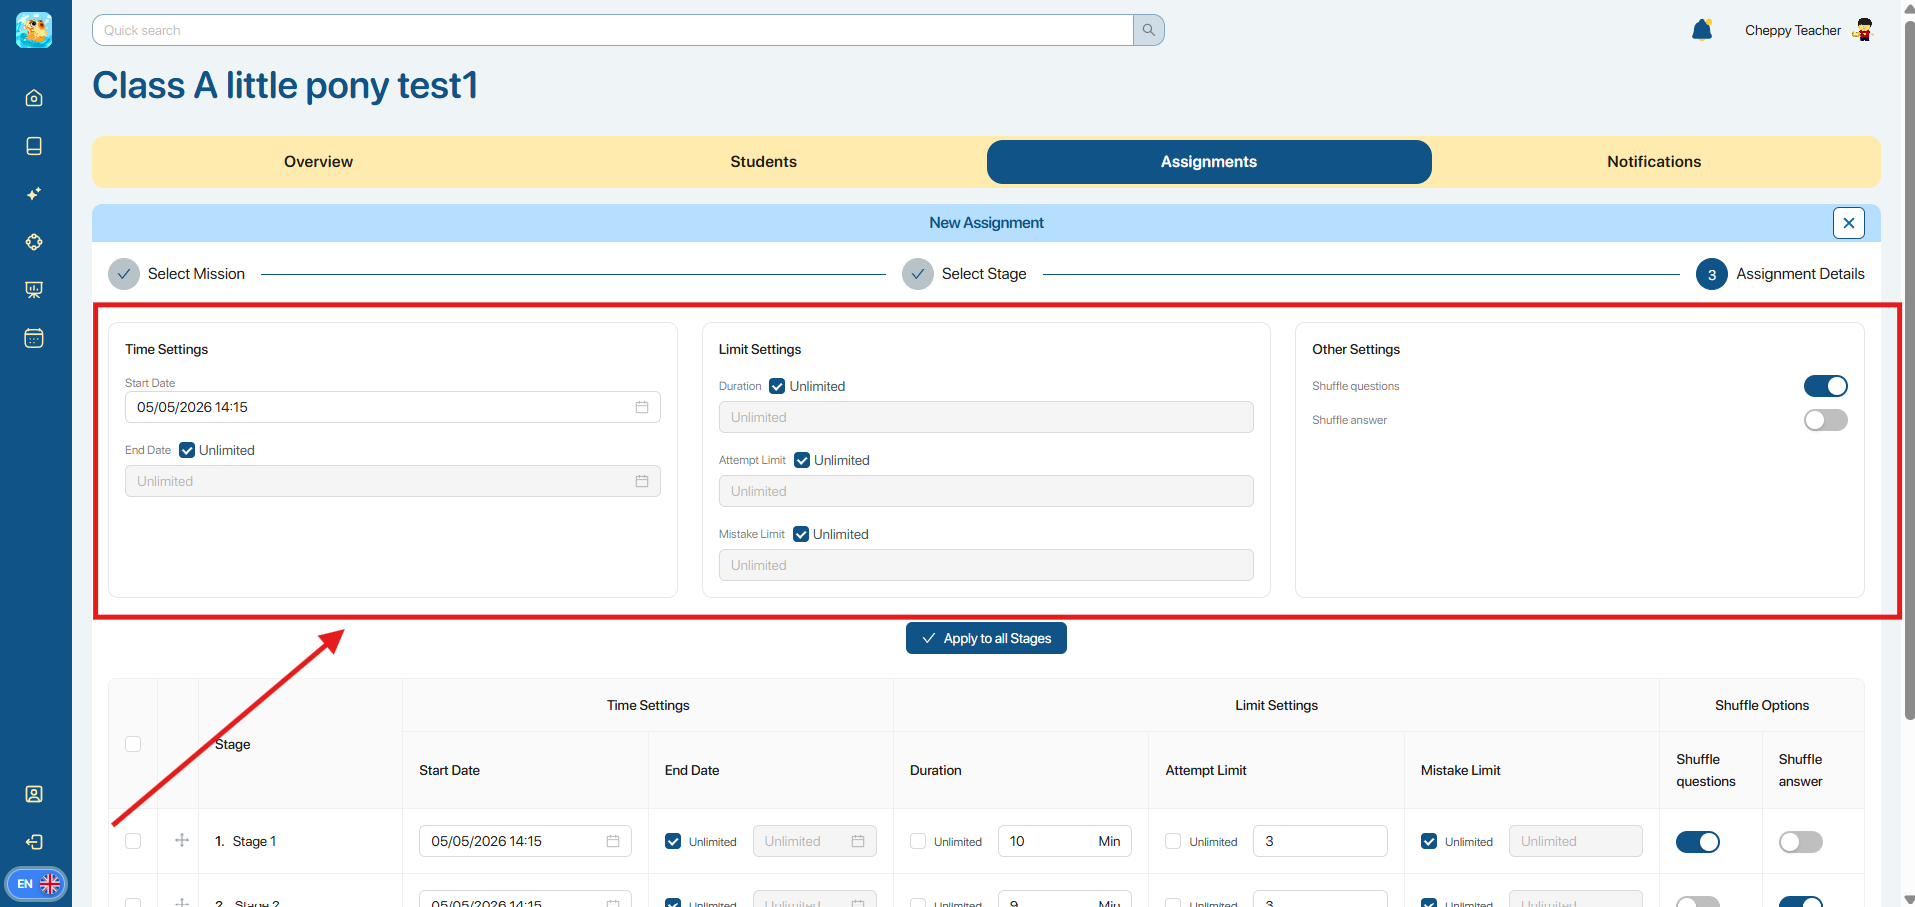
Note: The system does not select the settings items by default.
Method 2: Enter separate settings for each Stage.

Note: The user can hold and drag the button ![]() to change the Stage order.
to change the Stage order.
Step 5. Click the button ![]() to confirm creating the Assignment.
to confirm creating the Assignment.
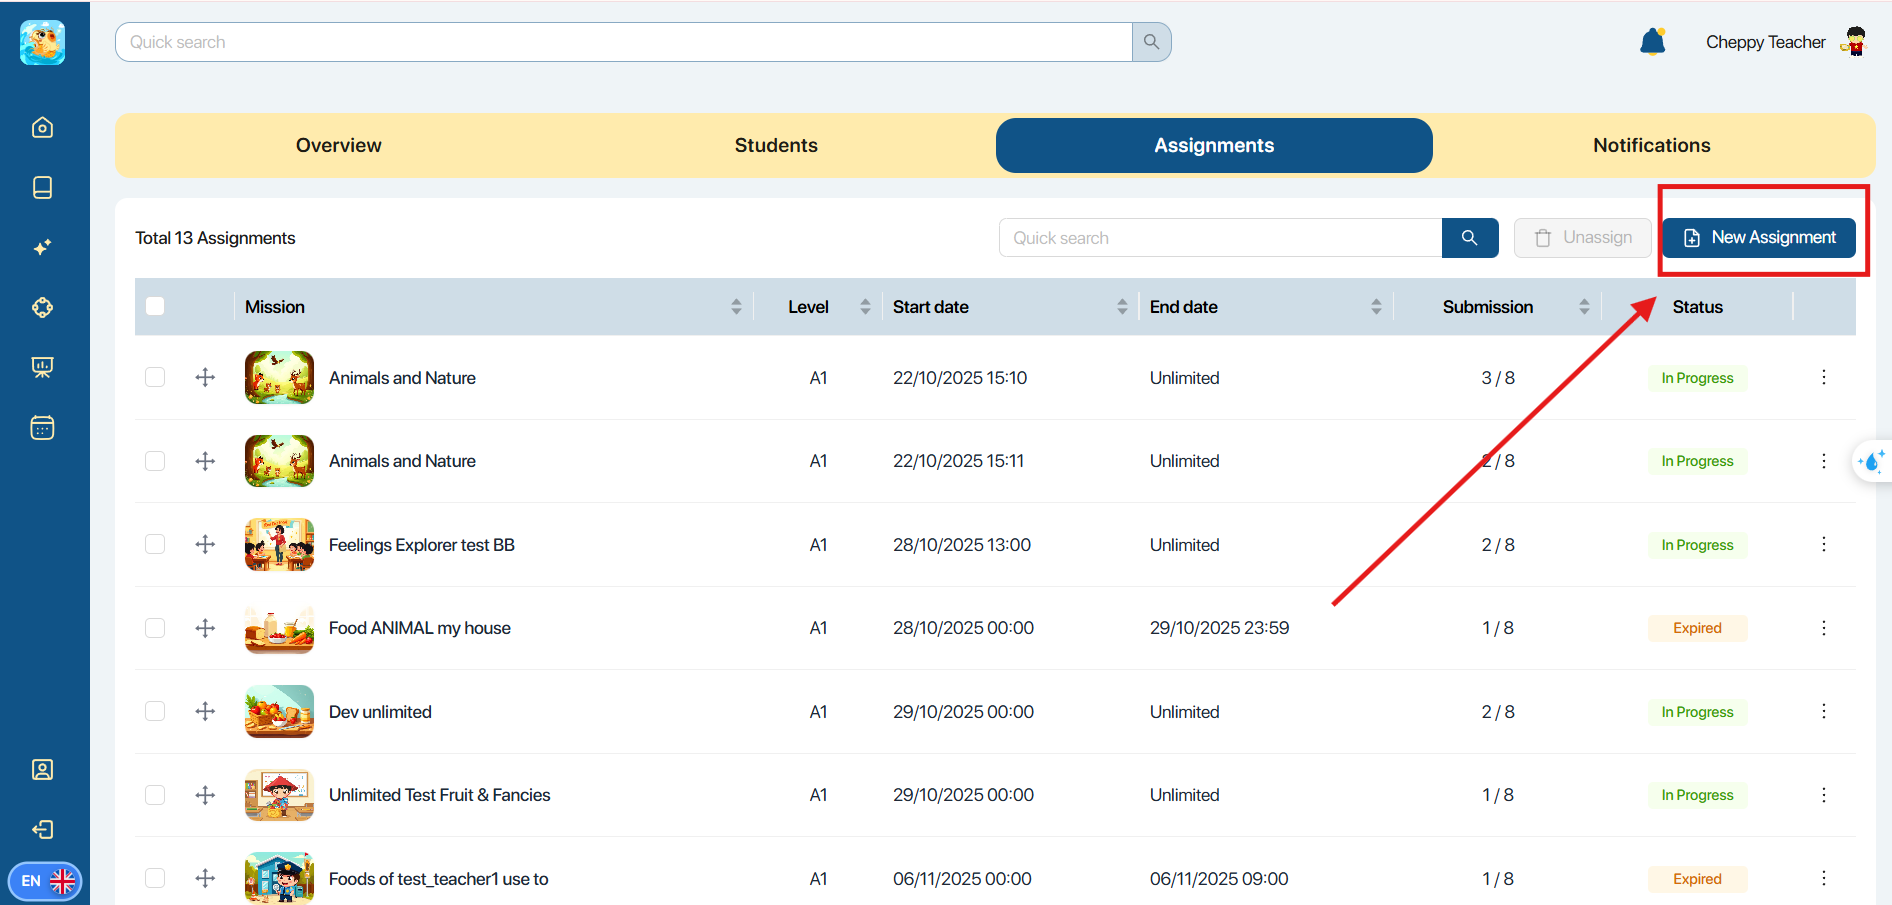
7.5. MANAGE THE ASSIGNMENT LIST
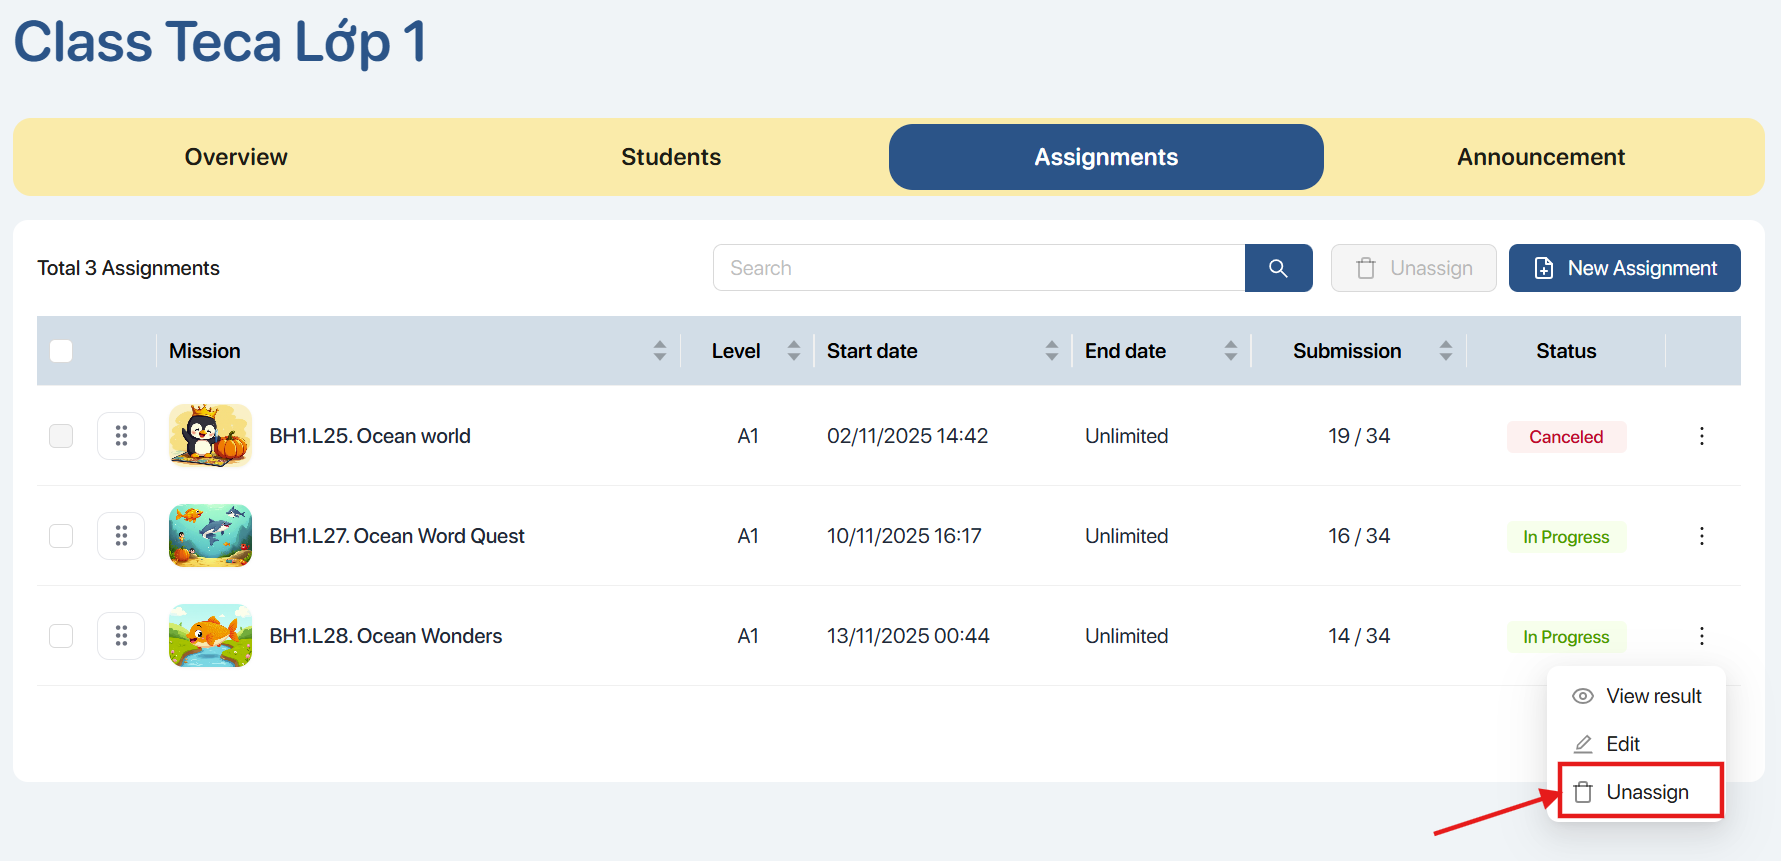
Step 1. From the top navigation bar, the user selects Assignments.
Step 2. To unassign multiple Assignments, the user selects the Assignments in the list and clicks the button ![]() .
.
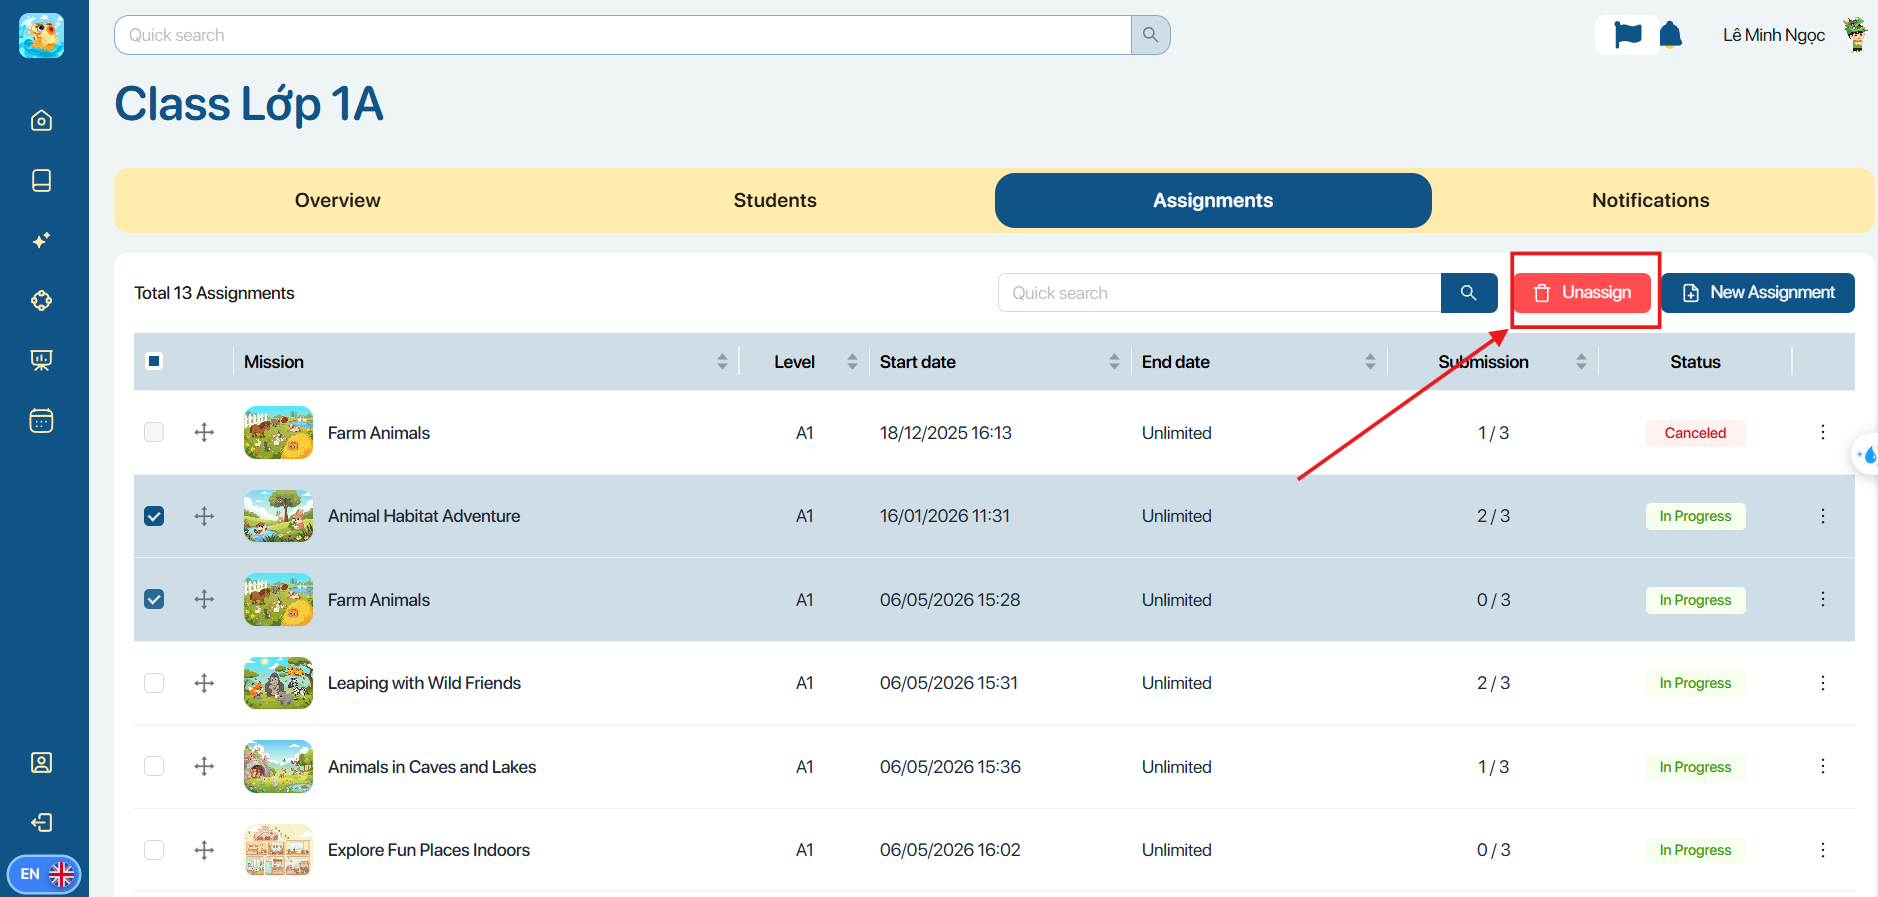
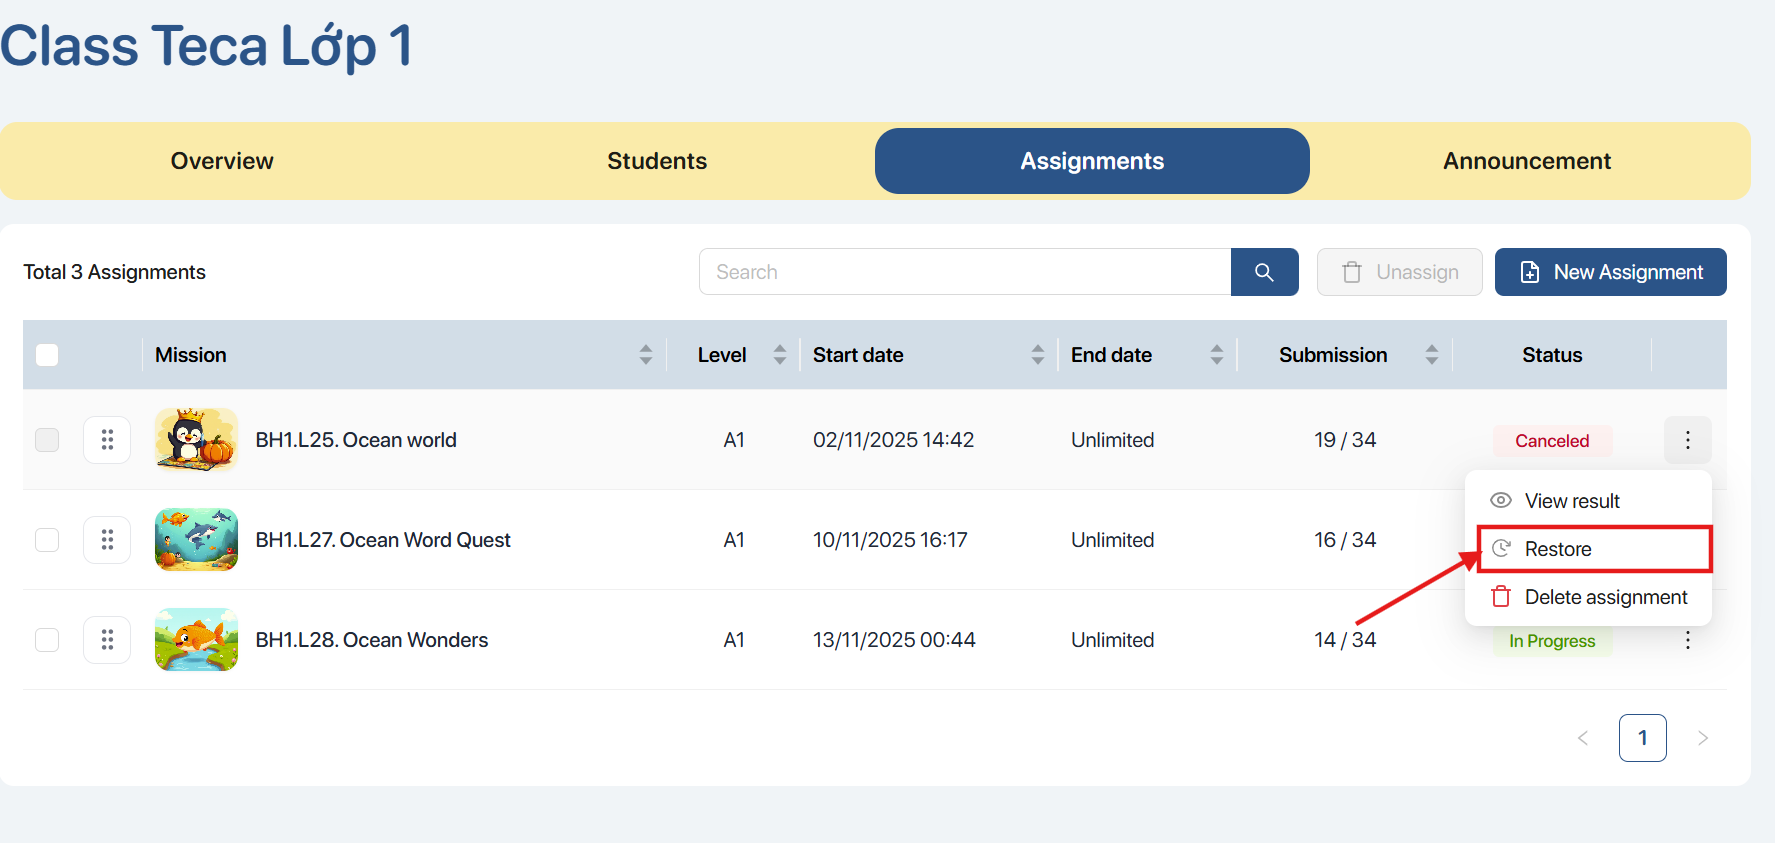
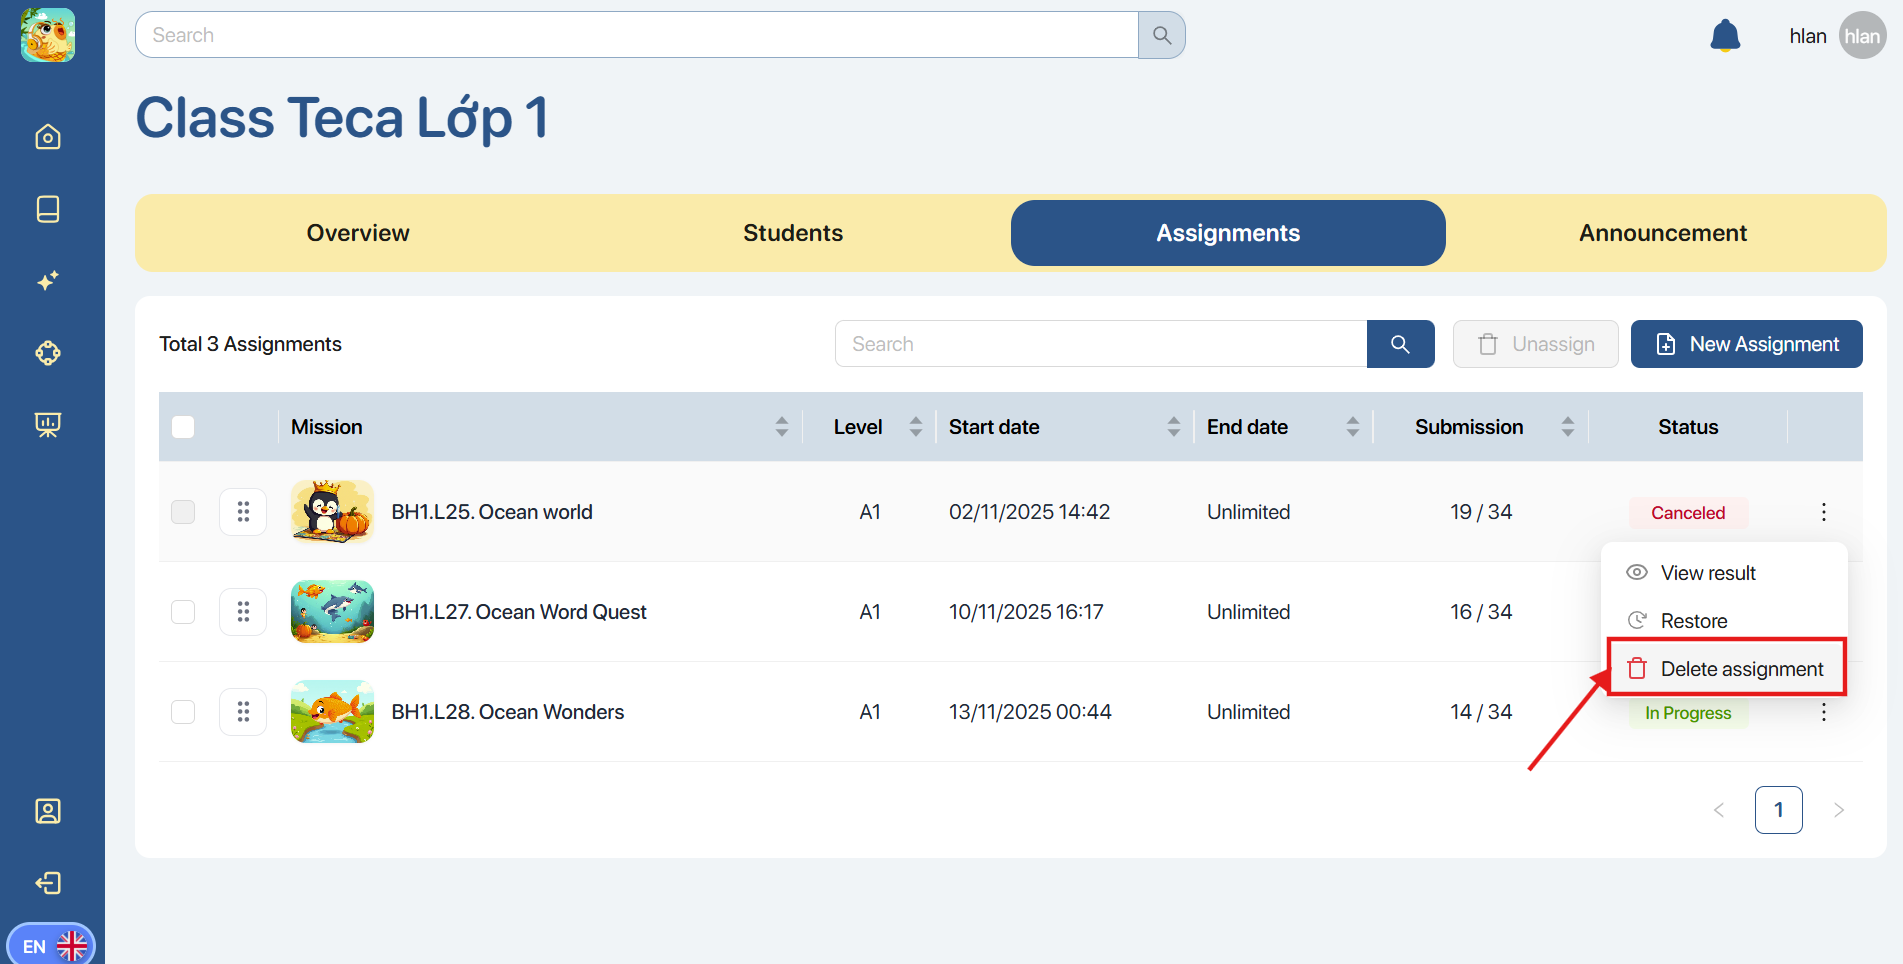
Step 3. Click the icon ![]() on each Assignment, and the system will display the following operation options:
on each Assignment, and the system will display the following operation options:
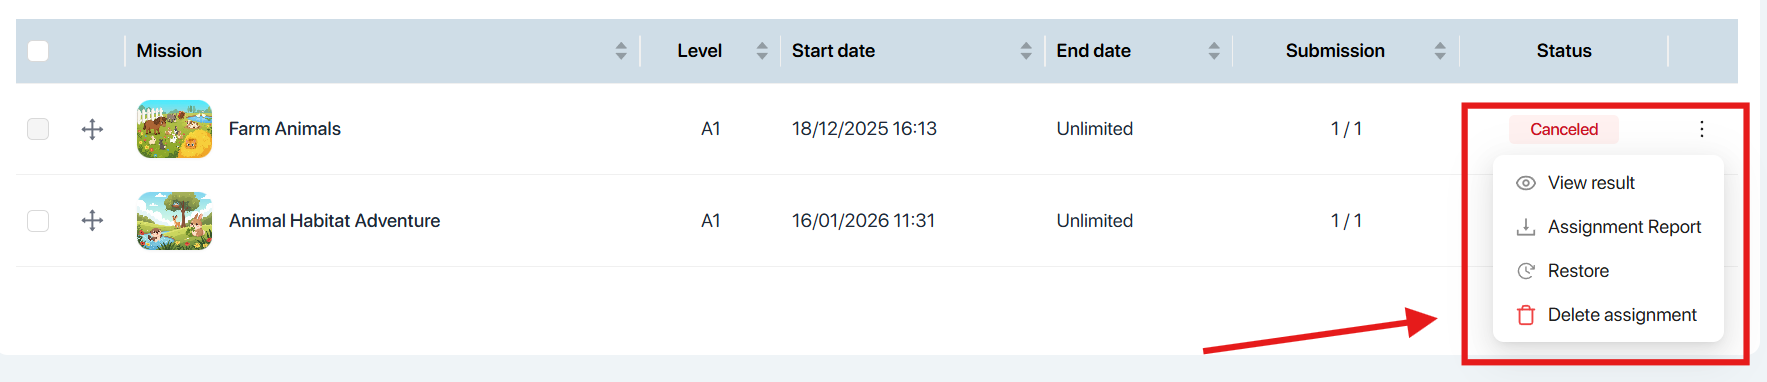
| No. | Function | Operation |
|---|---|---|
| 1 | View results The screen displays a comparison table of results among students. Users can view the following information: Highest score: The highest score of that student Number of completed Stages: Number of completed stagesCompleted time: Completion time Duration: Maximum time allowed for each mission.Status: Completed/Not completed status 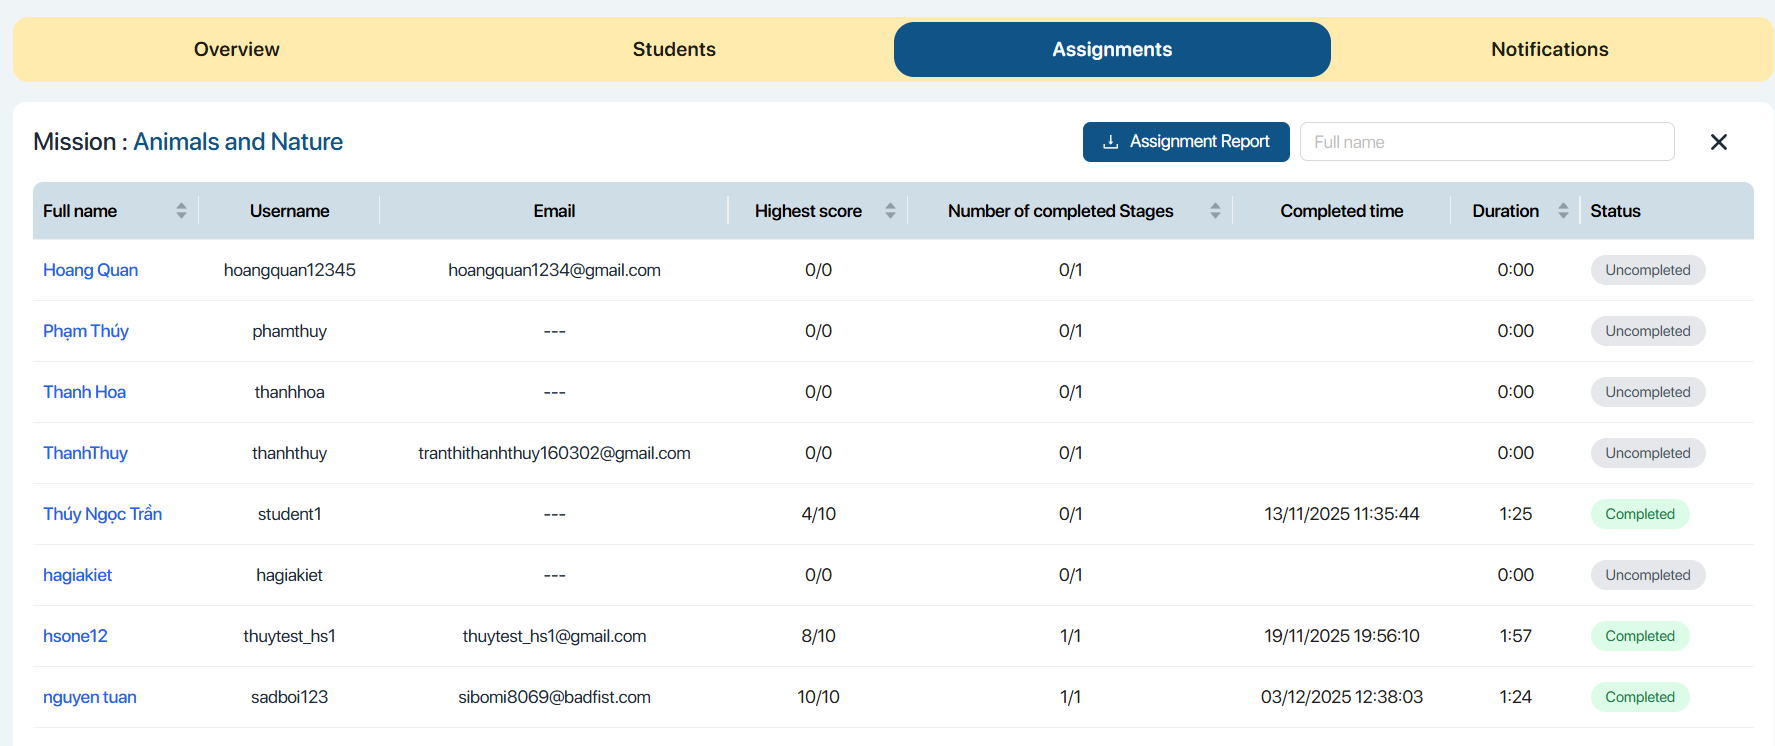 | |
| 2 | Download results report The user can download the assignment report. | |
| 3 | Edit assignment The screen displays the settings screen for the Assignment stages.  | |
| 4 | Unassign Mission |
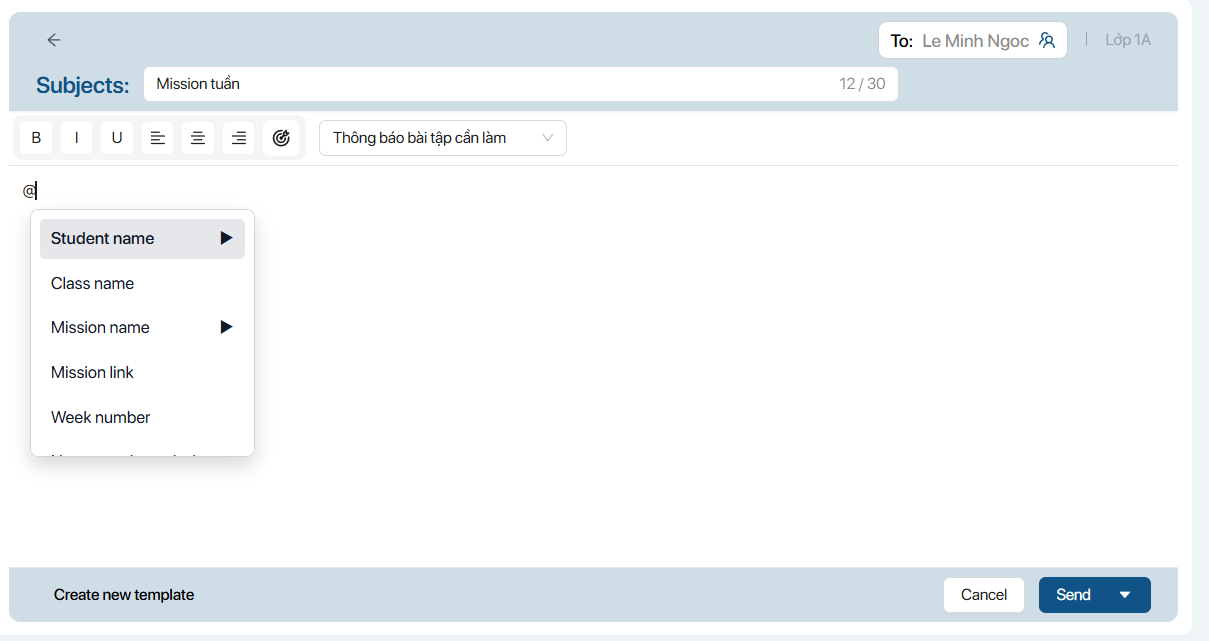
7.6. SEND NOTIFICATIONS/ STUDENT FEEDBACK
Step 1. From the Notifications screen, the user selects the icon ![]()

Step 2. The user enters the information, including:
- Subjects: Enter the title
- Content: Content of the feedback/notification
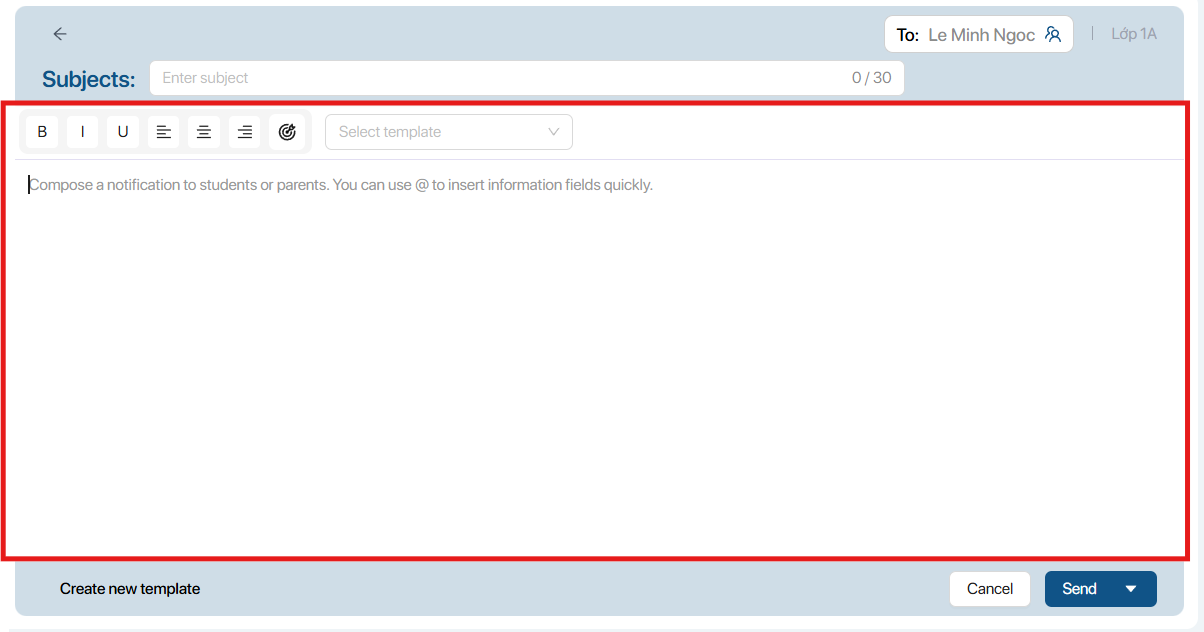
Lưu ý:
- The user can enter the “@” symbol to quickly insert data fields.
Step 3. To edit the format of the notification content, the user uses the following functions:
| No. | Function | Description |
|---|---|---|
| 1 | Formatting Tools The user selects the appropriate formatting tools, including: B = Bold I = ItalicU = Underline | |
| 2 |  | Alignment The user selects the appropriate alignment type, including :Left alignCenter alignRight align |
| 3 |  | Mission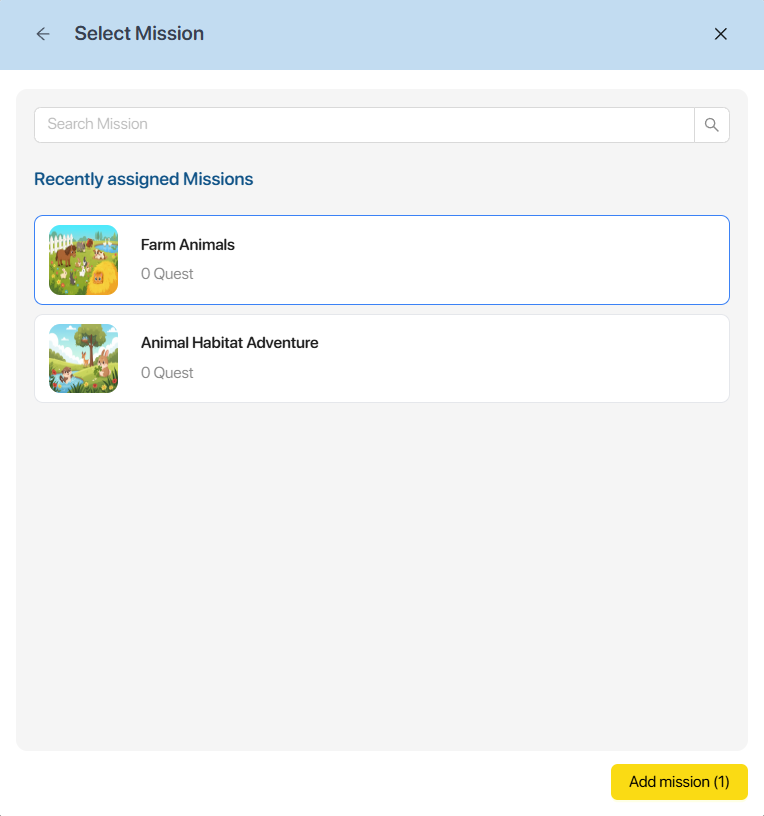 The user selects the Mission to attach to the notification content, then selects the icon The user selects the Mission to attach to the notification content, then selects the icon |
| 4 | Select template 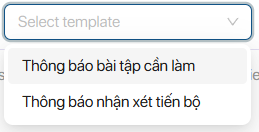 The user selects a pre-existing notification template according to the purpose of the notification. The system will then automatically display the corresponding message content.The user only needs to click on the fields formatted like The user selects a pre-existing notification template according to the purpose of the notification. The system will then automatically display the corresponding message content.The user only needs to click on the fields formatted like 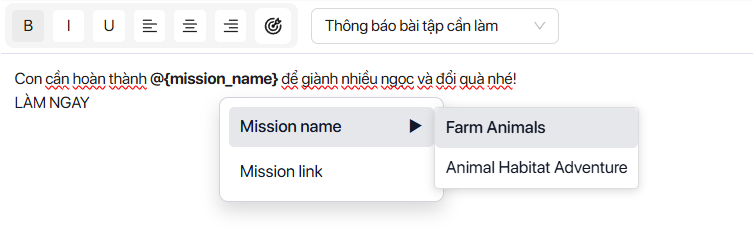 |
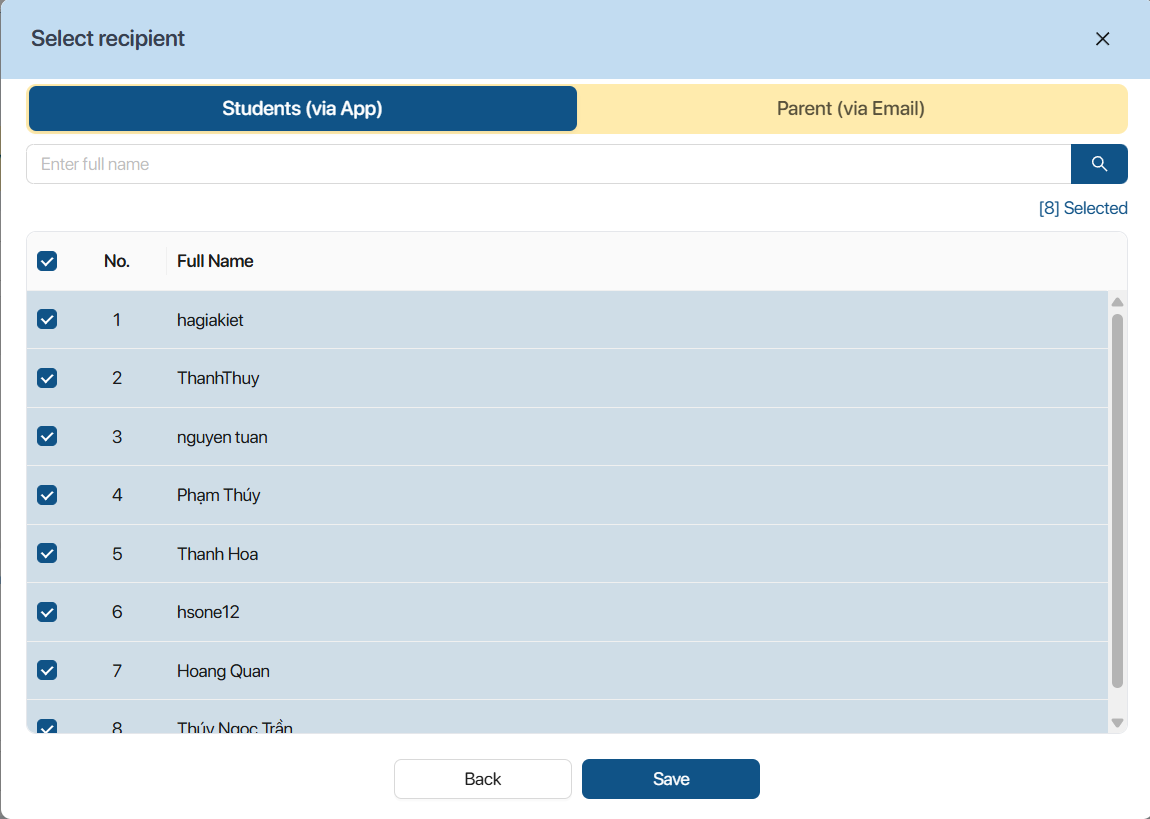
Step 4. The user selects the icon ![]() to check the list of recipients.
to check the list of recipients.
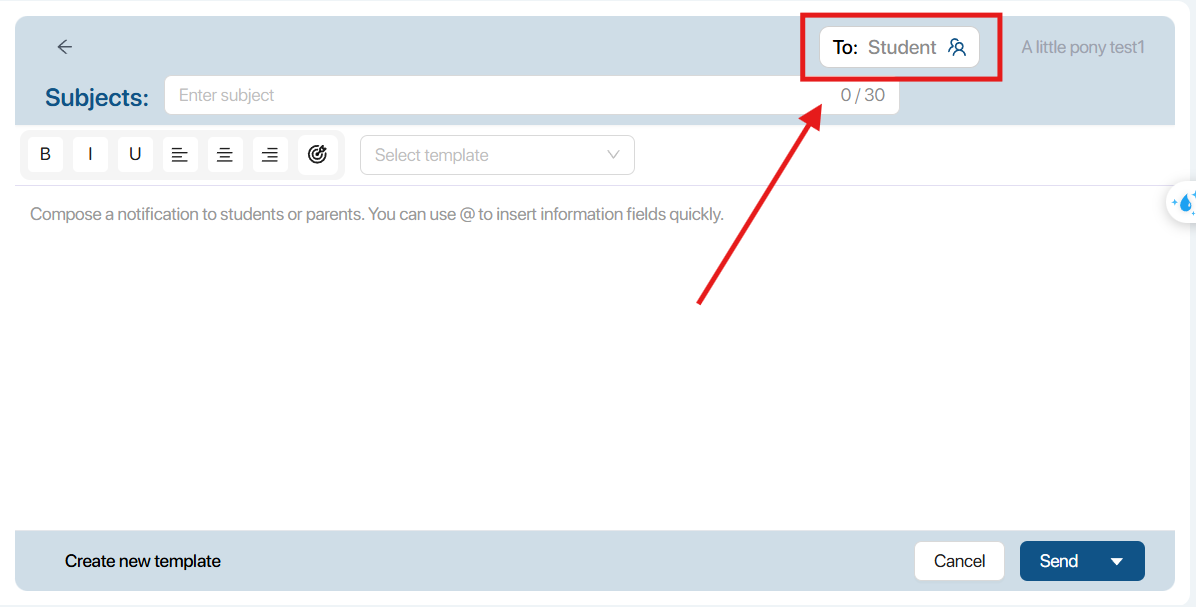
Note: The system defaults to sending to all students.
Step 5. The user can select or deselect students in the list to send the notification via the app and clicks the button ![]() .
.
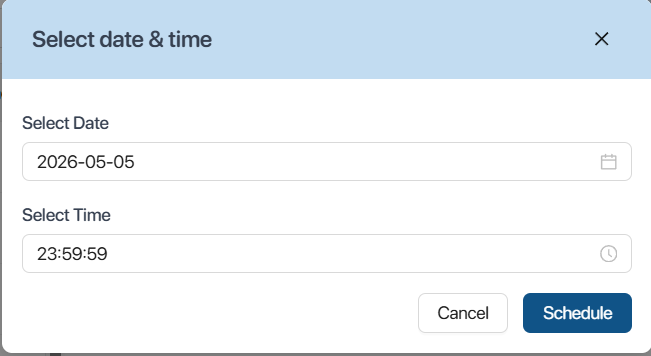
Step 6. To confirm sending the notification, the user can choose 1 of 2 ways as follows:
Method 1: Select Send now to send the notification immediately.
Method 2: Select Schedule send to set a schedule for sending the notification. The user needs to set the date and time for sending the notification and select the button ![]()
8. MY CALENDAR
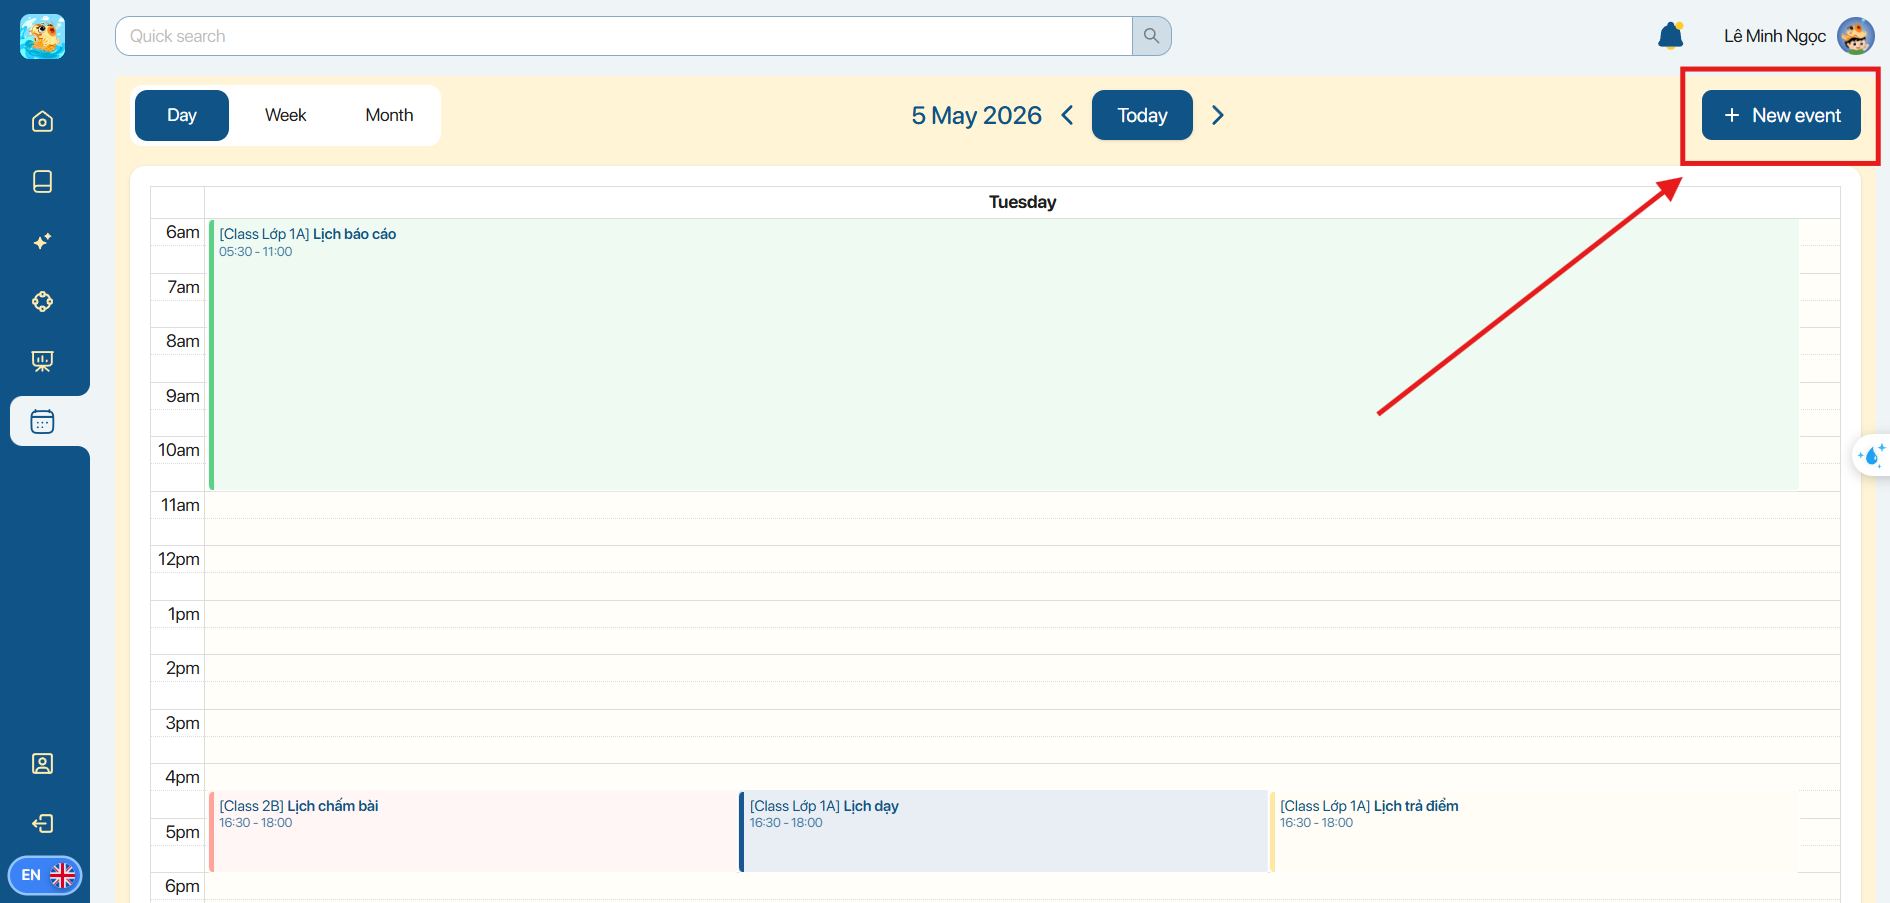
Step 1. On the left navigation bar, the user clicks the My Calendar icon.
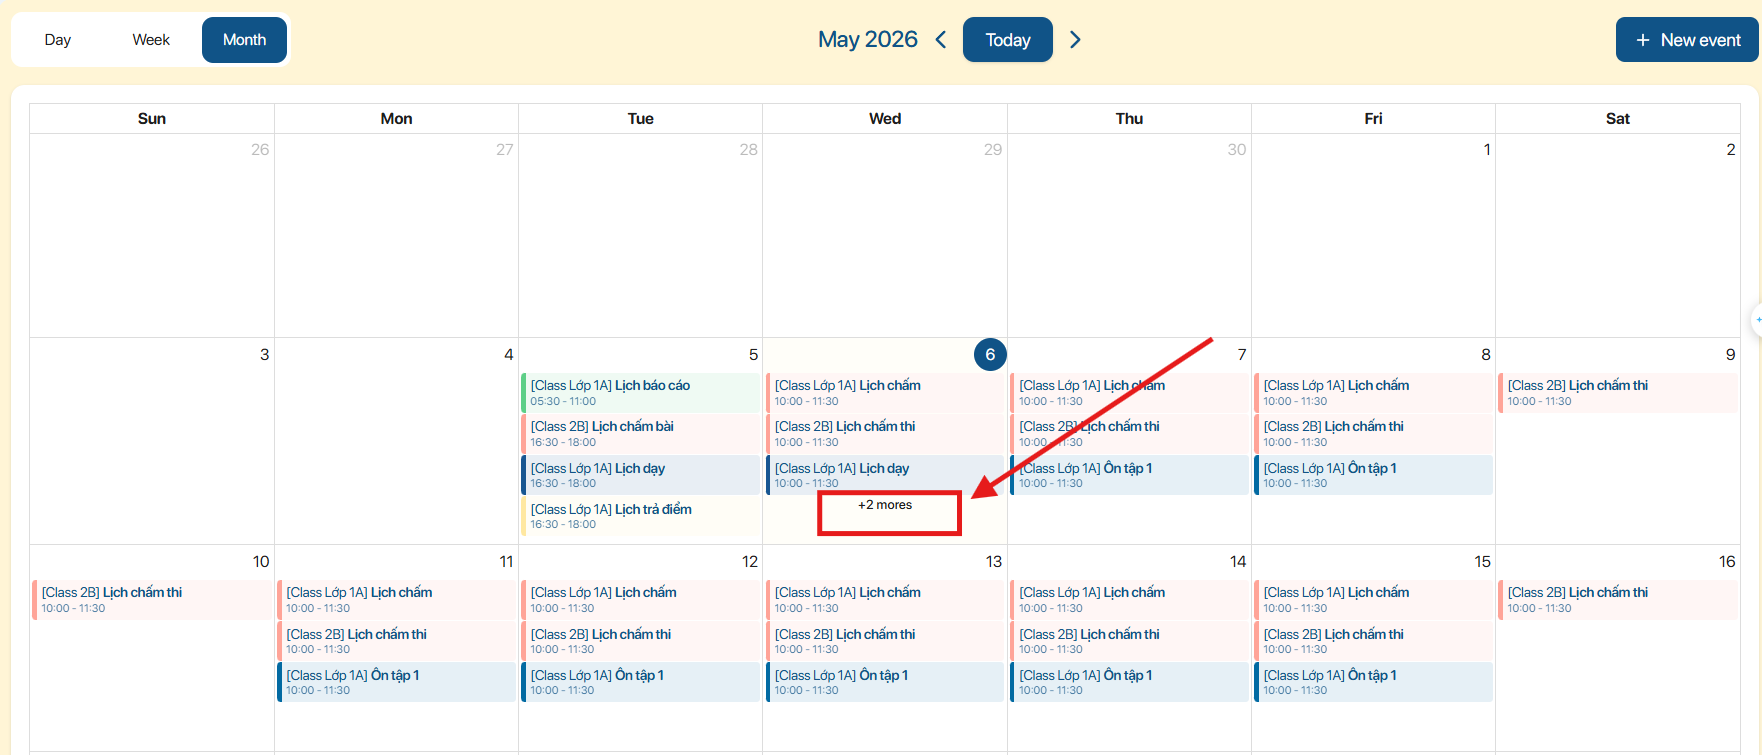
Step 2. In the area above the calendar, the user changes the calendar display mode as follows:
| No. | Function | Description |
|---|---|---|
| 1 |  | Calendar Mode The user can switch the calendar mode, including: Day: Day mode Week: Week mode Month: Month modeNote: The system defaults to month mode when the user clicks the My Calendar function . |
| 2 |  | Navigation Click the icon |
Step 3. The user selects an event on the calendar to view detailed information, including:
- Class name
- Class start date
- Start time - End time
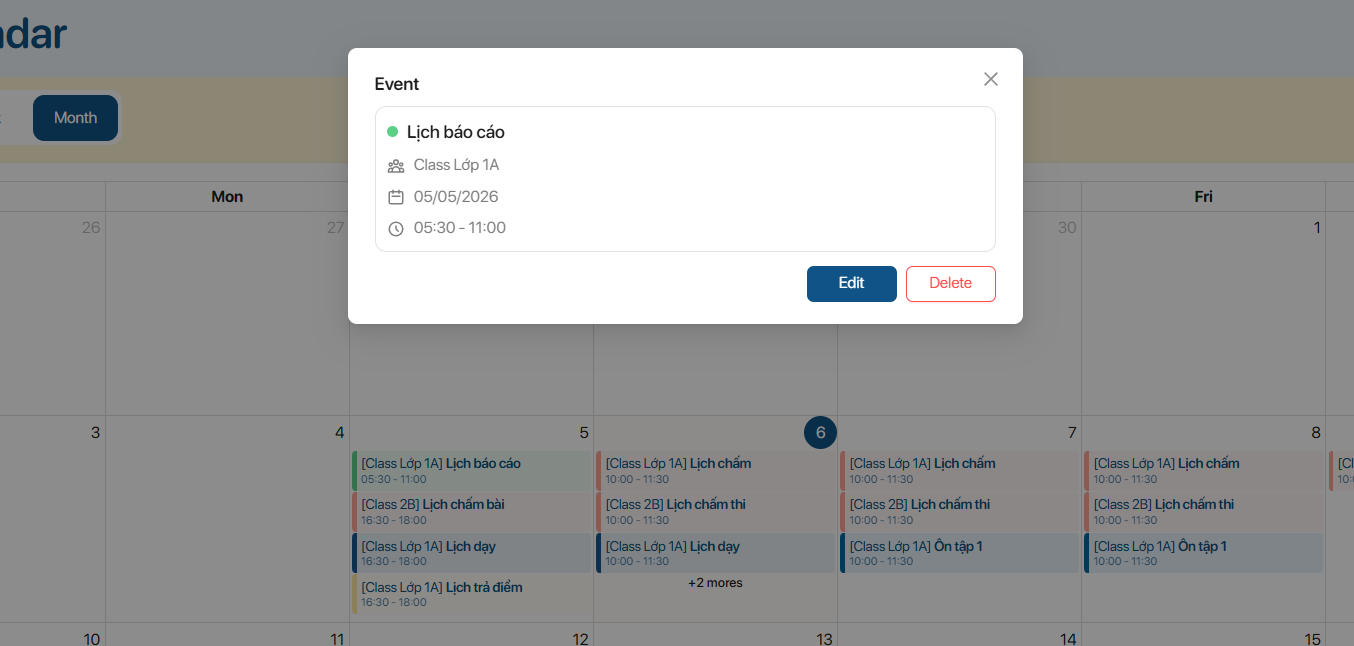
Note:
- If a time slot has multiple events, the user clicks [+number] more to view all events.
Step 4. The user selects the edit icon ![]() to edit the event information or the delete icon
to edit the event information or the delete icon ![]() to delete the event.
to delete the event.
8.1 CREATE A NEW EVENT
Step 1. On the Calendar screen, the user selects the button ![]()
Step 2. The user enters all missing information, including:
- Title: Enter the event title
- Date: Select the event date
- Time: Select the event time
- Task Type: Select the event type
- Class: Select the class
- Repeat: Tick to repeat the event
- Add notification: Add an event notification
- Description: Enter the event description

Note:
- If the user selects a Repeat option other than One time, the user can select the Add end repeat option to specify an end time for the recurrence.
- If the user selects “Add notification”, please select an end time for the event notification.
Step 3. The user can customize the Task type (Event Type) for use in subsequent event creations.
- Step 2.1 The user selects the color for the Task type.
- Step 2.2 Enter the name of the Task type.
- Step 2.3 Click the button
 to confirm adding this event type.
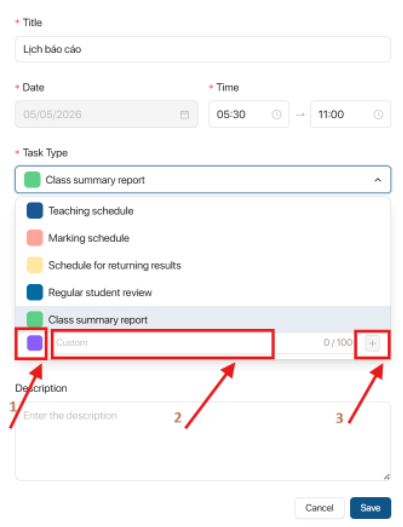
Step 3. Click the button ![]() to confirm creating the event.
to confirm creating the event.