USER MANUAL
LMS Cheppy for Manager
Version 1.2 - Updated May 8, 2026
1. OVERVIEW
1.1. General Introduction
This document is designed to support teachers in accessing, using, and effectively utilizing the teaching functions on the ELP (Educational Learning Platform) system developed by the Cheppy development team. Its aim is to contribute to improving foreign language proficiency and promoting digital transformation in education using Artificial Intelligence technology. This platform is gamified to make lessons engaging, allowing students to feel like they are playing while still learning effectively.
1.2. Conversion Terminology
The glossary below includes terms used in the gamified application, ensuring that the terminology is understood and used consistently by students, teachers, and parents.
| Pedagogical Language | Language in the App | Function |
|---|---|---|
| Unit/Lesson | Mission | Each Mission The application is structured around a specific theme, helping students feel they have a clear goal and a defined journey. |
| Exercise | Stage/Exercise | Each Mission contains Stages, Each stage consists of questions focusing on the same theme, aiming to fulfill the skill objectives and competency outputs of the Mission. |
| Score | Score | The score after completing a Stage is calculated based on the number of correct answers out of the total number of questions. |
| EXP/Experience Points | For each completed task, students will receive corresponding experience points. These points are used to determine rank advancement or to receive academic achievements. | |
| Reward | For each completed task, students receive additional gems as rewards, which can be used to purchase costumes and accessories for their characters. | |
| Competition Tracking Table | Leaderboard | The system displays student rankings by class/grade level based on metrics such as rewards and EXP, motivating students to maintain their study habits. |
Although languages change, Lesson structure - skill objectives - competency outcomes. This is still ensured under the supervision of the educational advisory team.
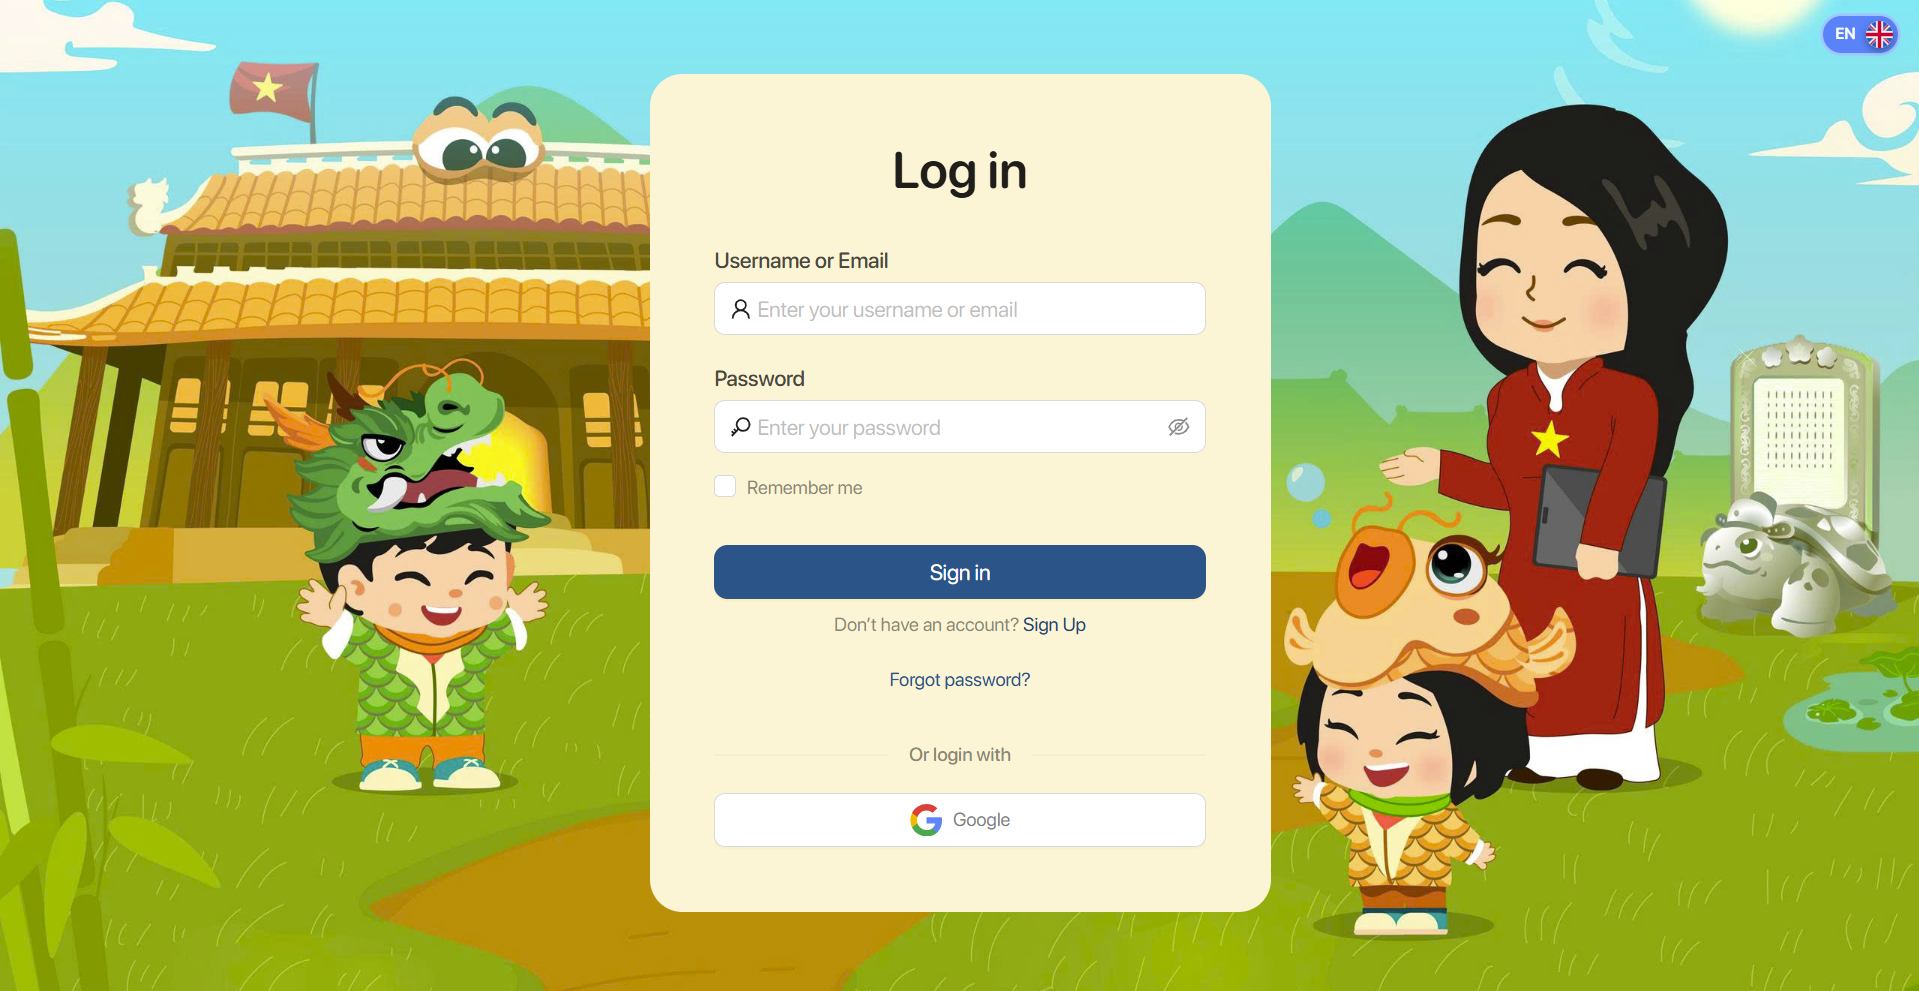
2. LOGIN/REGISTRATION INSTRUCTIONS
Step 1 Access the website https://beta.cheppy.ai.
Step 2: Click on the icon To change the display language between English and Vietnamese.
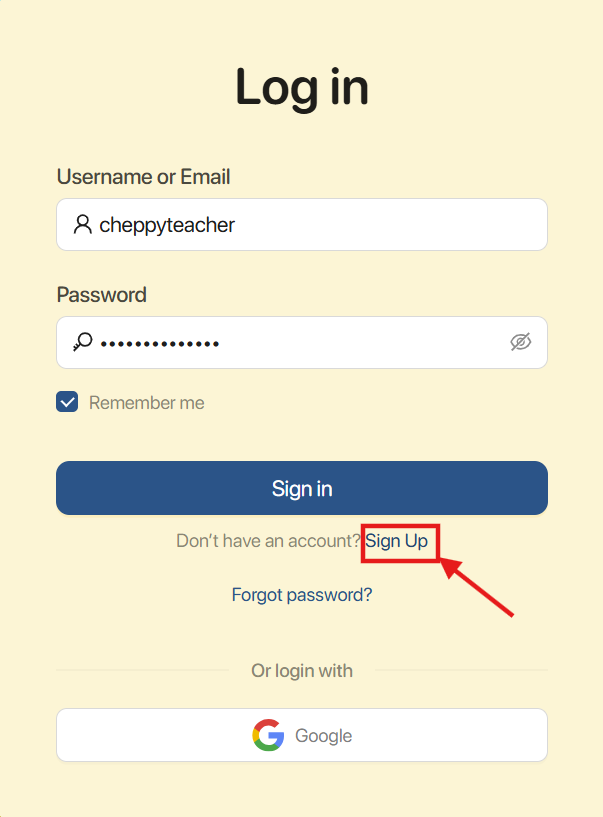
2.1. REGISTRATION INSTRUCTIONS
Step 1: Press select Sign up to switch to the new account creation page.
Step 2:Enter your full account information, including:
- Username: Login name.
- Full Name: Full name.
- Email: Email address.
- Password: The password must be between 8 and 16 characters and include at least one digit.
- Confirm Password: Re-enter your password.
Note: The information entered in the Password and Re-enter Password fields must be the same.
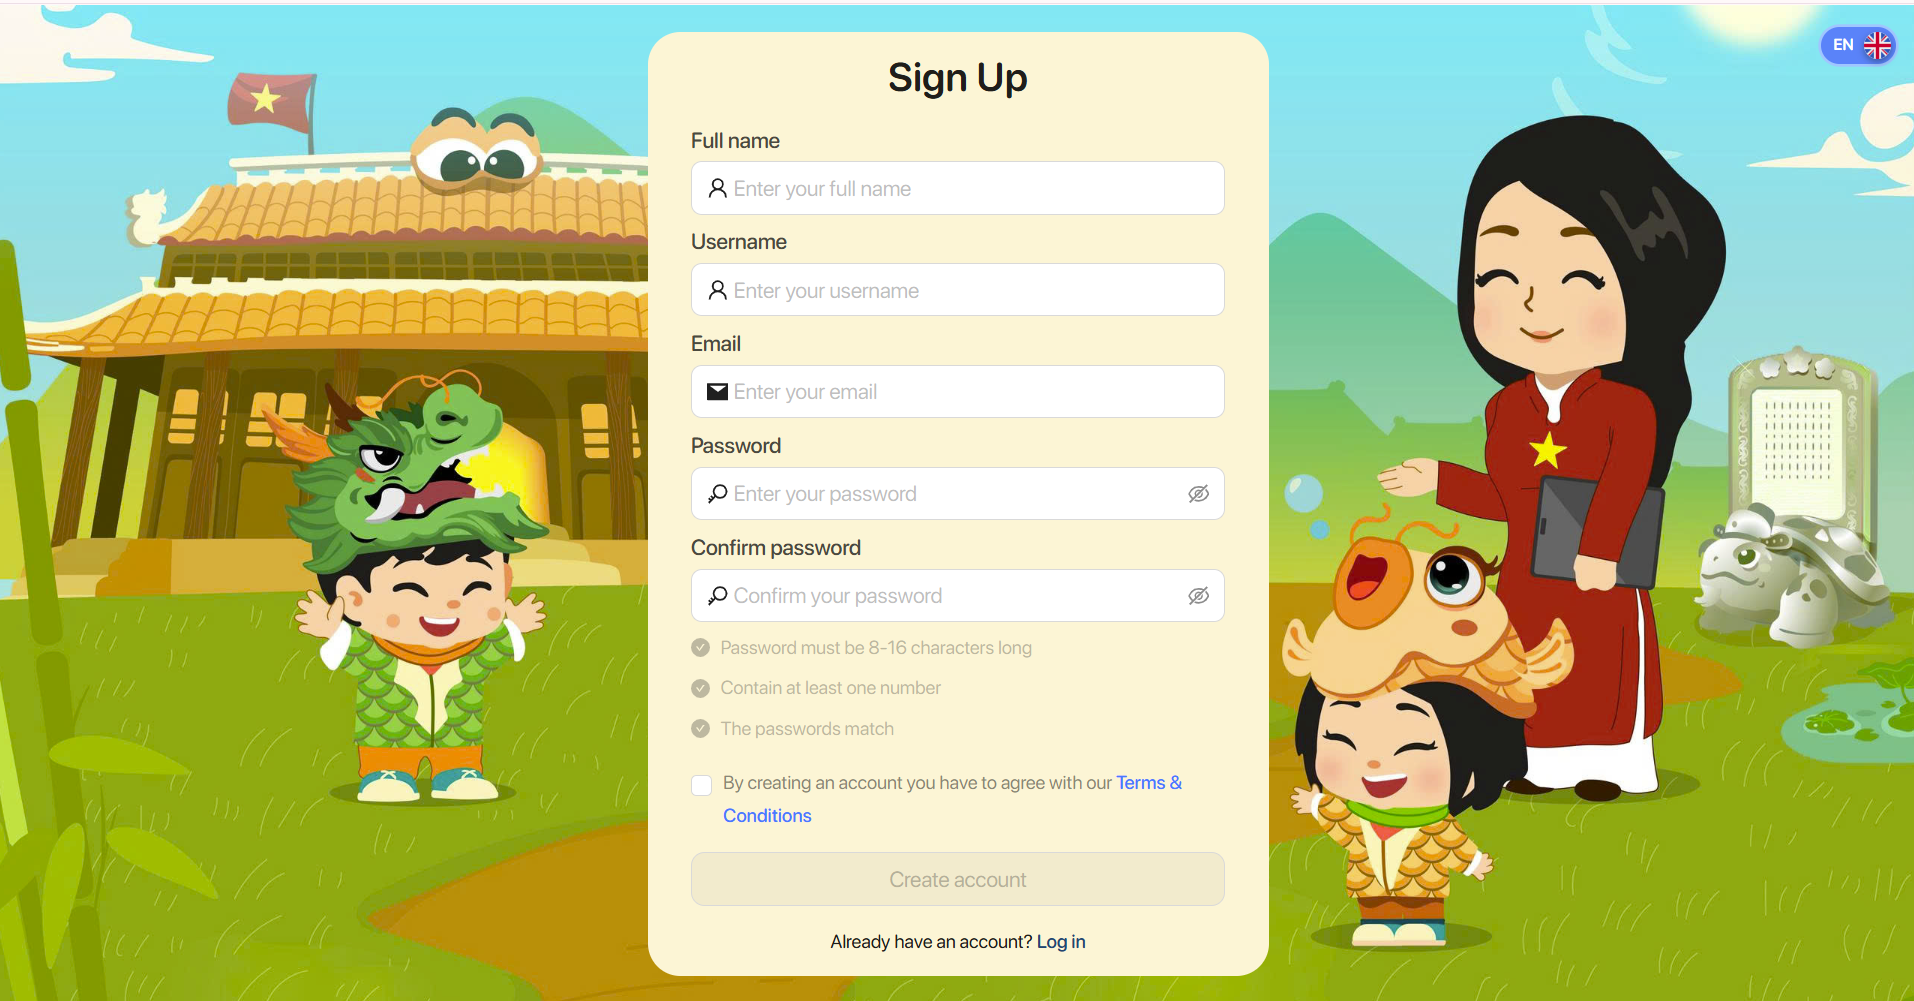
Step 3:After filling in all the information, users click on the "Terms and Policies" link to understand the terms related to using the platform. If they agree to the terms, they check the box.
Step 4: Press the Register button. )To complete account creation.
Note: After clicking the Register button, some information may be invalid. Please re-enter the required information to ensure it is correct.
2.2. LOGIN INSTRUCTIONS
Step 1: The login page offers two ways for users to perform the action.
Method 1:Enter your full account information, including:
- Username or Email: Your login name or email address.
- Password: Password.
Method 2: Log in quickly using your Google account.
Step 2: Press the button To complete the login process for the website.
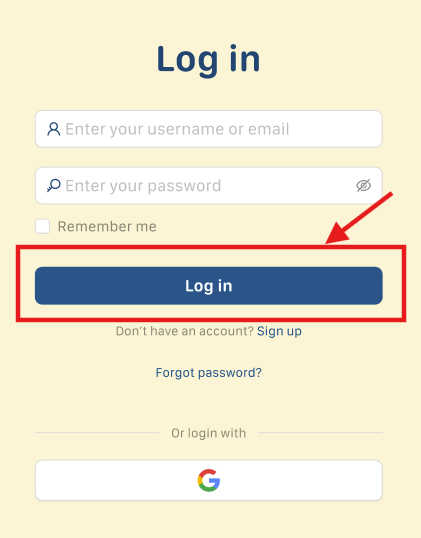
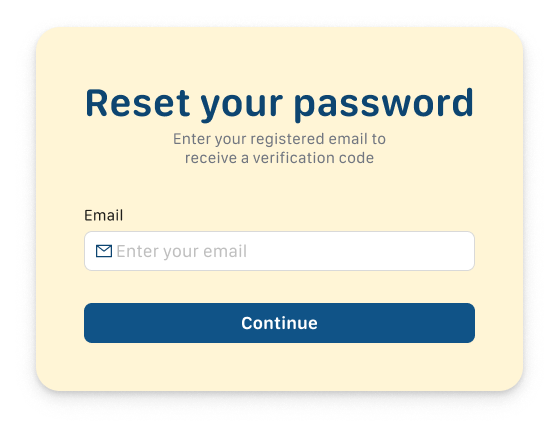
2.3. HOW TO CREATE RESET YOUR PASSWORD
Step 1:If you forget your password, click here. Forgot password?
Step 2: Enter your registered email address and press the button.![]()
Step 3:Access your personal email inbox and enter the 6-digit code.
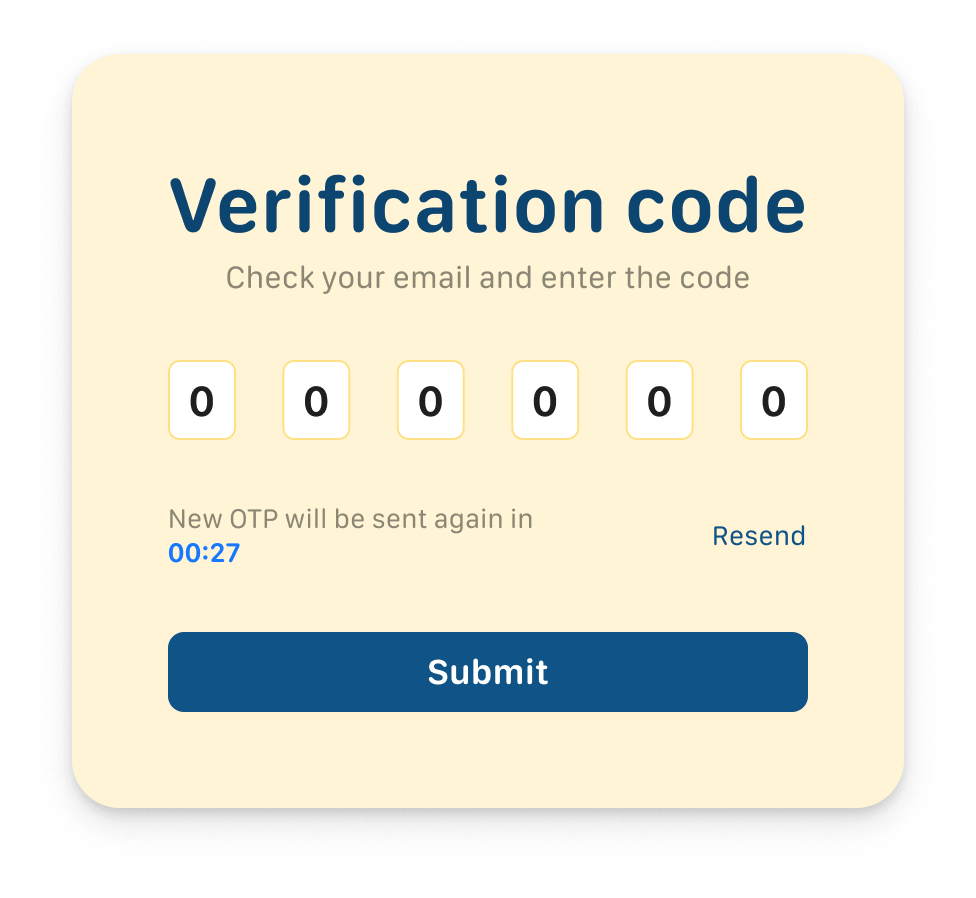
Note: If the verification code is not received or has expired, the user should press the button Resend to request the code be resent.
Step 4:Press the button to confirm the verification code.
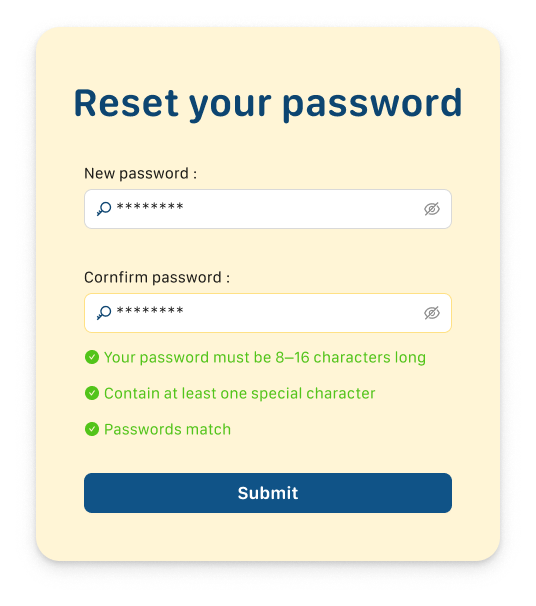
Step 5: The user enters the new password and presses the button to complete setting a new password.
2.4. SELECTING AN ORGANIZATION
Step 1. On the main screen, select the organization you currently work for from the list.
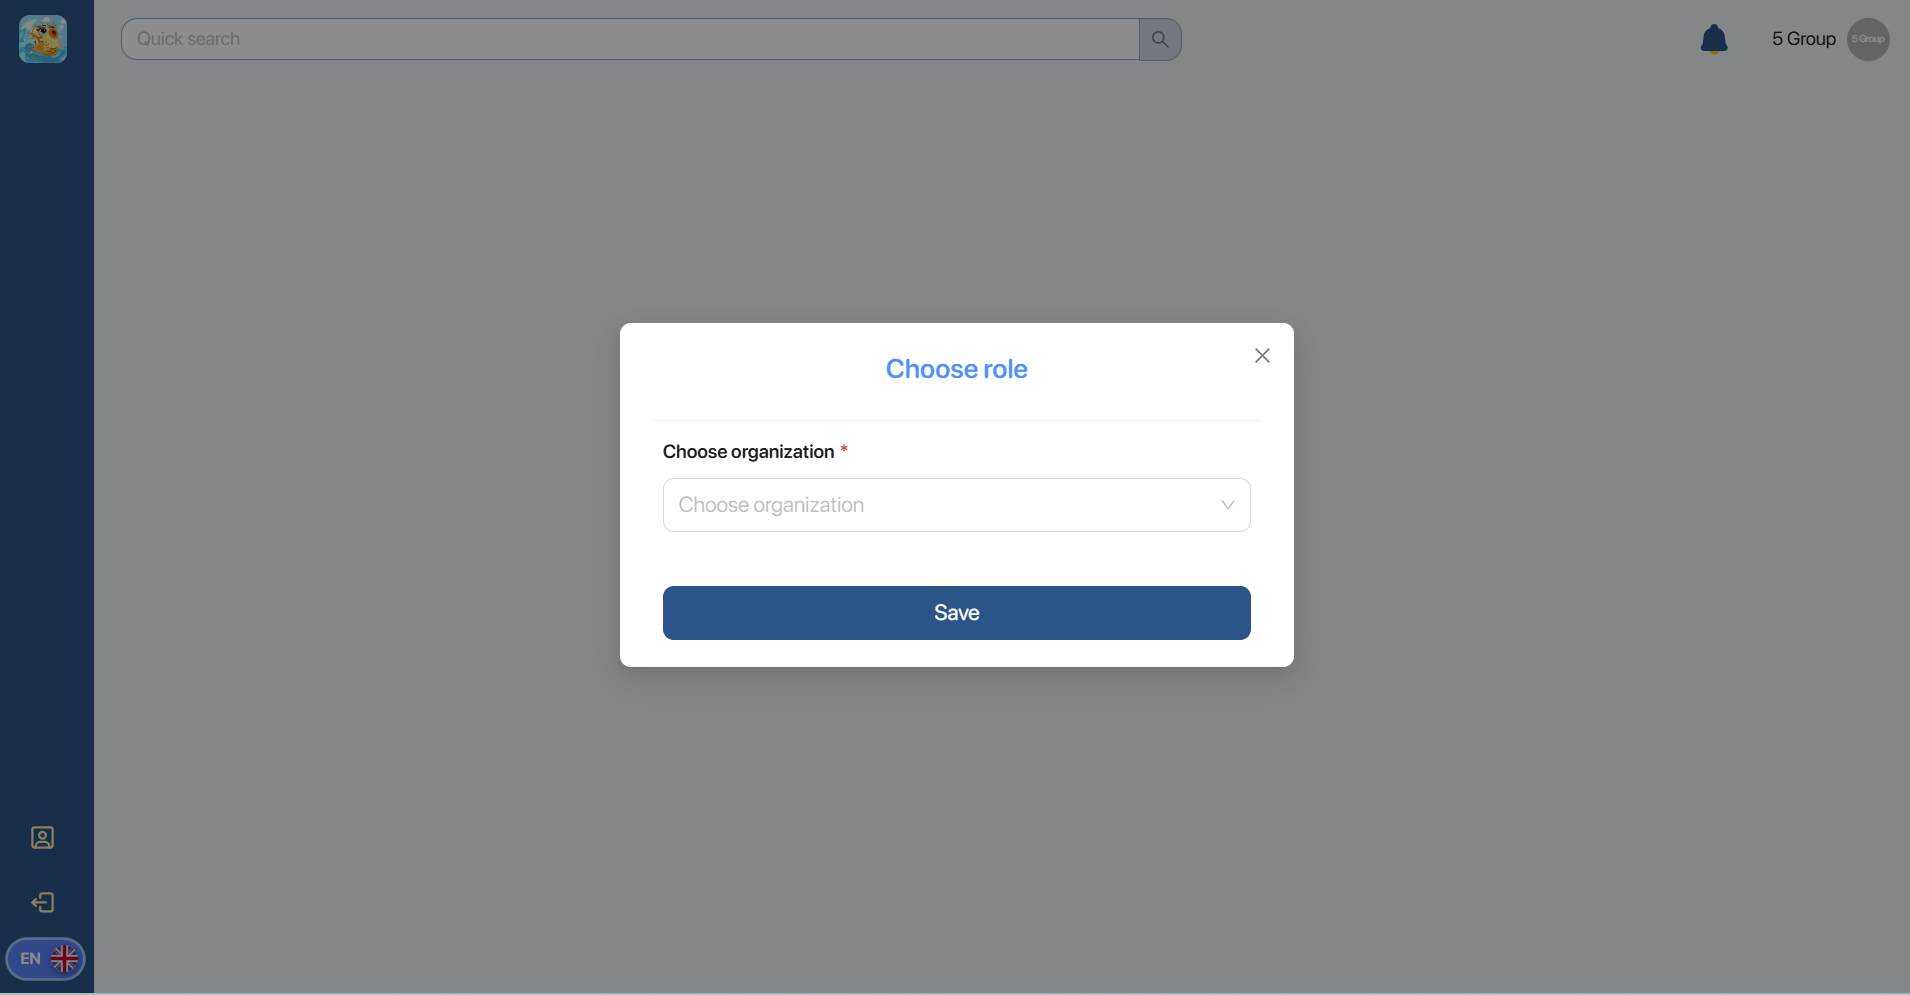
Step 2. Click on the icon![]() to switch to the page Dashboard.
to switch to the page Dashboard.
3. DASHBOARD
Step 1. Click on the iconTo change the display language between English and Vietnamese.
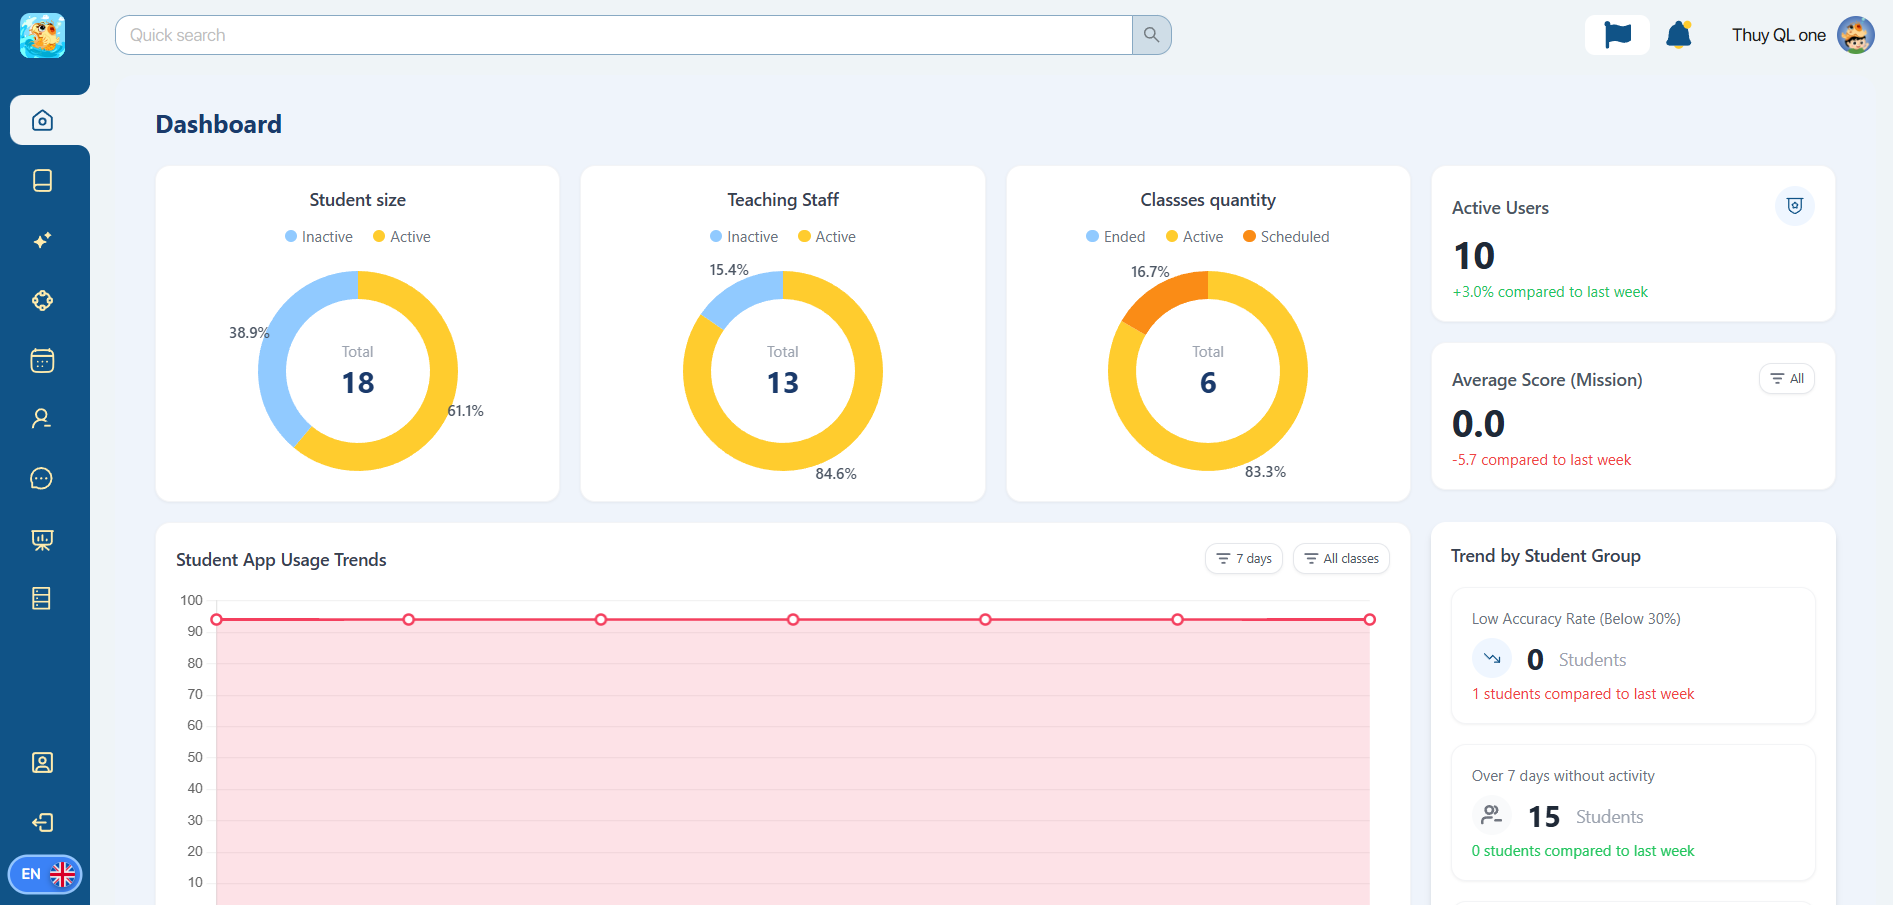
The navigation bar on the left contains the following quick access functions:
| STT | Icon | Function | Describe |
|---|---|---|---|
| 1 | Dashboard | Display an overview of charts and reports about | |
| 3 | My Library | Create, store, and manage Tasks.For students. | |
| 5 | Mission Creation | Create Tasks with AI assistance. | |
| 4 | Mission Gallery | Search for shared tasksfrom the community. | |
| 6 |  | Manage User | Create, store, and manage user accounts within the organization. |
| 2 |  | Manage Roles | Creating and assigning roles within the organization. |
| 7 |  | Manage Class | Manage the classes within the organization. |
| 8 |  | Manage Mission | Manage all tasks created by accounts within the organization. |
3.1. PIE CHART: STUDENT SIZE, TEACHING STAFF AND CLASS QUANTITY
| STT | Chart | Description |
|---|---|---|
| 1 | 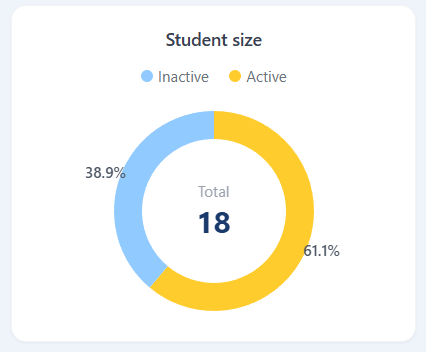  | Student sizeAllows viewing detailed charts showing the student enrollment size on the system, specifically:- The yellow area represents the number of active students.- The blue area represents the number of students who are inactive.- The figure in the center of the chart shows the total number of students in the system.Note: When you hover your mouse over a section of the chart, the system will display the corresponding scale. |
| 2 | 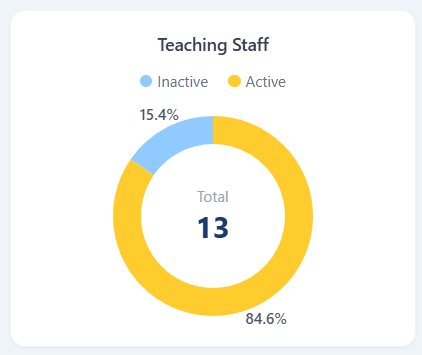 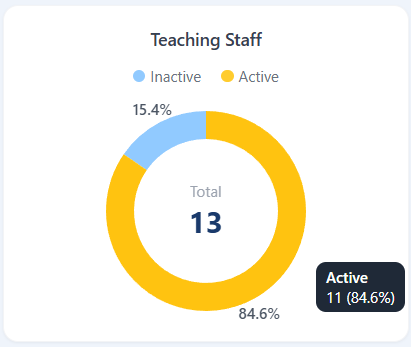 | Teaching StaffThe pie chart is used to display the proportion of employees by activity status within the system.- The yellow area shows the number of active employees.- The blue area represents the number of employees who are no longer working.- The figure in the center of the chart shows the total number of employees. |
| 3 | 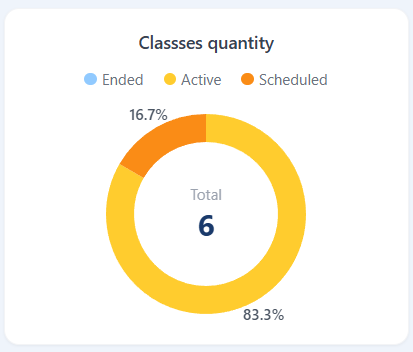 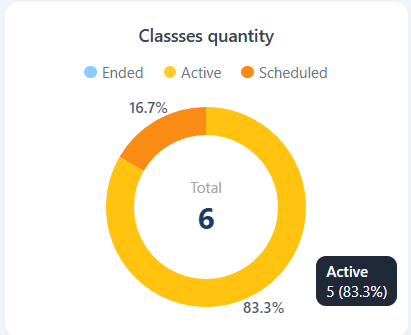 | Class quantityThe pie chart is used to display the percentage of classes based on their activity level within the system.- The yellow area shows the number of currently active classes.- The gray area represents the number of classes that are no longer in operation.- The figure in the center of the chart shows the total number of classes. |
| 4 |  | Number of active usersDisplays the number of users currently accessing the platform (including users active on both the web and app).Average score (Mission)Display the average score of students in the Missions completed during the current week (based on each student's highest score). |
3.2. STUDENT APP USAGE TRENDS
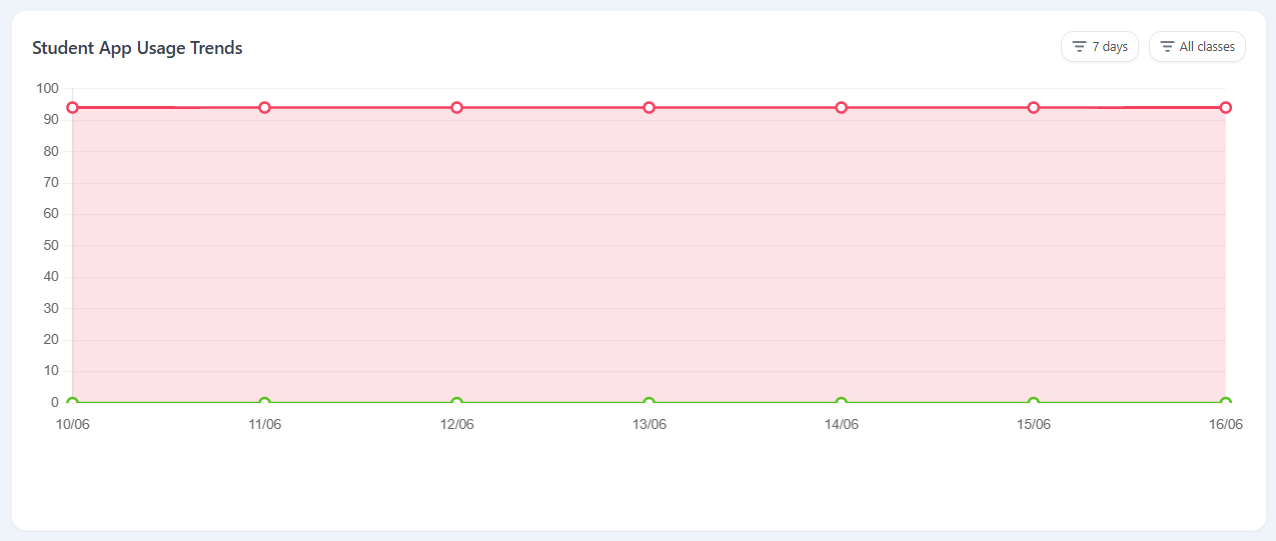
Description: A line graph is used to display the trend in the distribution of students based on their app usage over a selected time period.
Components:
- Green line (Active group) shows the percentage of students who have:
- Correct answer rate (Accuracy) from 70% or more
- Continuous activity on the application for 7 days or more.
- Red line (High-risk group) shows the percentage of students who have:
- Correct answer rate (Accuracy) below 30%
- Not working on the app anymore for 7 days.
Note:
- When you hover your mouse over a data point on the chart, the system will display the percentage and number of students in that group at that time.
- Users can use filters Time and Class to view data by specific time periods or categories:

3.3. TREND CHARTS BY STUDENT GROUP
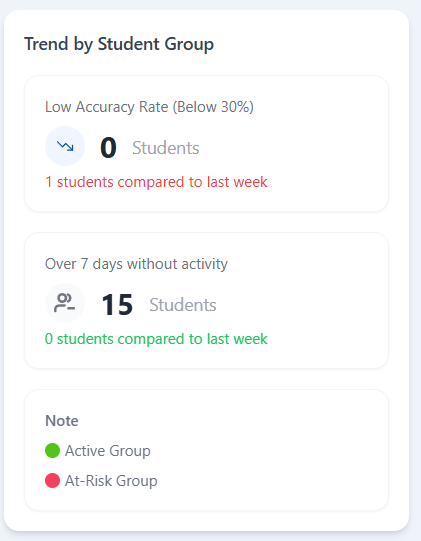
Description: Display the number of students in the groups of interest within the selected time period.
Components:
- Low correct answer rate (below 30%): Displays the number of students whose correct answer rate is below 30%.
- Inactive for over 7 days: Displays the number of students who have not been active on the app for more than 7 consecutive days.
3.4. TEACHERS MISSION ASSIGNMENT ACTIVITY
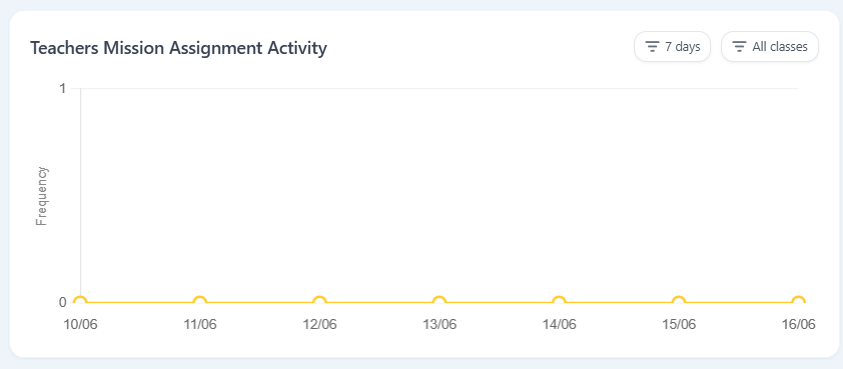
Description: A line chart is used to display the number of tasks assigned by a teacher to students each day within a selected time period.
Note:
- When you hover your mouse over a data point on the chart, the system will display the corresponding number of mission assignments at that time.
- Users can use filters Time and Class to view data by specific time periods or categories:


3.5. STUDENT MISSION COMPLETION RATE CHART
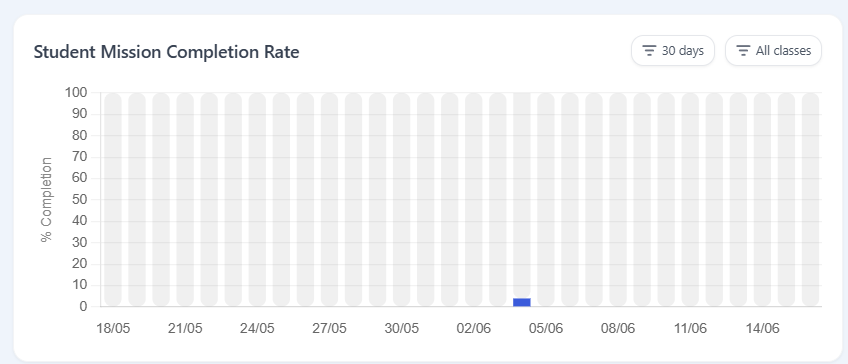
Description: The bar chart is used to display the percentage of Missions completed by students each day within the selected time period. Each bar represents the average completion rate (%) of the assigned Missions on that day.
Note: When you hover your mouse over a column on the chart, the system displays:
- Average completion rate (%).
- Number of Missions (Assignments) assigned during the day.
- Number of students who have completed the Mission.
3.6 ACTIVITY RATING CHARTS ON THE APPLICATION PLATFORM
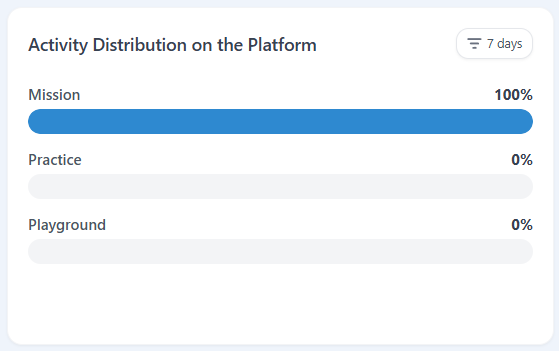
Description: Display the percentage of time students spend in the following areas: Mission (Learning), Practice (Exercises), Playground (Recreation).
3.7. SKILLS COMPETENCY CHART
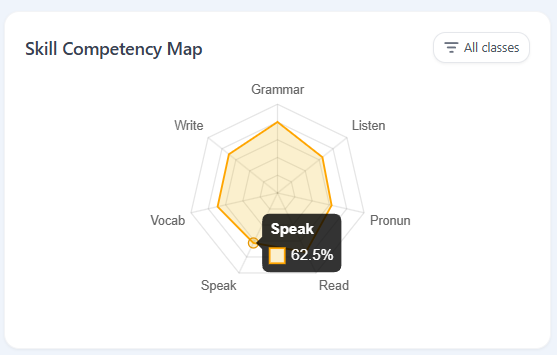
Description: This display shows the average student accuracy score distributed across 7 skills. The yellow area that expands more towards a particular skill indicates that the student has a higher accuracy score in that skill.
Components:
- Grammar
- Listening
- Pronunciation
- Reading
- Speaking
- Vocabulary
- Writing
3.8. COMPETENCY CHART BY CLASS
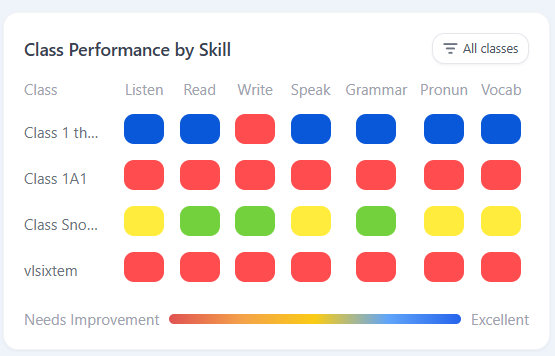
Description: Displays the average skill score of students at the organization (expressed as a percentage). The color of each cell is determined based on the average skill score:
- 0%: Dark red (lowest level).
- 50%Gold (average level).
- 100%Dark green (highest level).
3.9. CLASS COMPETITION TABLE
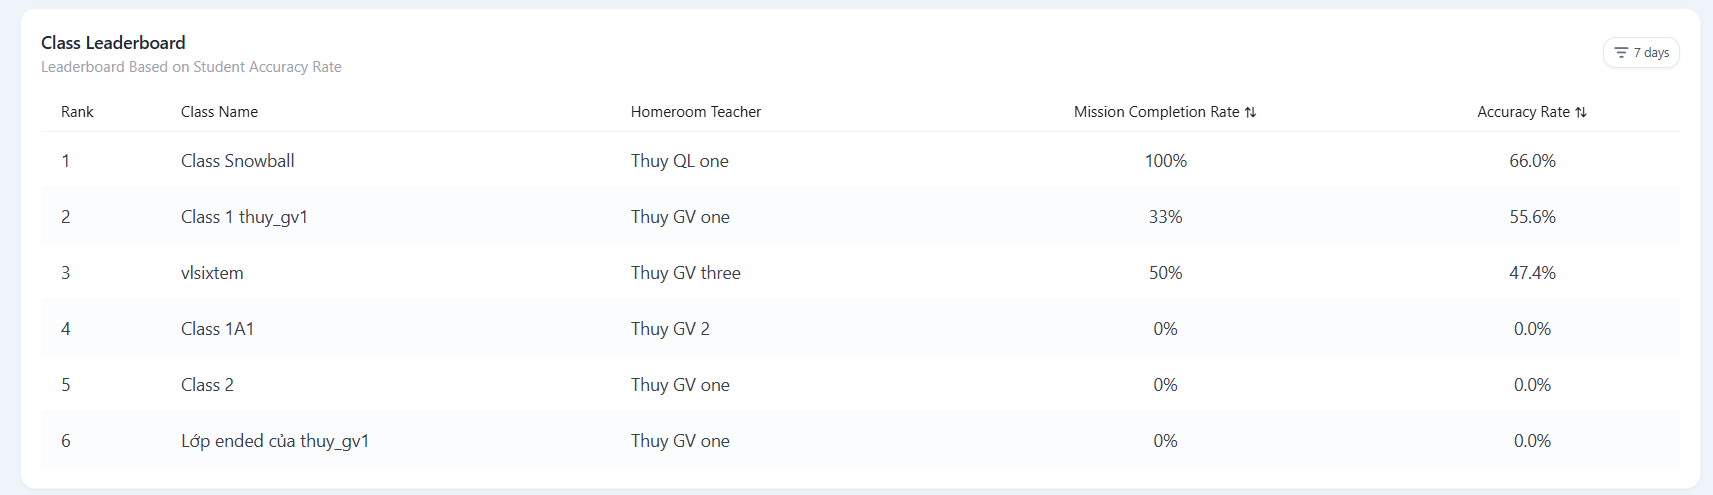
Description: Display rankings by class, order by correct answer rate (priority), mission completion rate (secondary criterion).
Note:
- Users can use filters Time to view data by specific time periods or categories:
3.10. INDIVIDUAL LEADERBOARD
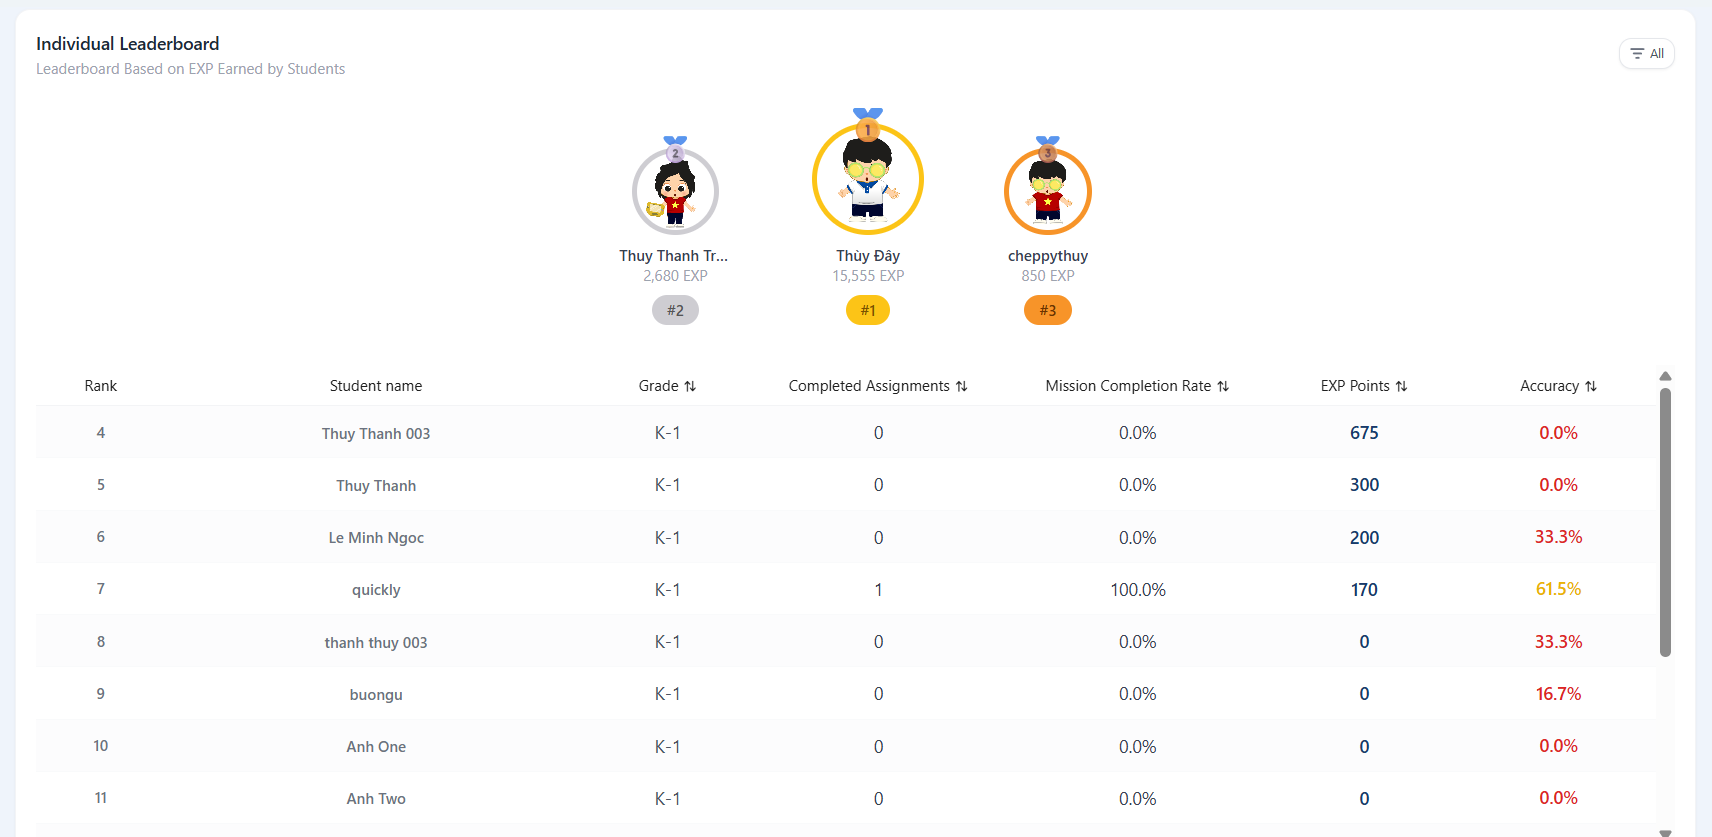
Description: Displays student rankings within the center based on experience points (EXP) accumulated from the learning process on the system.
- Students are arranged according to EXP points decreasing gradually..
- The top 3 ranked students are displayed at the top of the leaderboard.
Note: Users can filter data by Grade:

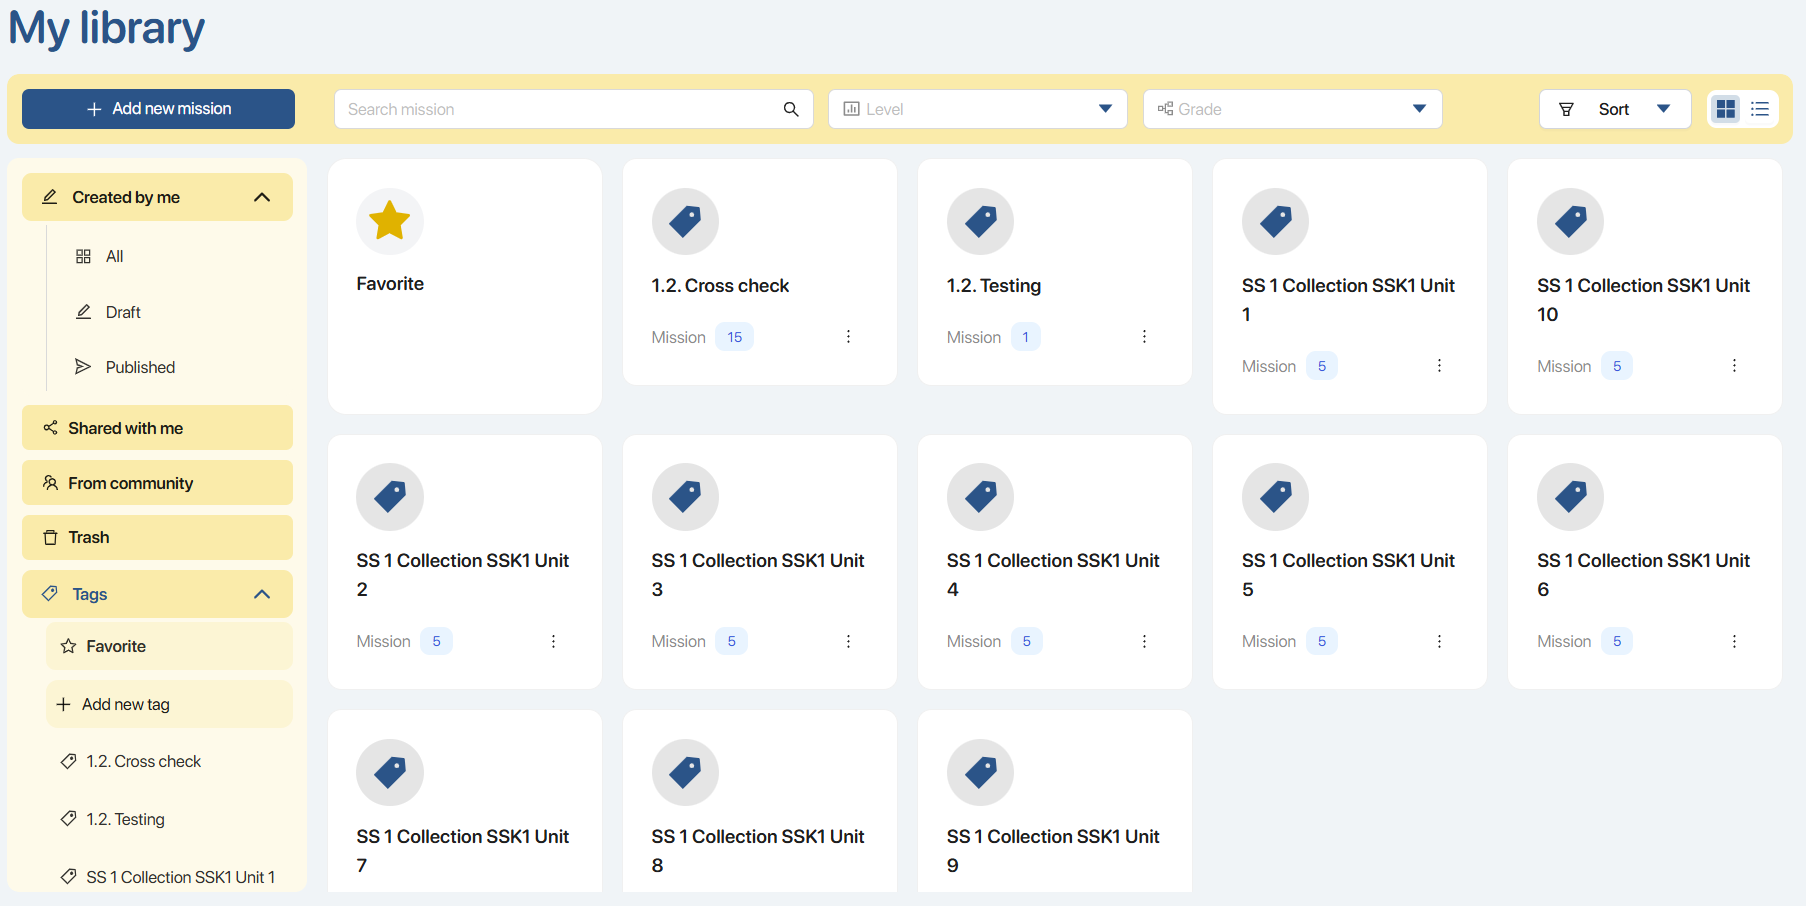
4. MY LIBRARY
Step 1. On the left-hand taskbar, the user clicks the icon.My Library To switch to the My Library page.
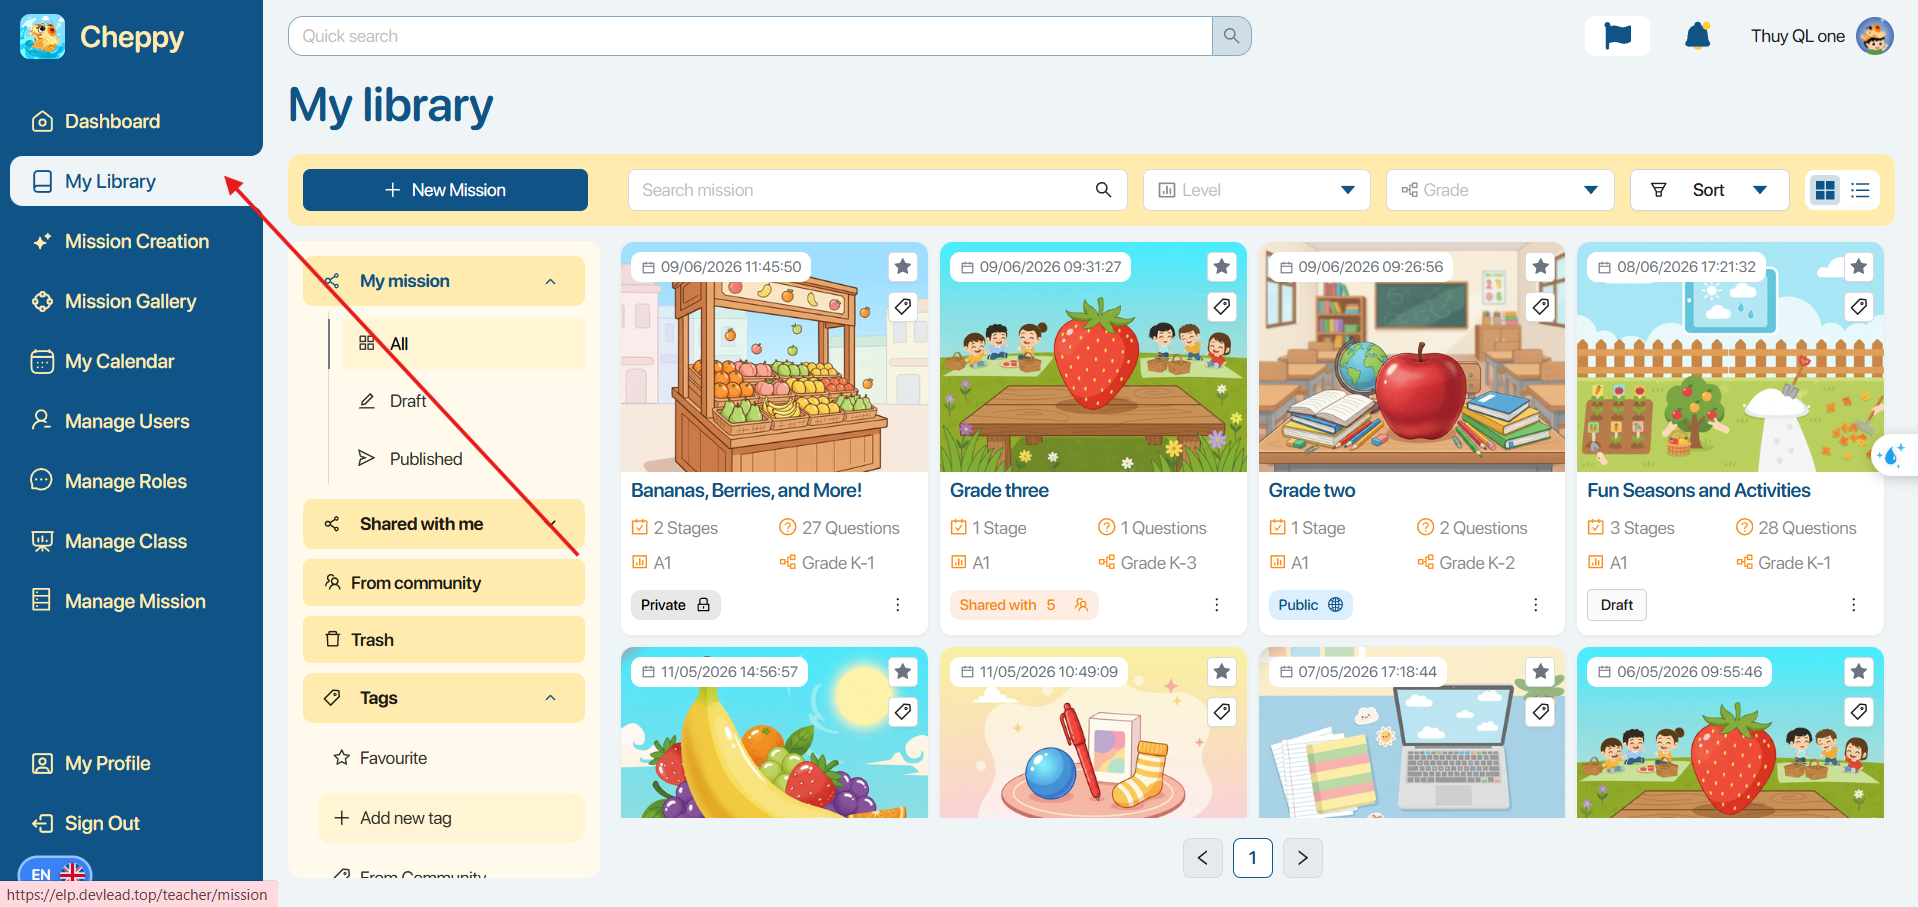
Step 2. In the left-hand navigation bar of the My Library page, users can view the categories.
The tasks include:
| STT | Item | Status | Describe |
|---|---|---|---|
| 1 | Created by me | All | All |
| 2 | Draft | Draft | |
| 3 | Published | Private | Private |
| Public | Public | ||
| Share with others | Share with others | ||
| 4 | Shared with me | Shared with me | |
| 5 | From community | From the community | |
| 6 | Trash | Deleted | |
| 7 | Tags | Favorite | Favourite |
| 8 | Add new tag | Add a new card |
Step 4. In the search bar area, users manipulate the filters to find Tasks.

| STT | Function | Describe |
|---|---|---|
| 1 | Search mission | Search for the Task name |
| 2 | Level | Select the task level according to the CEFR standard.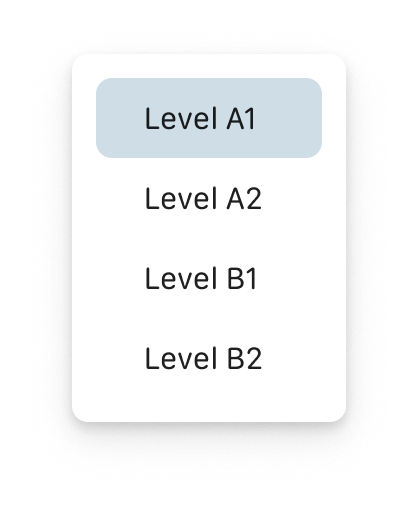 |
| 3 | Grade | Select the Task Class Block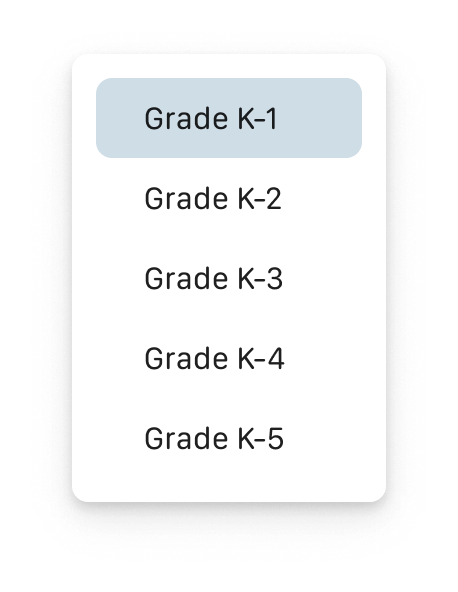 |
| 4 | Status | Select Task Status |
| 5 | Sort | Choose to sort the listby update time or by Task name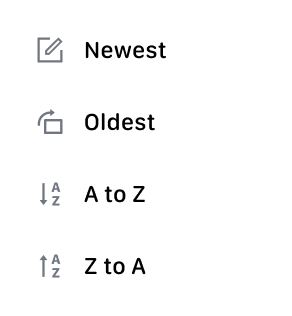 |
| 6 |  | Select display modein Grid view or List view |
4.1 HOW TO ATTACHING TASK TAG
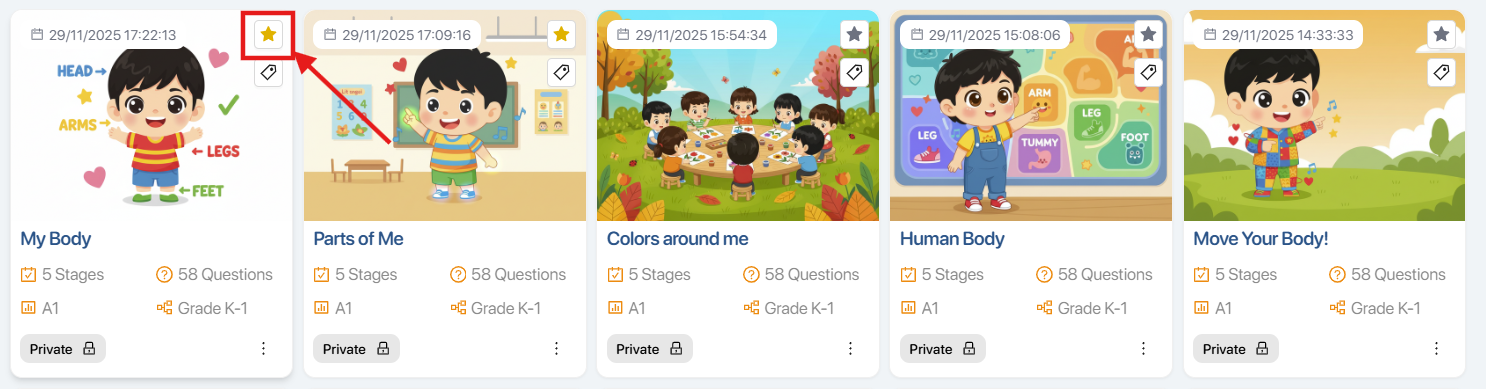
Step 1. To add Missions Favorite (Favorite), the user selects the icon on the Mission card.
After the operation, the Missions will be added.Favorite (Favorite) in the areaTags (Card).

At the same time, the Missions will be displayed at the top of the list.
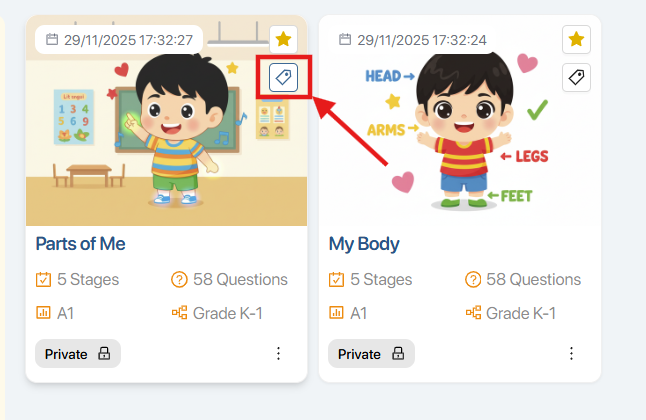
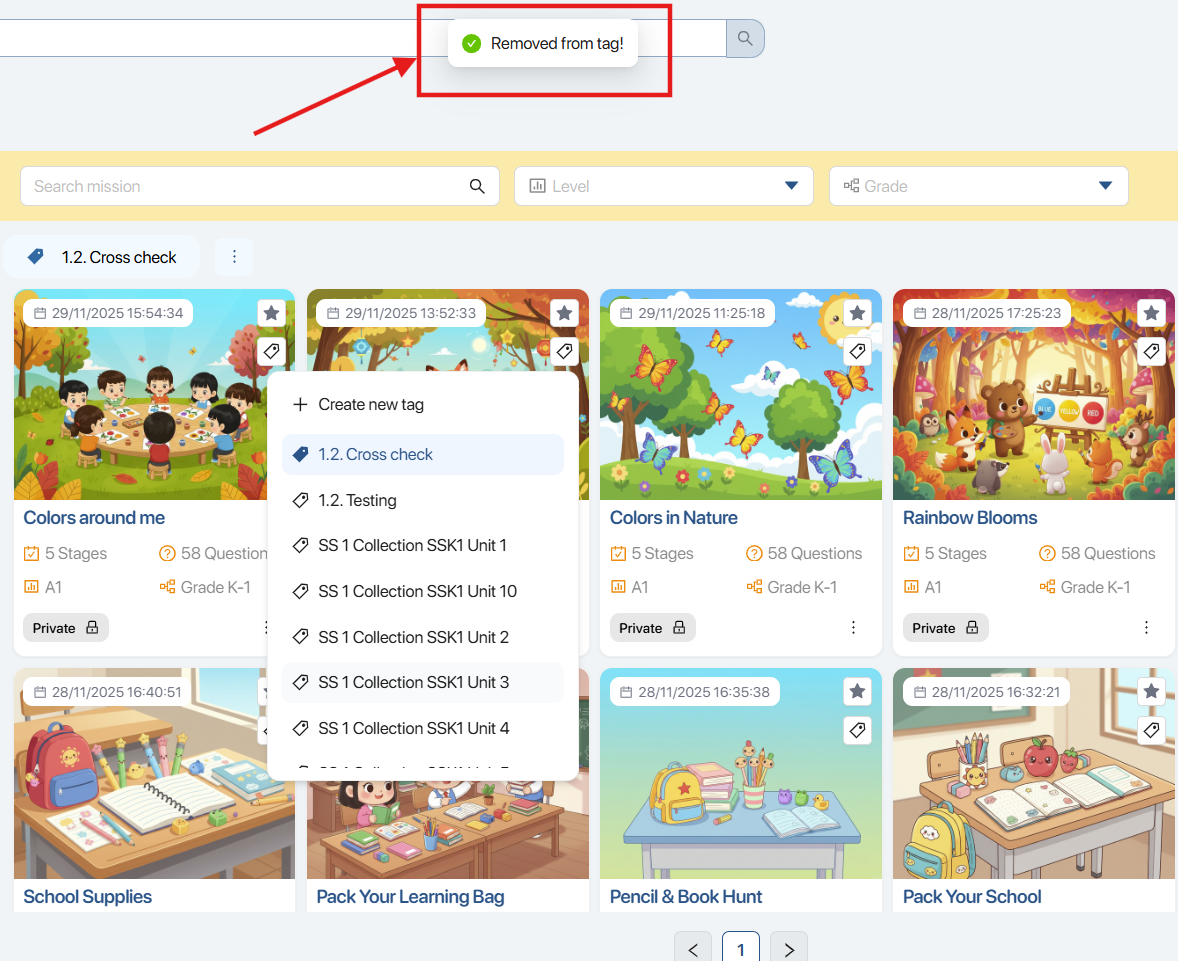
Step 2. To tag missions, users select the icon.![]() .
.
Step 3. Click to select the box![]() To add a new tag.
To add a new tag.
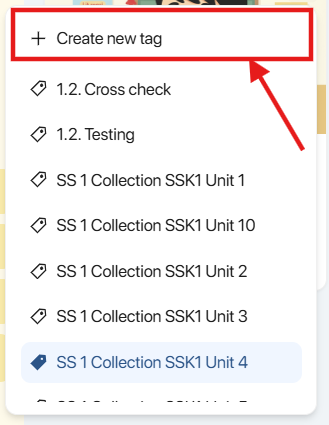
Step 4. The user enters the name of the new Tag in the box. and press the icon
![]() Or press Enter on your keyboard to confirm creating a new card.
Or press Enter on your keyboard to confirm creating a new card.
Note: On the left-hand toolbar, users can perform similar actions to create new tags by clicking the icon.![]() and enter the new Tag name.
and enter the new Tag name.

Step 5.After successfully creating a new Tag, users view the list and select the Tag with the corresponding Mission.

Note: A Mission can be associated with multiple Tags to help users categorize and search more quickly.
To remove a tag, the user clicks on the added tag. The system will automatically update and display a success message.
Step 6. To view the created tags, tap the icon. on the toolbar on the left side of the screen.
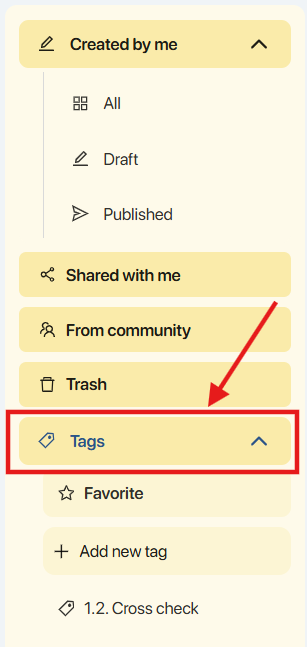
Step 7. In the list of Tags page, users can view the information included.
- Name: Card name.
- Number of missions: The number of missions that have been tagged.
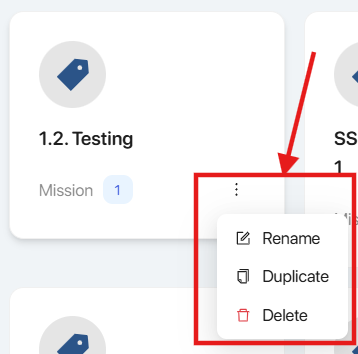
Step 8. Click on the icon![]() On the Tag, the system will display various action options.
On the Tag, the system will display various action options.
| STT | Function | Operation |
|---|---|---|
| 1 |  | Change Tag name After entering the tag name, the user clicks the icon. After entering the tag name, the user clicks the icon. |
| 2 |  | Create a copy of the Tag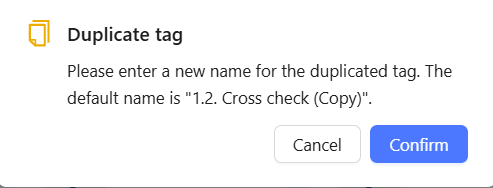 The user clicks on the icon. The user clicks on the icon. |
| 3 |  | Remove Tag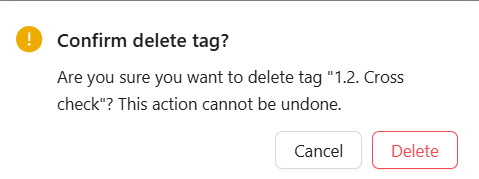 The user clicks on the icon. The user clicks on the icon. To delete the Card, press or press To delete the Card, press or press |
4.2 ASSIGN MISSION INSTRUCTIONS
Step 1. To assign missions to the class, users can use the following three methods.
Method 1. At the page Generate Mission, press the button 

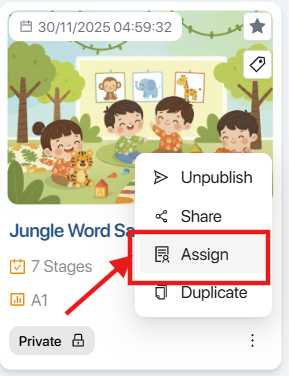
Method 2. At the page My Library, press the icon![]() on the Mission tab and select
on the Mission tab and select
Method 3. At the page Manage Class, select the class and press the tab and click
 ![]()
Step 2. On the Mission page, the user selects Class. Then, they press the button.
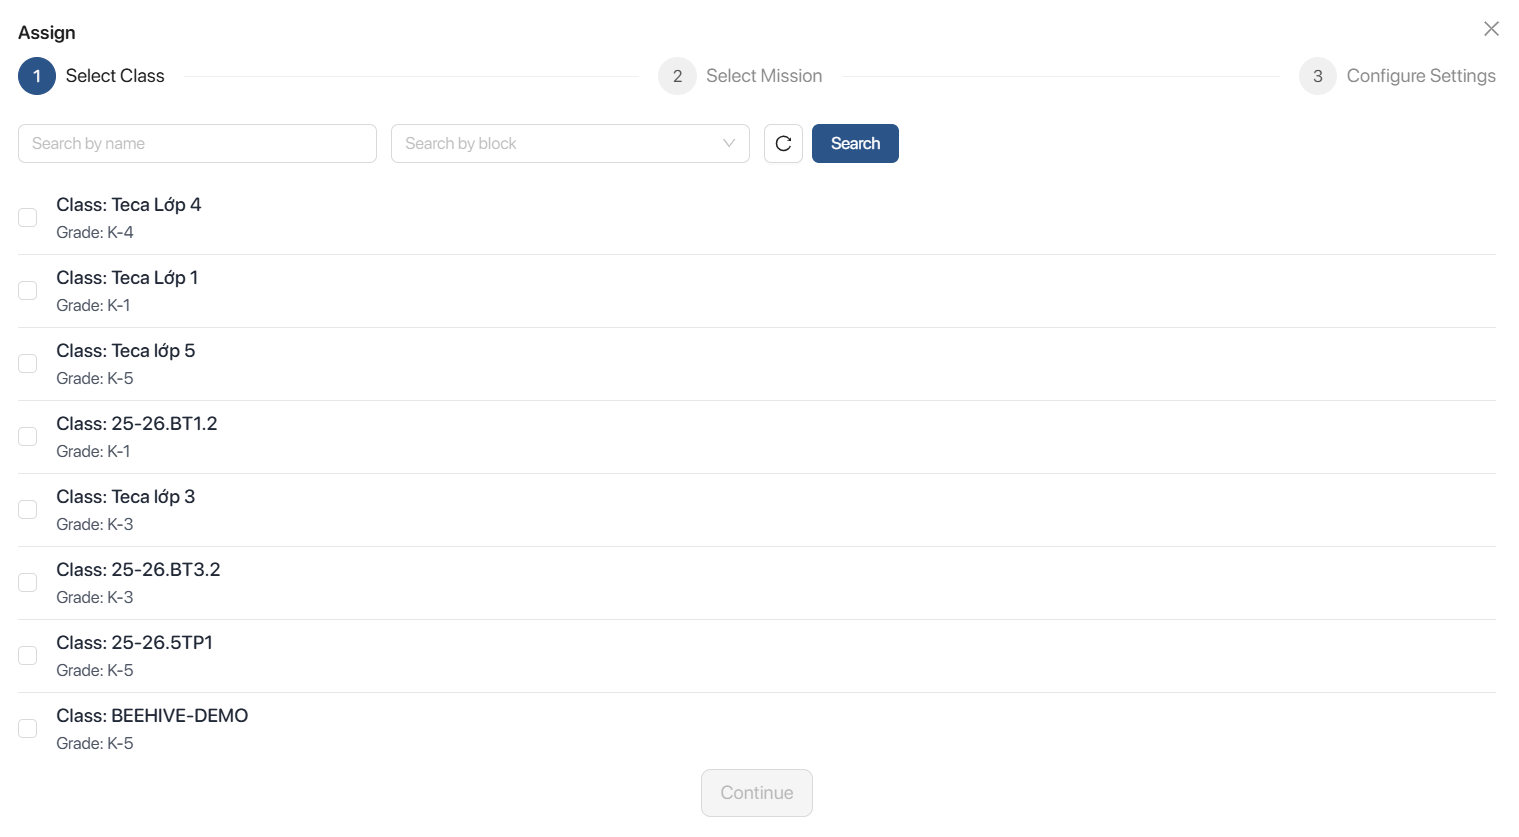
Note: Multiple classes can be selected to be assigned the same Mission.
Step 3. After selecting a Class, the system displays information about the Mission and the corresponding number of Stages.
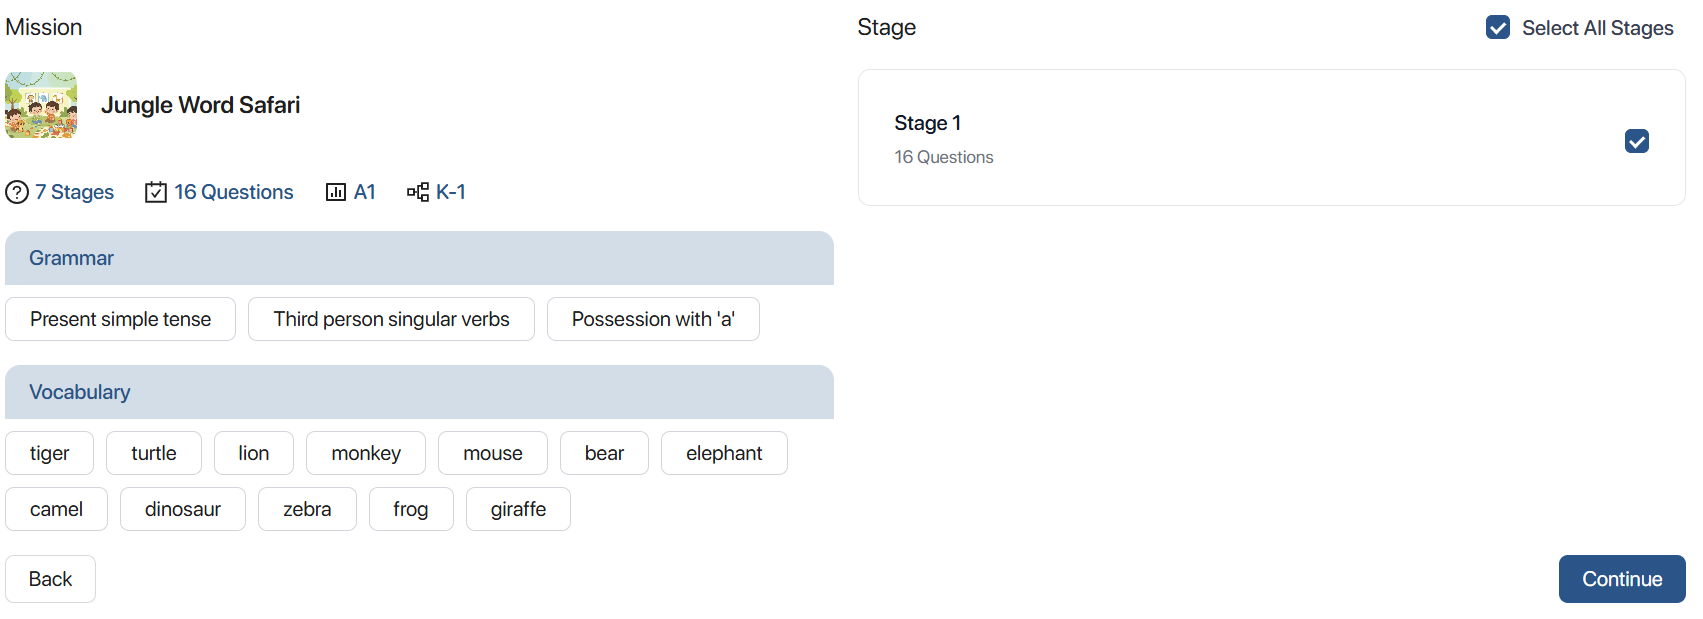
- To select the entire Mission Stage, select the checkbox.

- To select certain Stages in Mission, select the box.
 next to the corresponding Stage name.
Step 4. After selecting a Stage, the system displays an page for editing Mission information, including:

| STT | Information | Describe |
|---|---|---|
| 1 | Start Date | Assignment dateThis corresponds to the time when the Task begins to appear on the student application. |
| 2 | End Date | Completion deadlineThis corresponds to the time when the Task displays the Expired status on the student application. |
| 3 | Duration(Minutes) | Exam time(measured in minutes) |
| 4 | Attempt limit | Number of times students are allowed to retake the assignment. |
| 6 | Mistake limit | Maximum number of errors allowed before the end of the lesson.Converted to the number of hearts on the app for students |
| 7 | Shuffle questions | Shuffle the order of the questions.(Toggle option on/off) |
| 8 | Shuffle question options | Shuffle the order of the options in each question.(Toggle option on/off) |
| 9 | Apply to All | Apply quickly to all stages. |
Step 5. View the assignment information for Stages after applying the button.

Step 6. Press the button To successfully complete the mission, press the button.
 To review the Mission information.
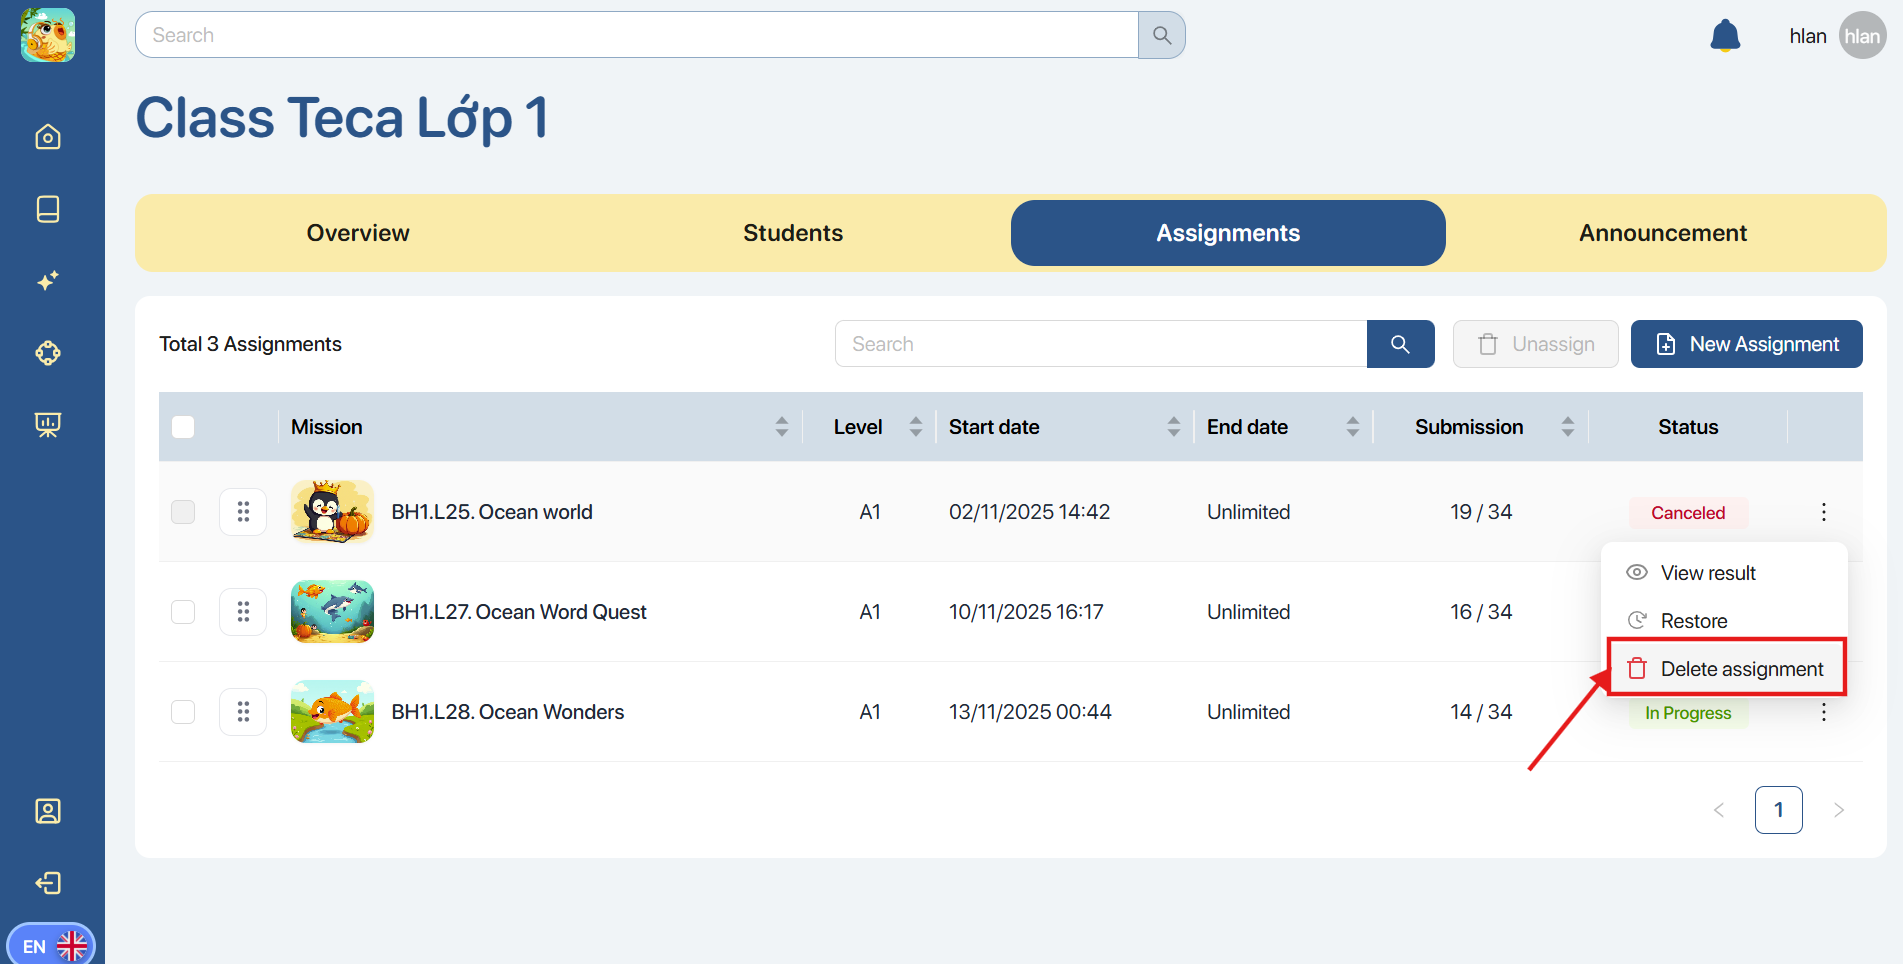
Note:
- To hide Mission from the student app page, press the button.

- To display Mission back in the assigned list on the student application page, press the button.

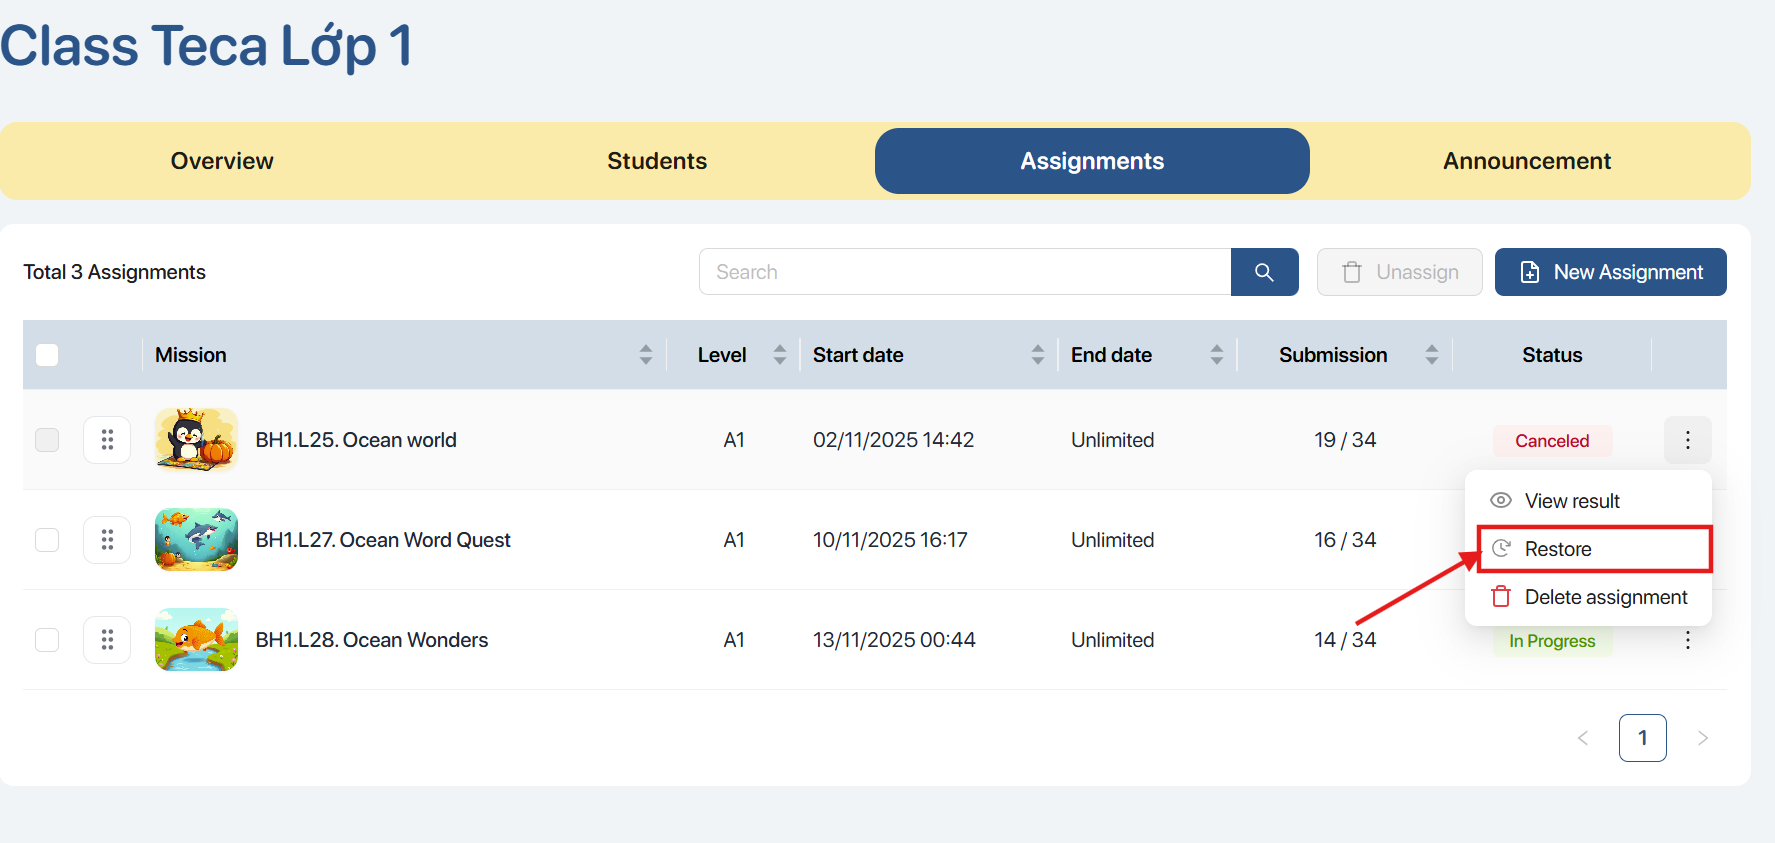
- To delete an assigned task, press the button.

5. MISSION CREATION
5.1. HOW TO CREATE A MANUAL MISSION
Step 1: In the navigation bar on the left side of the screen, select
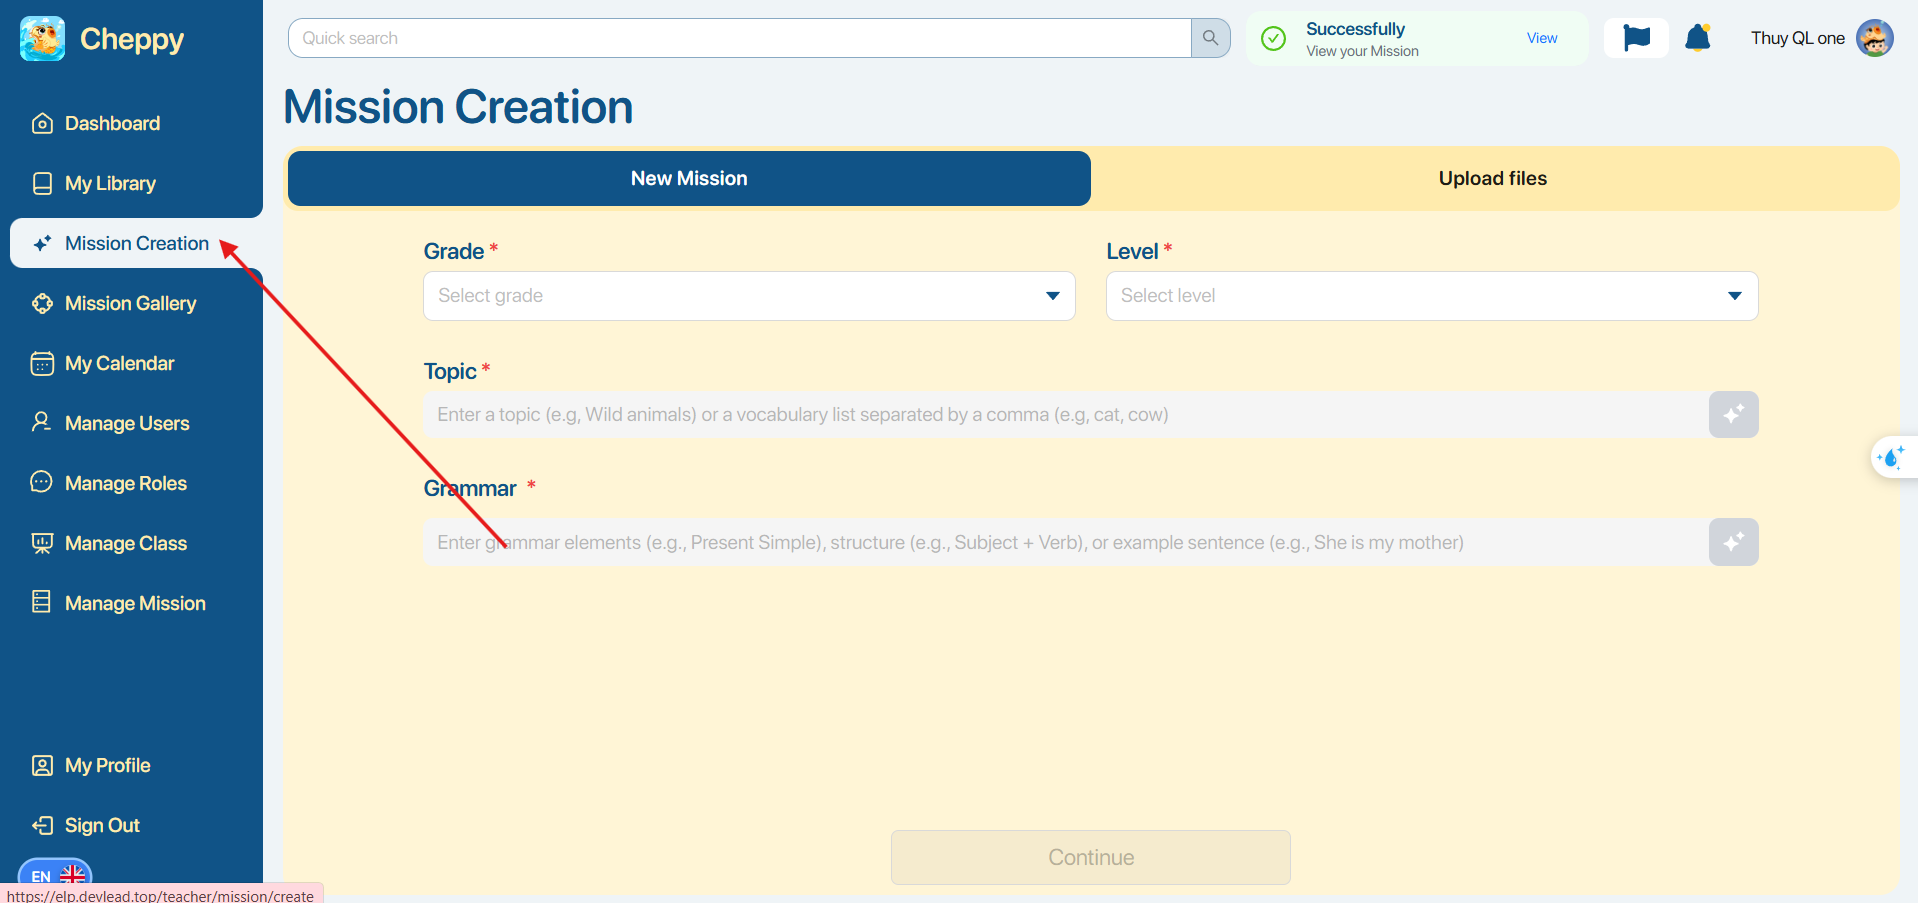
Step 2: On the screen, the user selects the corresponding Grade and Level.
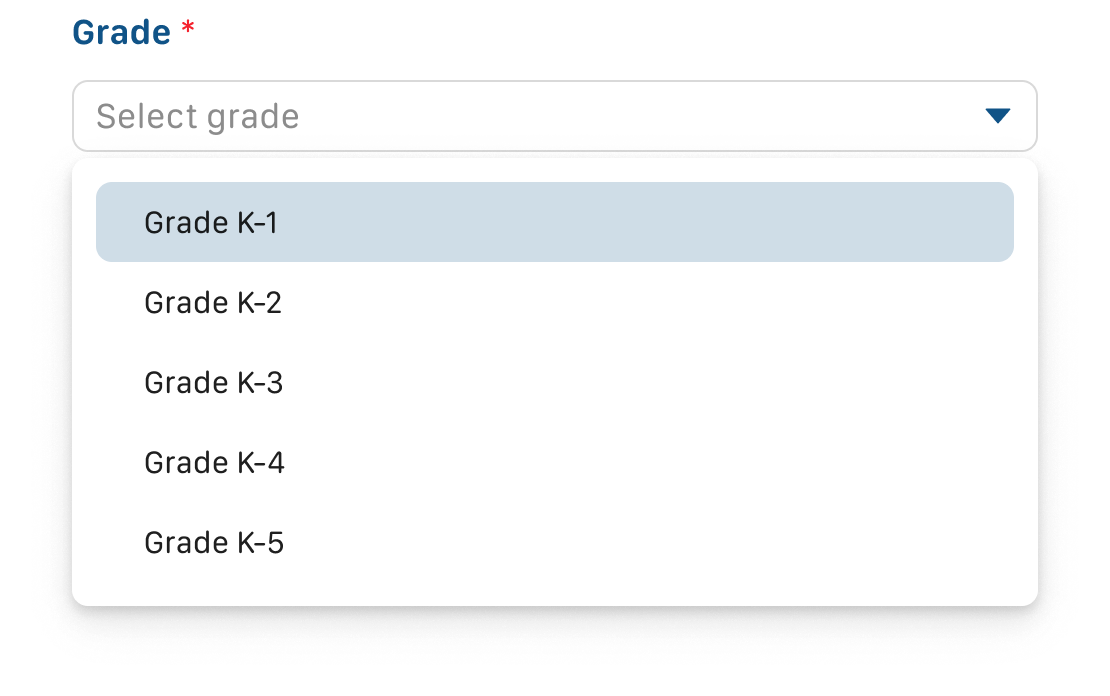
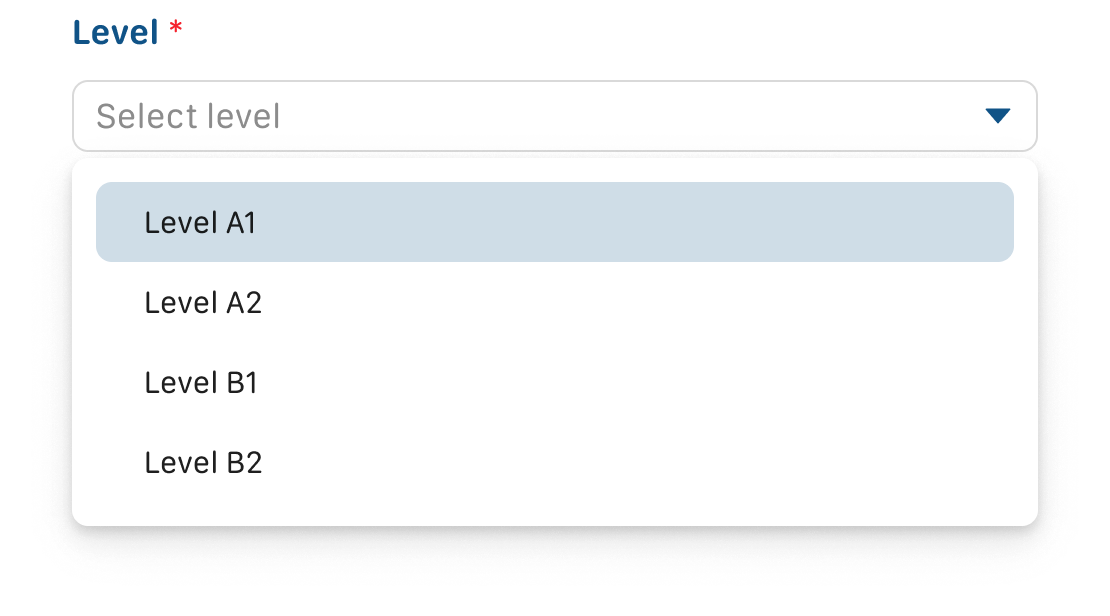
Note:To ensure that the Mission is appropriate for the students' level, the system will automatically limit the Grade and Level options as follows:
- If the user selectsGrade before:
- With K1, K2, K3, the system only allows selecting Level A1.
- With K4 and K5, users can choose between Level A1 or A2.
- If the user selects Level before:
- Select A1: users can choose any Grade from K1 to K5.
- Select A2: the system only allows you to choose Grade K4 or K5.
Step 3: In the Topic field, there are three ways for users to find a topic that matches their mission.

Method 1.Enter the topic name, and the system will suggest a list of topics and subtopics related to the keyword you entered.
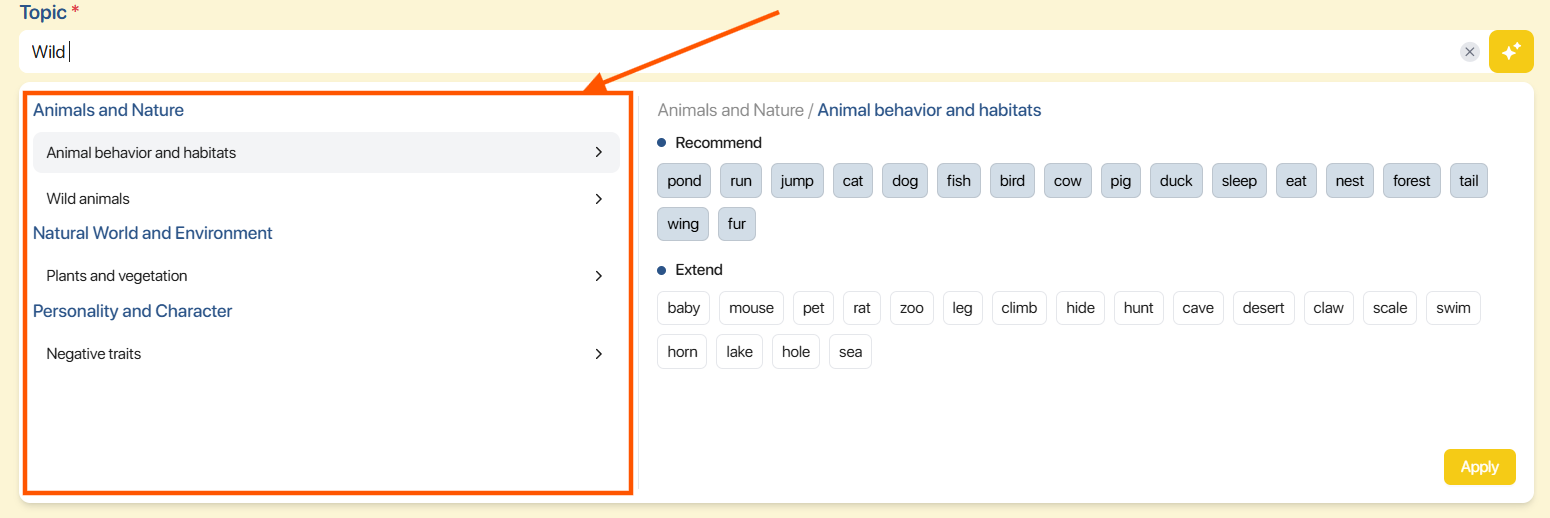
Note: Users can click on the names of the subtopics in the list to select the appropriate one.
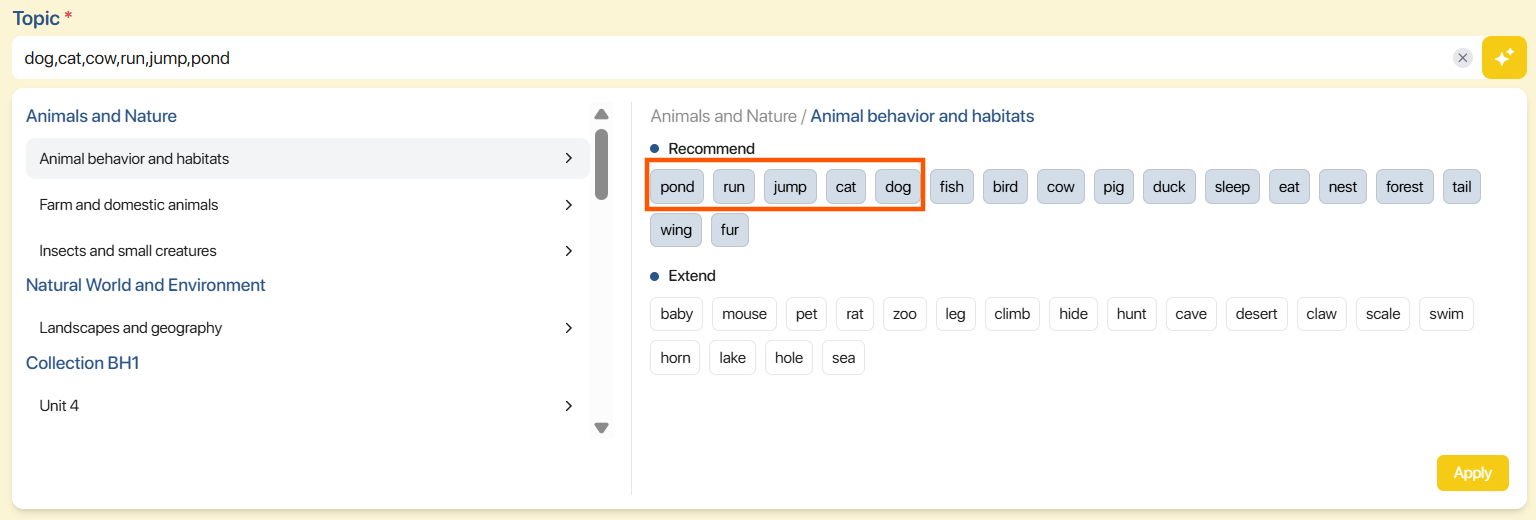
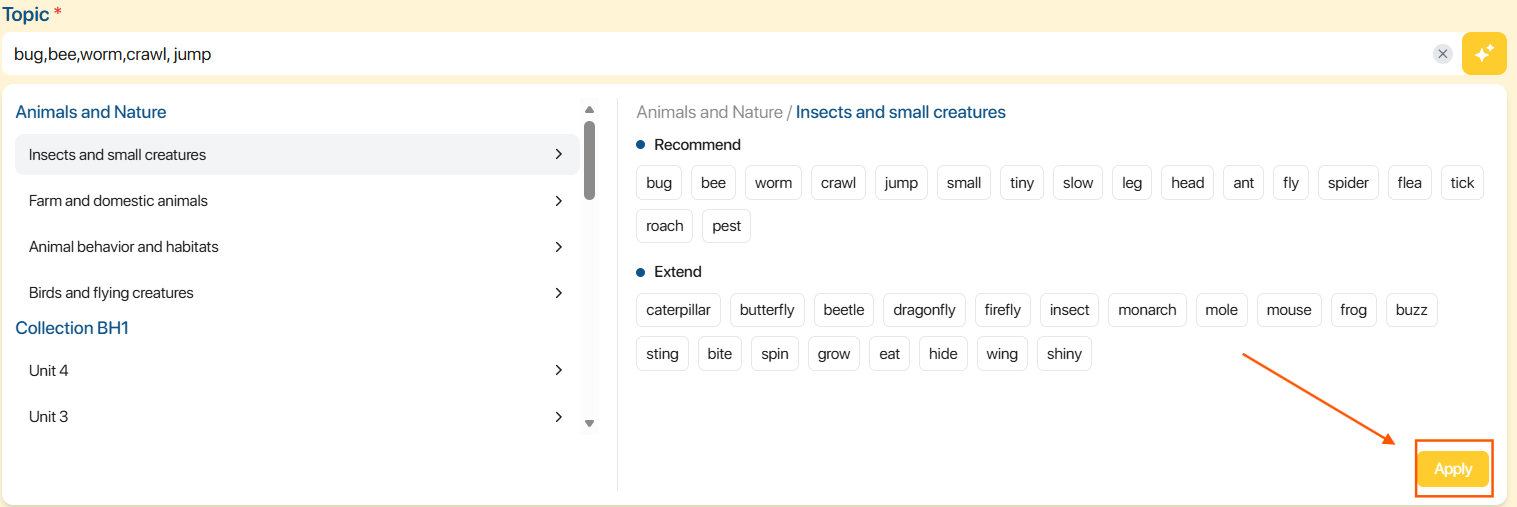
Method 2.Fill in or copy the vocabulary list, and the system will display related topics and subtopics.
Method 3.Click on the icon In the top left corner of the search bar, select "Topic" so the AI system can help create the corresponding topic and vocabulary.

Note: If you enter keywords but don't find any matching topics, click the search box or icon.This allows the AI system to assist in creating the appropriate topic and vocabulary.

Step 4: Within each topic, users can view a list of vocabulary divided into three groups, including:
- Recommend: Display the correct vocabulary.Grade selected
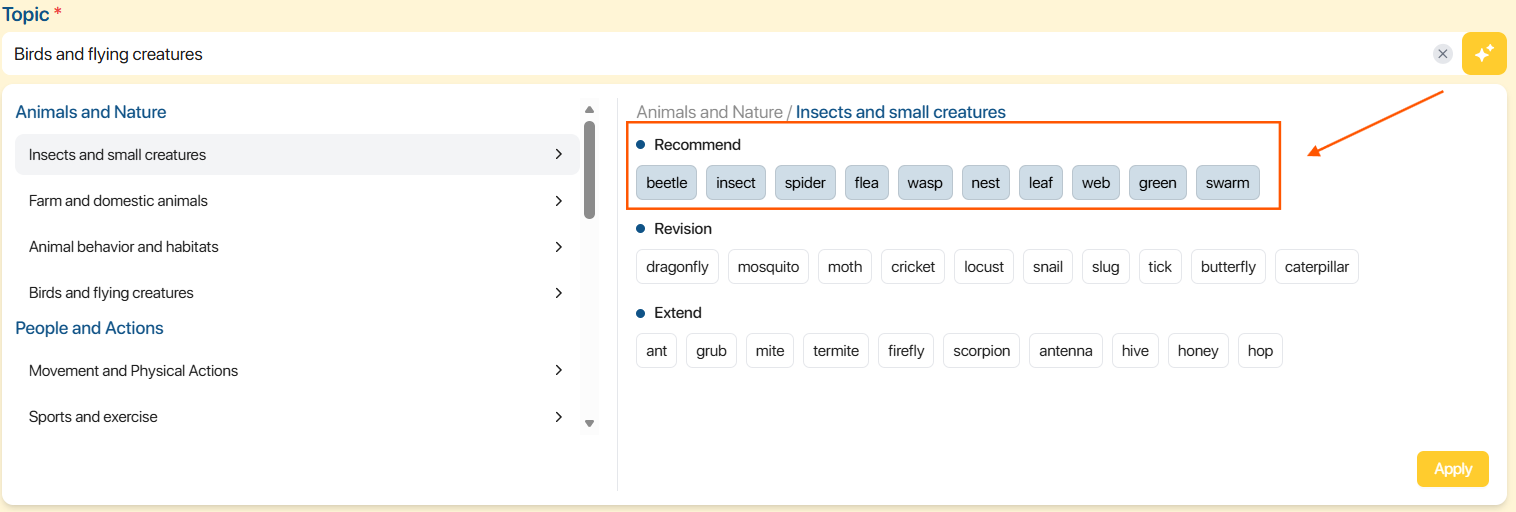
Note:DefaultAll words are pre-selected.Users can select or deselect words.
- Revision: Display vocabulary ofGrade one level lower than the selected Grade (if applicable)
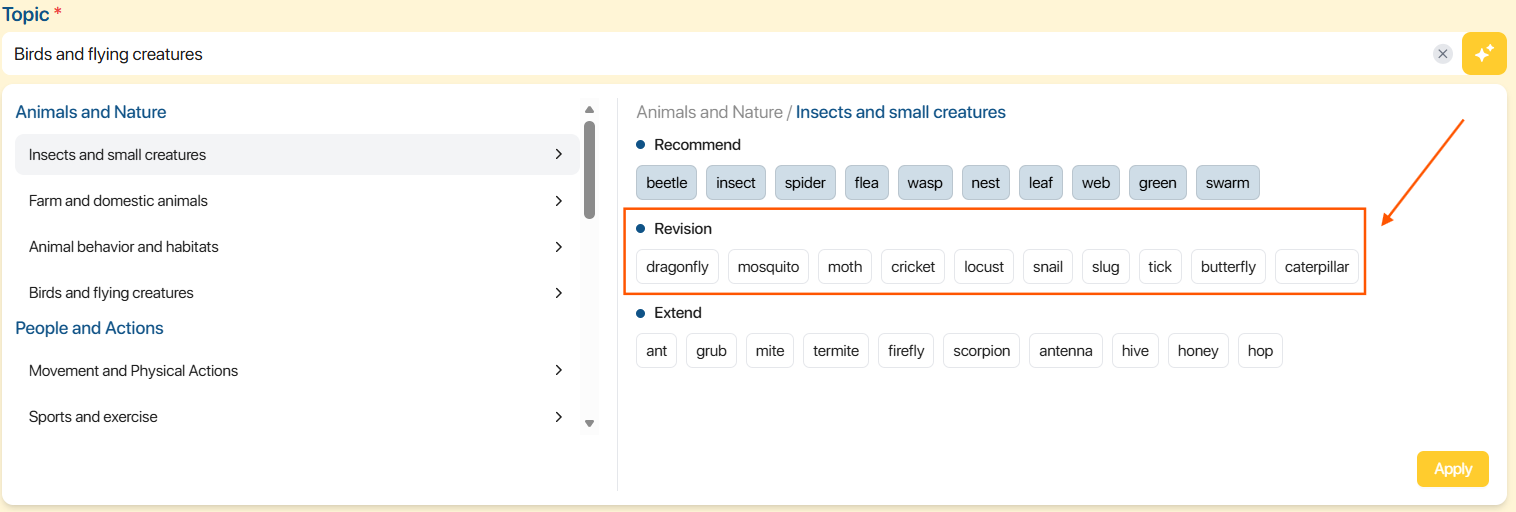
- Extend: Display vocabulary ofGrade is one level higher than the selected Grade (if applicable).
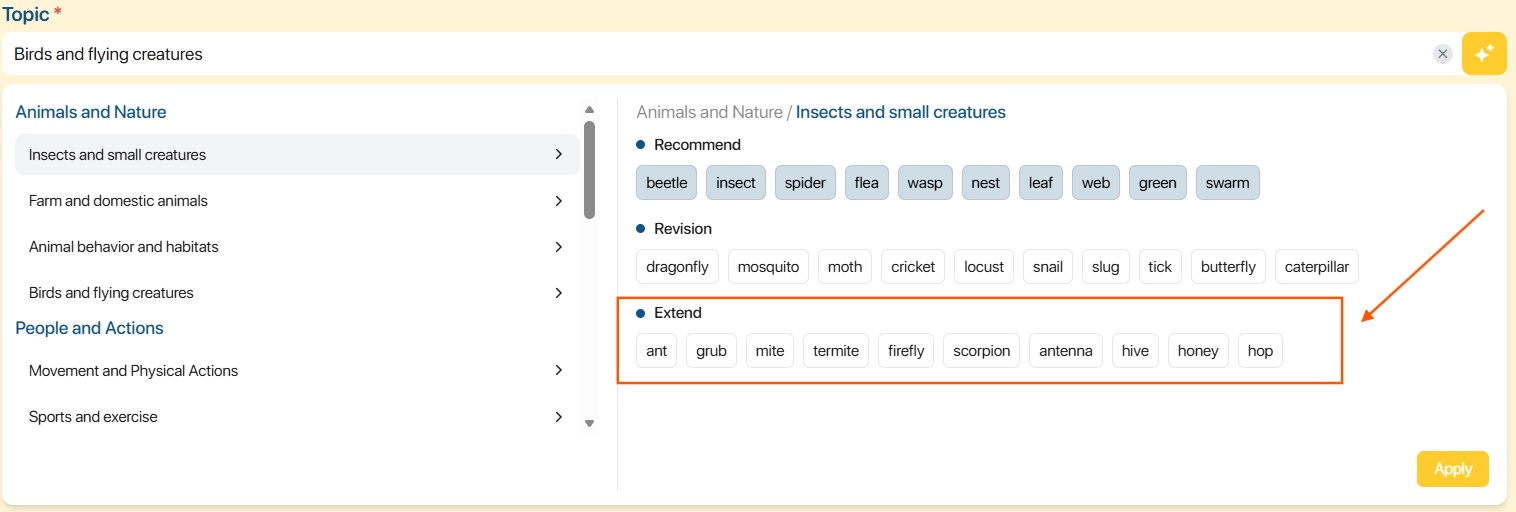
Note:Users can select or deselect individual words.
Step 5: After selecting the vocabulary for the Mission, the user clicks the button. To have the system display the added list in the Vocabulary box.
Note: The user clicks on the icon.![]() To delete the entered content.
To delete the entered content.
Step 5: After applying the list, there are two ways for users to add vocabulary as follows.
Method 1.Press the button To add new vocabulary words to the list.
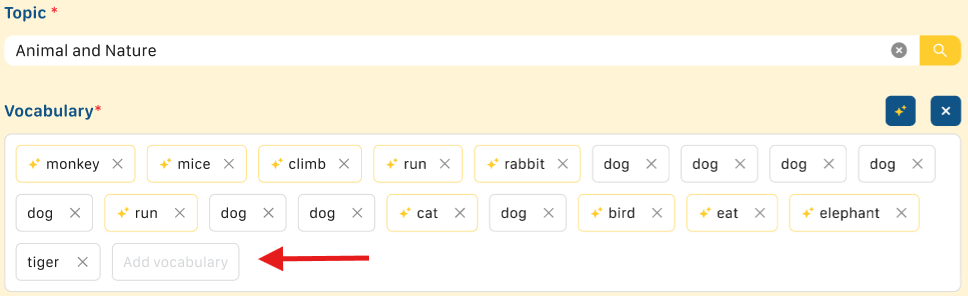
Method 2.Press the button To allow the AI system to suggest new vocabulary words to add to the list.

Step 6: In the Vocabulary section, users can delete vocabulary words as follows.
- To delete a word from the list, click the button.
 alongside vocabulary
- To delete the entire vocabulary list, the user presses the button.


Note: If a user applies a new Topic, the system will delete the entire vocabulary list of the old Topic and replace it with the vocabulary list of the new Topic.
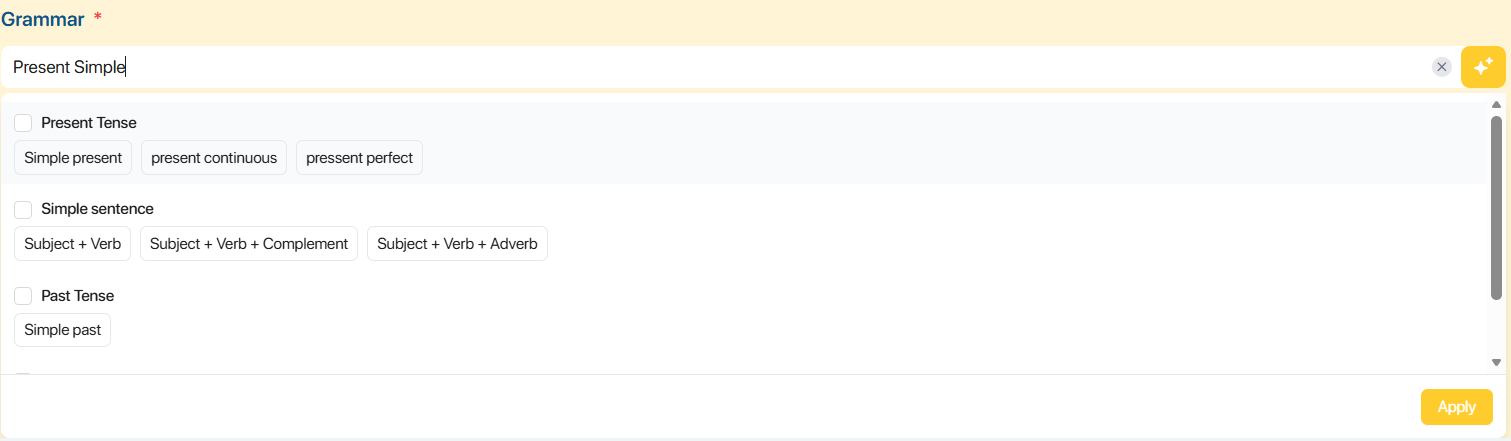
Step 7: In the Grammar section, there are three ways for users to find the grammar that matches their Mission.
Method 1.Enter the name of the grammar topic (e.g.,“Present Simple”)
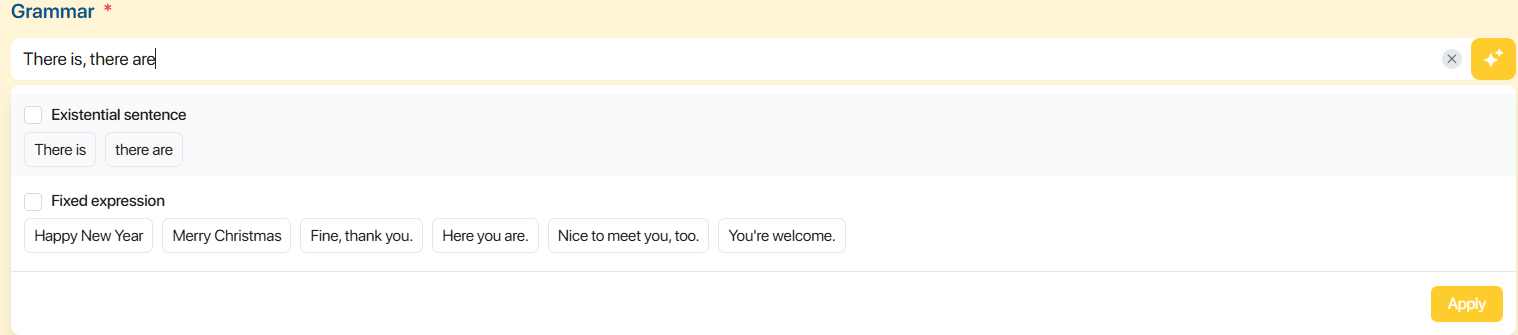
Method 2.Enter the grammatical structure (for example:“There is, there are”)
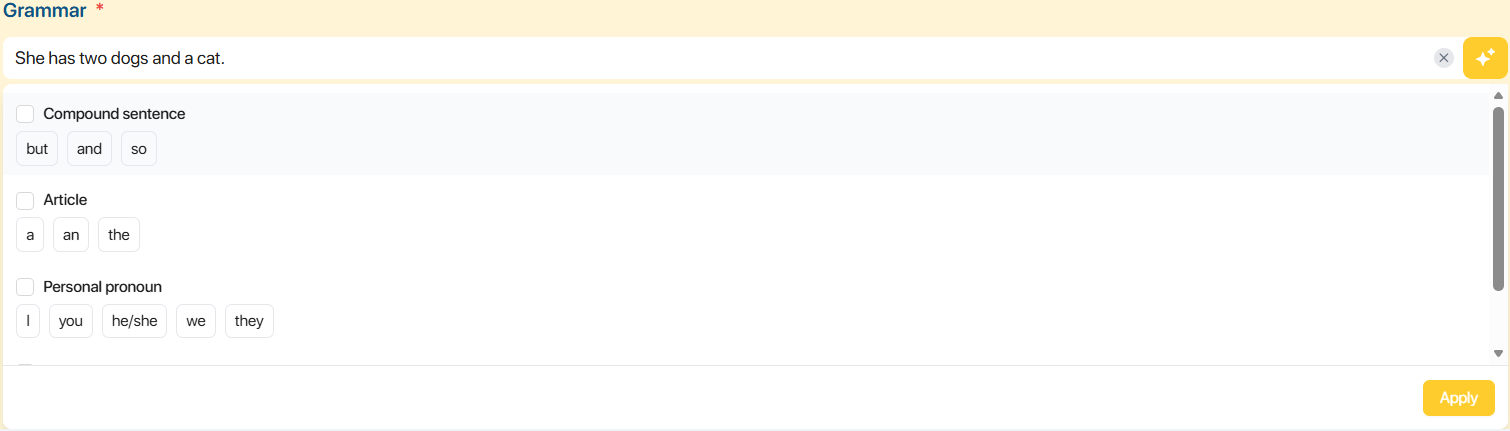
Method 3.Enter an example sentence containing the grammar (e.g.,“She has two dogs and a cat.”)
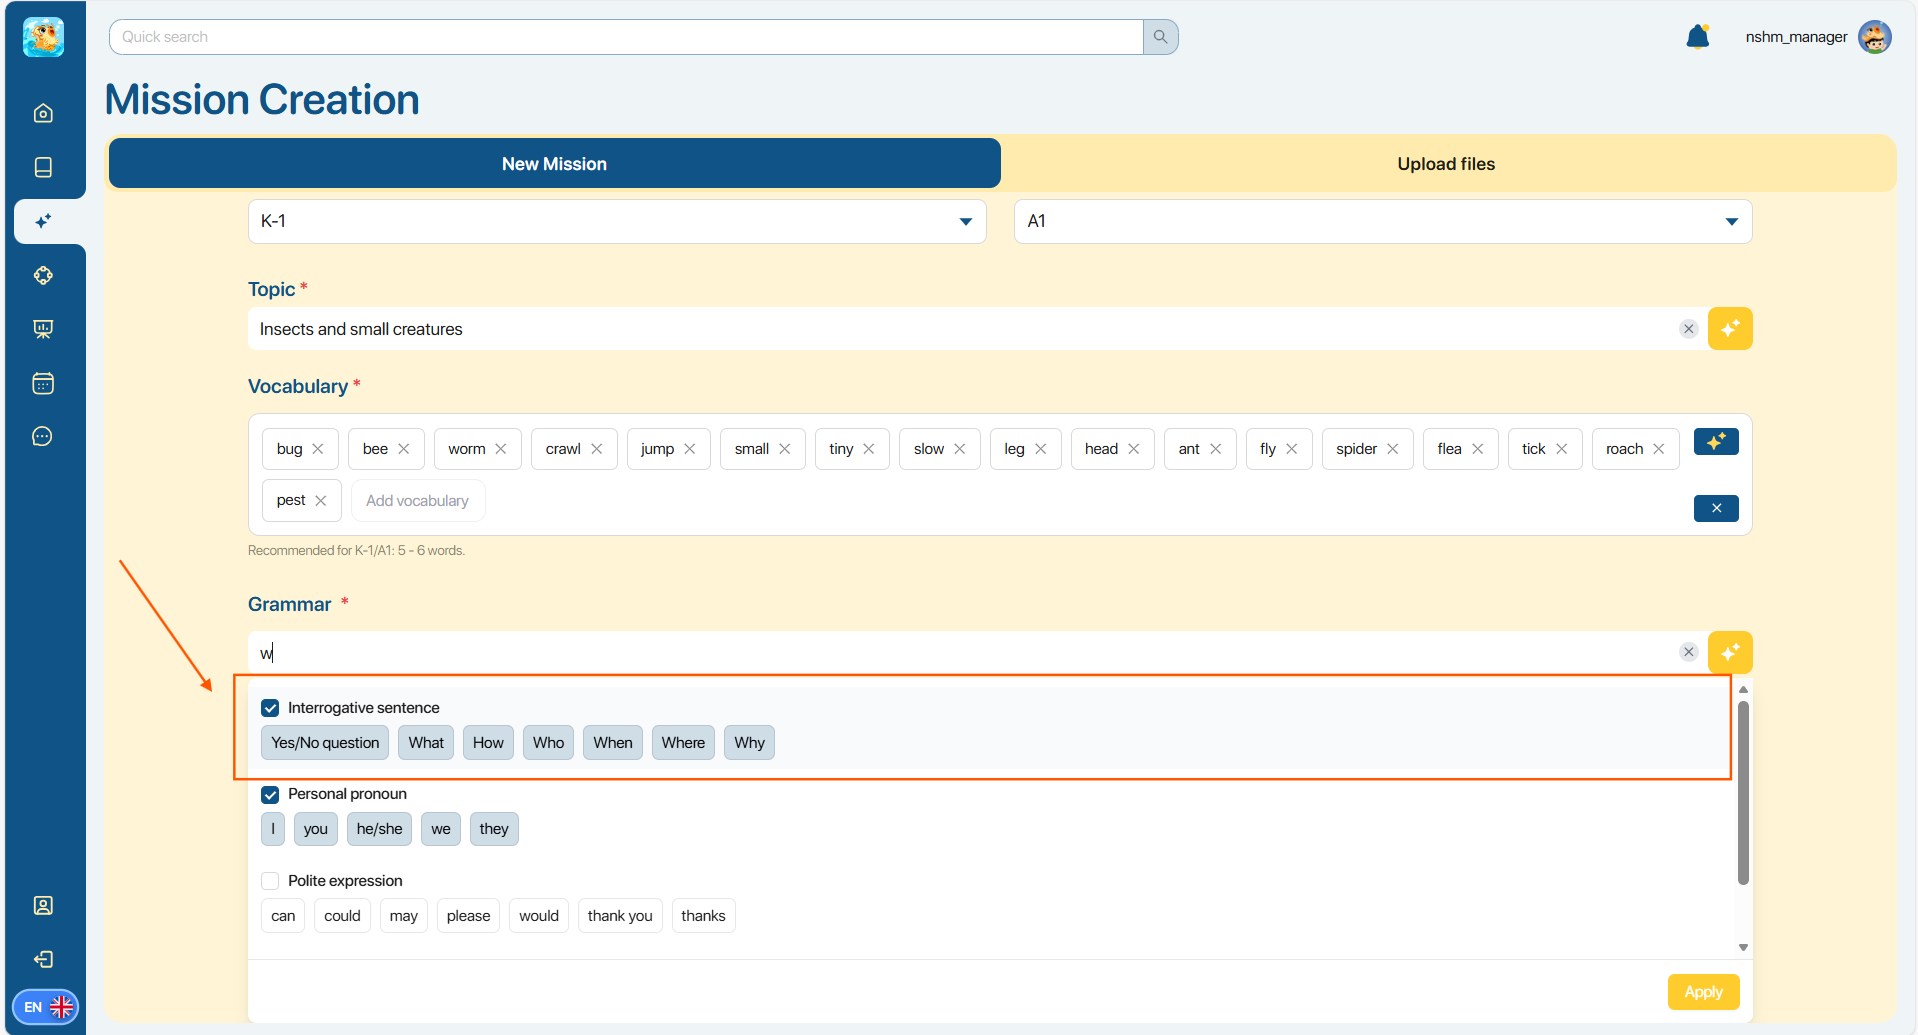
Note: If you enter keywords but no matching Grammar results are found, click the icon.Let the AI system help you find the grammar.
Step 8: Select the Grammar options from the displayed list and press the button.To have the system display the added list in the Grammar box.
Step 9: In the Grammar section, users can delete vocabulary words as follows.
- To delete a grammar topic from the list, click the button.in addition to grammar topics

- To clear the entire list of grammar topics, the user presses the button.

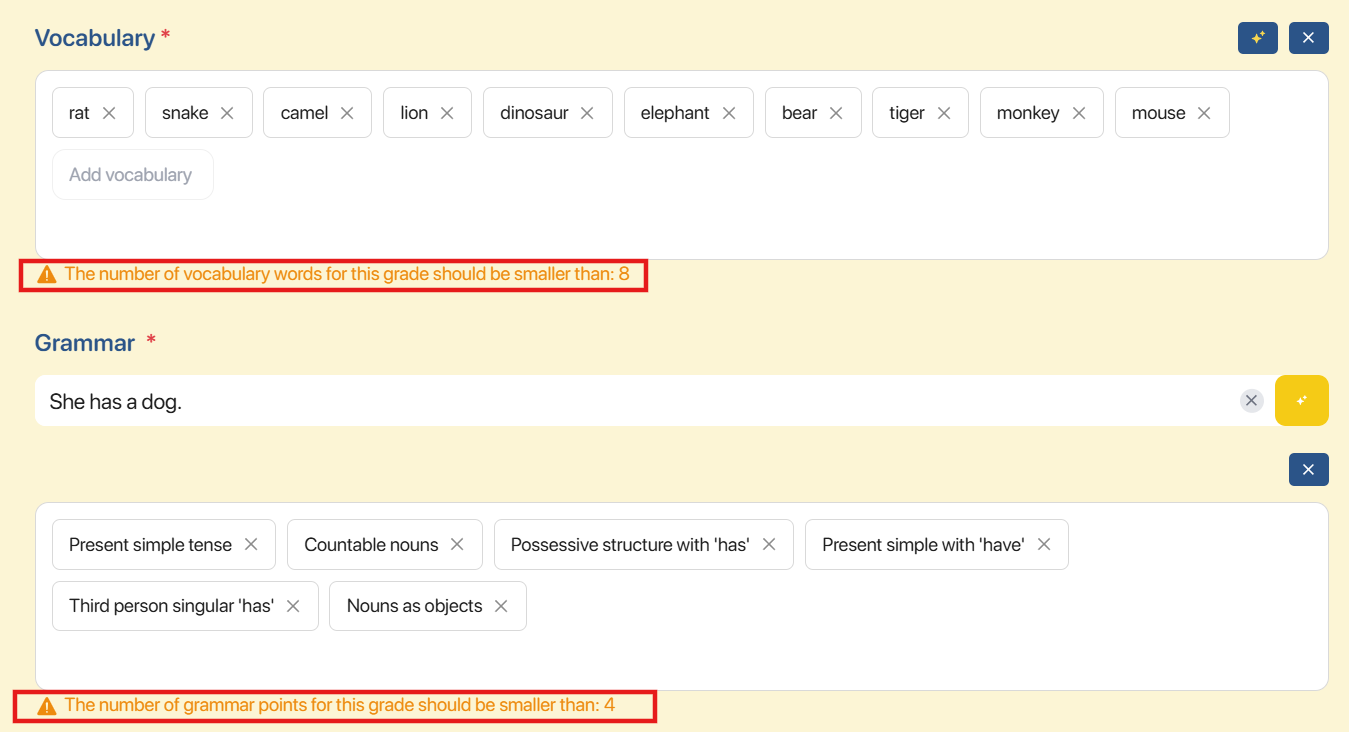
Note: To help create missions that match students' level and grade, the system suggests the corresponding amount of vocabulary and grammar.
Step 10: After entering the information above, press the button. to switch to the Stage (Assignment) creation page.
5.2. HOW TO CREATE MISSIONS USING PDF/DOCX FILES
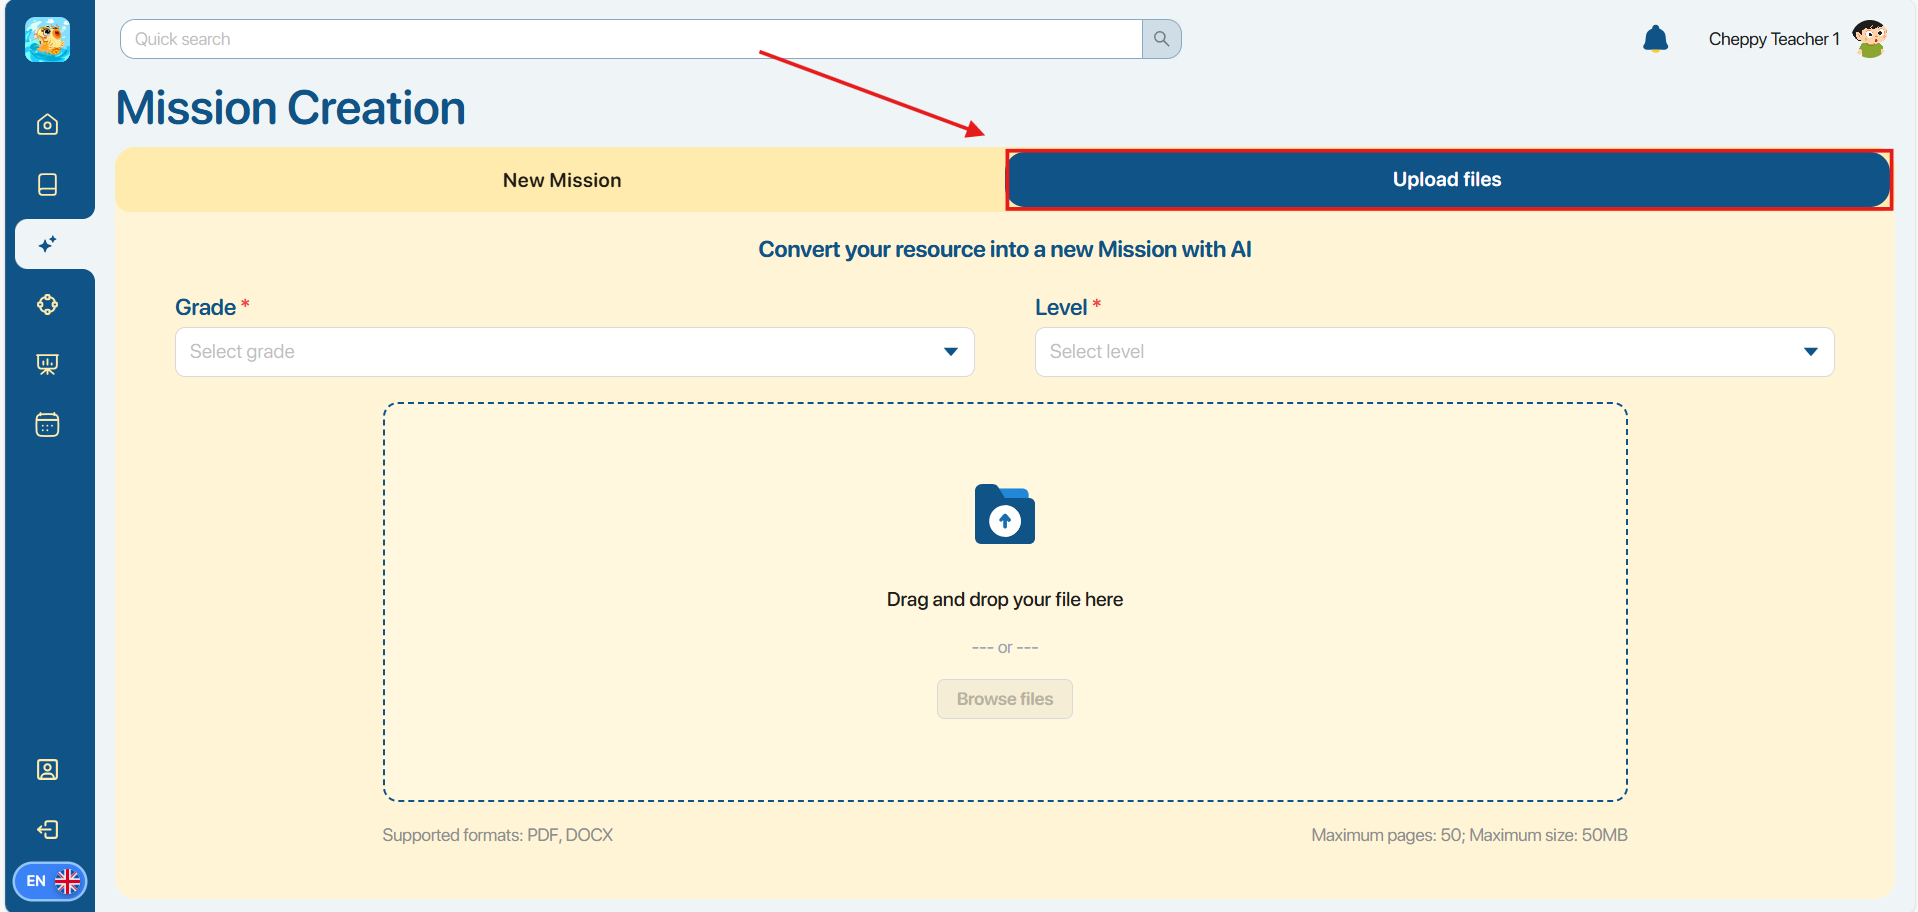
Step 1: At the page Mission CreationThe user then selects the tab. To create Missions from learning materials files.
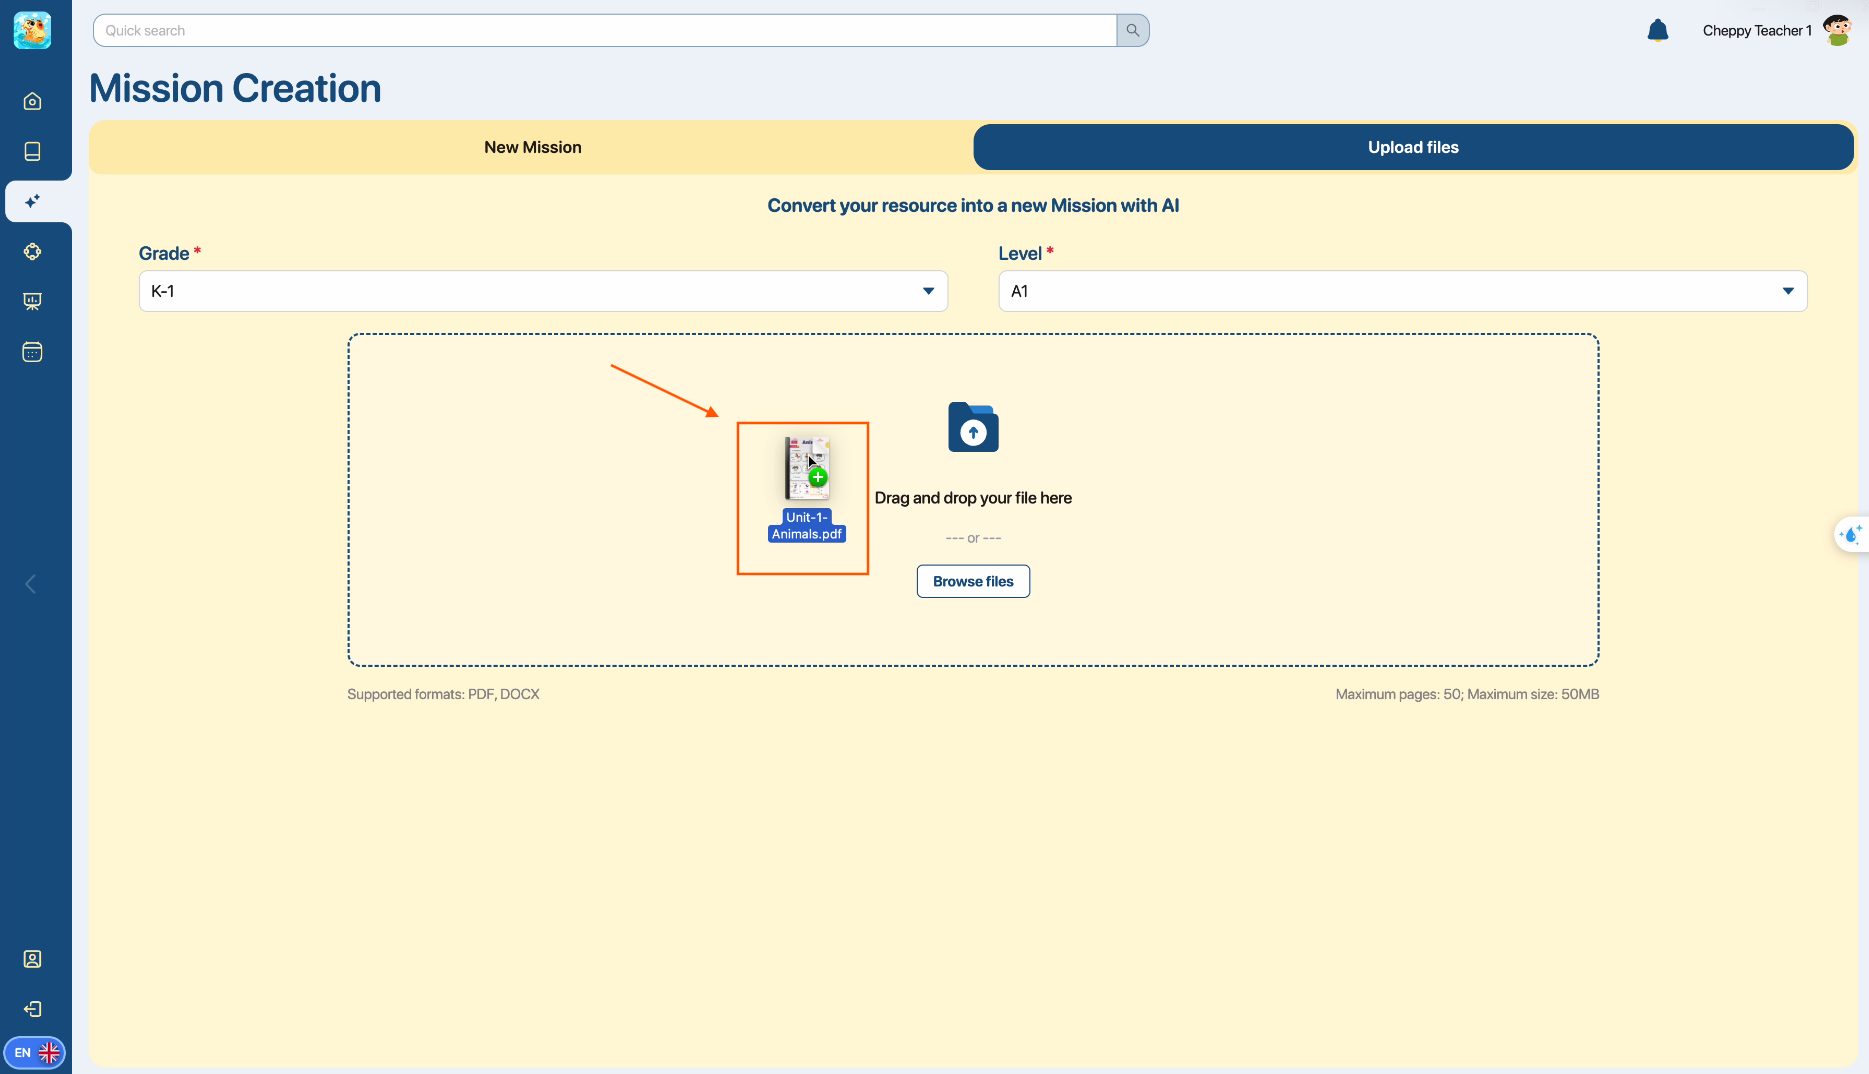
Step 2: At the pageUpload filesThe user selects the corresponding Grade and Level.
Note: Users can upload files once the Grade and Level have been selected.
Step 3: In the file upload area, users can do one of two things:
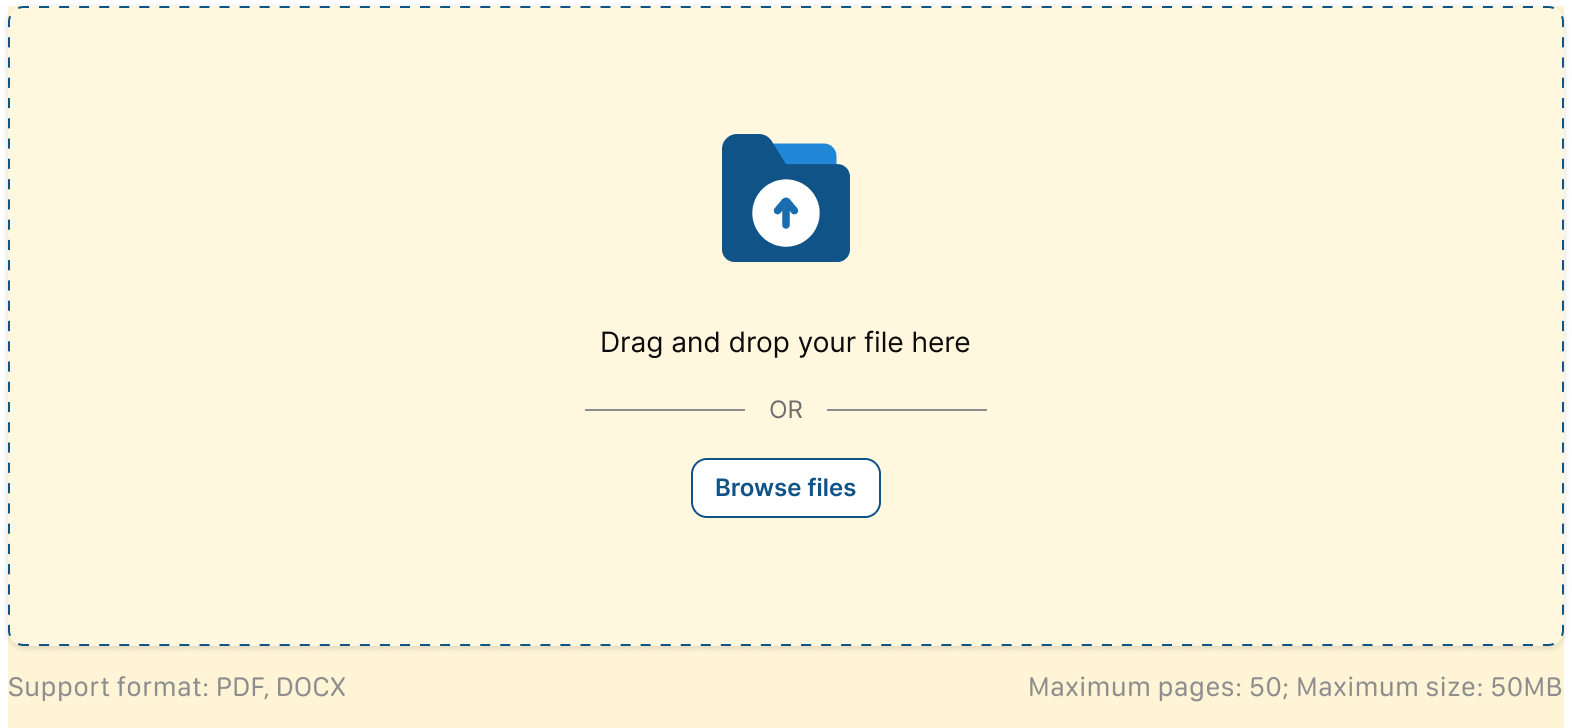
Method 1.Drag and drop the PDF/DOCX file into the file upload area.
Method 2.Press the button To select a file from the device.

Note: The system supports uploading files in various formats.PDF, DOCX, with the maximum number of pages50 pagesand the capacity does not exceed50MB.
Step 4: After the file is successfully uploaded, the system displays a preview page of the file content. The user checks the desired pages to use in creating questions.
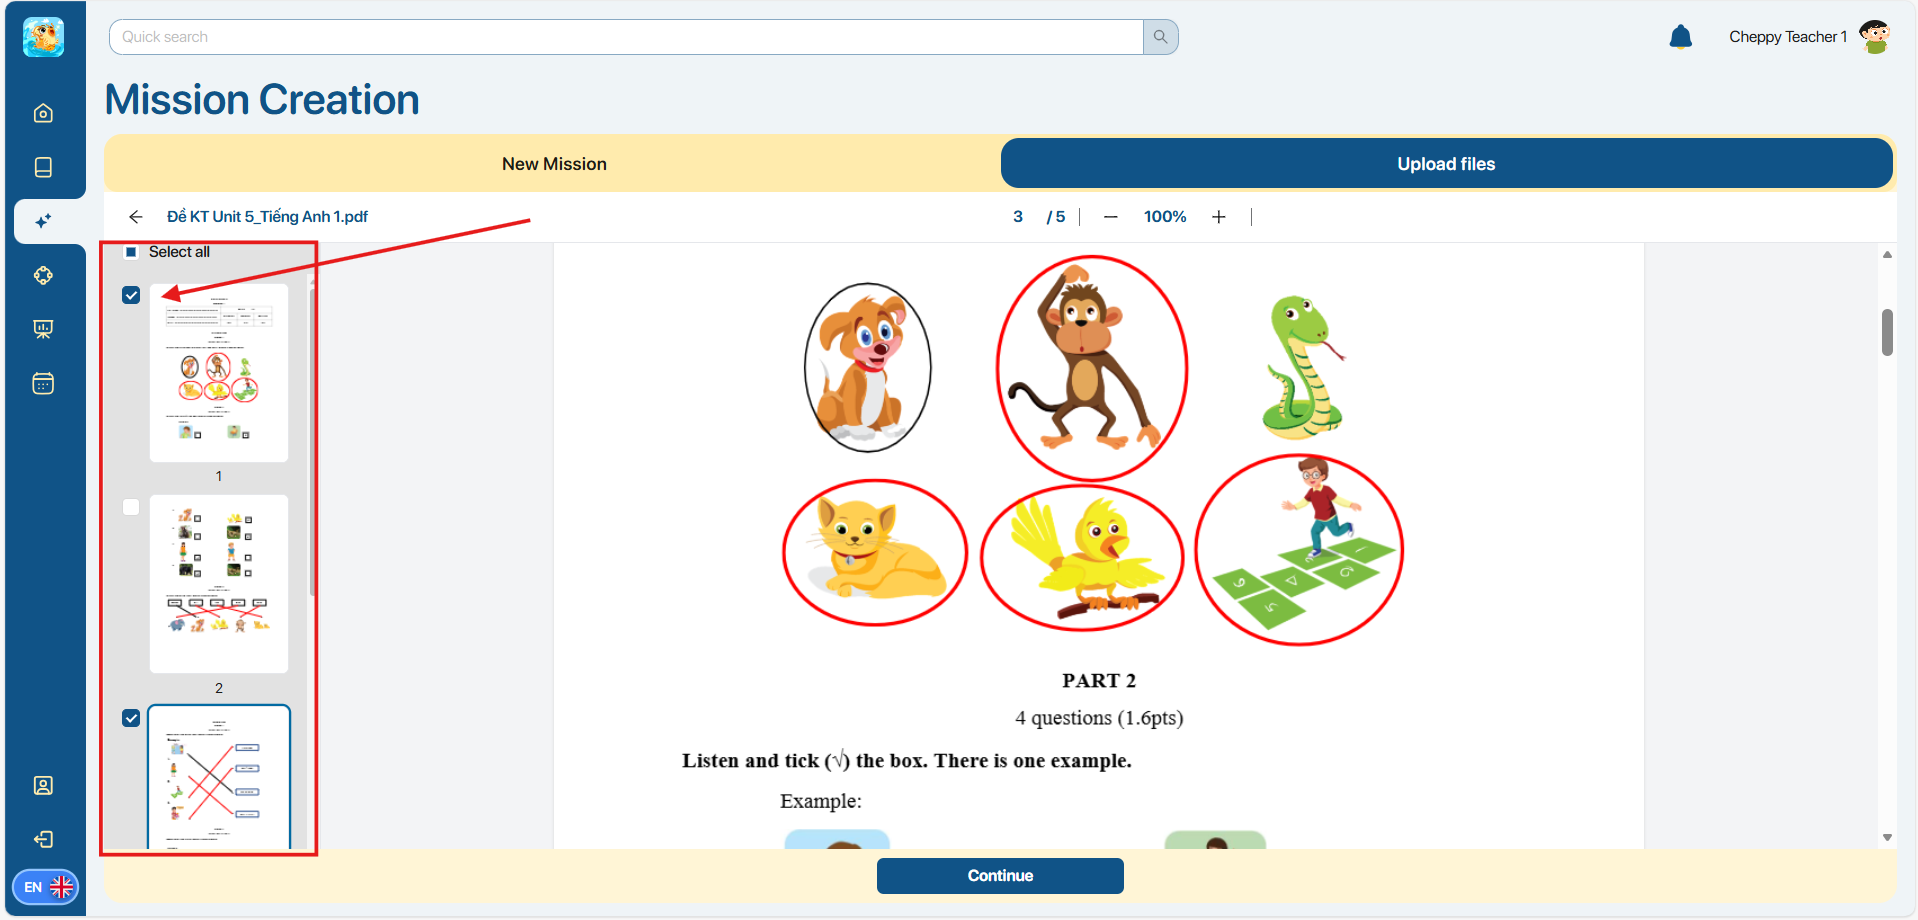
Note: Only pages selected by the user are processed by the system and questions are generated.
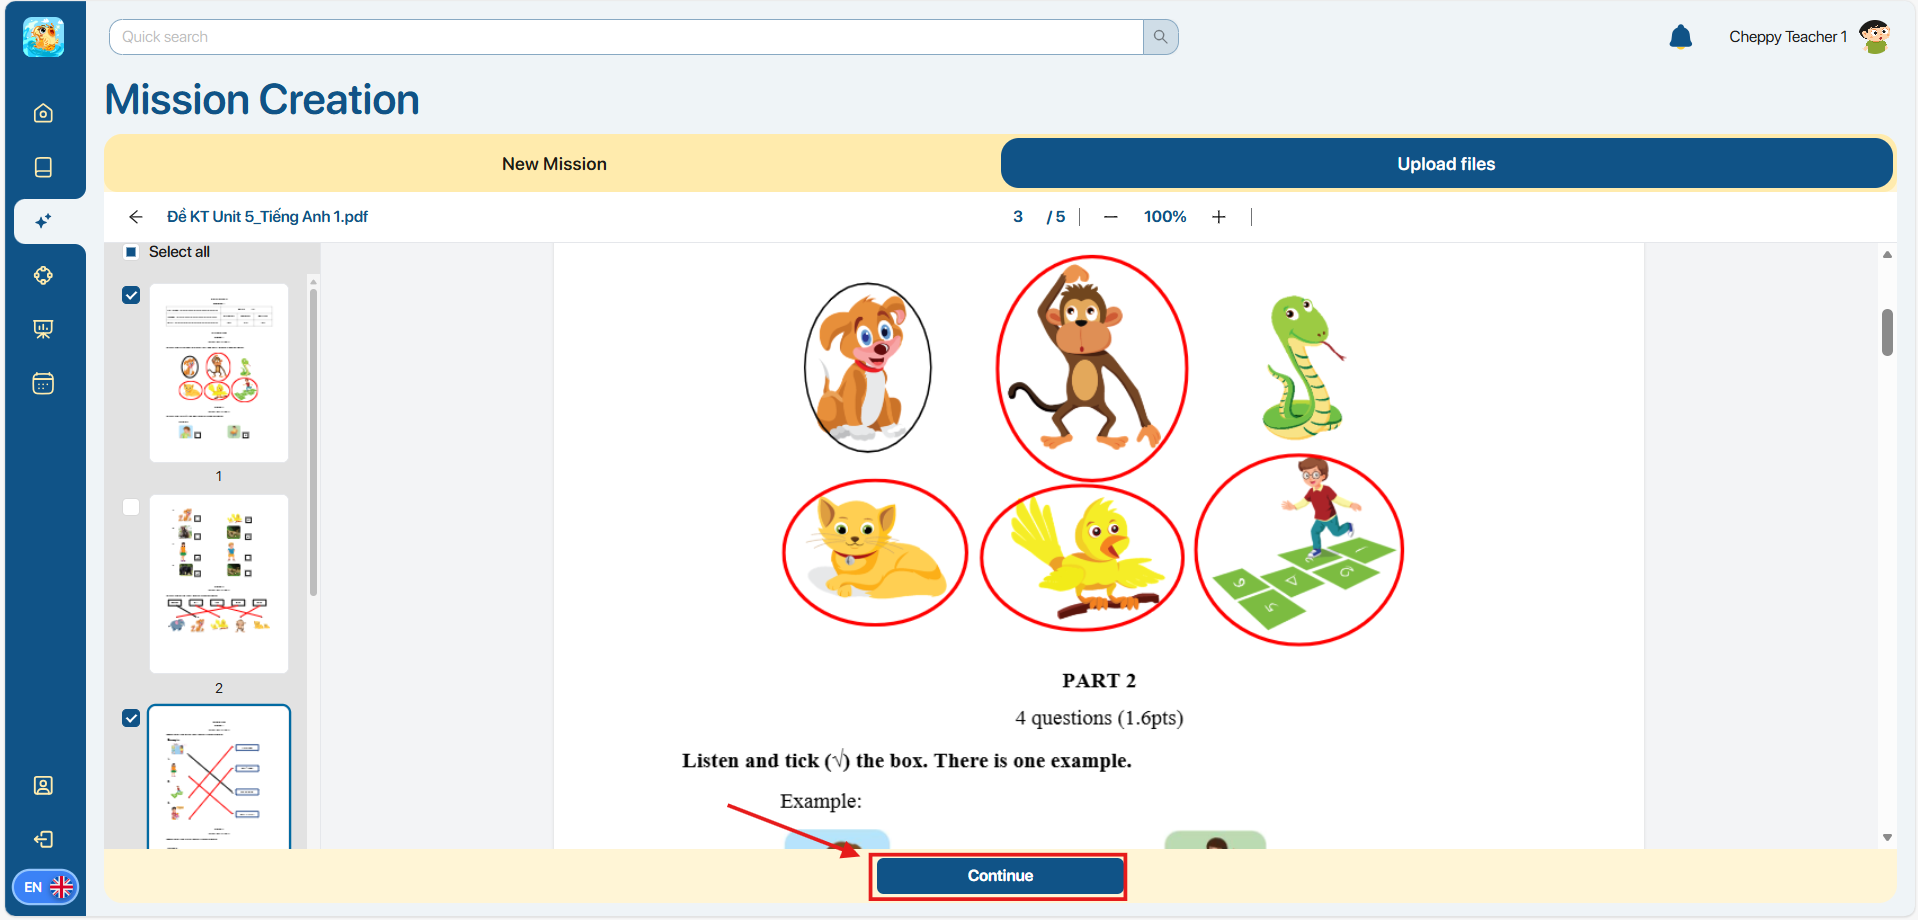
Step 5: The user presses the button. The AI system will automatically generate exercise content corresponding to the selected topic.
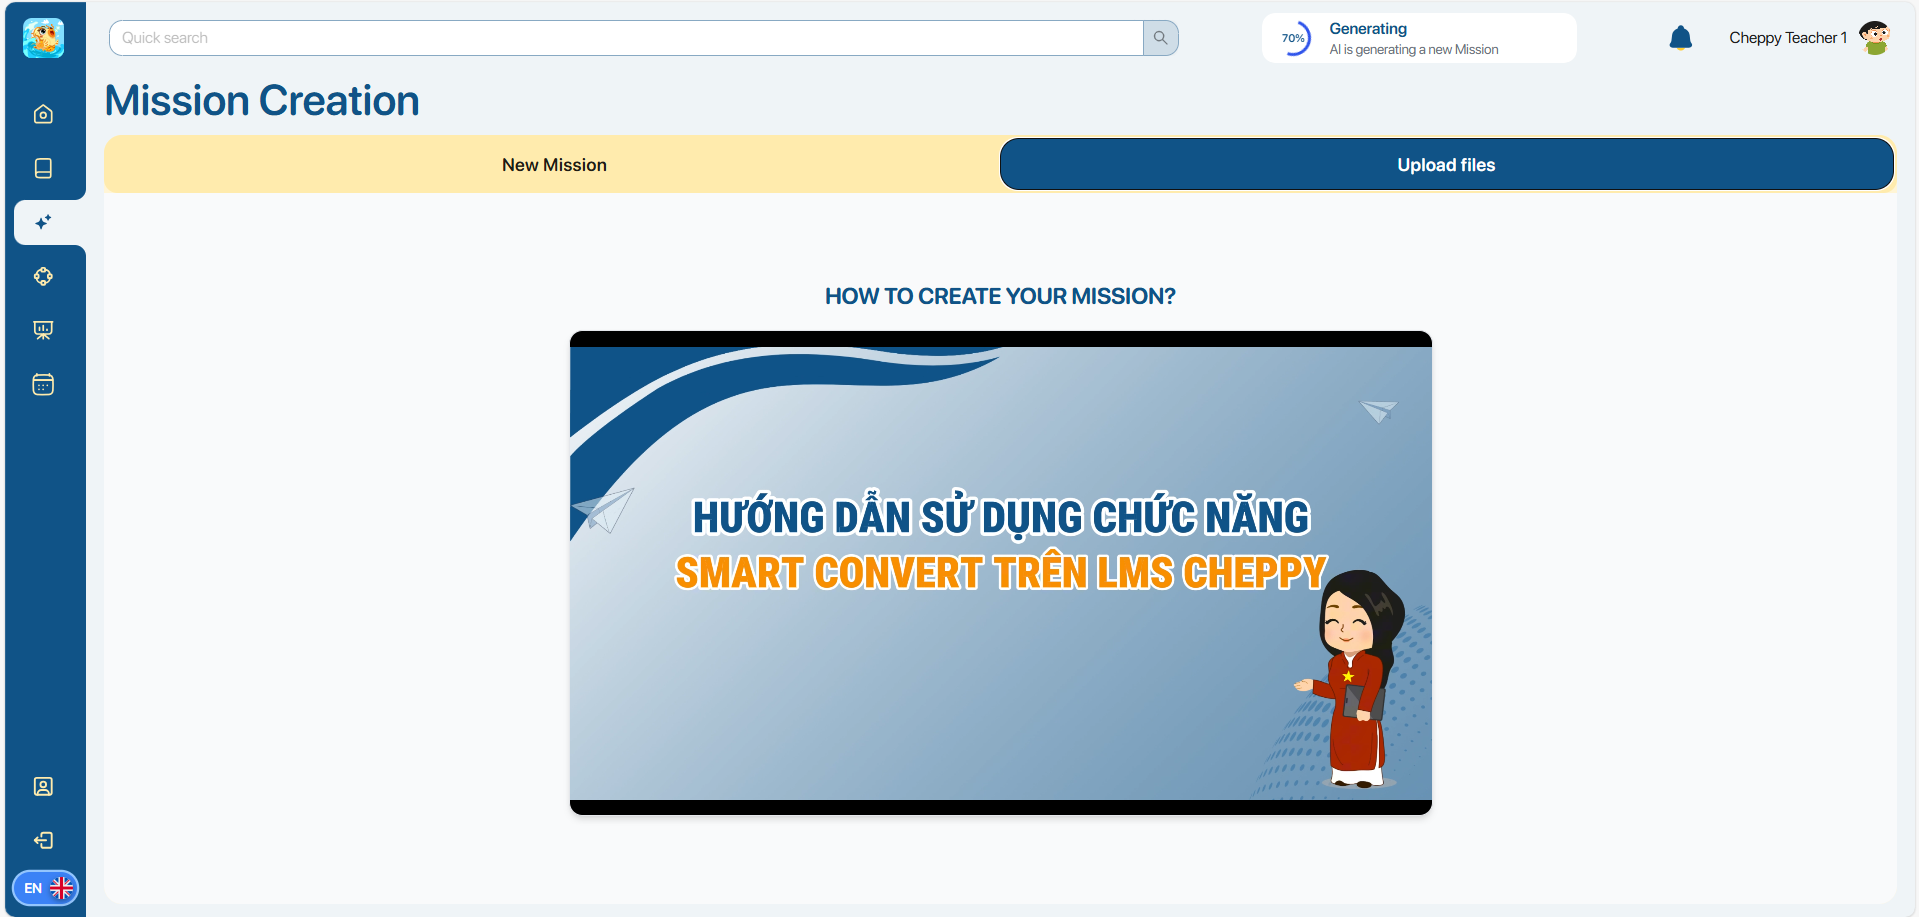
Step 6: After pressing the button The system displays a video titled "How to use the Smart convert function on Cheppy LMS" while the AI system is generating question content.
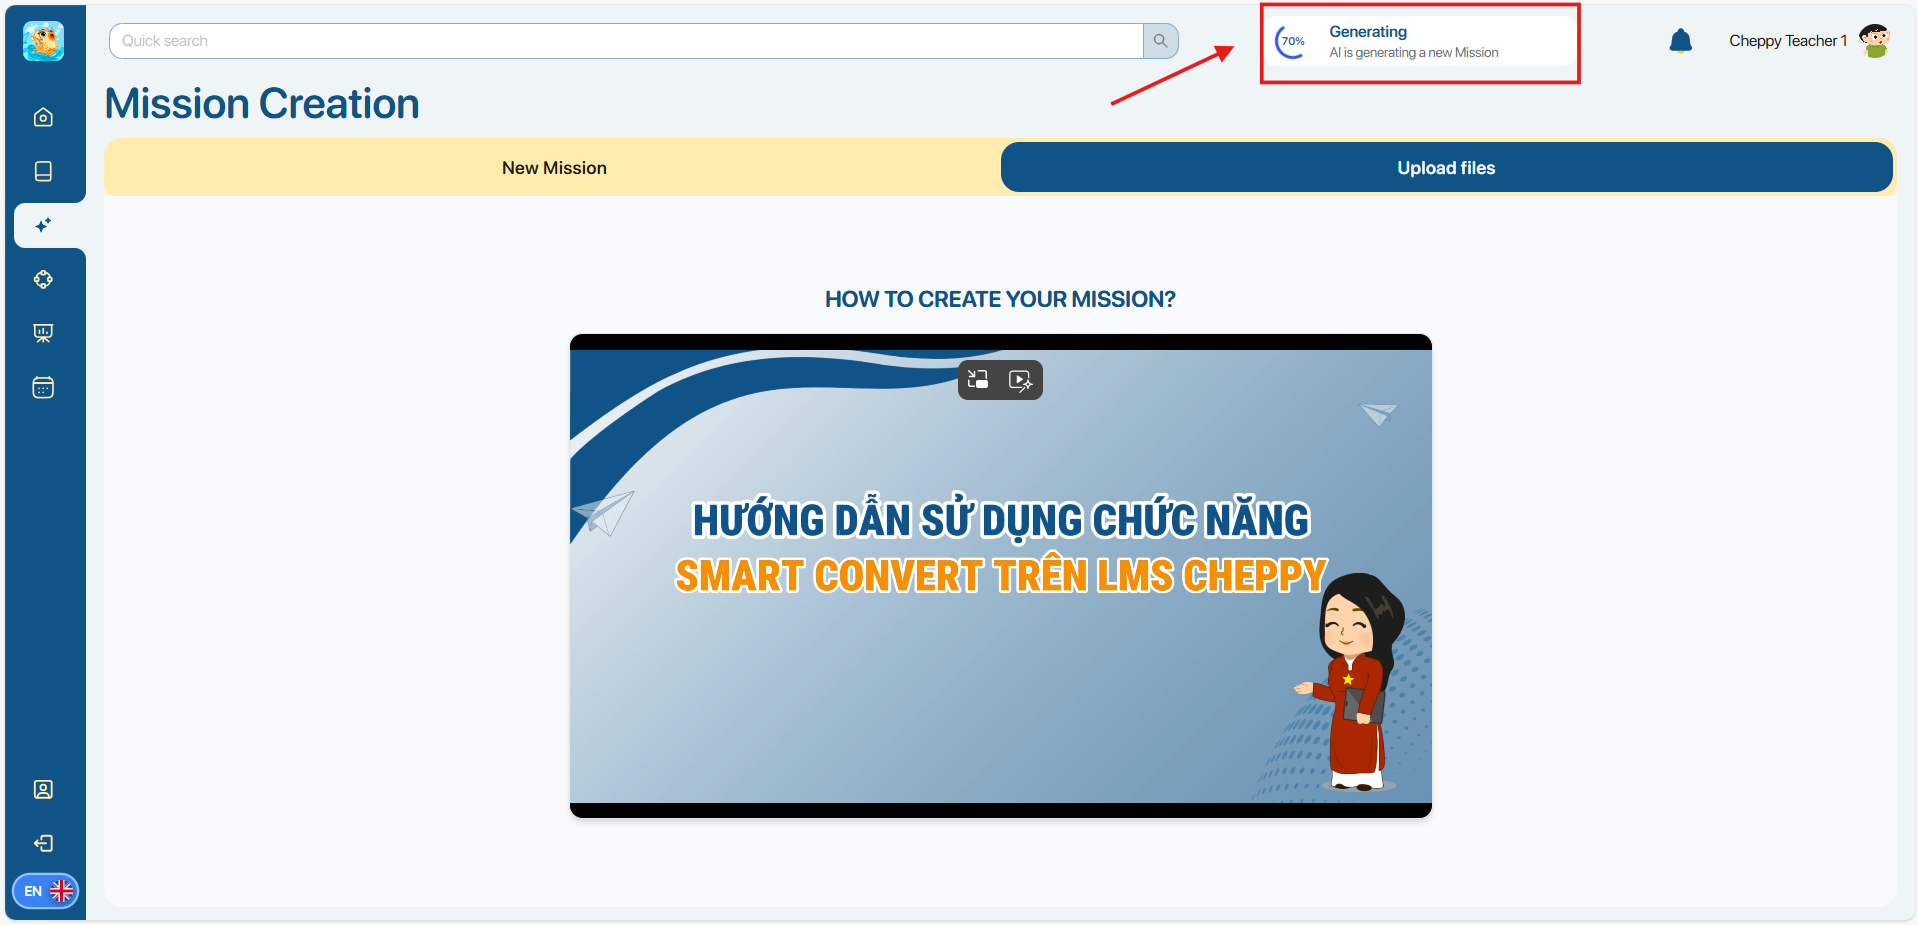
Note:While the AI is creating assignments, users can still perform other tasks on the platform. The progress of assignment creation is displayed via a progress bar in the upper right corner.
Step 7:After the system finishes generating the question and displays a success message, the user presses the button. Click on the top right corner of the screen to switch to the question preview page.
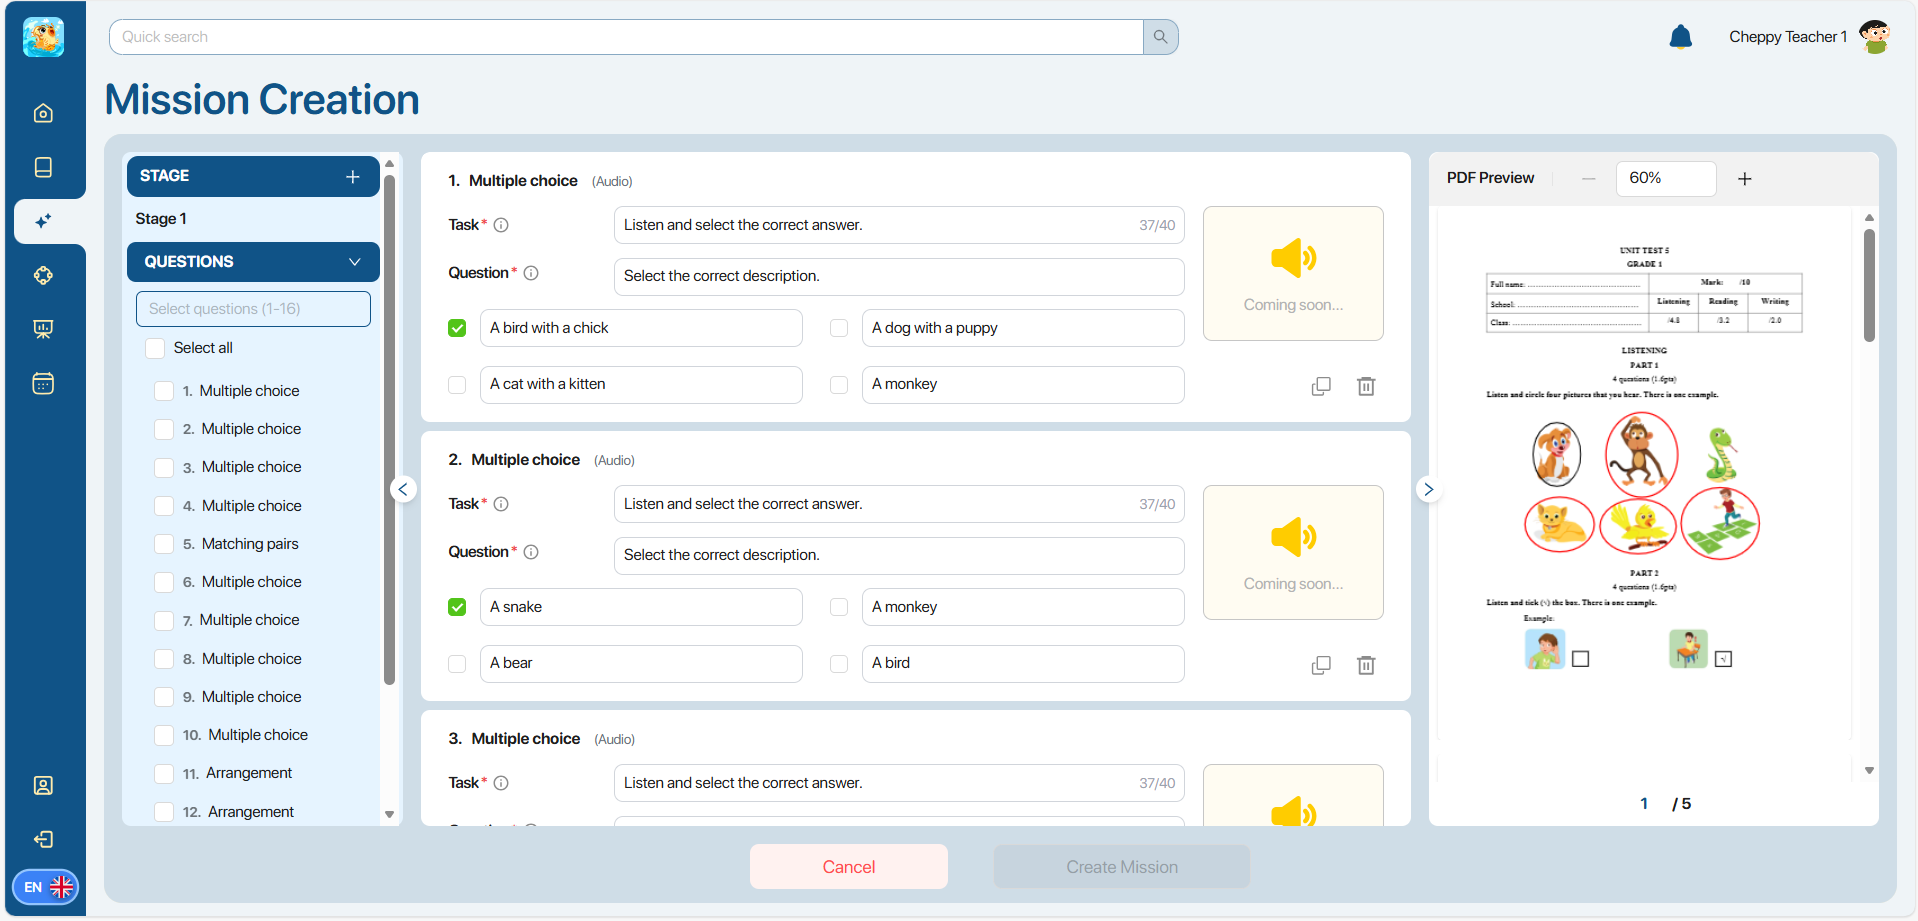
Step 8:In the Content Preview page, the system displays the question content generated from the uploaded file, including:
| STT | Function | Describe |
|---|---|---|
| 1 |  | Auto Arrange(Automatic sorting)Instead of manually sorting and dividing the questions, users can press a button.Above the Stage list is the option to automatically divide the questions.Step 1:When you press the Auto Arrange button, the system displays two options for question arrangement criteria: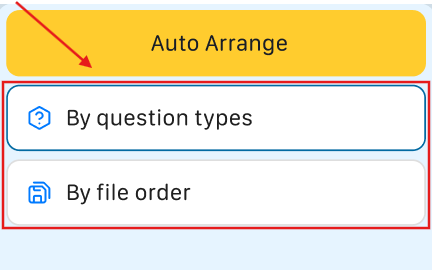 By Question TypesArrange the questions by question type.By PDF Order: Arrange the questions in the order of the original file pages.Step 2:User selects1 of 2 criteriaThe page and system automatically divide all the questions into stages and display them on the screen. By Question TypesArrange the questions by question type.By PDF Order: Arrange the questions in the order of the original file pages.Step 2:User selects1 of 2 criteriaThe page and system automatically divide all the questions into stages and display them on the screen.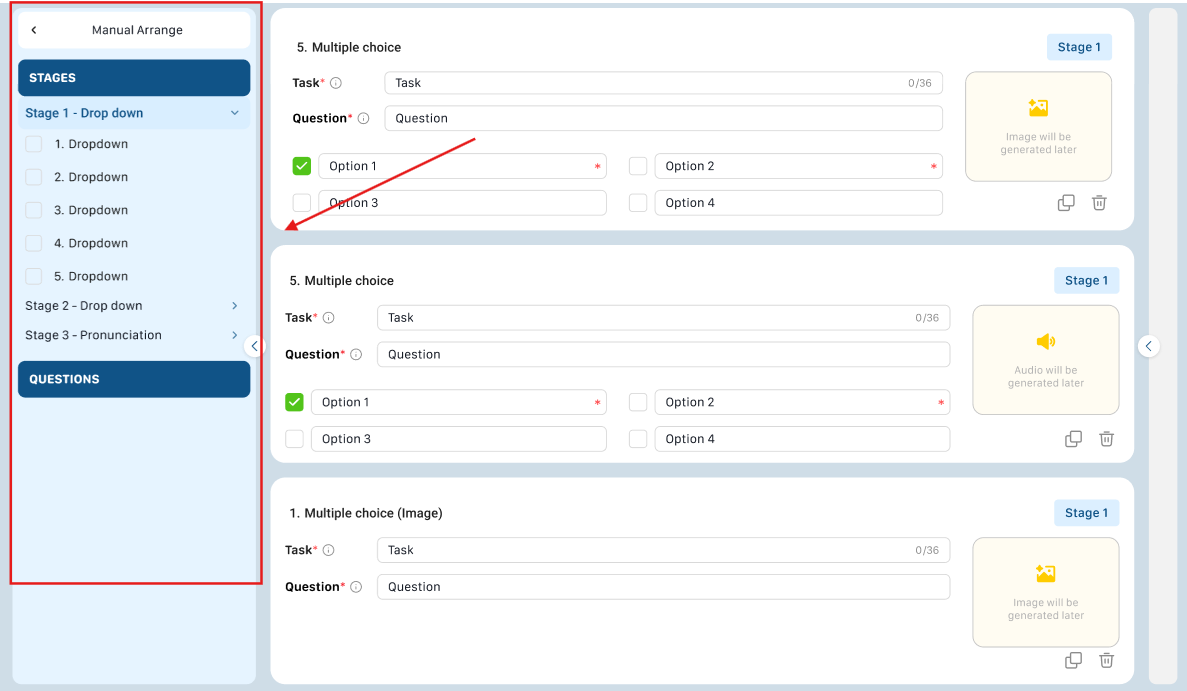 Note: Users can still drag and drop, and edit questions or stages if needed.Stage names are chosen based on selected criteria. Note: Users can still drag and drop, and edit questions or stages if needed.Stage names are chosen based on selected criteria.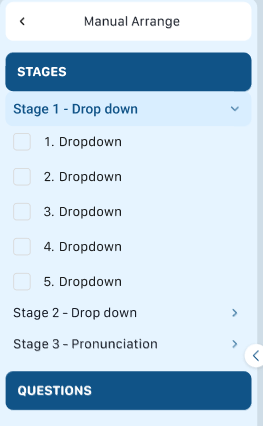 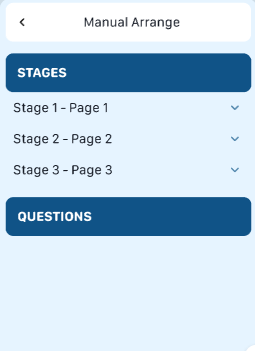 |
| 2 |  | Stage (Exercise)The system automatically creates the first Stage with the default name "Stage 1".To create a new stage, the user clicks the button.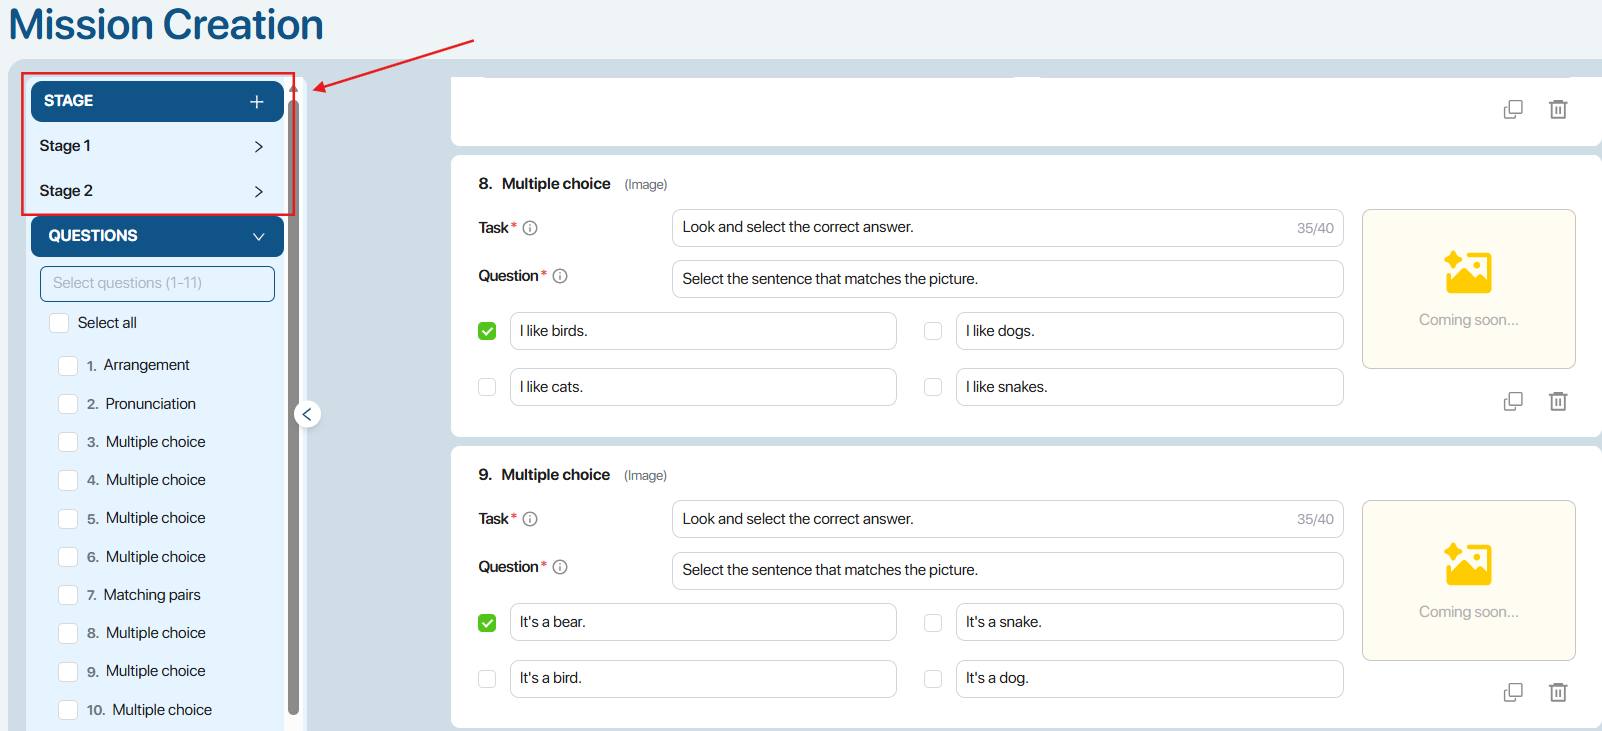 To delete a Stage, the user points the mouse and clicks the button. To delete a Stage, the user points the mouse and clicks the button. at the corresponding stage. at the corresponding stage. Note: The list of questions from the deleted stage will be displayed in the Questions section.To view the questions in a stage, users select the desired stage, and the system will display a list of questions for that stage. Note: The list of questions from the deleted stage will be displayed in the Questions section.To view the questions in a stage, users select the desired stage, and the system will display a list of questions for that stage.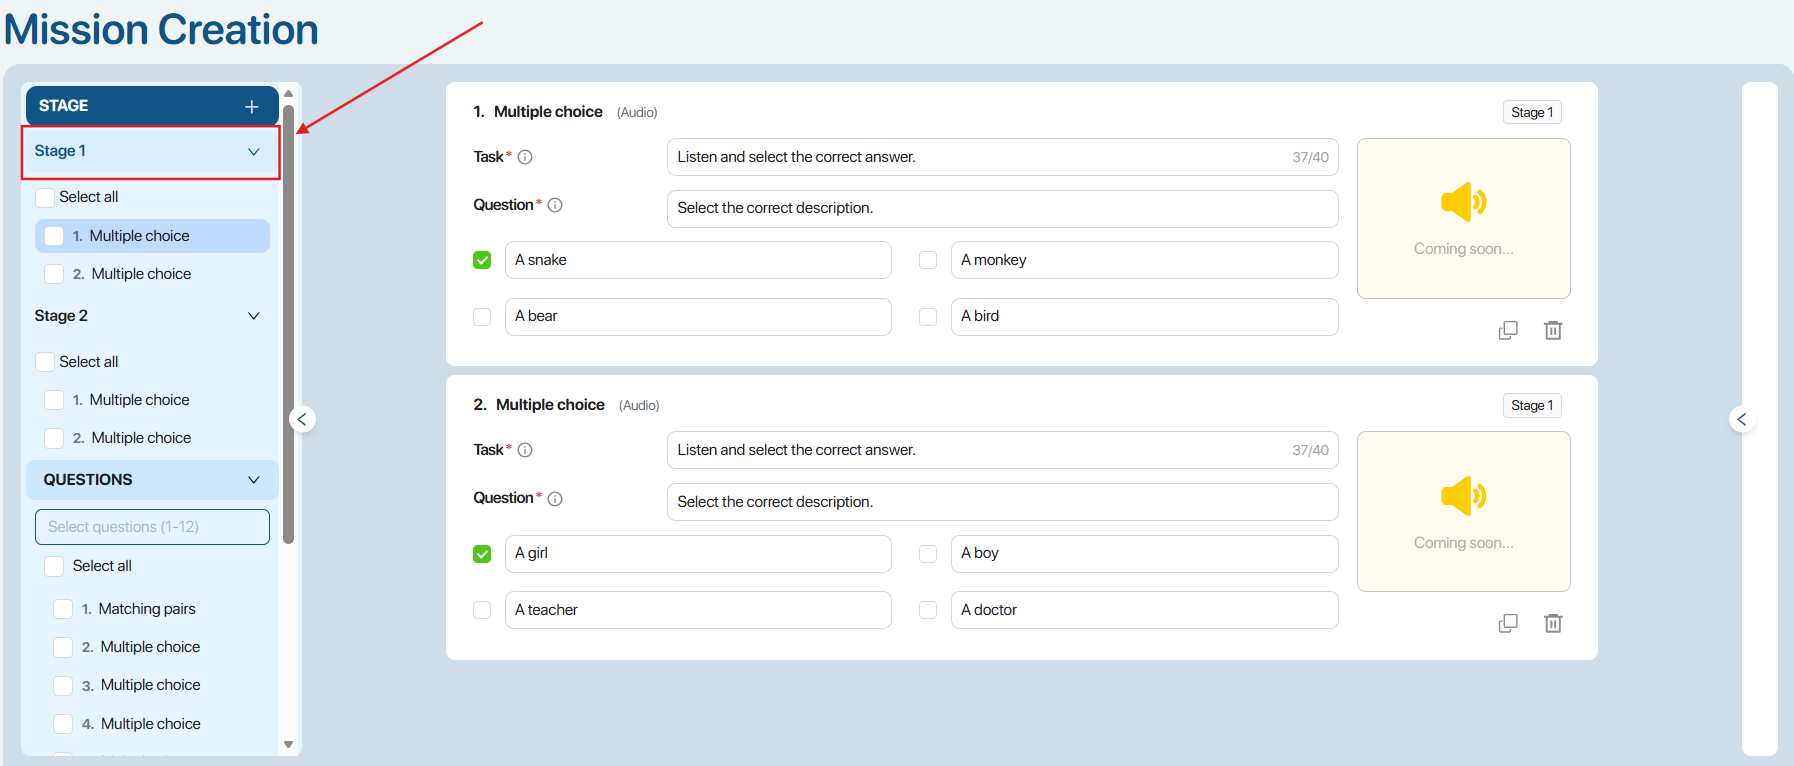 |
| 3 | 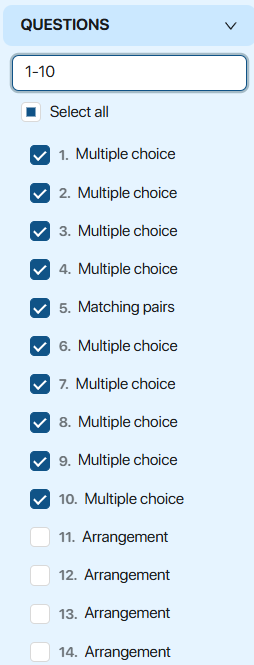 | Questions (List of questions)By default, the system displays all questions generated by the AI from the file content.To divide questions into stages, users select one or more questions and drag and drop them into the desired stage.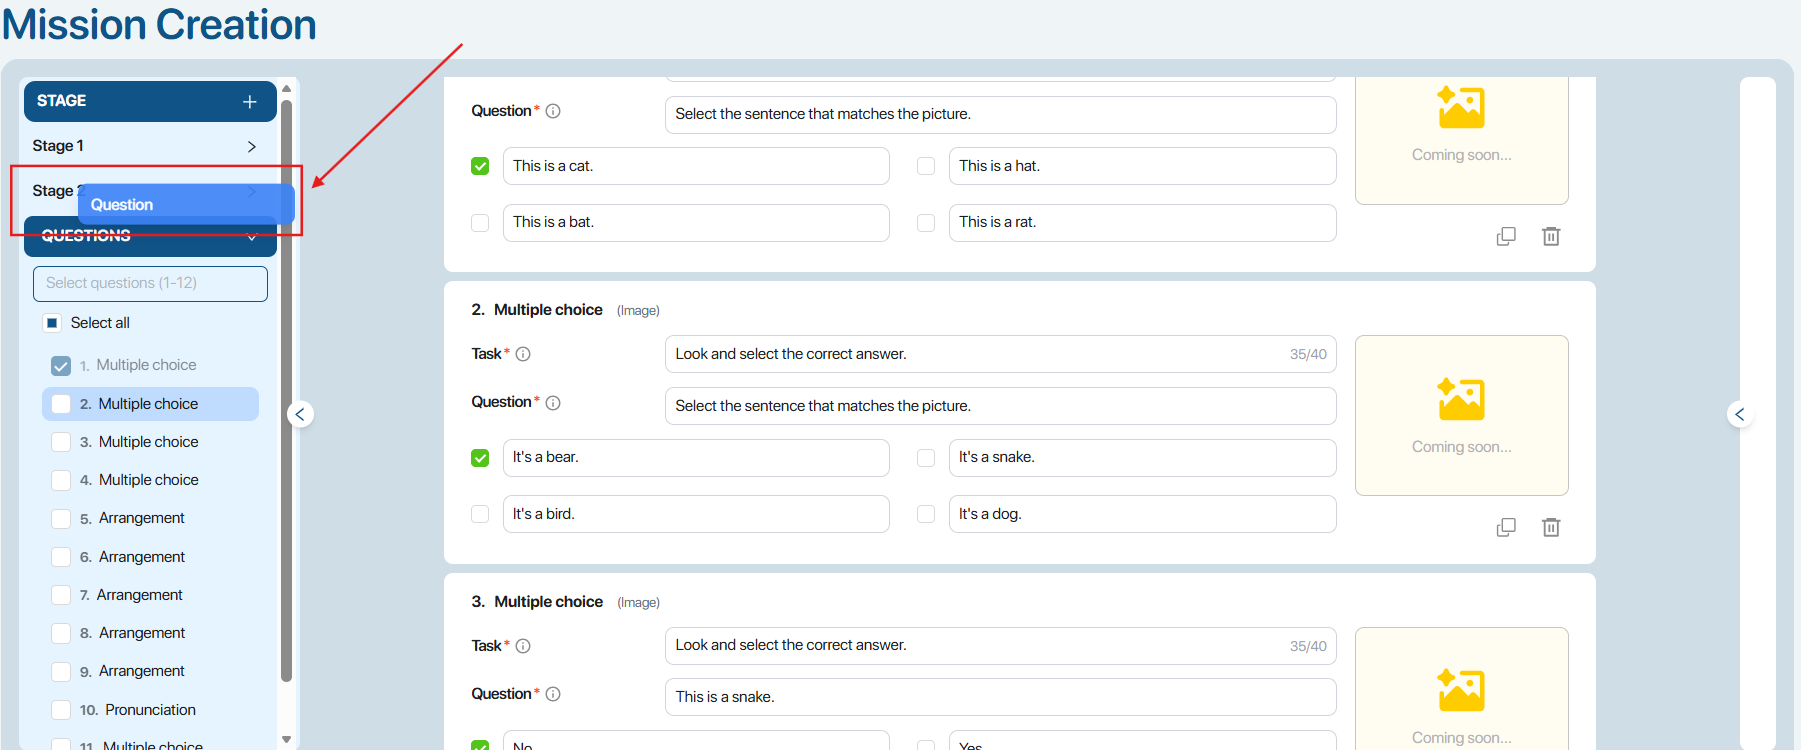 Users can select and drag questions from the current Stage to another Stage or back to the Questions area. Users can select and drag questions from the current Stage to another Stage or back to the Questions area.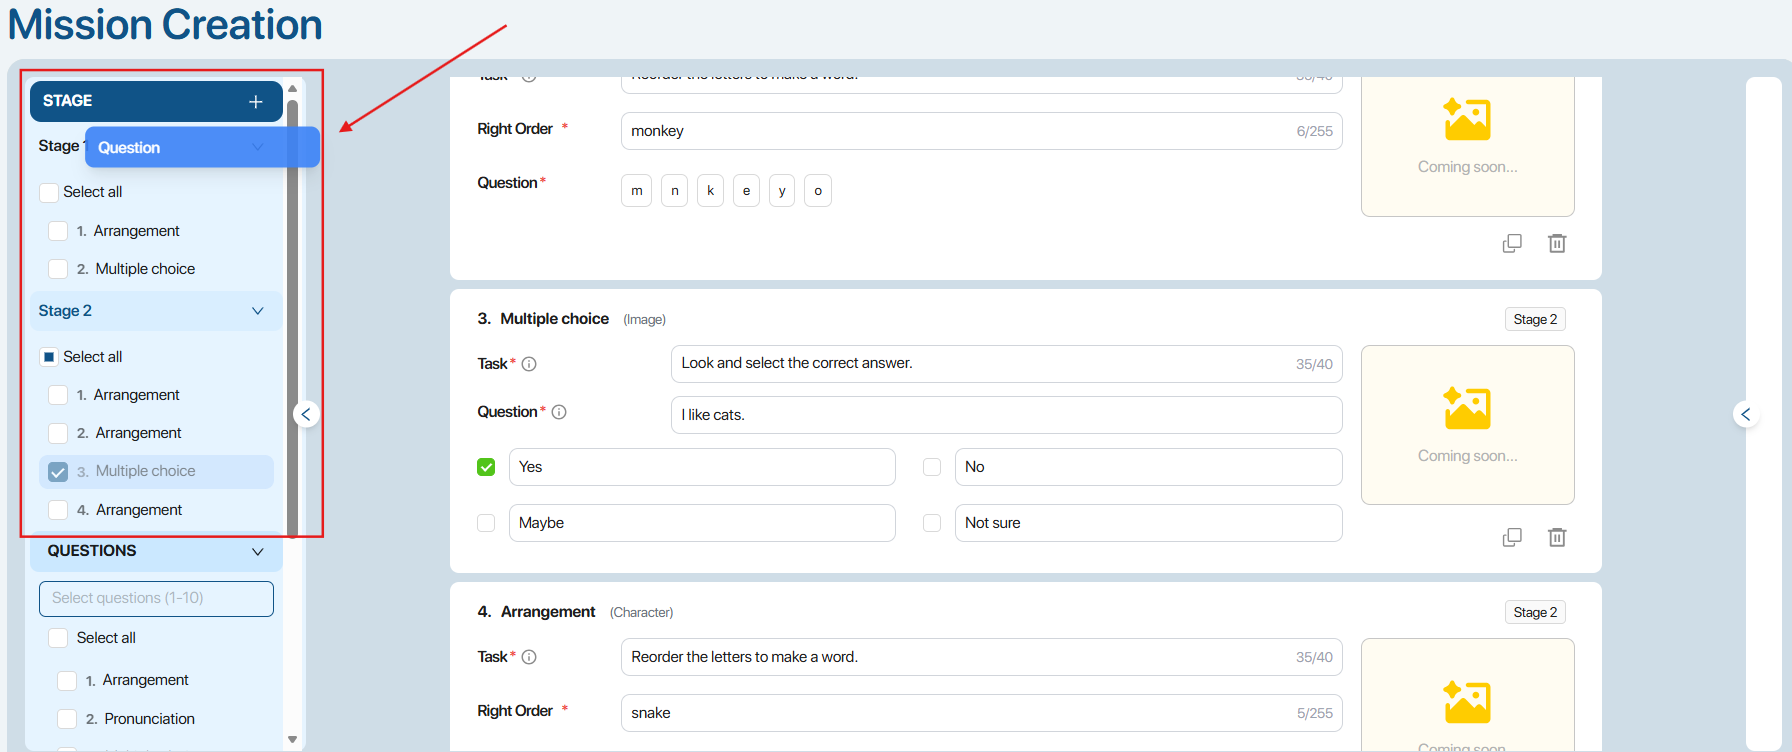 To quickly select multiple questions, users can enter a range of questions (e.g., 1-10), and the system will automatically select all questions within that range. To quickly select multiple questions, users can enter a range of questions (e.g., 1-10), and the system will automatically select all questions within that range.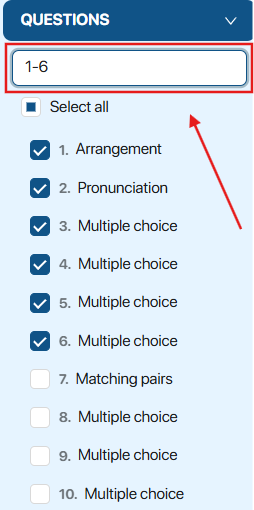 |
| 4 | 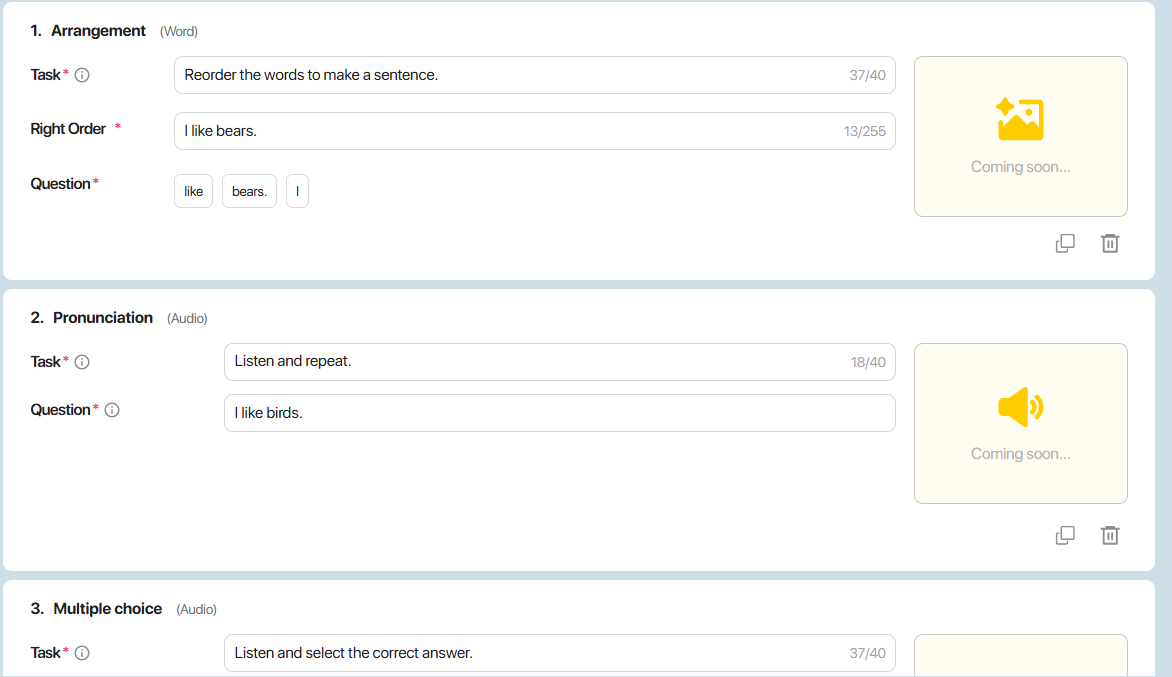 | Question contentWhen a user selects a question, the system displays the details of that question.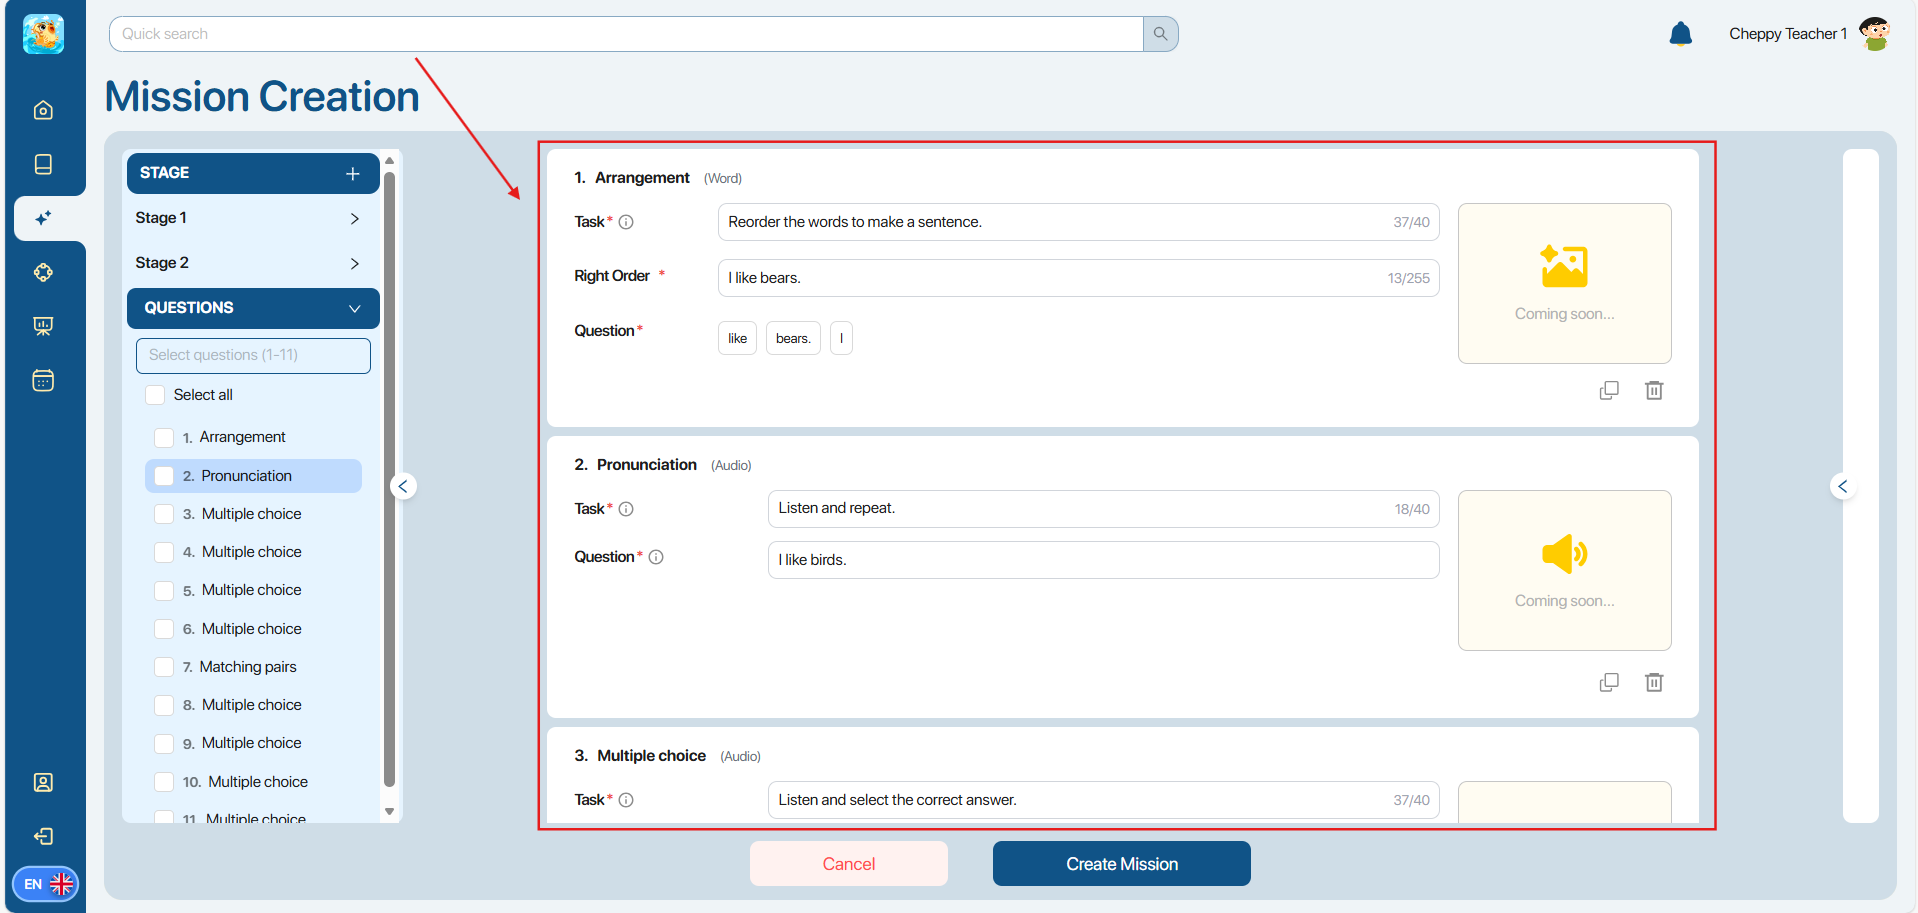 Note:Users can edit the question content directly on the screen page. Note:Users can edit the question content directly on the screen page. |
| 5 | 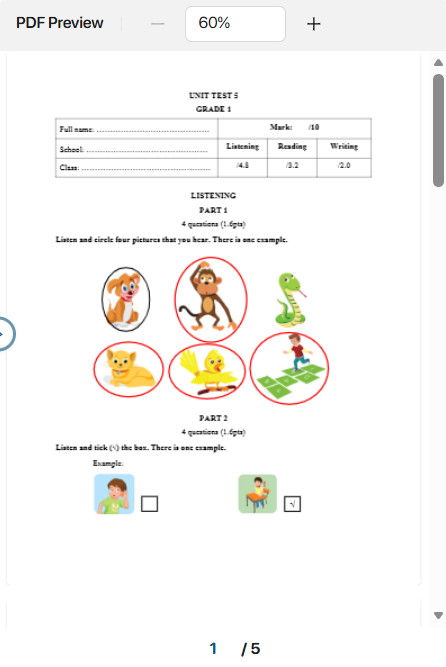 | File contentsThe user presses the button. This allows the system to display the file content that the user selected in the File Upload step on the right side of the page.Note:Users can compare the original content of the file with the questions generated by the system to ensure accuracy and relevance. This allows the system to display the file content that the user selected in the File Upload step on the right side of the page.Note:Users can compare the original content of the file with the questions generated by the system to ensure accuracy and relevance. |
Step 9: After completing the question division and content editing, the user presses the button. To create a new Mission.
Note: Conditions for pressing the button,include:
- There must be at least one stage.
- Each stage has at least one question.
- All questions were valid and the correct answers were selected.
Step 10:After successfully creating a Mission, the system displays a success message. The user taps the message displayed on the screen to view the Stage (Assignment) page.
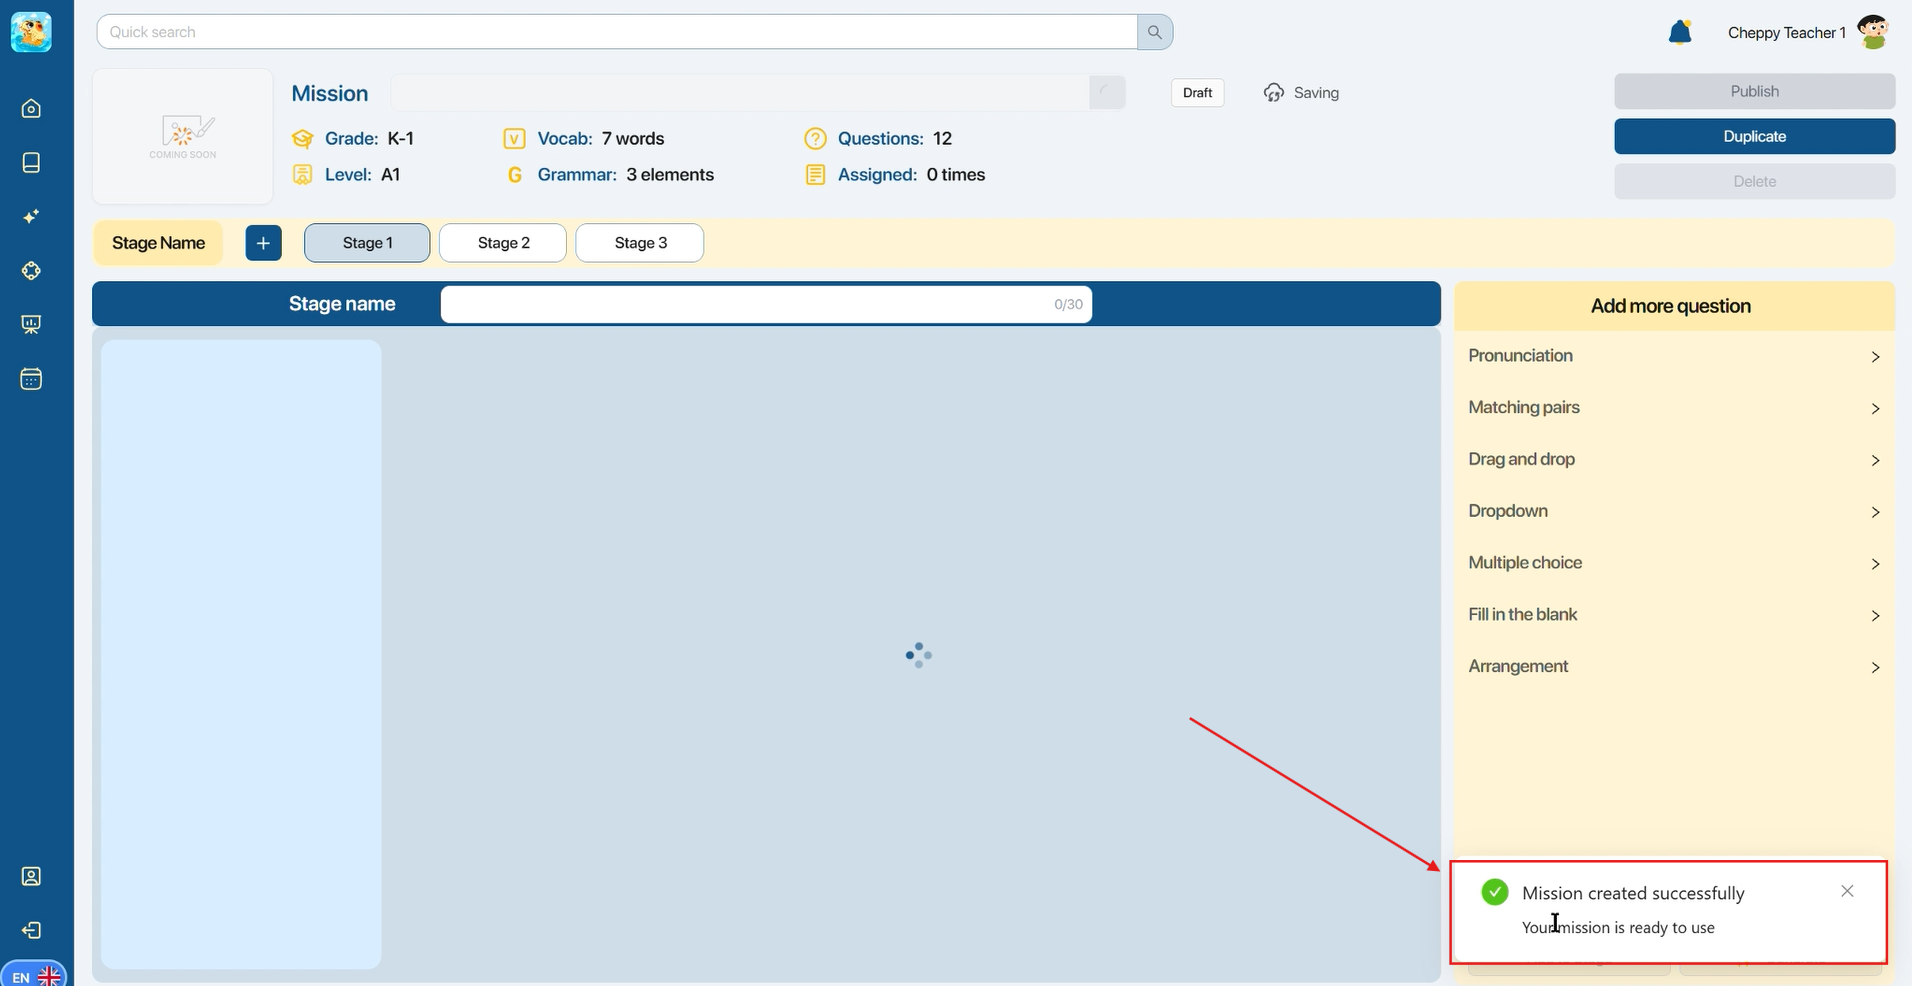
Note:Users can still view the details of the Mission they just created in the area.My Librarywhen no selection was made in the previous notification.
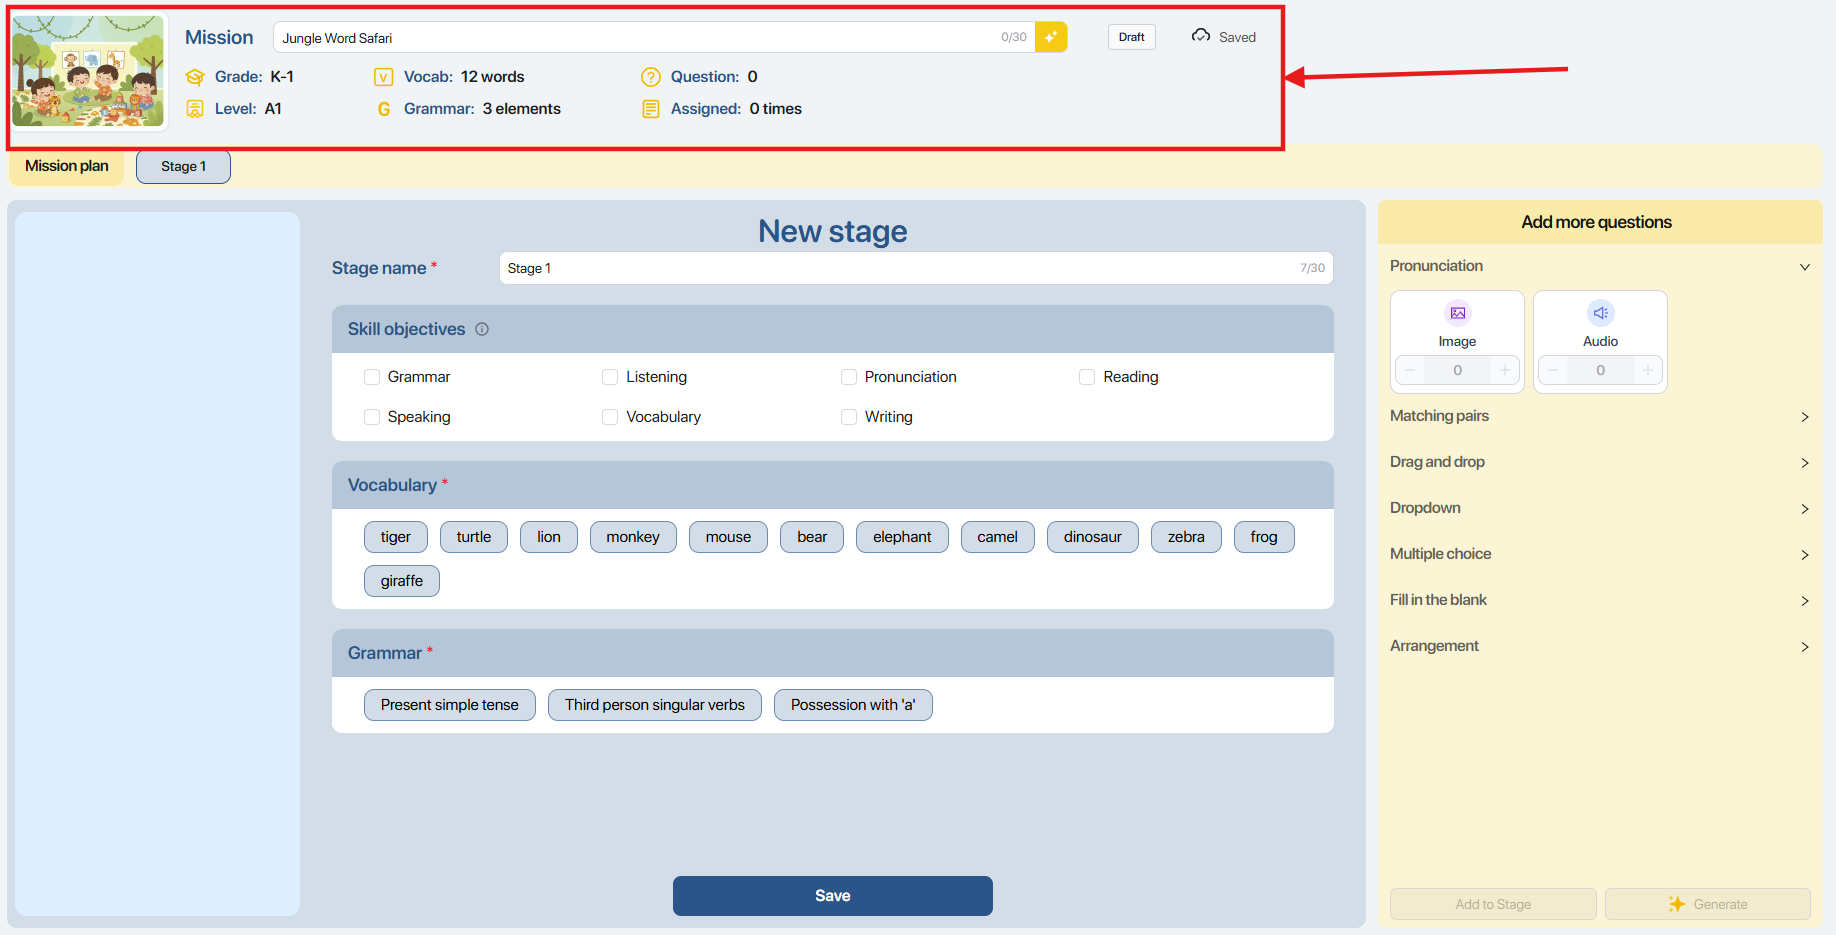
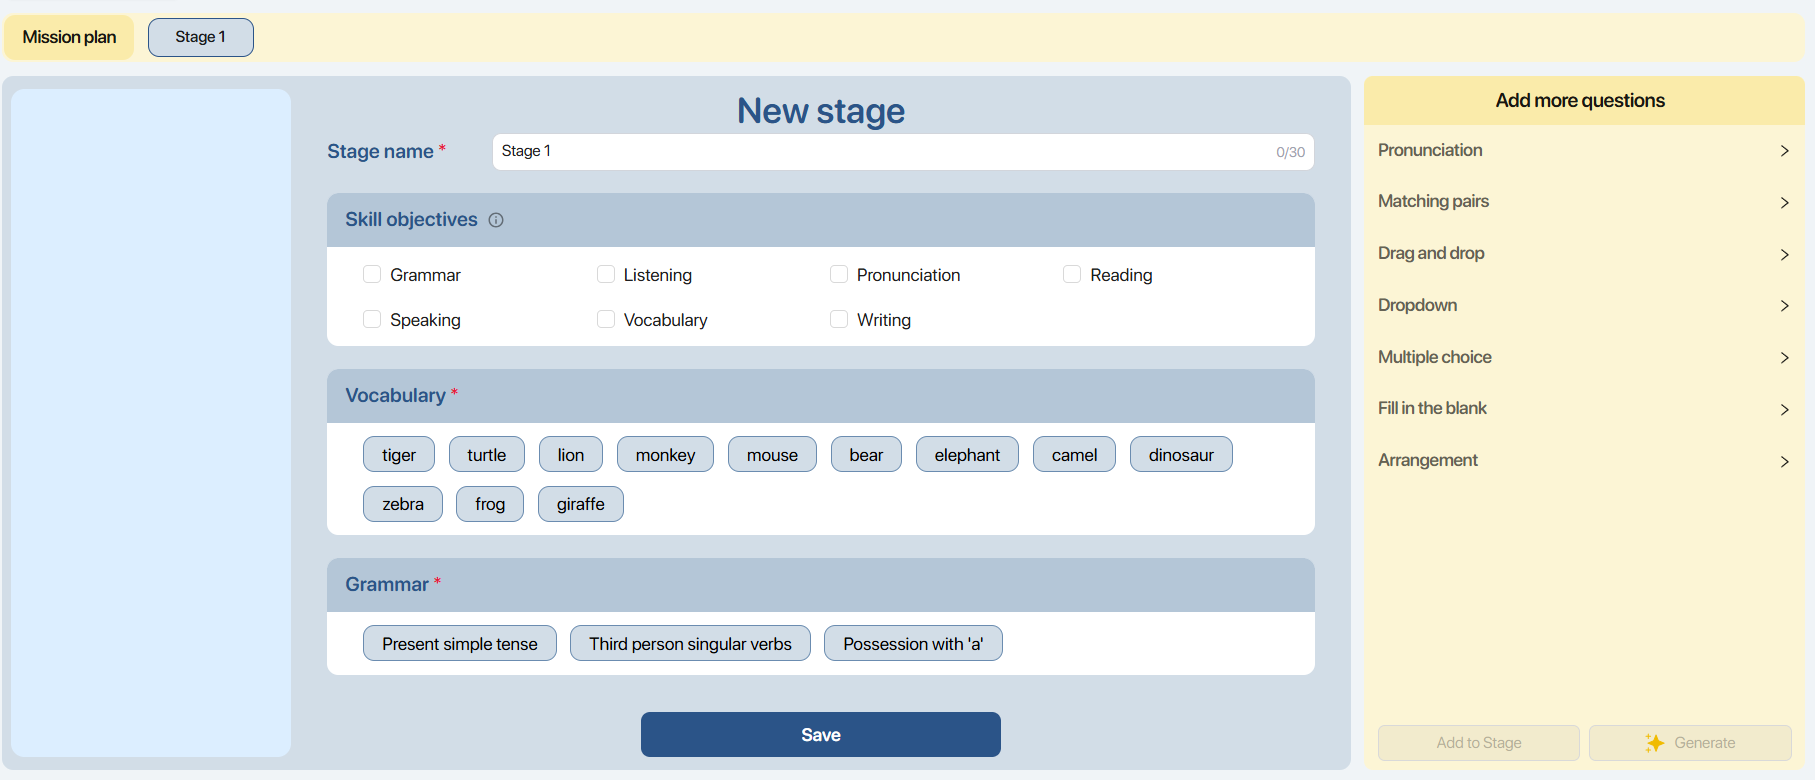
5.3. HOW TO CREATE STAGES
Step 1: In the Stage creation page, users can view Mission information in the upper left corner of the screen, including:
| STT | Icon | Describe |
|---|---|---|
| 1 |  | Thumbnail (Illustrative image)After creating the Mission, the AI system automatically generates a thumbnail.Note: Users can further customize thumbnails as follows.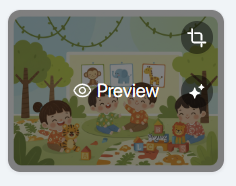 To view the image, click on the icon. To view the image, click on the icon. |
| 2 |  | Mission nameNote: Users can perform additional actions with the Mission name as follows.Manually enter the code to change the Mission's name.Or click on the icon Let AI help create a new name.Mission names are limited to 30 characters to fit the page on the Cheppy app. Let AI help create a new name.Mission names are limited to 30 characters to fit the page on the Cheppy app. |
| 3 |  | Grade |
| 4 |  | Level |
| 5 |  | VocabularyUsers hover their mouse over the Vocabulary area to view the list of vocabulary words for Mission.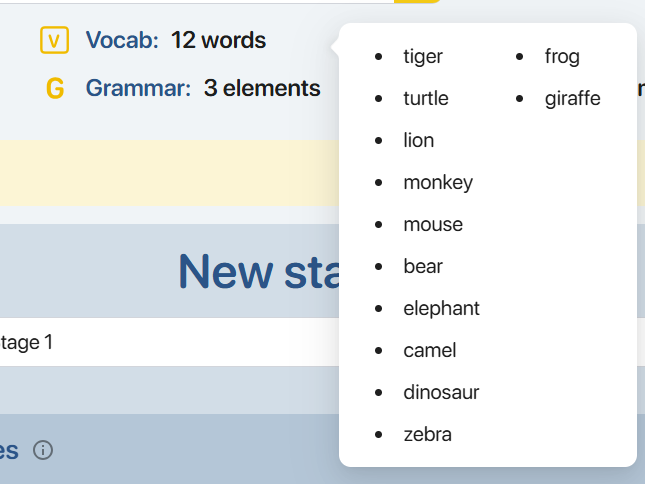 |
| 6 |  | GrammarUsers hover their mouse over the Grammar area to view a list of Mission's grammar topics.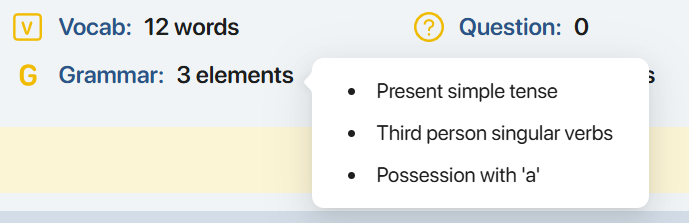 |
| 7 | Question (Number of questions) | |
| 8 |  | Assigned (Number of assignments given) |
| 9 |  | Status (Mission Status) |
| 10 | Saved (Last changes saved) | |
| 11 |  | Saving |
Step 2: In the Add New Stage page, users enter the stage's information.
| STT | Information | Describe |
|---|---|---|
| 1 |  | Stage nameThe system automatically creates the first Stage by default as “Stage 1”. Users canEnter the command to change the assignment name.Stage names are limited to 30 characters to fit the page on the Cheppy app. |
| 2 |  | Skill objectivesUsers select the target skill for each stage, and the system will suggest exercises suitable for that skill.Choosing a target skill is not mandatory. |
 | VocabularyClick on a vocabulary word to deselect it from the Stage list. : Deselect : Deselect : Selected : Selected | |
| 3 |  | GrammarClick on a grammar topic to deselect it from the Stage list. |
Step 3: Click on the icon  To confirm Stage's information.
Note: In the list of Stages, users perform the following actions.
- To add a new Stage to the Mission, press the button.


- If there are multiple stages, press the left/right arrow buttons to view and interact with each stage.

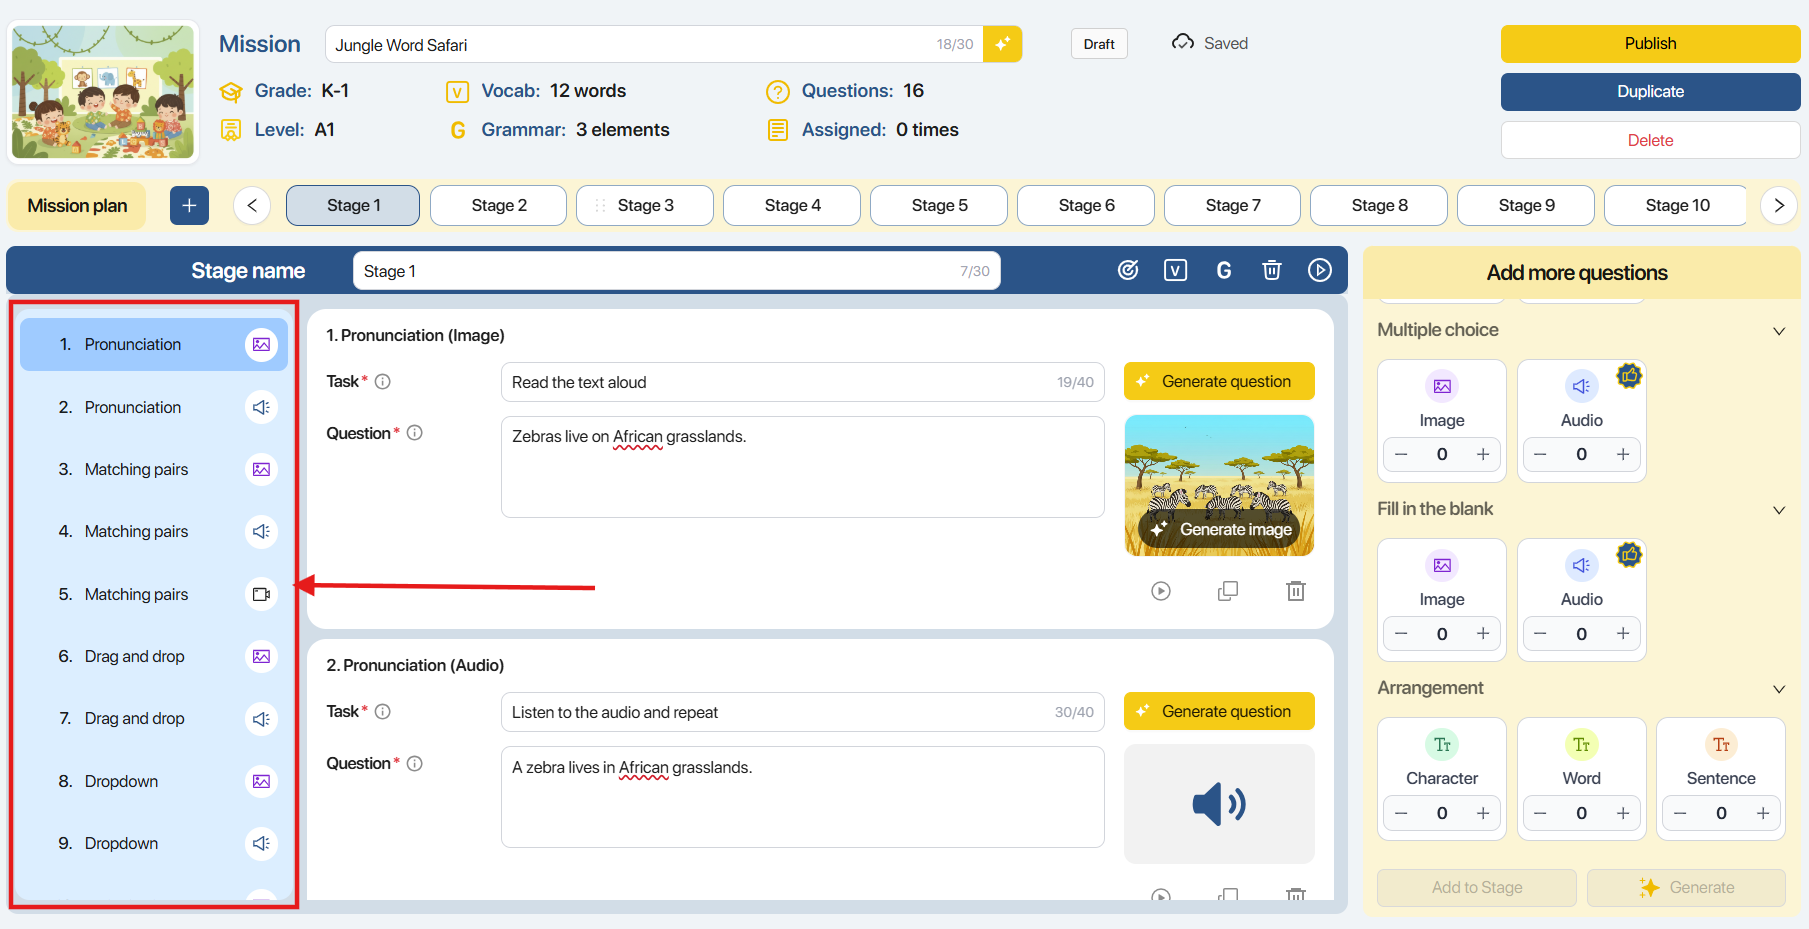
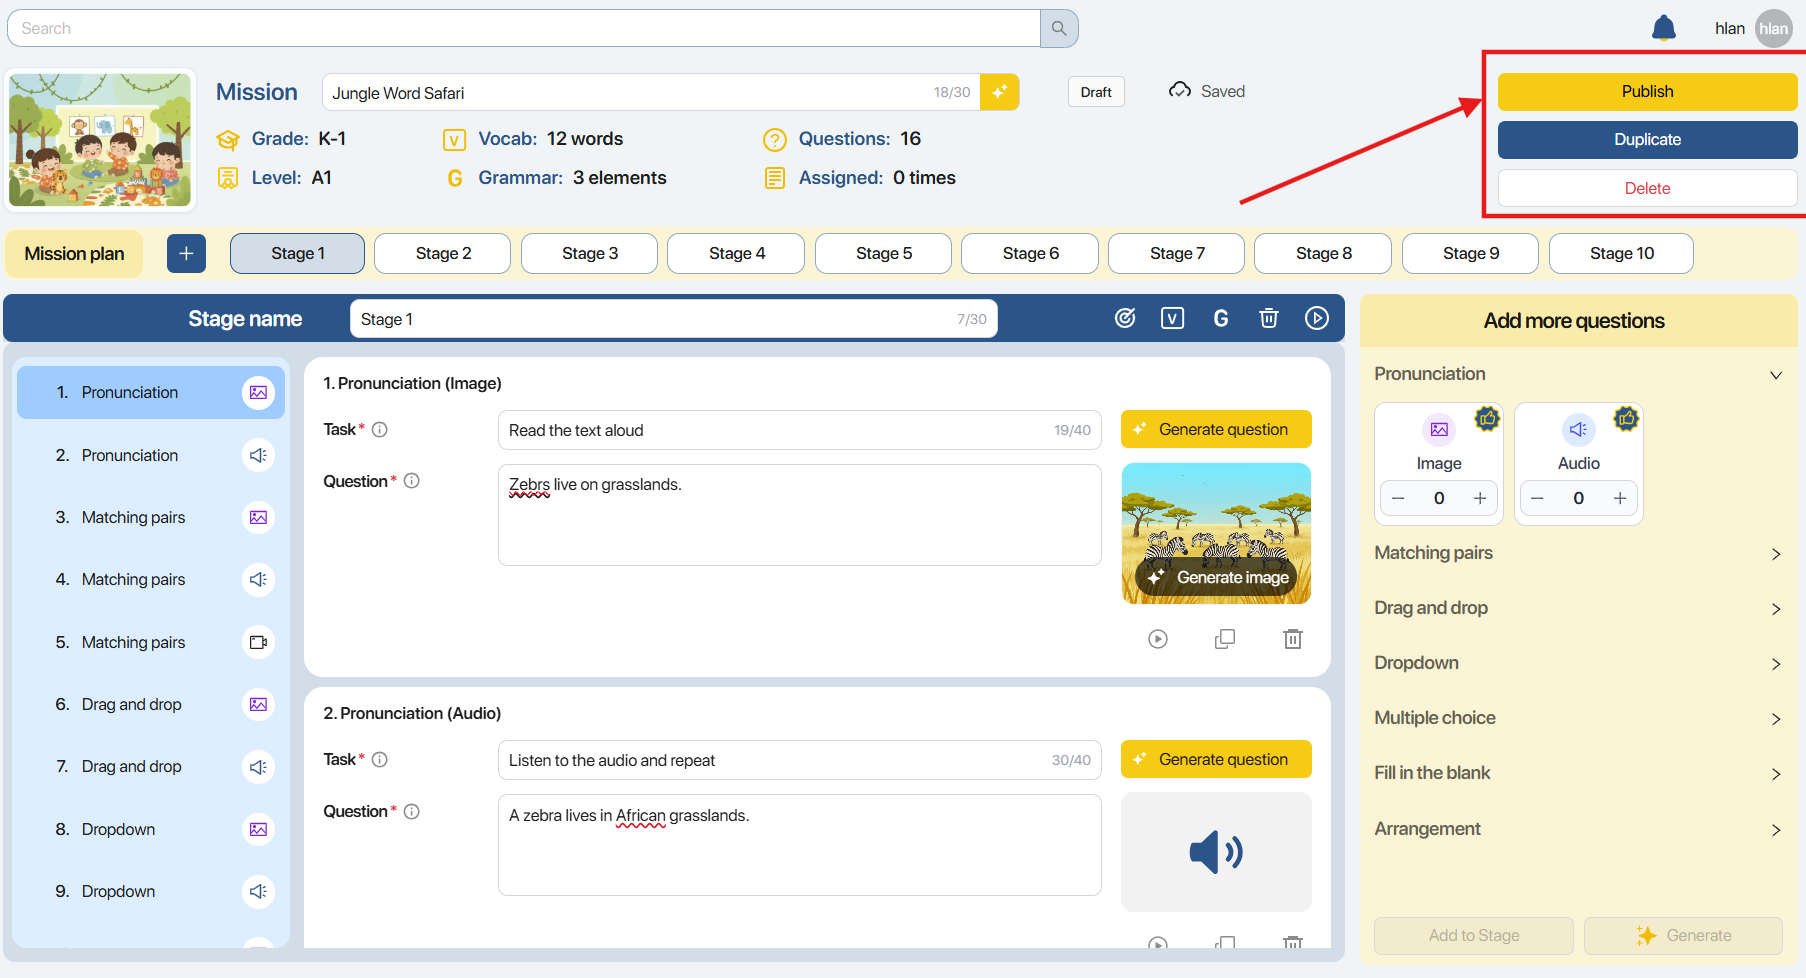
5.4. HOW TO CREATE QUESTIONS
Step 1: After creating a new Stage, users can click on the icons to view the Stage's details.
![]()
| STT | Icon | Information |
|---|---|---|
| 1 |  | Skill objectivesUsers can choose to add target skills to the Stage.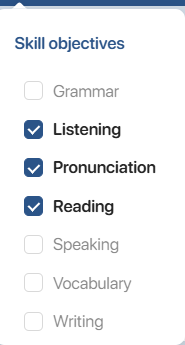 |
| 2 |  | Preview Stage (Preview Exercise)The user answers the created questions and clicks the button.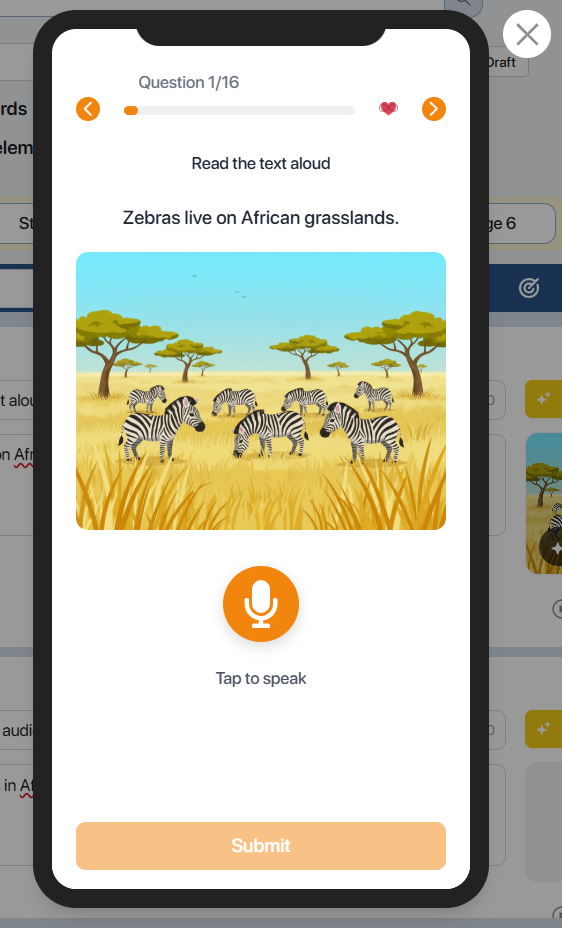 |
| 3 |  | Vocabulary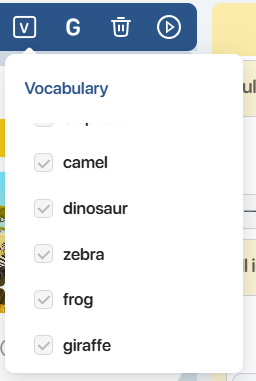 |
| 4 |  | Grammar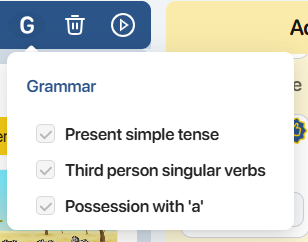 |
| 5 |  | Delete Stage (Delete Assignment)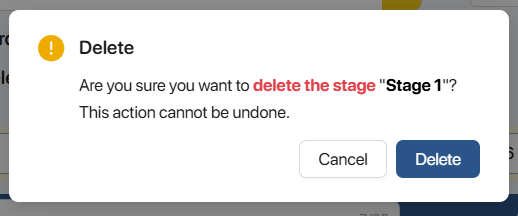 The user clicks on the icon. The user clicks on the icon. To confirm deleting Stage, press To confirm deleting Stage, press |
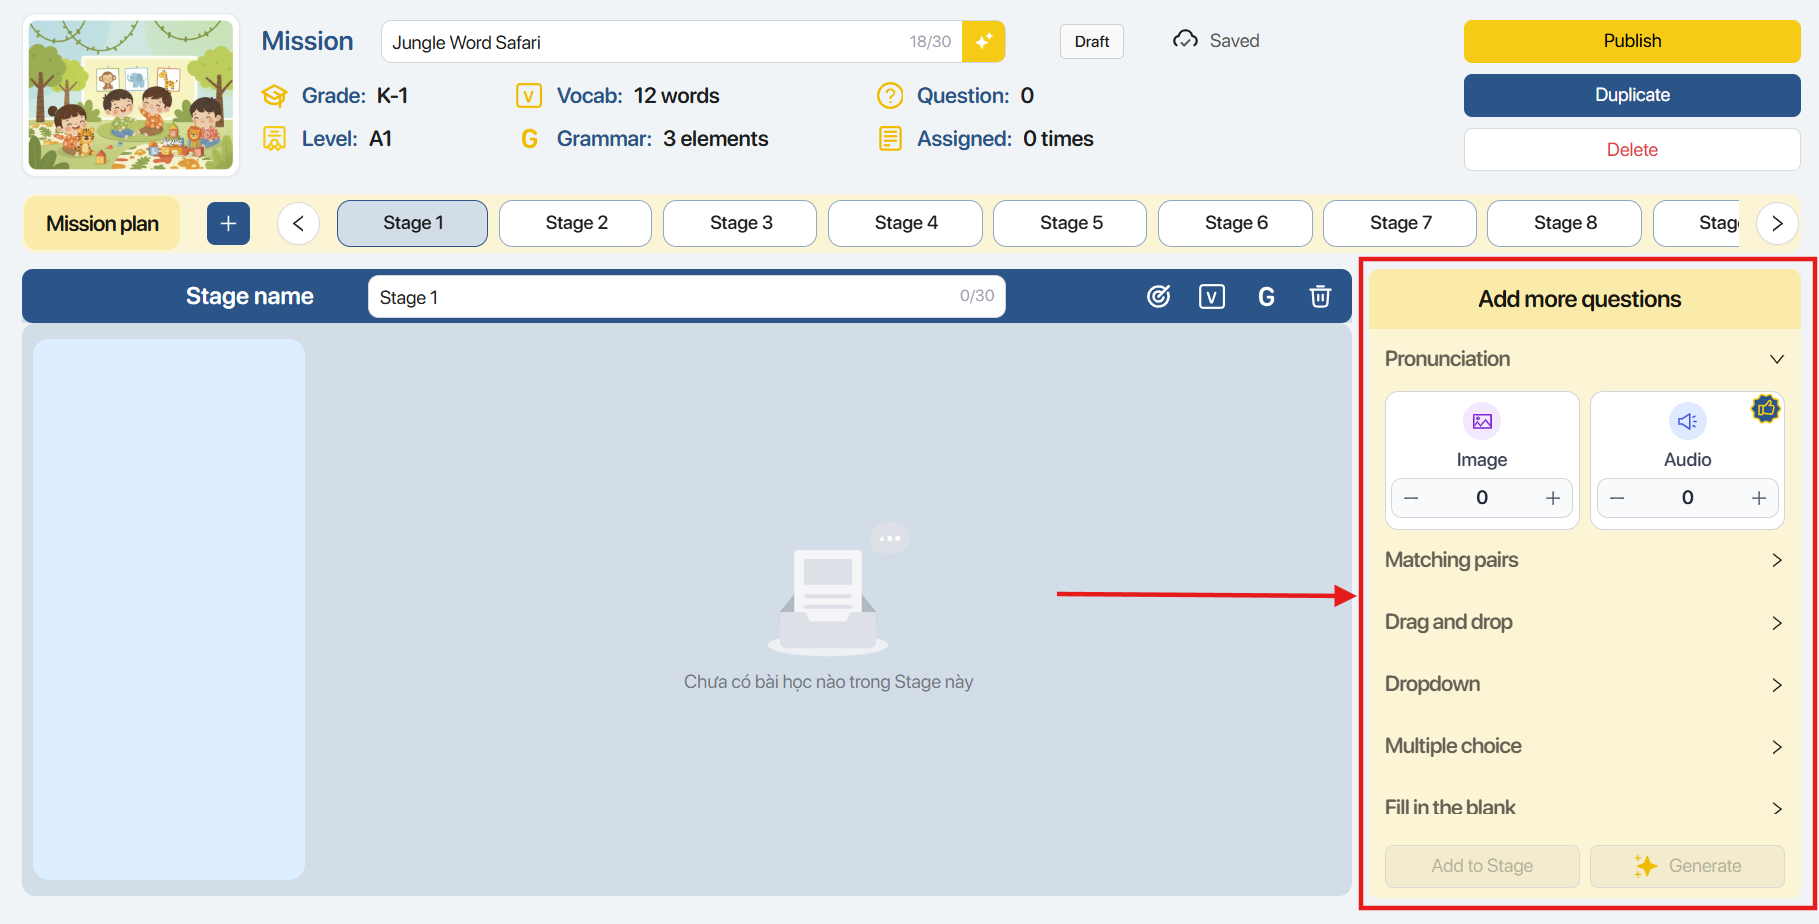
Step 2: In the "Add more questions" section in the upper right corner of the page, users can view the following information.
| STT | Information | Describe |
|---|---|---|
| 1 | 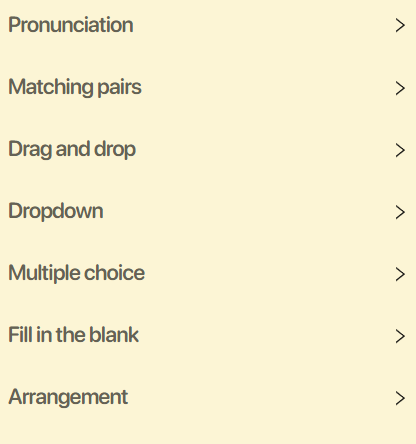 | Pronunciation: Pronunciation exercises are graded by AI.Matching Pair: Matching exercise.Drag and Drop: Drag and drop the correct answer into the blank space.Dropdown: Multiple-choice exercise: Choose the correct answer from a list.Multiple Choice: Multiple-choice questions.Fill the Blank: Fill in the blanks in the exercise.Arrangement: The exercise involves arranging the answers in the blanks. |
| 2 | 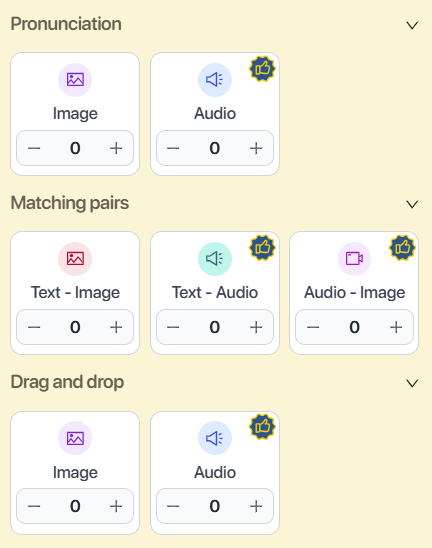 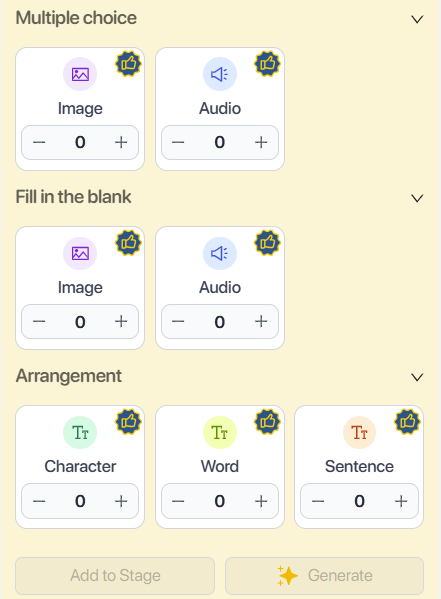 | Image format |
| 3 | Press select | |
| 4 |  | The system suggests suitable exercises for Mission based on the criteria of Skill objectives, Grade, and Level. |
| 5 |  | Add the selected number of questions to the Stage.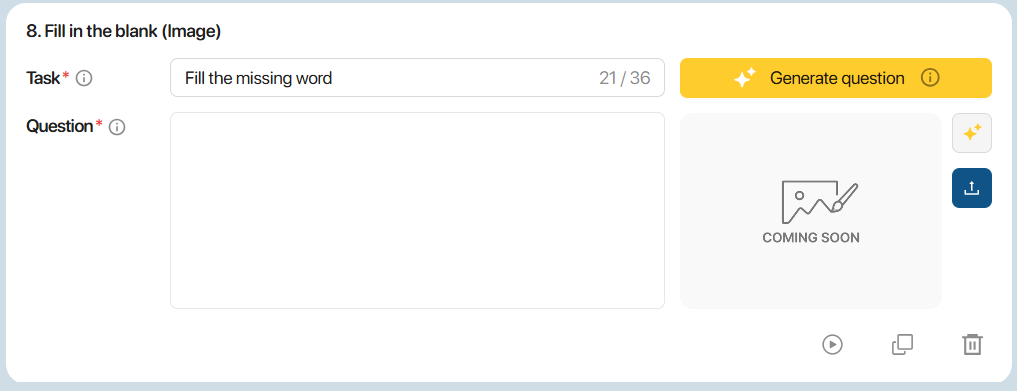 |
| 6 |  | Add the selected number of questions, complete with AI-generated content, images, or audio, to the Stage.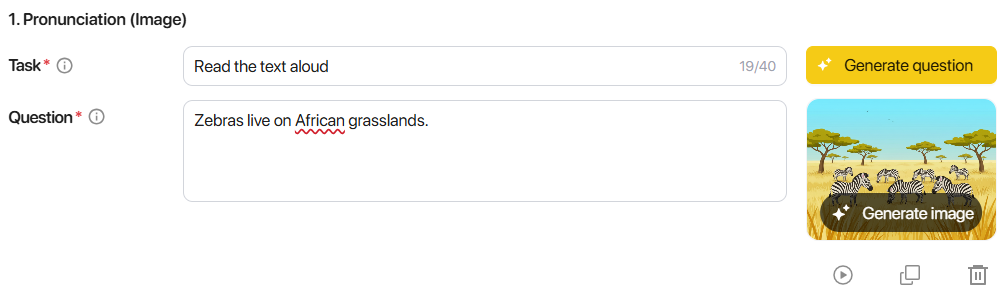 |
Step 2: After adding the number of questions to the Stage, the question list function bar in the left corner of the page helps users quickly manipulate the questions.
Note:
- Click on the questionTo quickly navigate to the detailed content of the selected question.
- Click on the question with the icon.
 To provide additional information for the question.
 - Drag and drop the icon.
 To change the position and order of the questions in the Stage.
Step 3: In the exercise page, users can edit the content and images/audio of the questions.

| STT | Icon | Operation |
|---|---|---|
| 1 |  | Generate Question (Create questions with AI)AI assists in creating questions that include content, images/audio suitable for the Grade, Level, Vocabulary, Grammar, Skill objectives, and Question types selected by the user. |
| 2 |  | Task (Instructions)Users can type in the instructions to change the content. Please note that the content is limited to 40 characters to fit the page on the Cheppy app. |
| 3 |  | Question Question content |
| 4 | Information (Detailed information)Hover your mouse over the icon to view the information.details of the function | |
| 5 |  | Preview QuestionView the created question with the page.Cheppy app. |
| 6 |  | Duplicate (Create a copy)Create a copy of the corresponding question. |
| 7 |  | DeleteDelete the created question. |
All exercise types include the functions presented in the summary table. For some exercise types, the system provides additional corresponding functions and operations.
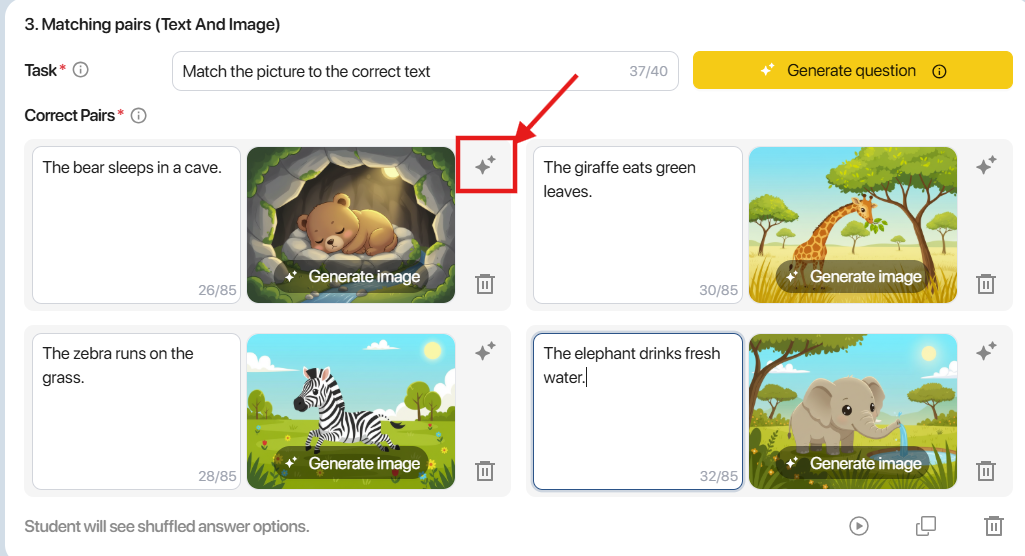
Step 4: With this type of question Matching Pairs, press the icon![]() at each corresponding pair to
at each corresponding pair to
AI creates new content with images and audio.
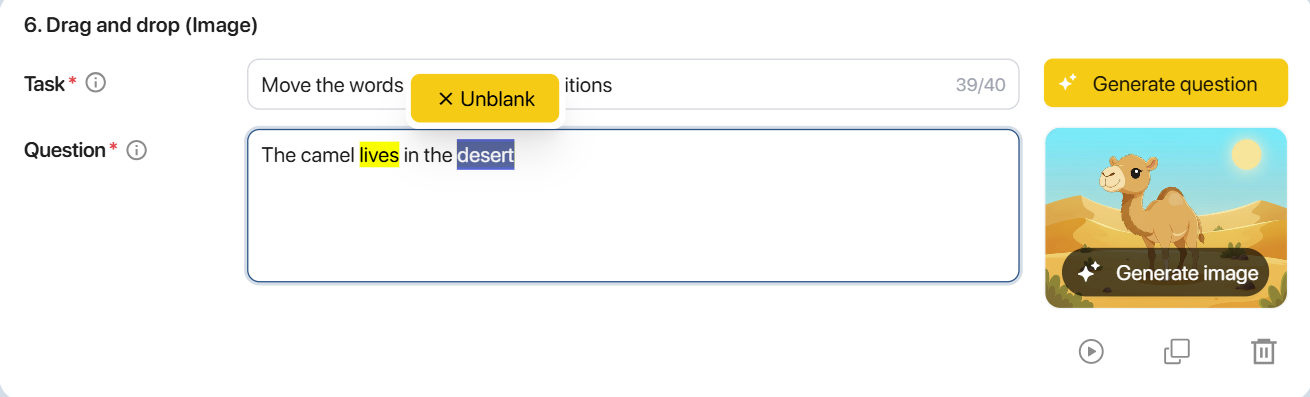
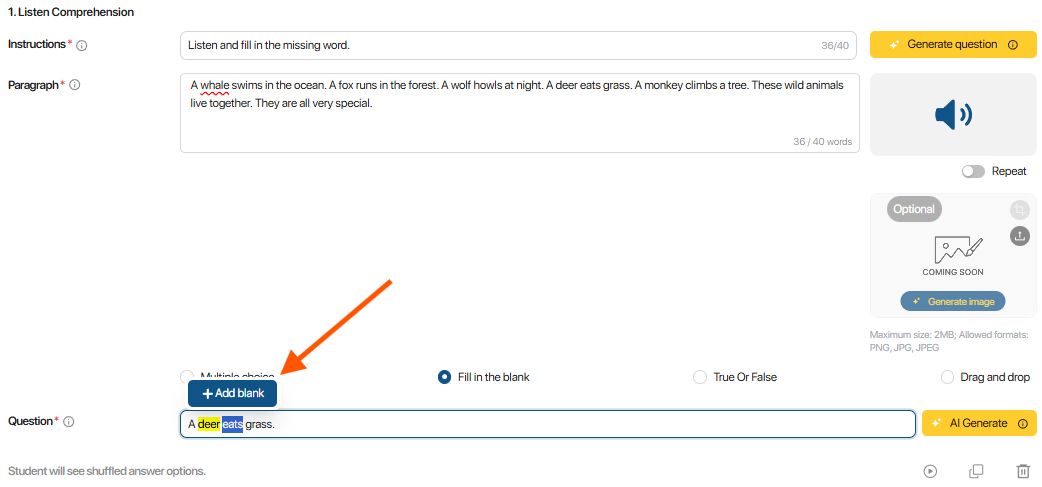
Step 5: In this question type Drag and Drop, Fill in the blank và Drop down, Highlight or double-click the word or phrase you want to create a blank for and press the button.
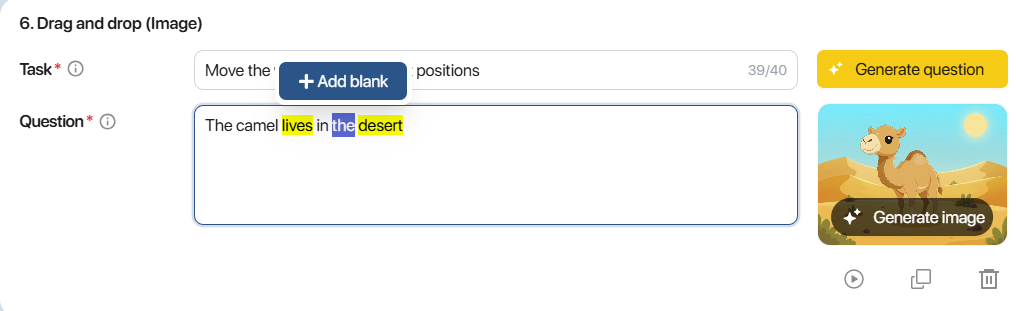
To remove a blank space, highlight or double-click the created word or phrase and press the button.
Note: In this question type Drop down, The word or phrase created to fill in the blank will be considered the correct answer.
- Click on the icon![]() to add more options.
to add more options.

- Click on the icon![]() To remove the selected blank space.
To remove the selected blank space.

- Double-click on the selection boxes to change their content.

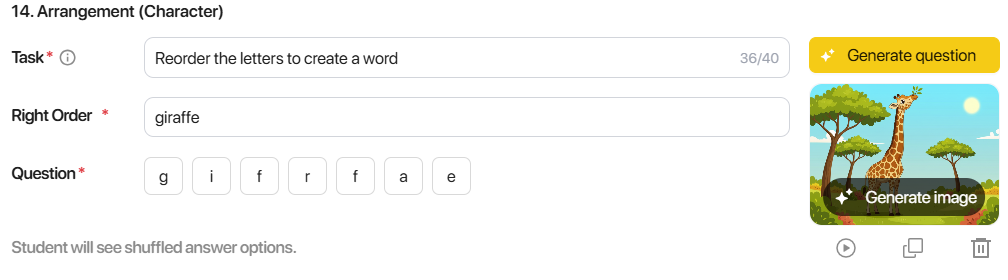
Step 6: In this question type Arrangement (Character), Enter the words in the correct order in the "Right order" box.
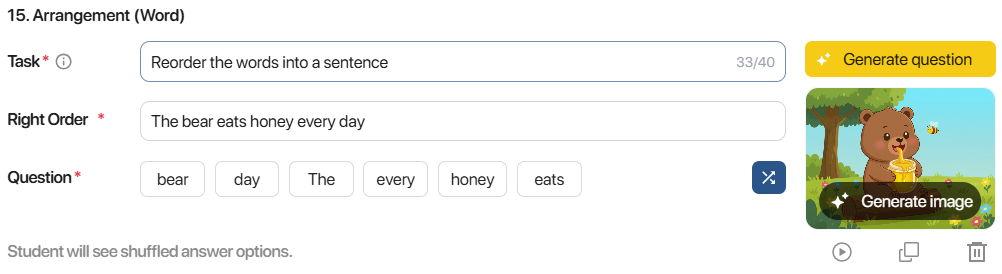
In this question type Arrangement (Word), Enter the phrase or sentence in the correct order in the "Right order" box.
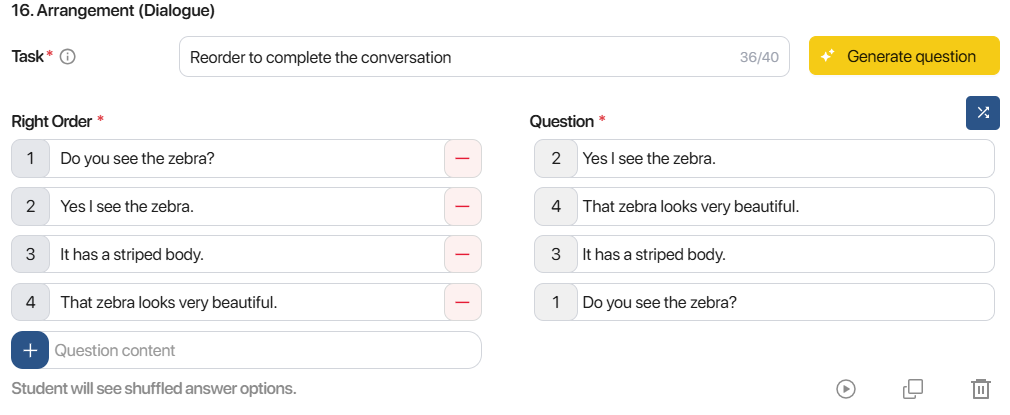
In this question type Arrangement (Dialogue)Enter the sentences in the order of the dialogue in the "Right order" box.
Note:
- Click on the icon
 (add) and
 (Delete) the created sentence.
 - Click on the icon
 To rearrange the order of the questions.
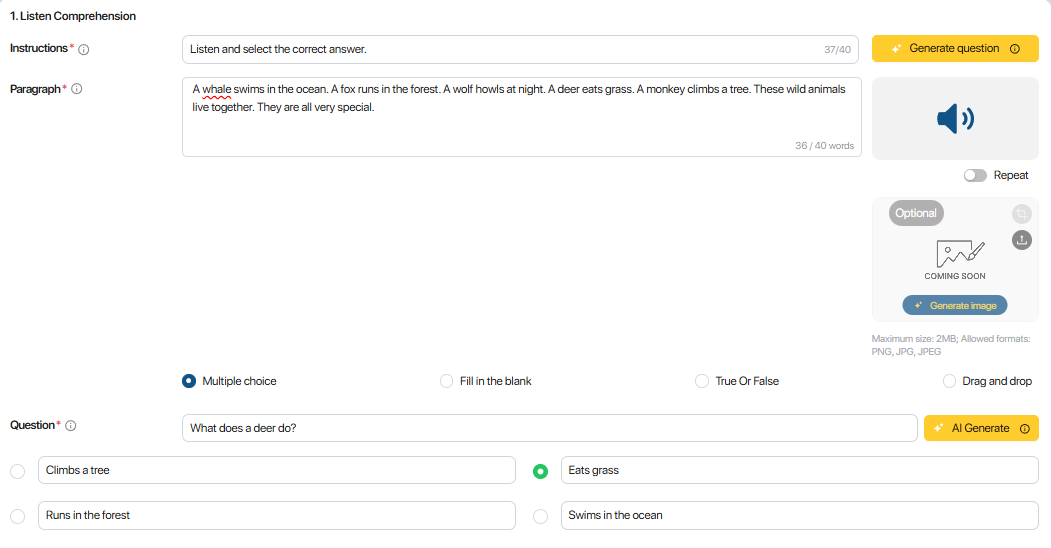
Step 7:In this question type Multiple choice, press the icon![]() to choose the correct answer.
to choose the correct answer.
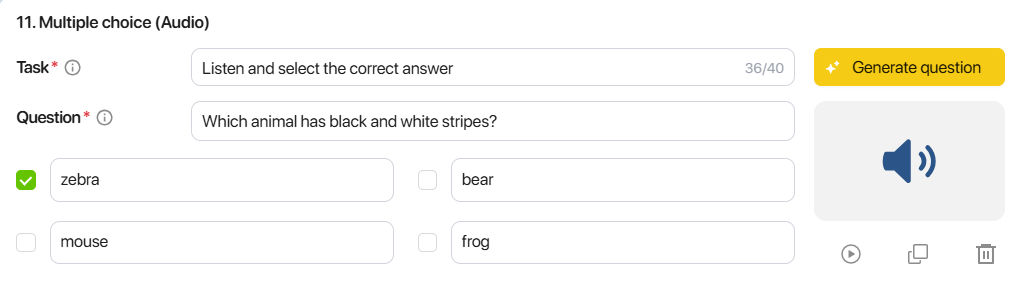
Note: You need to create at least two options.
Step 8: In this question type Comprehension (Multiple choice), Enter the words in the correct order in the "Right order" box.
In this question type Comprehension (Fill in the blank, Drag and drop), press ![]() to generate a question, highlight or double-click the word or phrase you want to create a blank for and press the button.
to generate a question, highlight or double-click the word or phrase you want to create a blank for and press the button.
 .
.
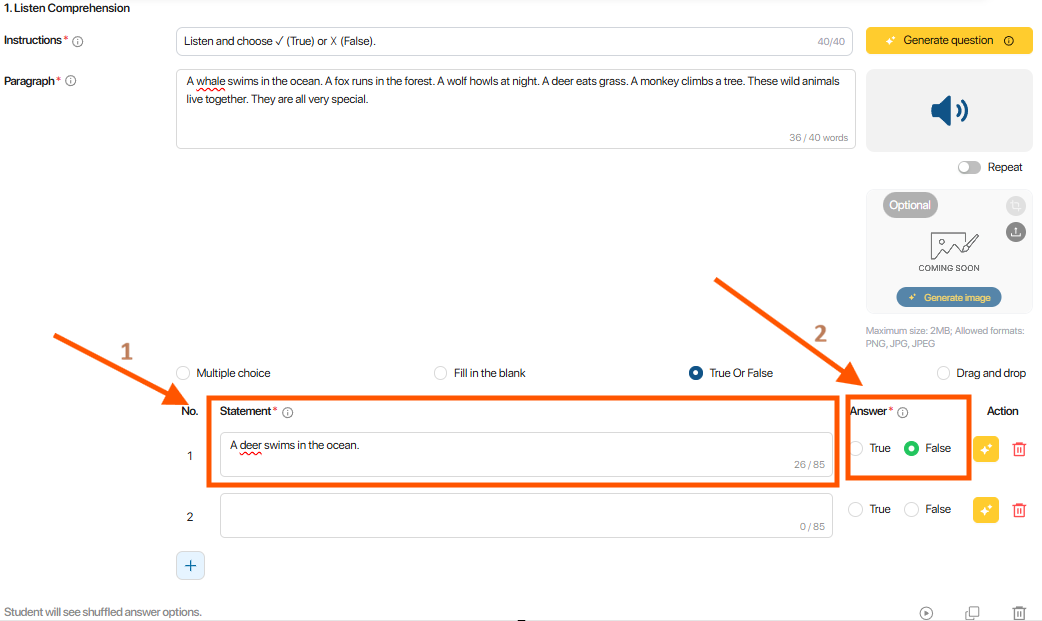
In this question type Comprehension (True or False), enter the statement, then select True/False.
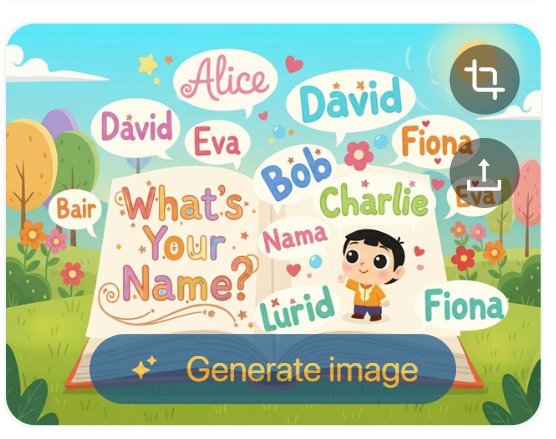
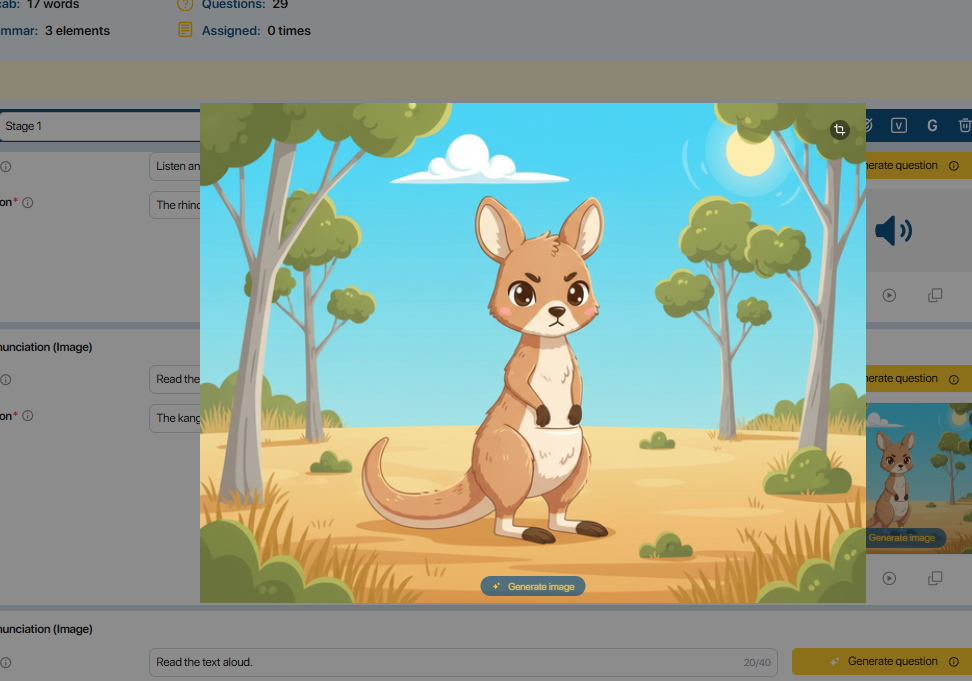
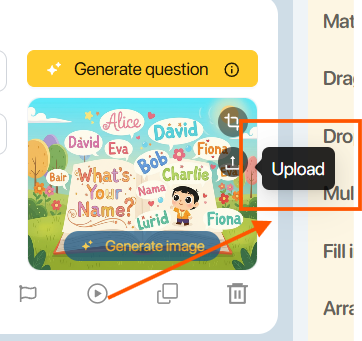
5.5. HOW TO CREATE IMAGES
Step 1: For exercises that use images, click the icon. This allows the AI system to help create images that match the content of the question.
Step 2:Click on the image to view its details.
Step 3: Click on the icon![]() To crop the image to fit the frame.
To crop the image to fit the frame.
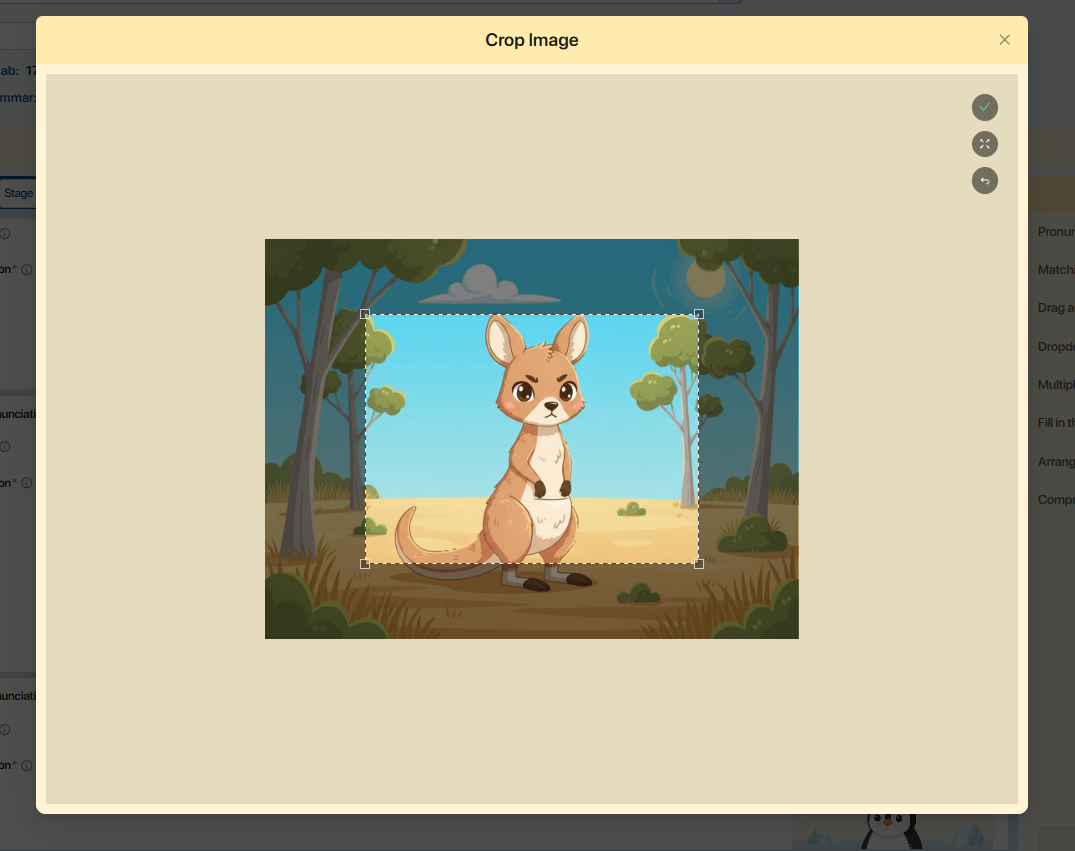
Press the button to save the selected photo frame.
Press the button![]() To restore the image to its original frame.
To restore the image to its original frame.
- Press the button![]() To cancel the operation.
To cancel the operation.
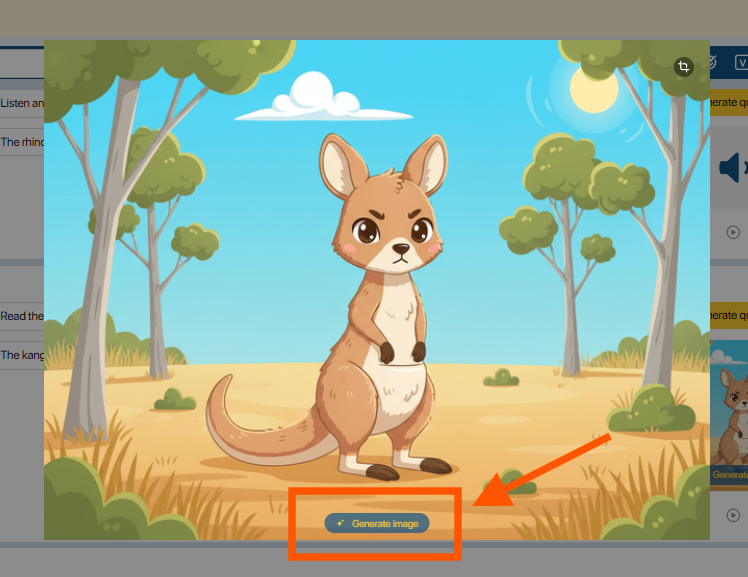
Step 4: Press ![]() to create a new image from the new command
to create a new image from the new command
Step 5: The user edits the command and presses the button.![]()
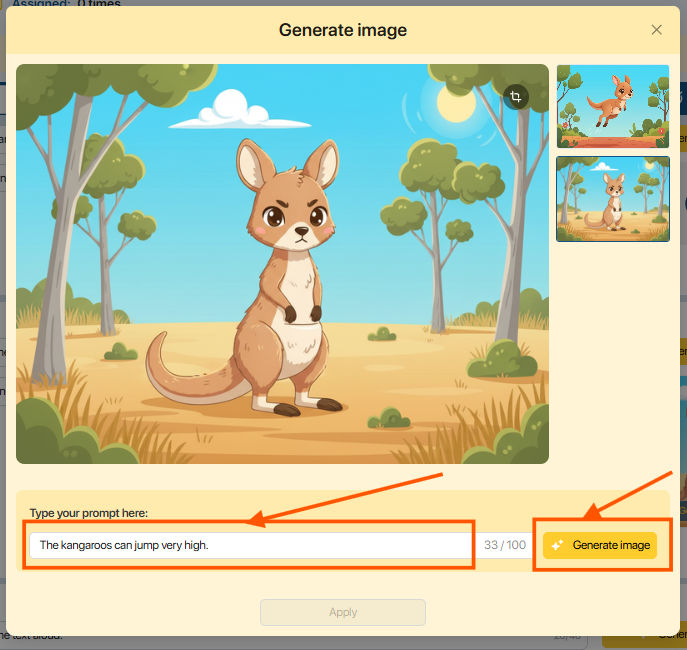
Note:Images created using previous commands will be saved to the right of the image.
Step 6: Press the button![]() To use the new image for the corresponding question, or press
To use the new image for the corresponding question, or press![]() To cancel the operation.
To cancel the operation.
Note: If the user wants to upload from a personal computer, press![]()
5.6. HOW TO CREATE AUDIO
Step 1: For exercises that use audio, click the icon.![]() The AI system will then assist in creating an audio file that matches the content of the question.
The AI system will then assist in creating an audio file that matches the content of the question.

Step 2:Click on the icon to listen to the sound that the AI created.
Note: To change the question content, the user clicks on the icon.![]() to create a new audio file.
to create a new audio file.
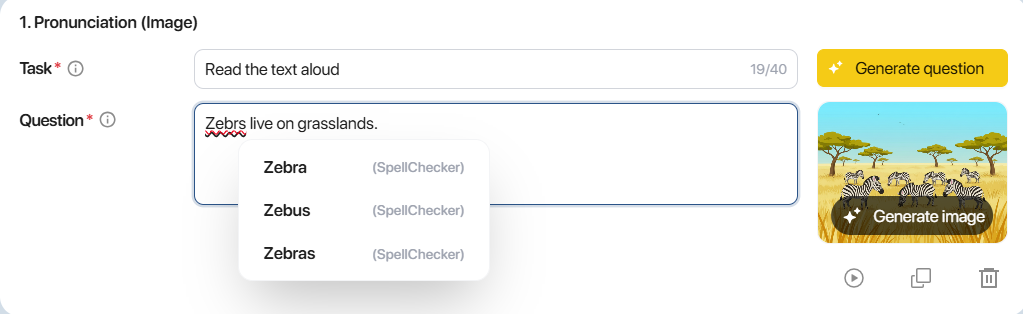
5.7. SPELLING AND GRAMMAR CORRECTION FEATURE
Step 1: To assist users in creating homework assignments, the system integrates a feature to report spelling and grammar errors in English. Click on the words highlighted in red for suggested corrections.
- Suggestions for correcting spelling errors:
- Suggestions for correcting grammatical errors:
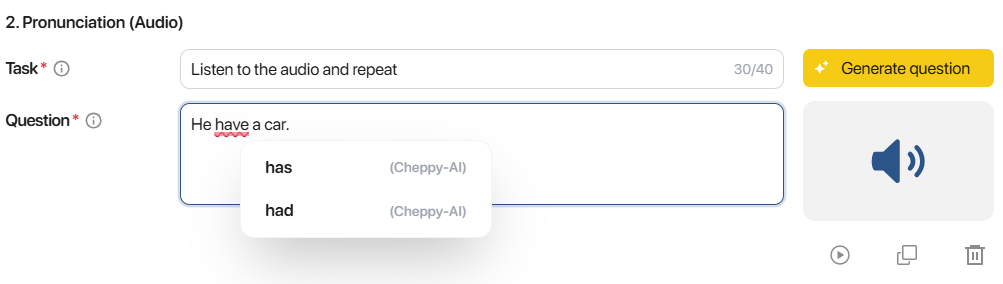
Step 2: From the list of suggested words, the user selects a word. The system then automatically replaces it with the chosen word.
5.8. PUBLISH MISSION INSTRUCTIONS
Step 1: On the Stage creation page, the user clicks the button. In the upper right corner of the screen, select Publish.
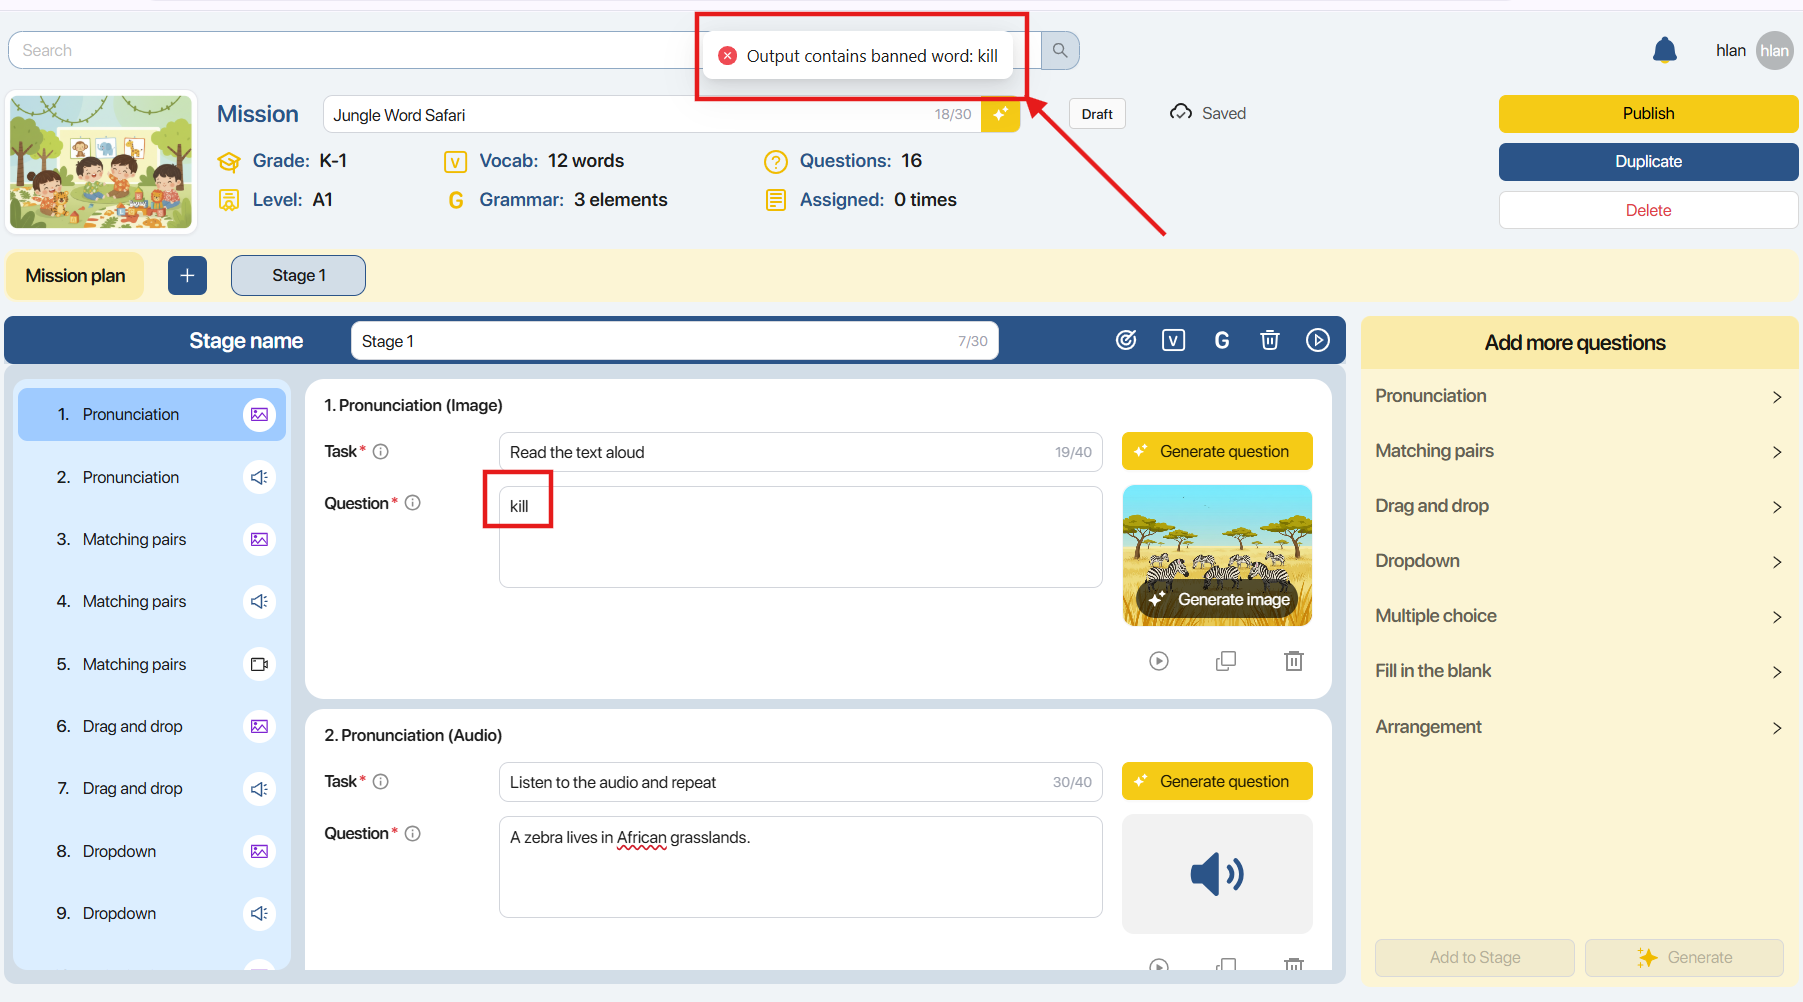
Step 2: After you select it, the system automatically checks the content of the questions created in Mission.
Note: If you find that the question contains inappropriate language, please edit the content before publishing.
Step 3: On the Publish Confirmation screen, users can view information about the Mission, including...
- Mission name: Mission Name
- Grade: Class level
- Level: Proficiency
- Thumbnail: Illustrative image
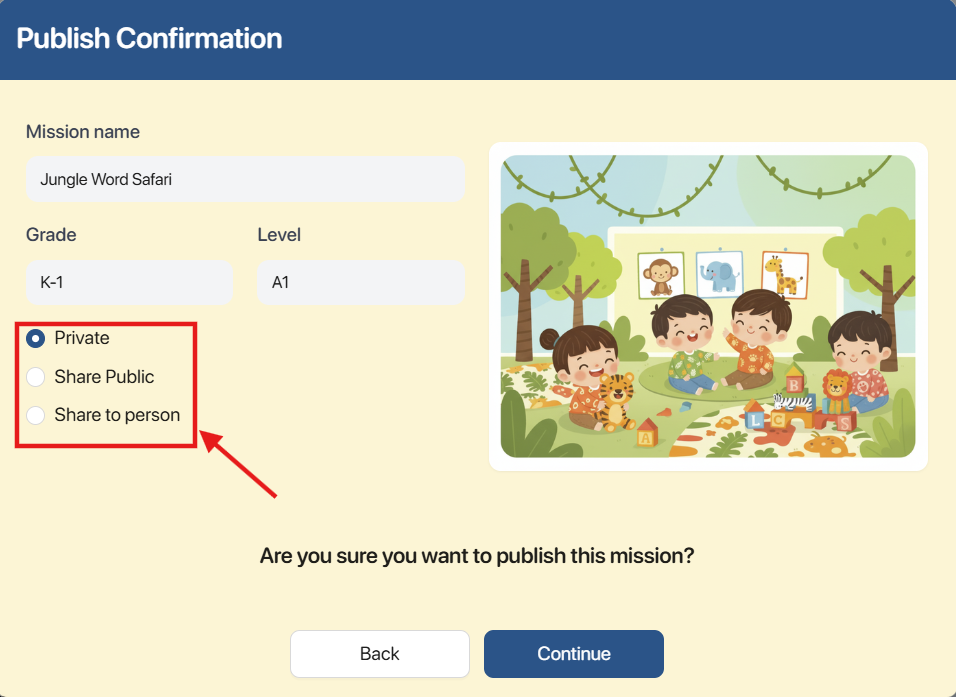
Step 4:Choose from the available Mission sharing options.
- Regime Private:Only the creator has the right to view, edit, and assign Tasks to the class.
- Regime Share Public:Missions are shared publicly with the community at Mission Explore. Other users have the right to view, edit, and distribute copies of the mission to their classes.
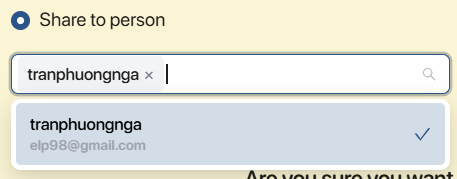
- Regime Share to person:Missions are shared exclusively with authorized individuals. Those with access receive a copy of the Mission and have the right to view, edit, and distribute that copy to their class.
With the mode Share to person, Users enter the username or email address of another user in the organization to share missions.
Note: To ensure the security of learning materials, administrators of the organization where the user works have the right to configure the blocking function Share Public or Share to person.
Step 5: Press the button to change the Mission's state.
Or press the button To return to the Stage creation page, the Mission is saved in Draft mode.
5.9. UNPUBLISH MISSION INSTRUCTIONS
To edit published Mission content, users should follow these steps.
| STT | Status | The operation to return to Draft mode. |
|---|---|---|
| 1 | Private & Assignment Not Yet Submitted | Press the button |
| 2 | Private & Assigned | Press the buttonMethod 1.Create a copy of Mission 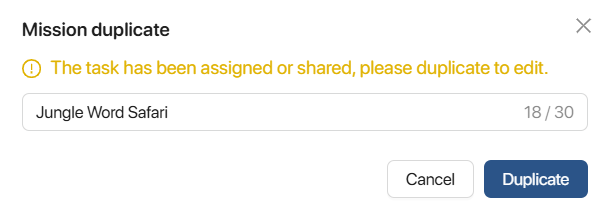 Method 2.Unassign Mission has been assigned. Method 2.Unassign Mission has been assigned.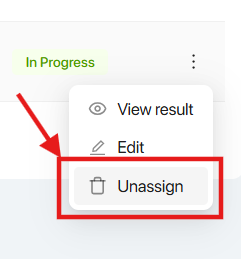 Detailed instructions on how to unassign can be found in section 5.2. Detailed instructions on how to unassign can be found in section 5.2. |
| 3 | Share with othersAssignment not yet submitted. | Press the button |
| 4 | Publicly shared & Assignment not yet submitted | Press the button |
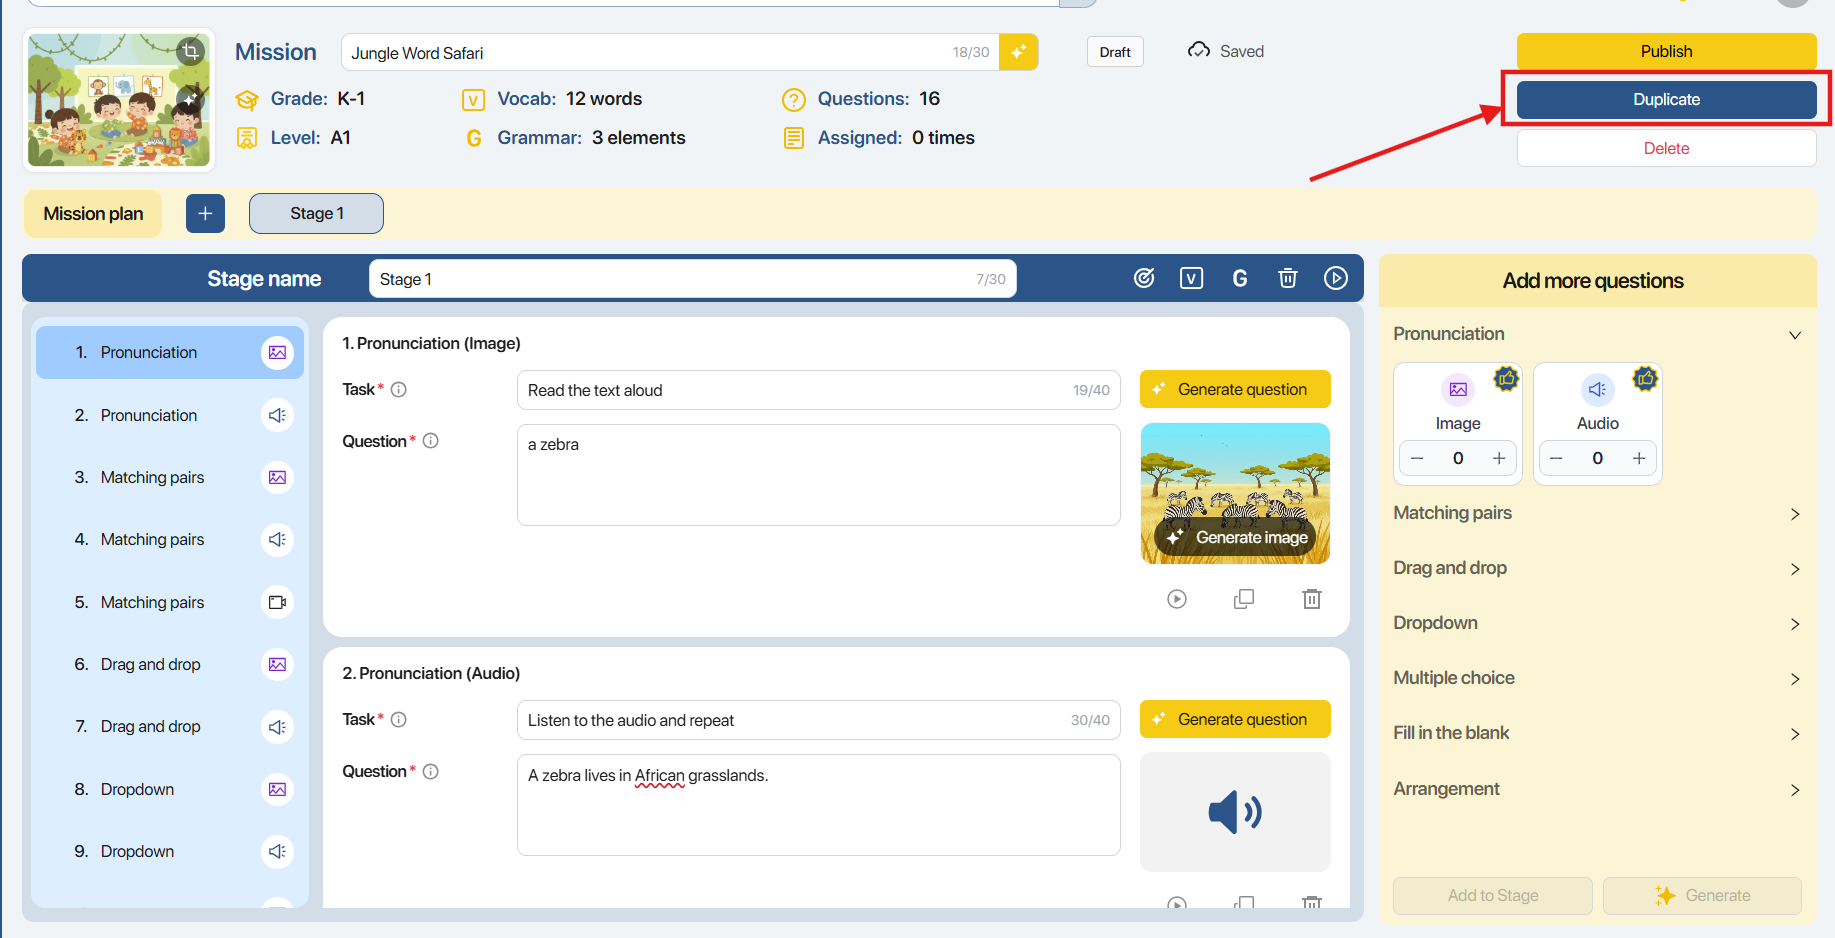
5.10. HOW TO A DUBLICATED MISSION
Step 1: On the Stage creation page, the user clicks the button.![]() Click in the upper right corner of the screen to create a copy of Mission.
Click in the upper right corner of the screen to create a copy of Mission.
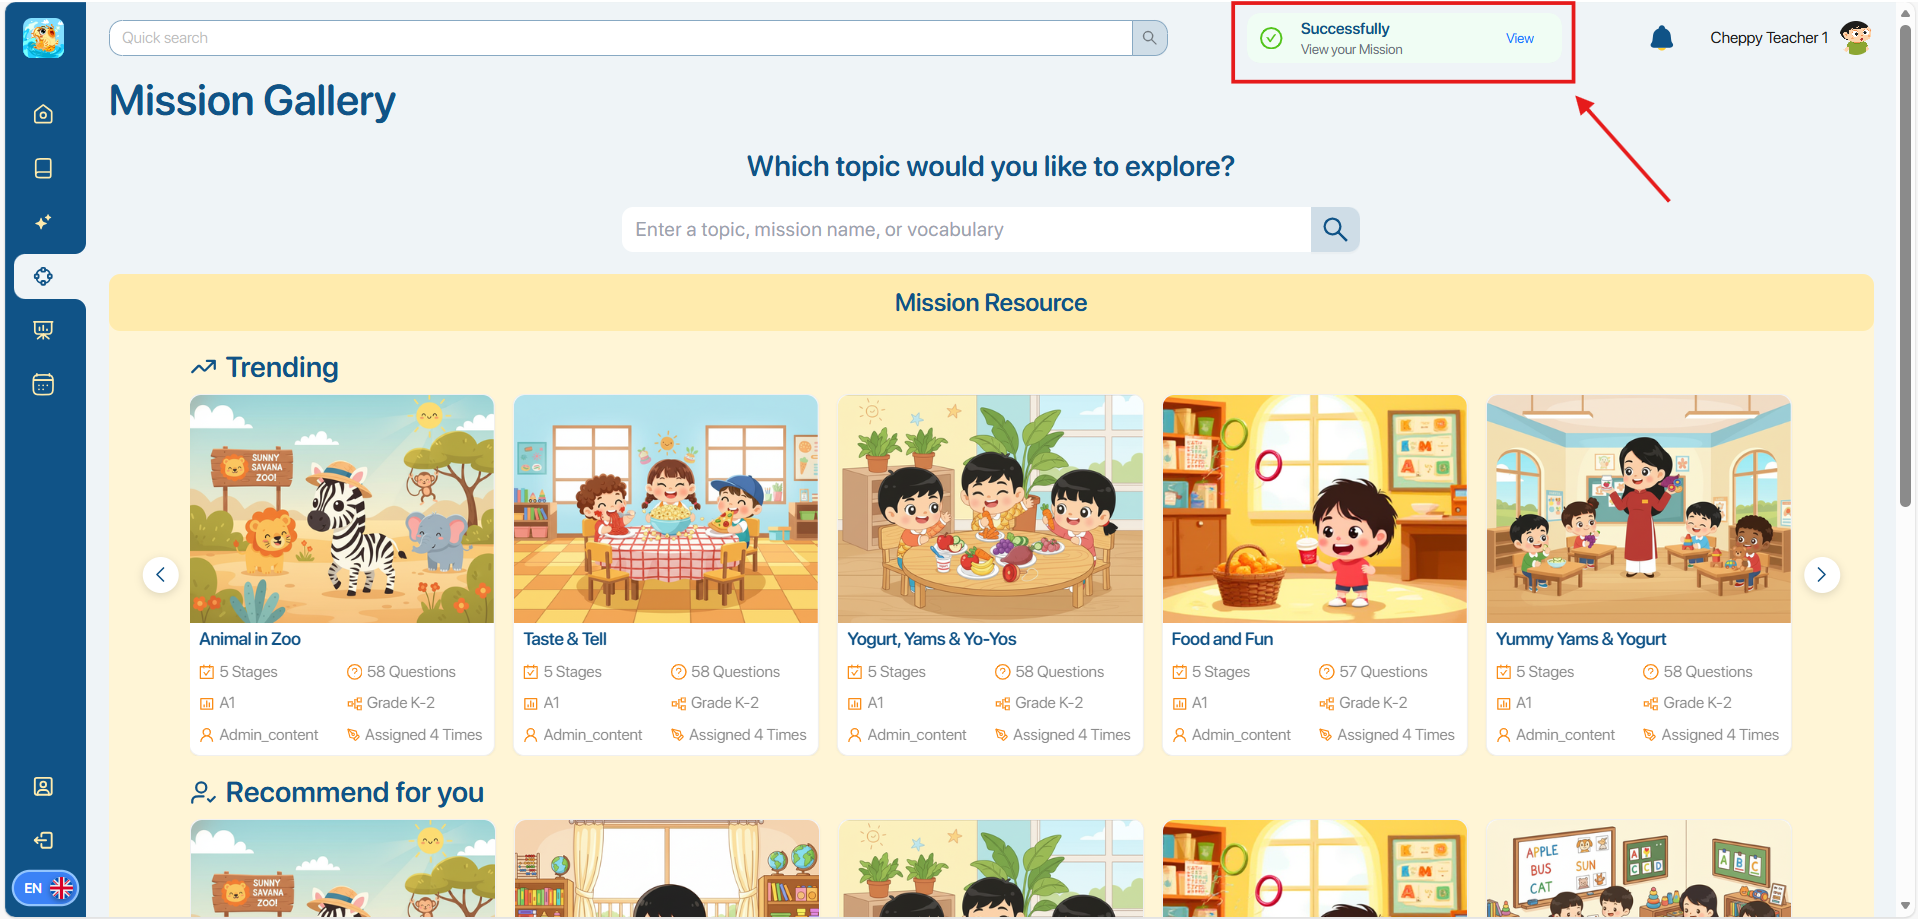
6. MISSION GALLERY
Step 1. On the left-hand taskbar, the user clicks the icon.Mission Gallery.
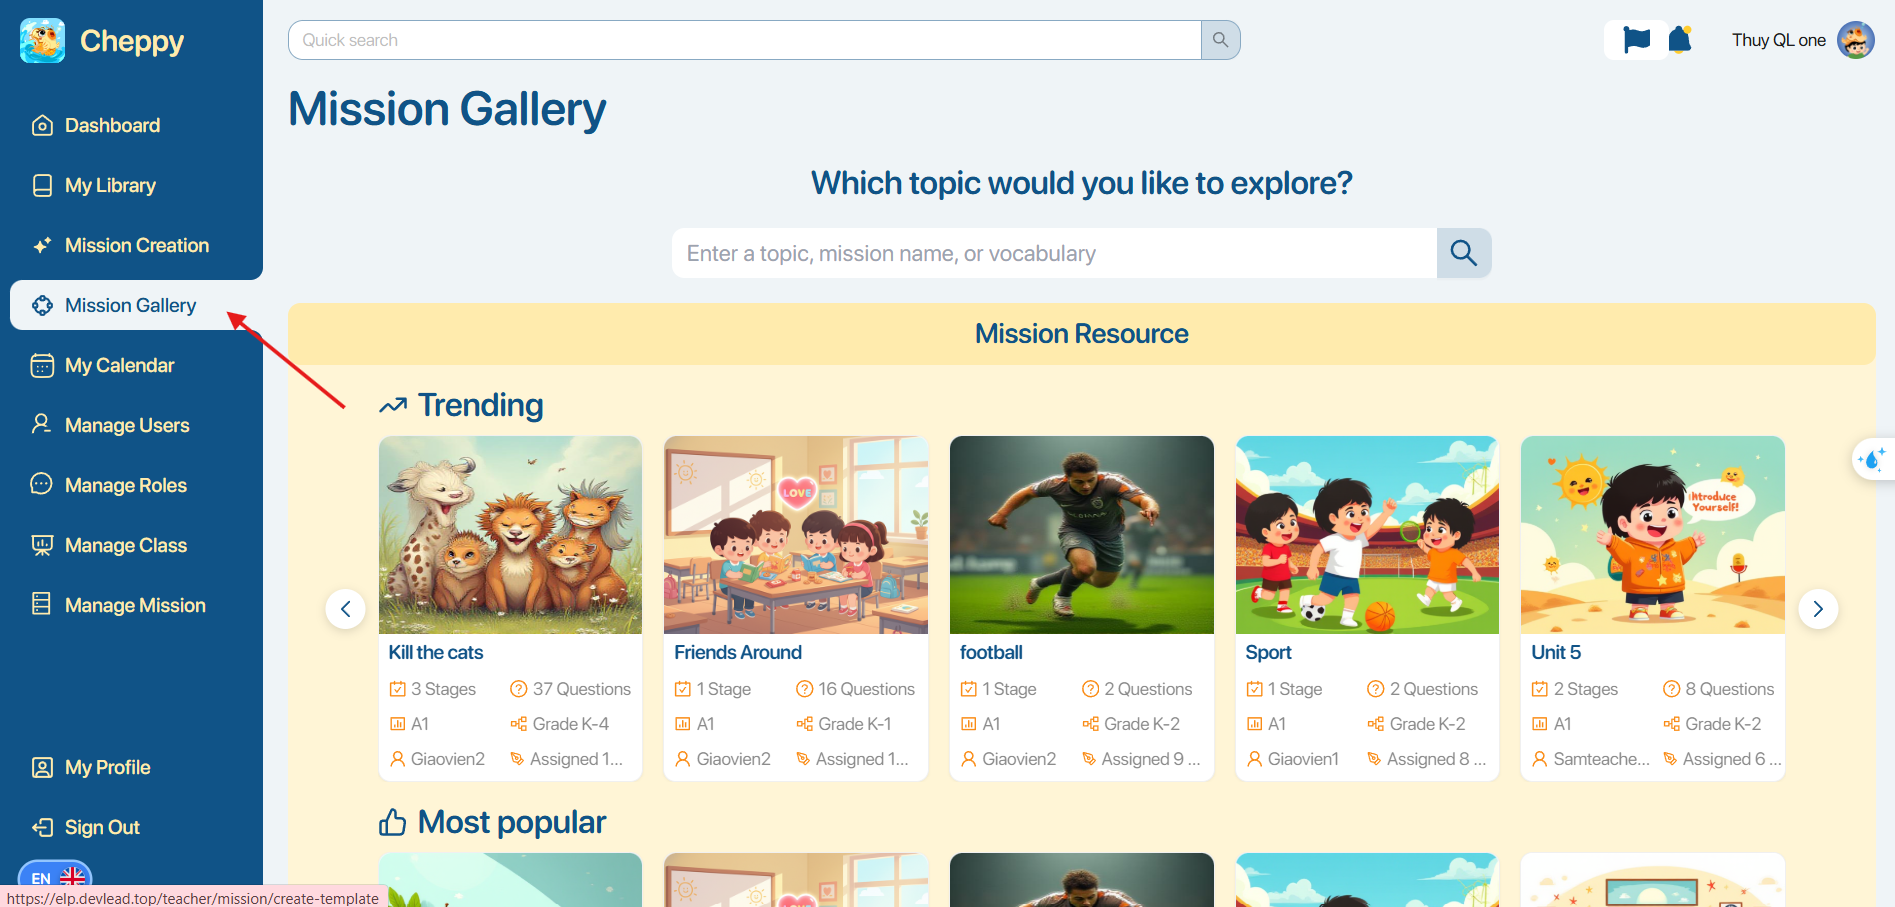
Step 2. In the Mission Explore page, click the left/right arrow icon.


To see the Missions sorted by:
- Trending missionsPopular task.
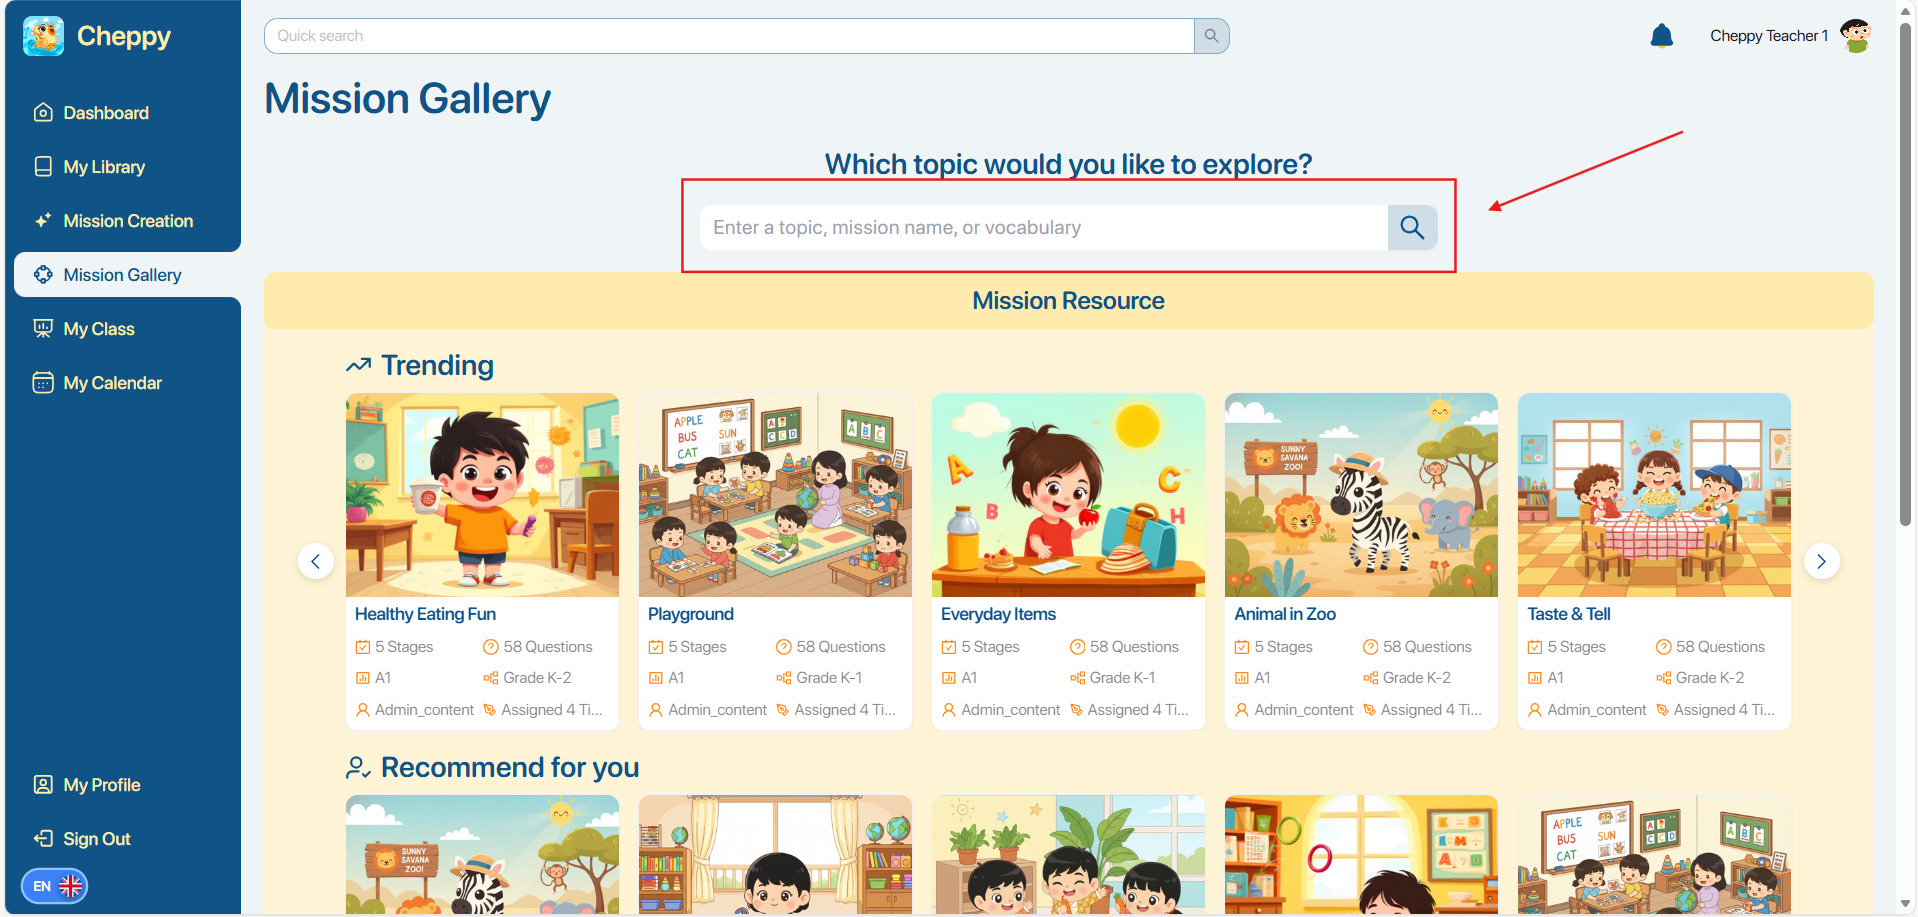
- Recommend for you: Suggested tasks for the user.
Step 3. In the search box, Enter the Topic name of the Mission you want to search for.
Step 4. After entering the Topic name, users can use the filters to search for the Task.
- Grade: Class level
- Level: Proficiency
- Number of stages: Number of exercises
- Estimated time: Estimated time for completing the test
- Question types: Exercise types
- Sort by: Advanced Filters
Step 5. By clicking on Mission, users can quickly view information and content about the Stages.
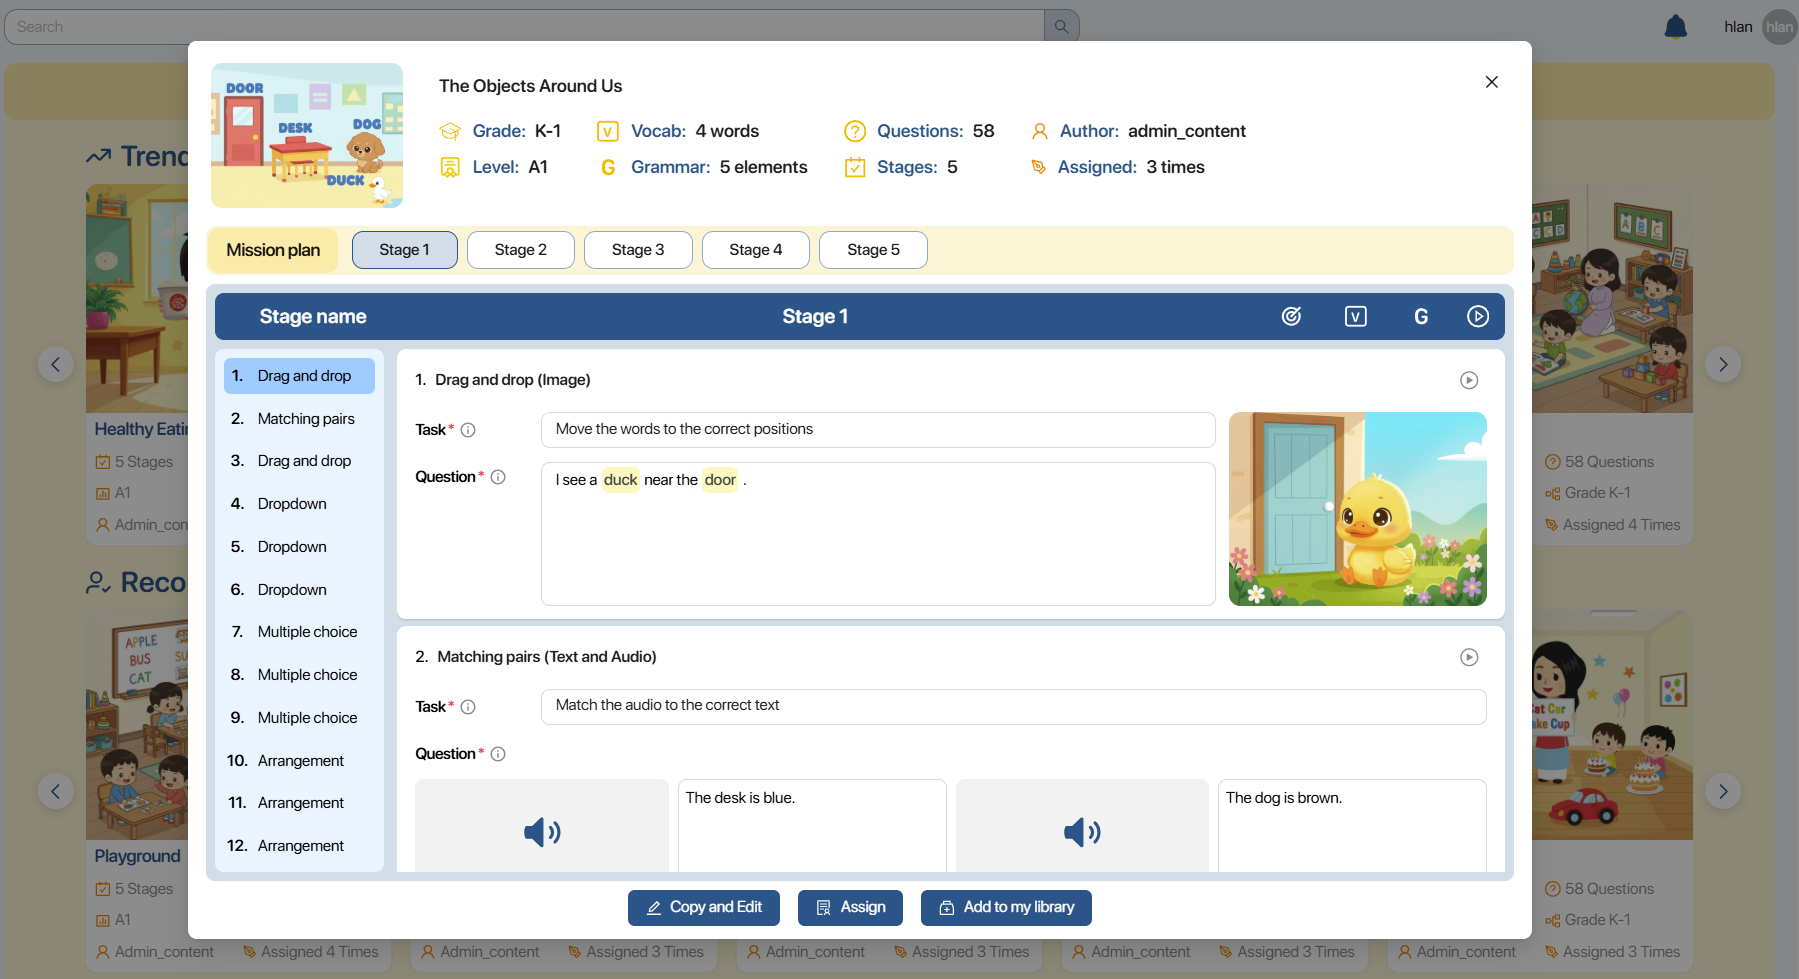
Step 6. In the Mission preview page, perform the following actions according to the options:
- To create a copy and edit it, press the button.

- To deliver the Mission to the classroom, press the button.

- To add a Mission to My Library, press the button.

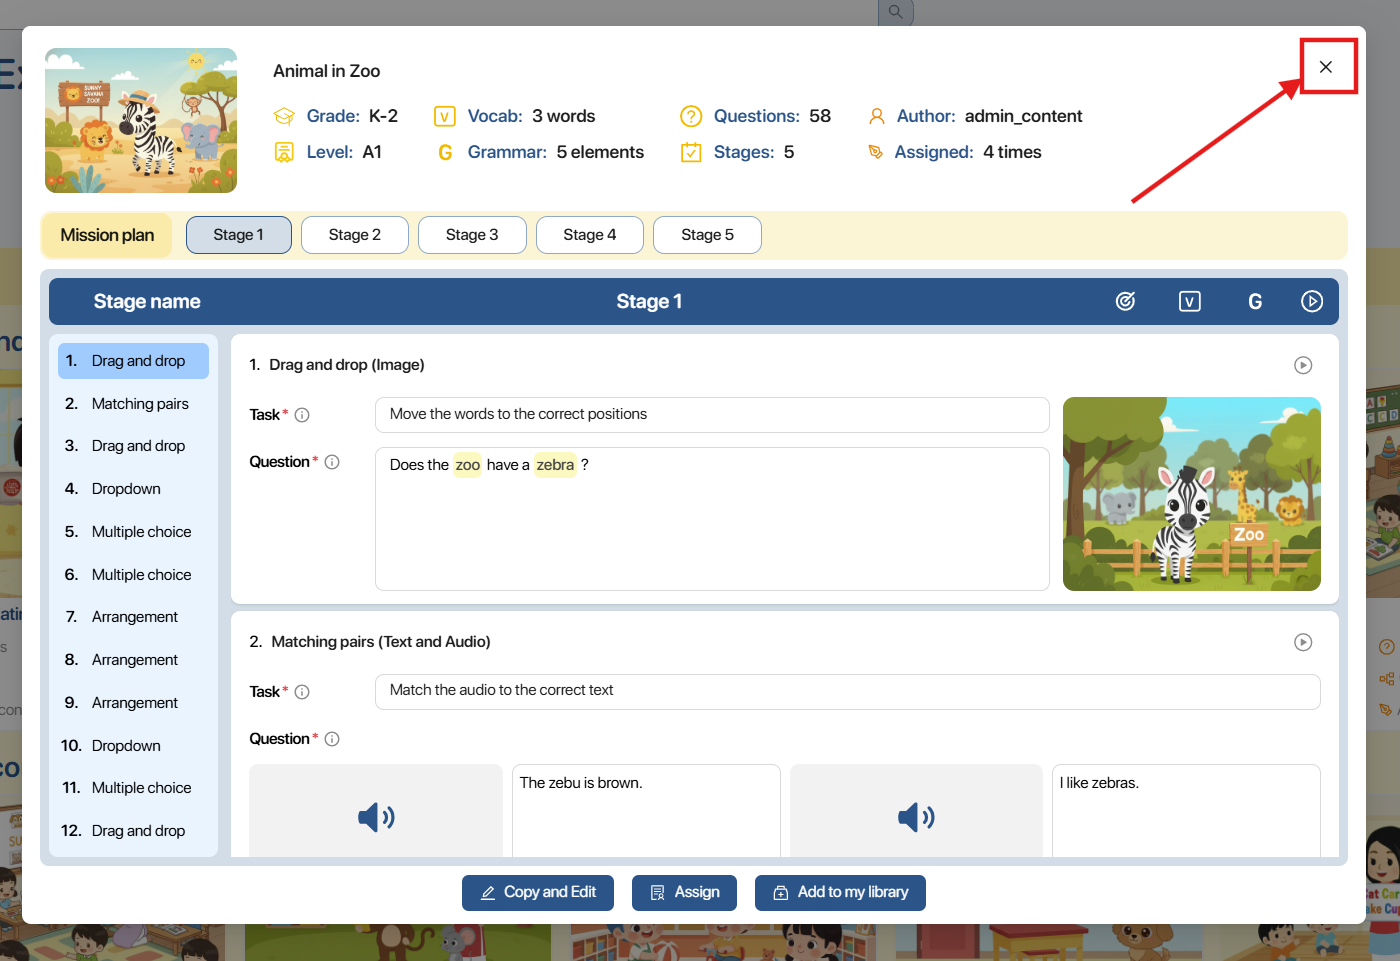
Step 7.Click on the icon![]() To exit the Mission preview page.
To exit the Mission preview page.
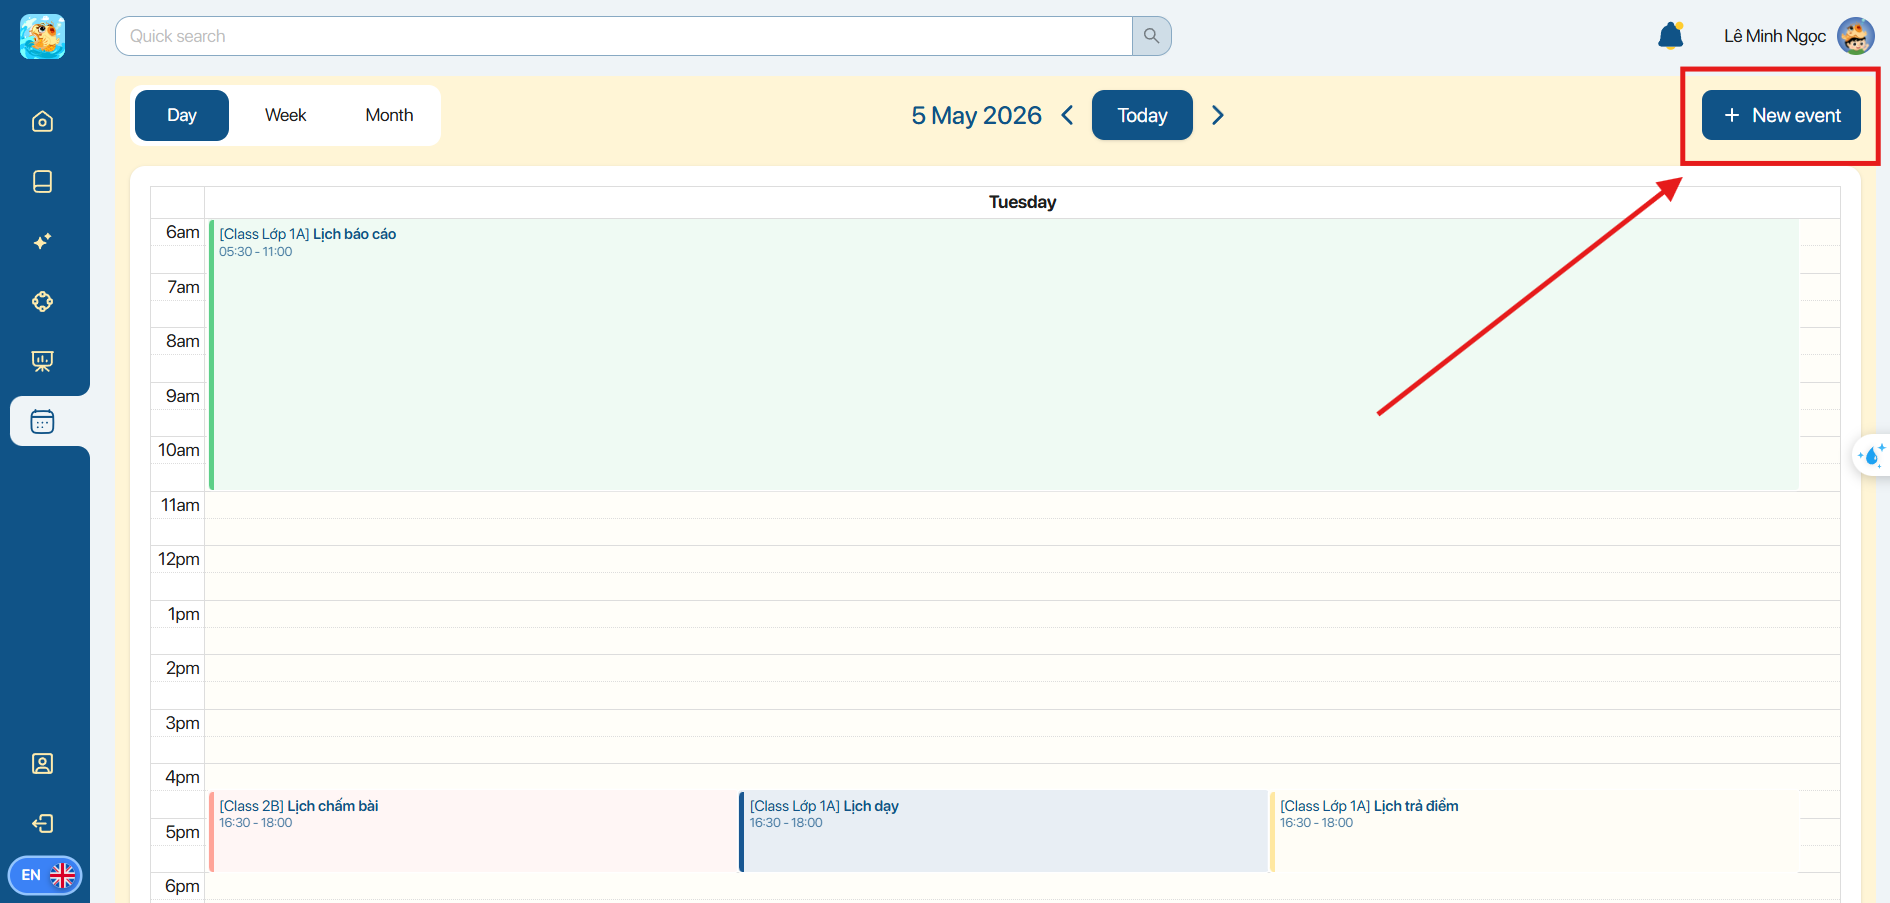
7. MY CALENDAR
Step 1. On the left-hand taskbar, the user clicks the icon My Calendar.
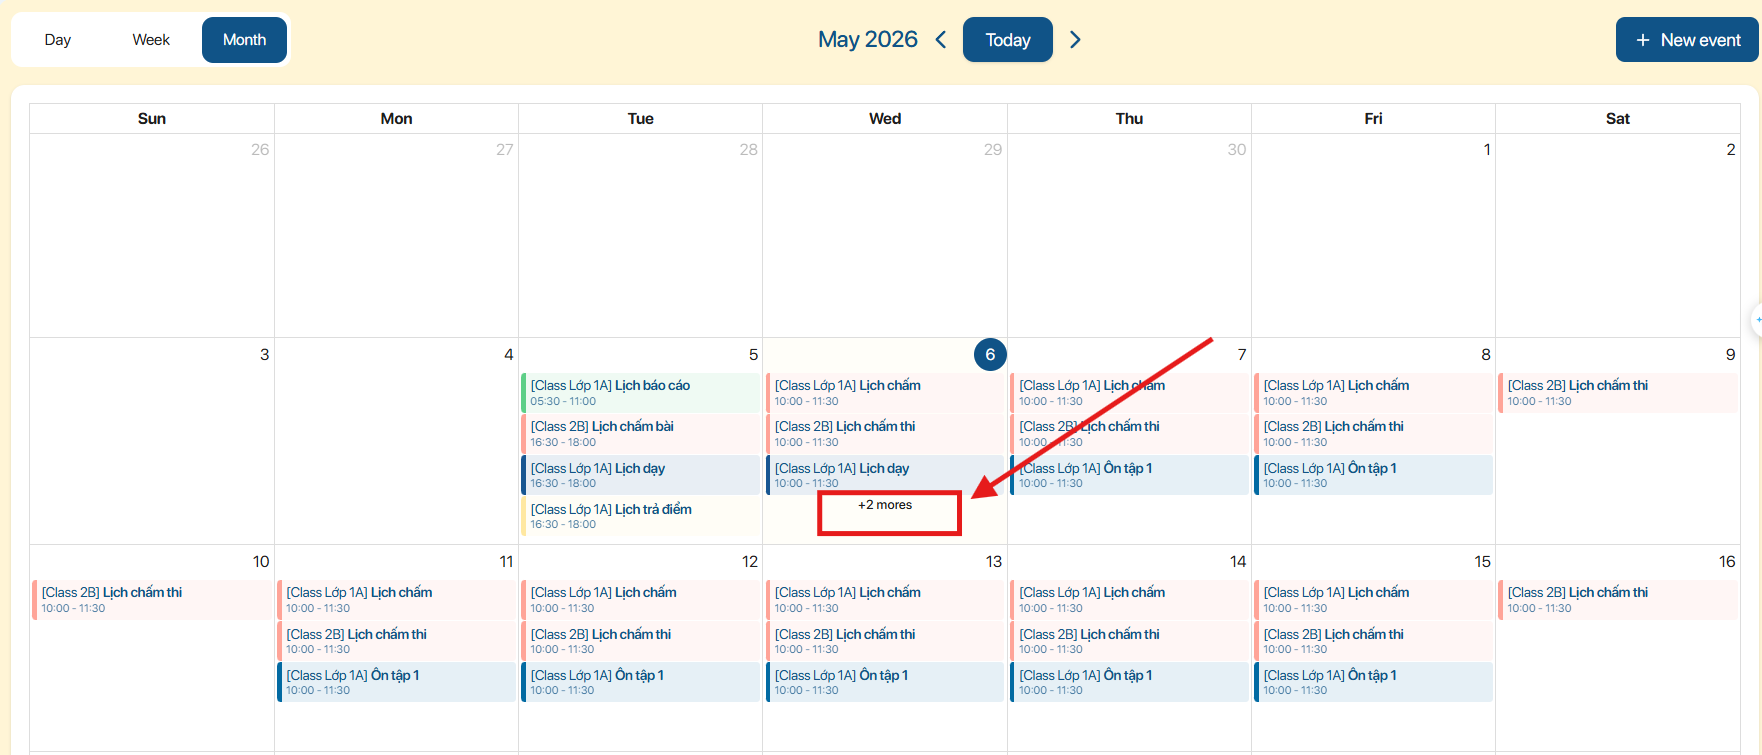
Step 2. In the area above the calendar, users can change the calendar display mode as follows:
| STT | Function | Describe |
|---|---|---|
| 1 |  | Calendar modeUsers can switch calendar modes, including:Day: day modeWeek: weekly modeMonth: monthly mode.Note: The system defaults to the month mode when the user presses the My Calendar function. |
| 2 |  | NavigationClick |
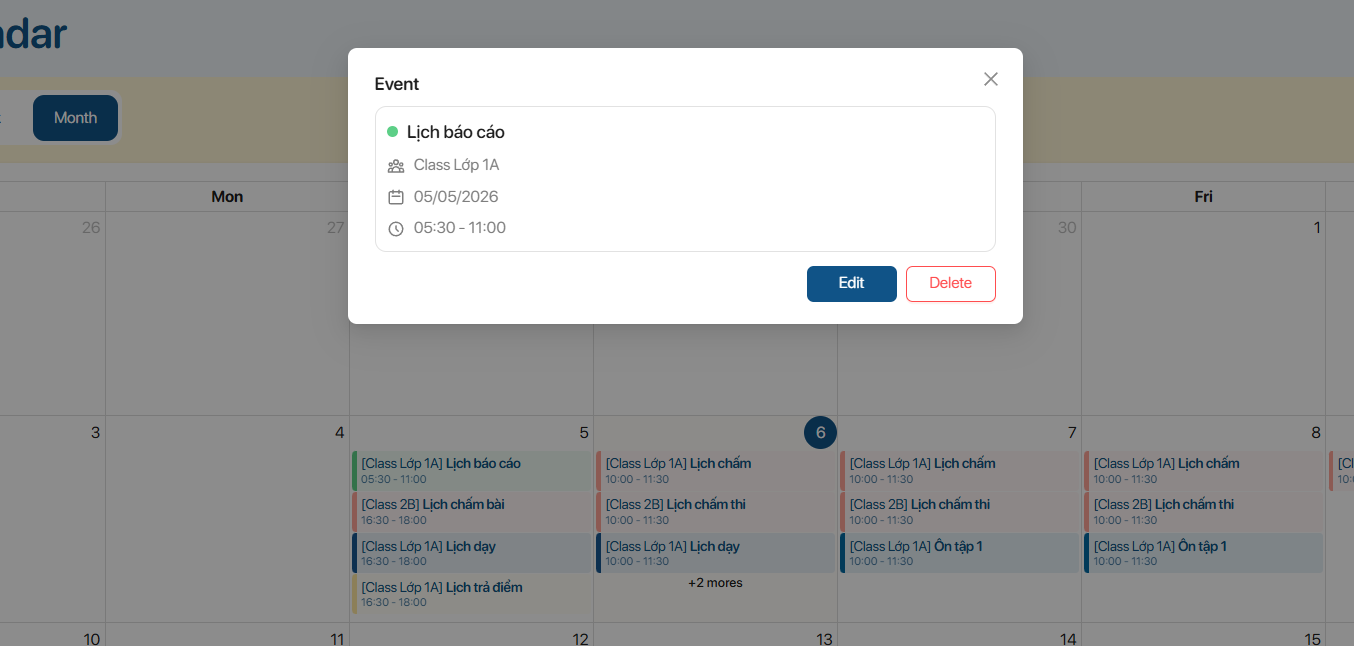
Step 3. Users select an event on the calendar to view detailed information, including:
- Class name
- Class start date
- Start time - End time
Note:
- If the time slot contains multiple events, the user presses [+number] moreTo view the full event:
Step 4. User selects![]() to edit event information or
to edit event information or![]() to delete the event.
to delete the event.
7.1 GUIDE TO ADDING NEW EVENTS
Step 1. On the Calendar screen, the user selects![]()
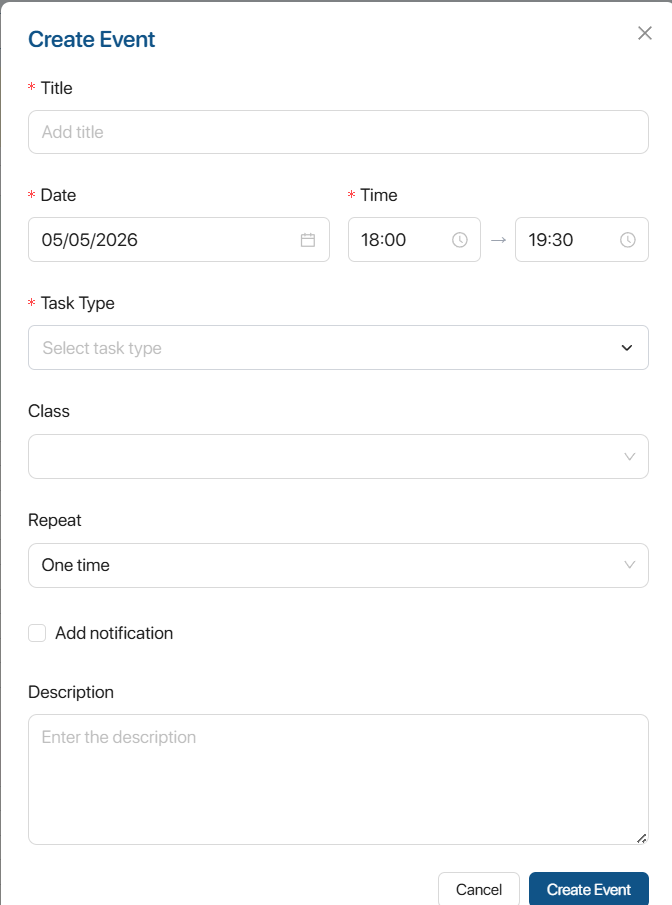
Step 2. The user has entered all the missing information, including:
- Title: Enter a title for the event
- Date: Select the date of the event
- Time: Select the time for the event.
- Task Type: Select the event type
- Class: Select a class
- Repeat: Tick to repeat the event
- Add notification: Add event notification
- Description: Enter a description of the event
Note:
- If the user selects "Repeat" other than "One time," they can check the "Add end repeat" option to add a time limit for the repeat.
- If the user selects "Add notification," please choose an additional time for the event notification to end.
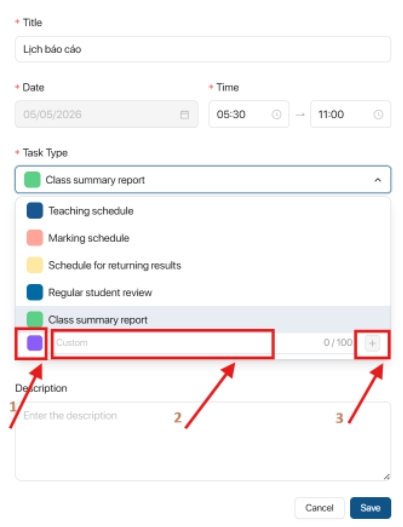
Step 3. Users can customize the Task type (Event Type) for use when adding events in the future.
- Step 3.1 Users choose the color for the Task type.
- Step 3.2 Enter the name of the Task type.
- Step 3.3 Press the button
 to further confirm this type of event
Step 3. Press ![]() to confirm event creation
to confirm event creation
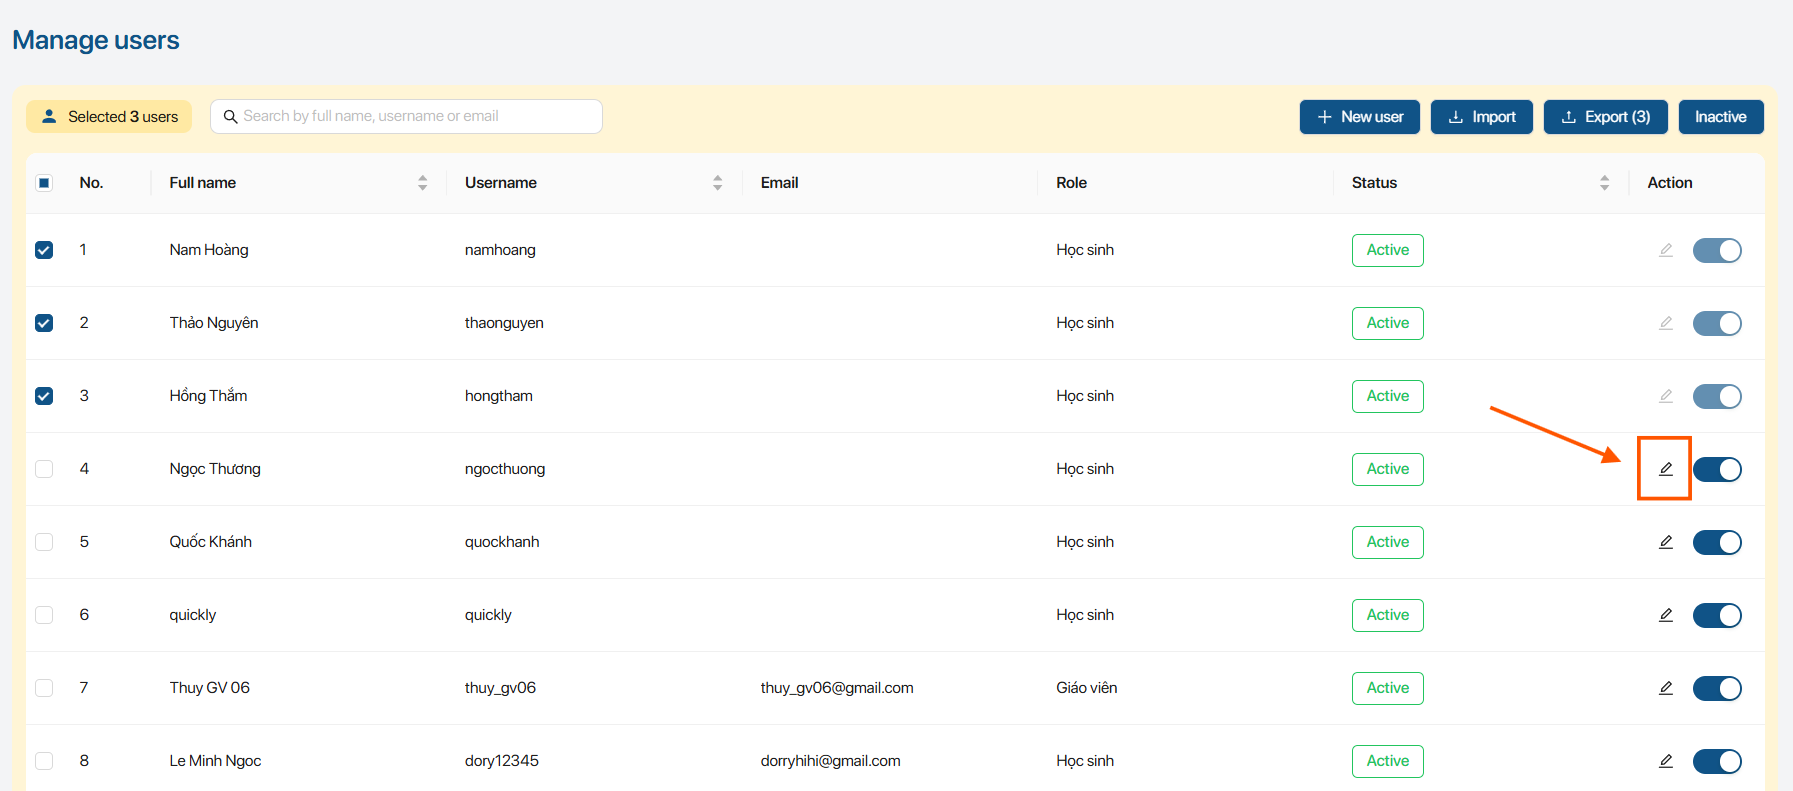
8. MANAGE USERS
Step 1. On the left-hand taskbar, users click the Manage Users icon.
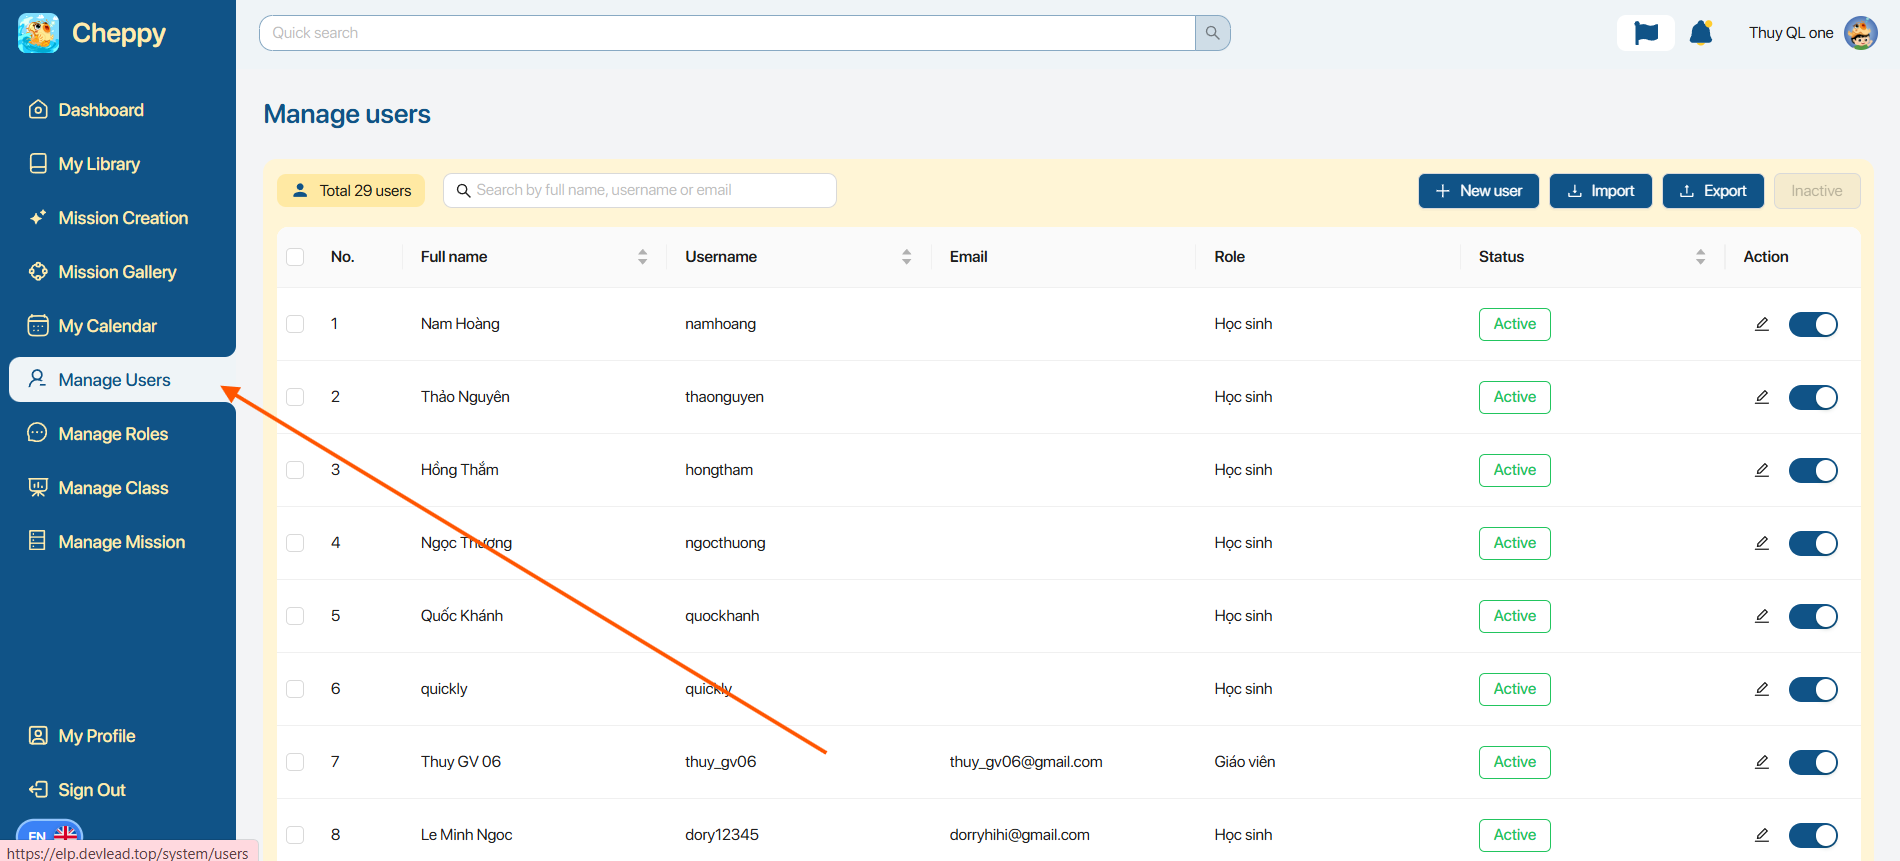
Step 2. In the search bar area, users manipulate the filters to find accounts.

| STT | Function | Describe |
|---|---|---|
| Total 29 users | Display total number of accounts | |
| 1 | Quick search class name | Search by name, username, or email. |
| 2 | Import | Import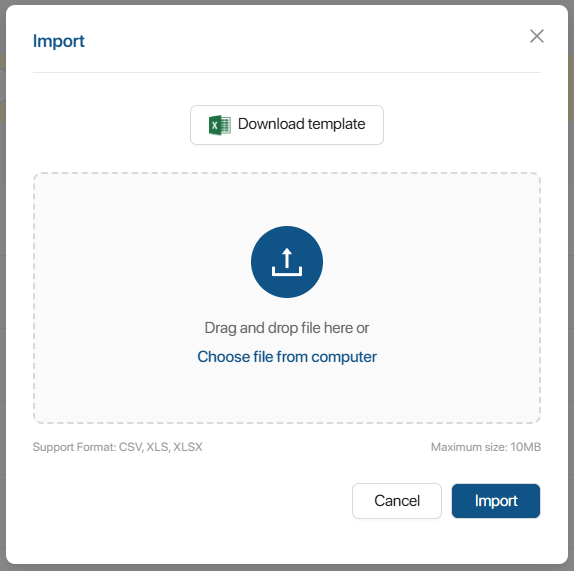 Users click on the upload area to upload the account list file from their computer.Note: The user presses Users click on the upload area to upload the account list file from their computer.Note: The user presses to download the sample fileFile formats: CSV, XLS, XLSX to download the sample fileFile formats: CSV, XLS, XLSX |
| 3 | Export | ExportAllows users to download a list of accounts based on filter/search results. |
| 4 | Inactive | Inactive Select the accounts you want to deactivate.Press Inactive. Select the accounts you want to deactivate.Press Inactive. |
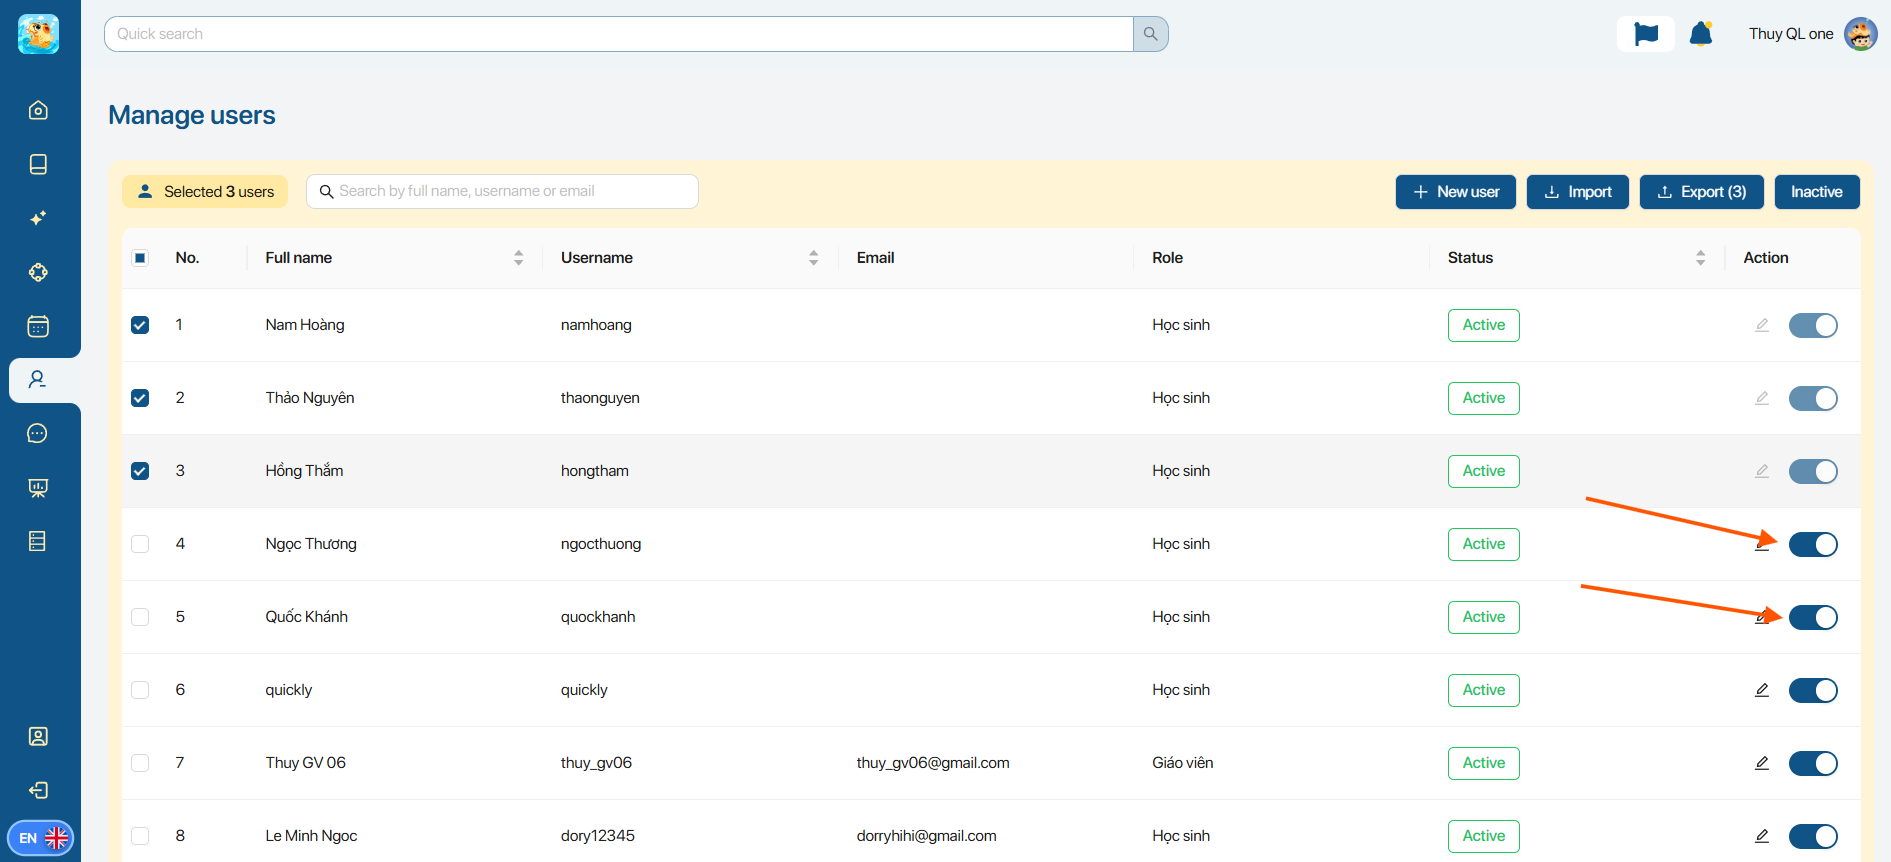
Step 3.To disable/enable individual accounts, press![]()
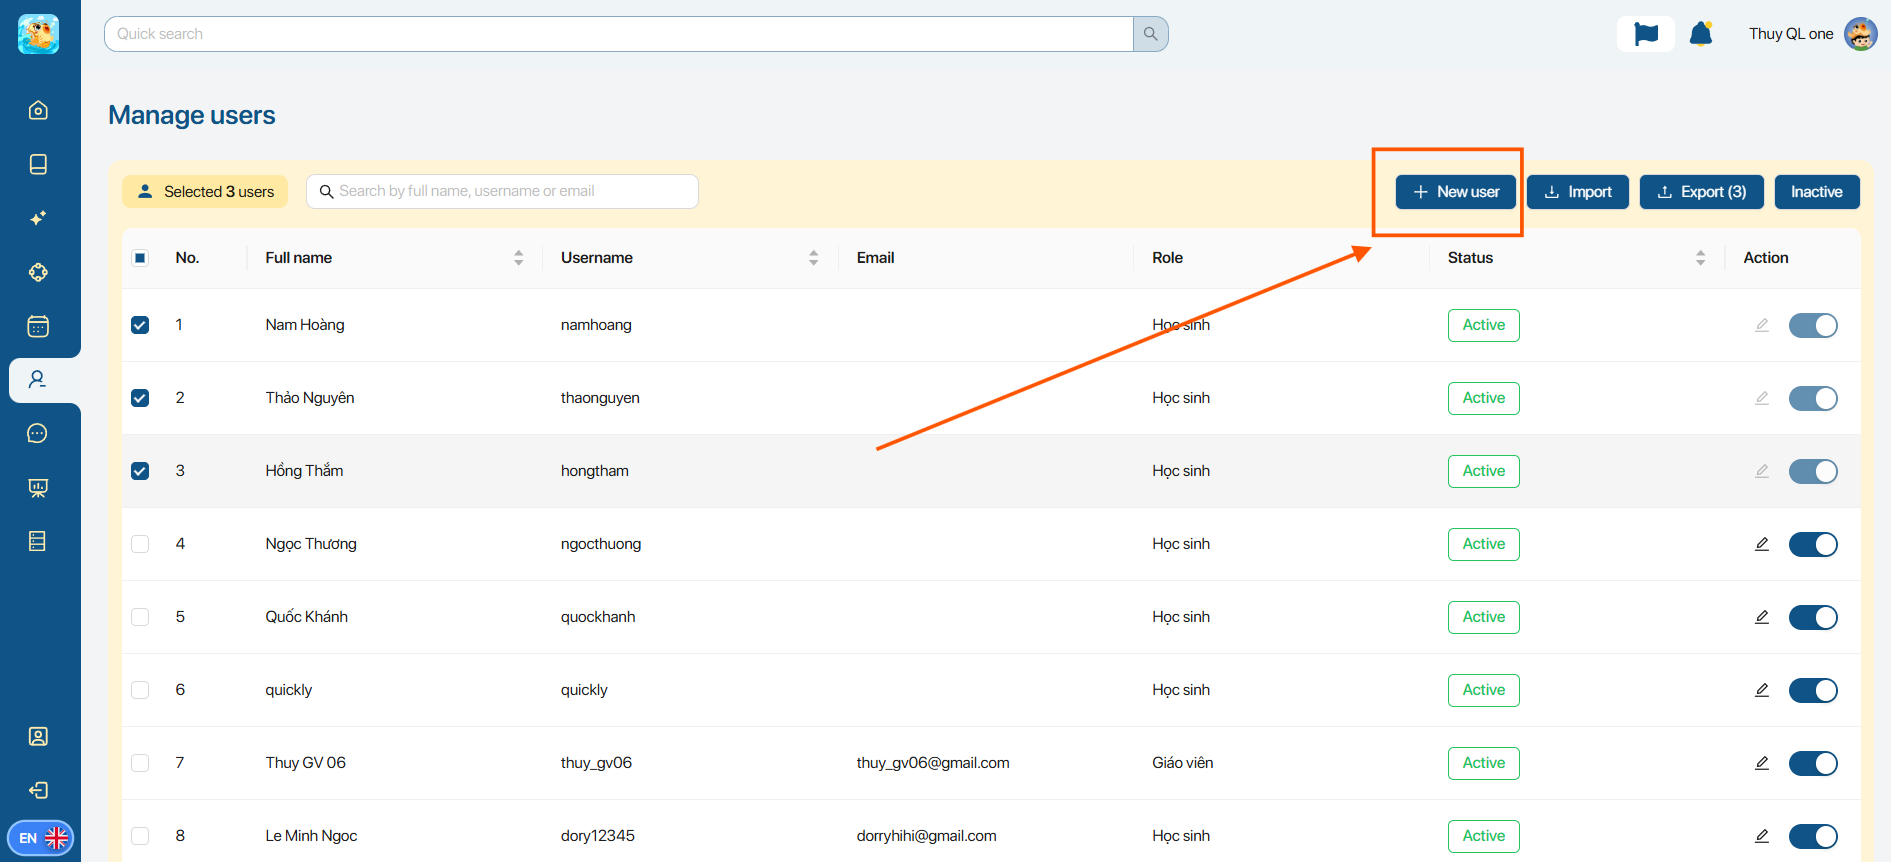
8.1 GUIDE TO CREATING A NEW USER
Step 1.The user selects the button.![]()
Step 2.On the screen, the user fills in all the corresponding information, including:
- Institution: Displays the name of the organization
- Username: Enter your account name
- Password: Enter a password for the account (default: 123456aA@)
- Fullname: Enter your full name
- Email: Enter email
- Role: Choose a role for your account
- Status: Choose a status for your account
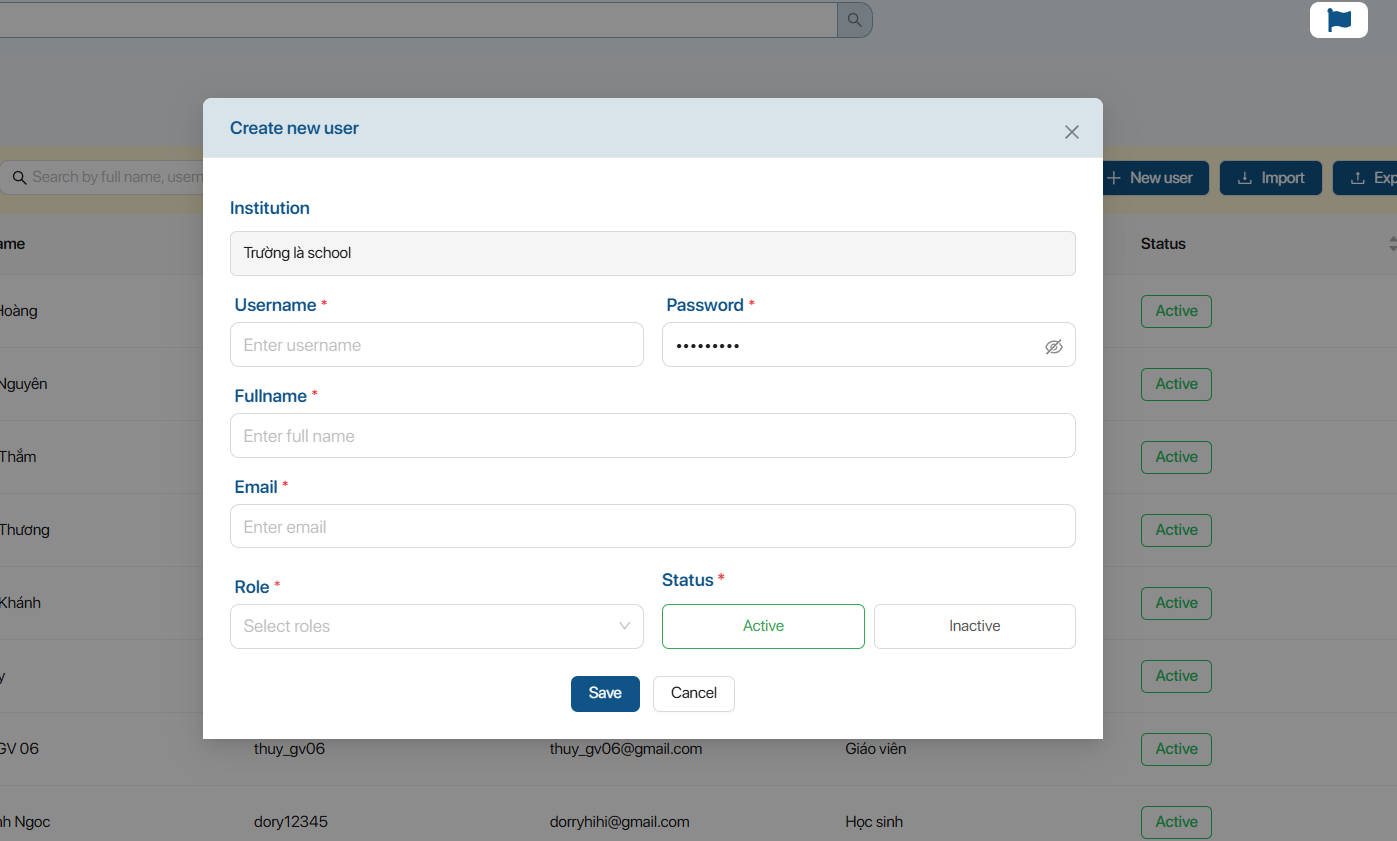
Step 4. Press ![]() to confirm creating a new account
to confirm creating a new account
Note: After selecting a role, the account's permissions are automatically assigned based on that role.
8.2 HOW TO EDIT ACCOUNT PERMISSIONS
Step 1.The user selects the button.![]() in the account for which you want to grant permissions
in the account for which you want to grant permissions
Step 2.Users scroll down to the Permissions section.
Step 3.Users select the corresponding function to grant permissions for that function.
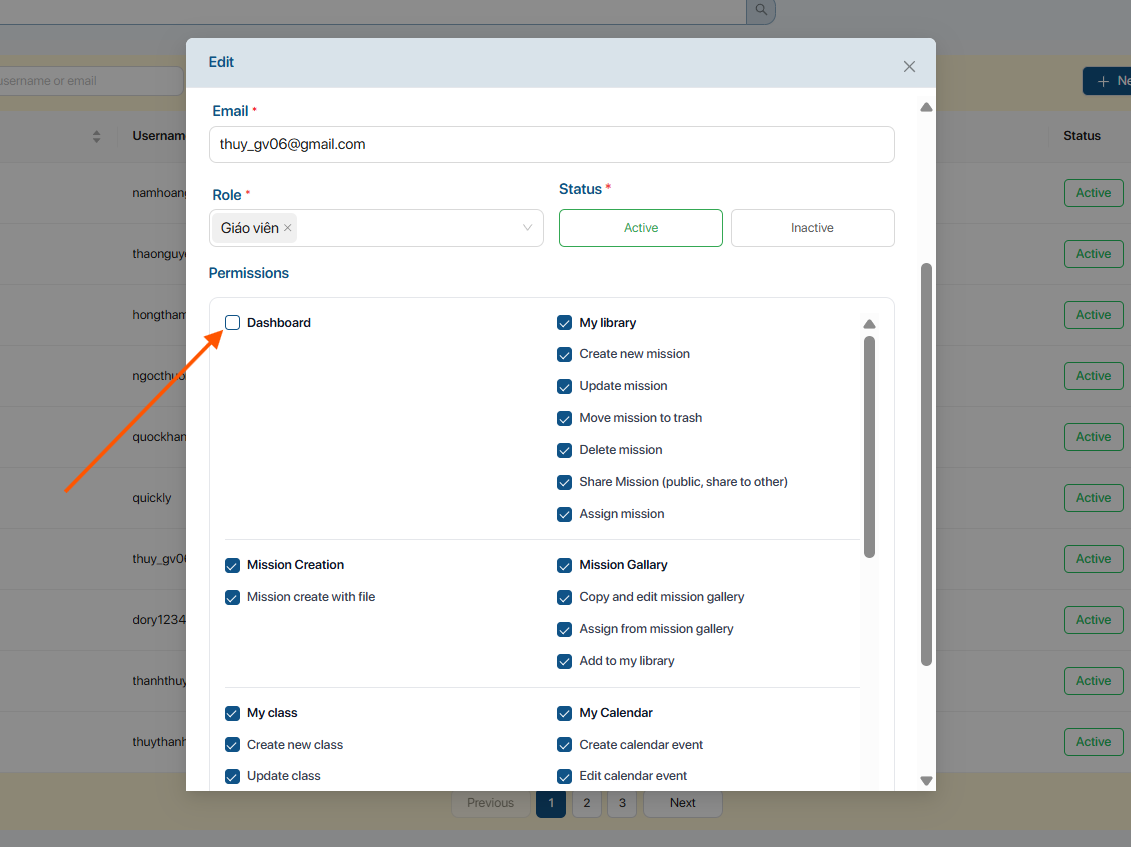
Step 4. Press ![]() to confirm creating a new account
to confirm creating a new account
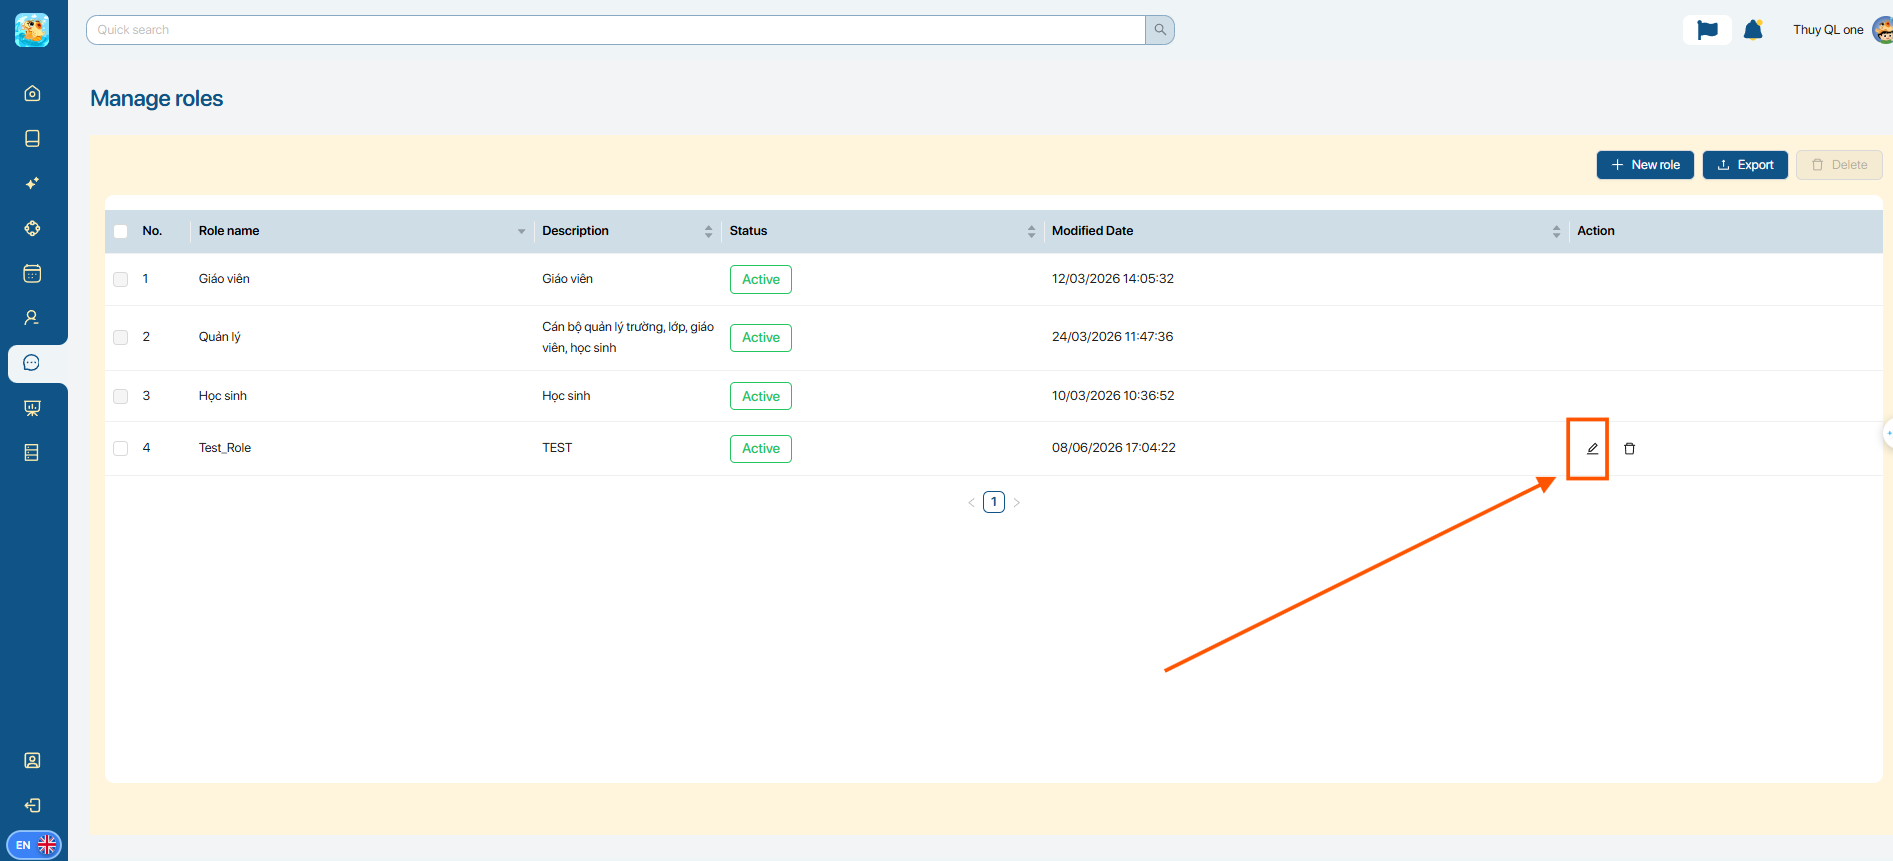
9. MANAGE ROLES
Step 1.On the left-hand taskbar, users click the Manage Roles icon.
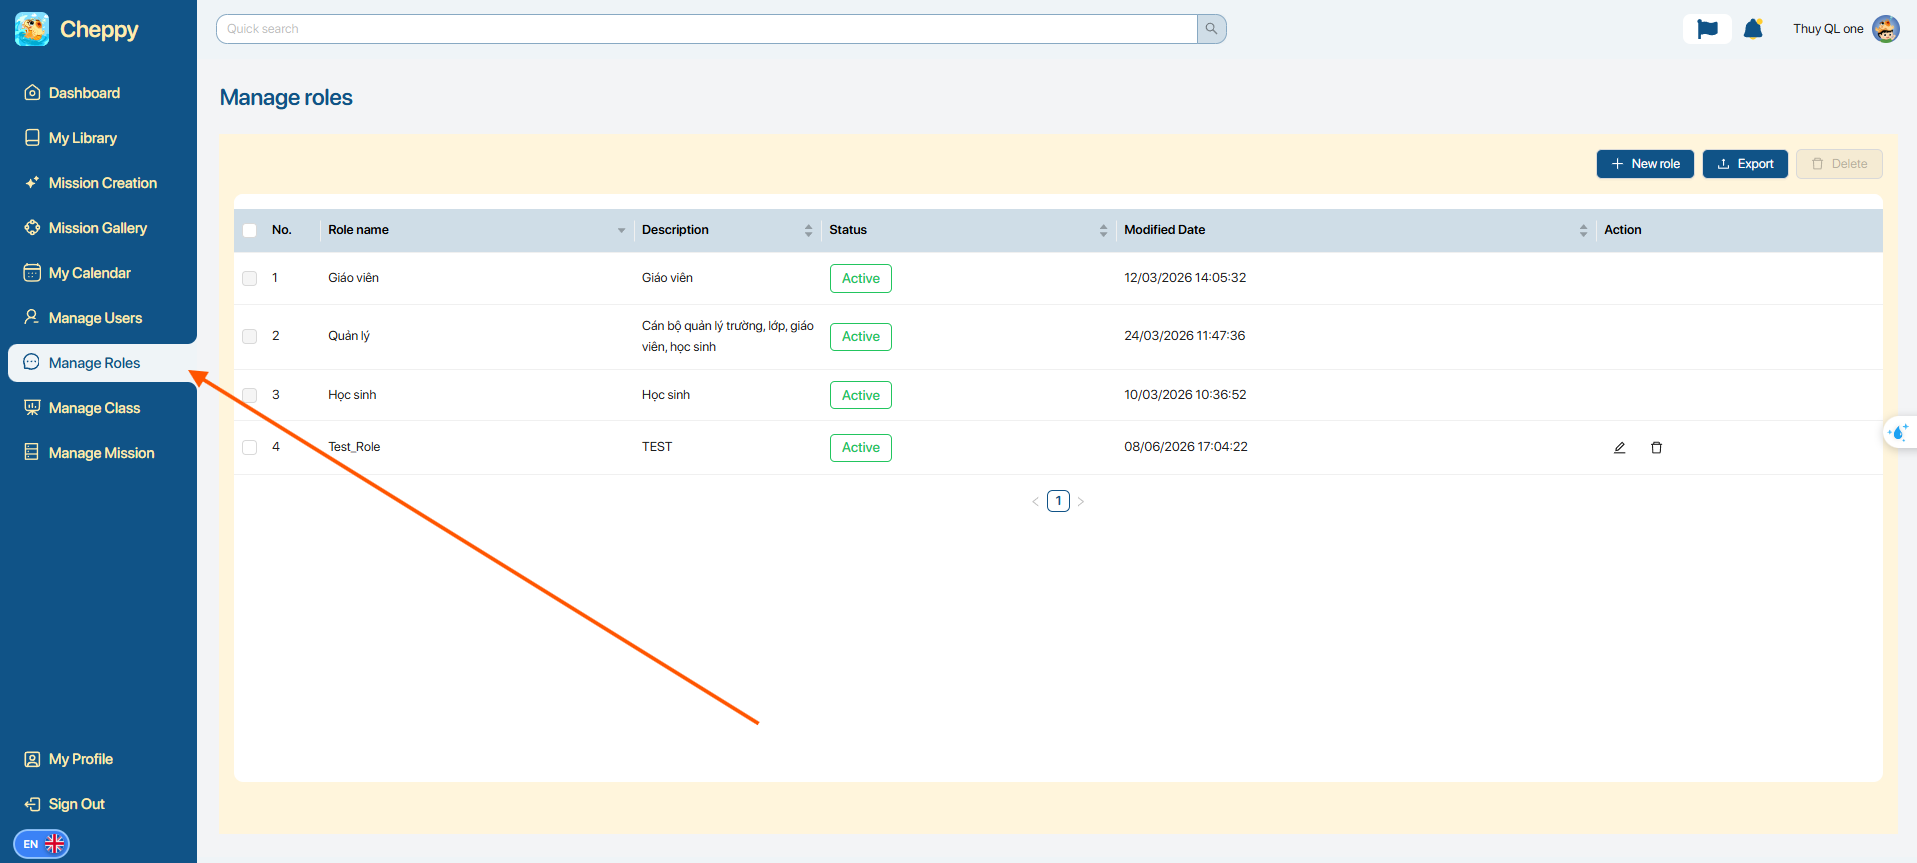
Step 2.At the top, users interact with the following functions:
| STT | Function | Describe |
|---|---|---|
| 3 | Export role | ExportAllows users to download a list of accounts based on filter/search results. |
| 4 | Delete role | DeleteCheck the boxes next to the roles you want to delete.Press Delete. |
9.1 GUIDE TO CREATING NEW ROLES
Step 1. On the Manage role screen, the user selects![]()
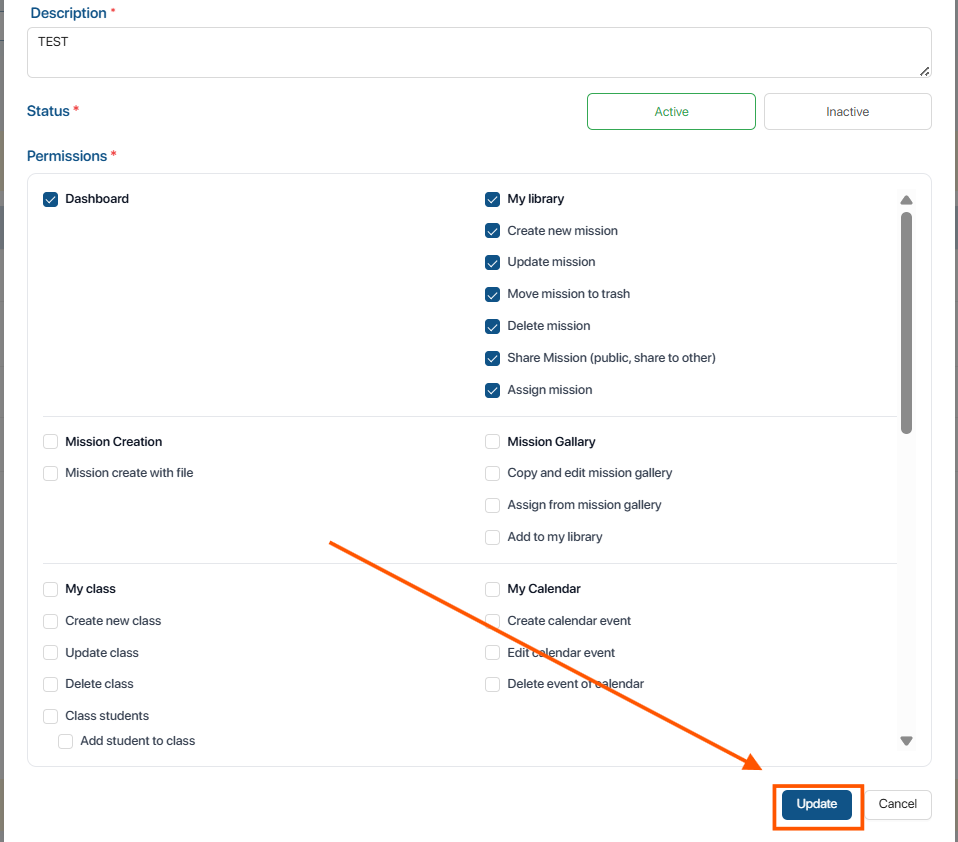
Step 2.On the screen, the user fills in all the corresponding information, including:
- Role name: Enter the role name
- Description: Enter a description of the role
- Permissions: Select permissions for the role.
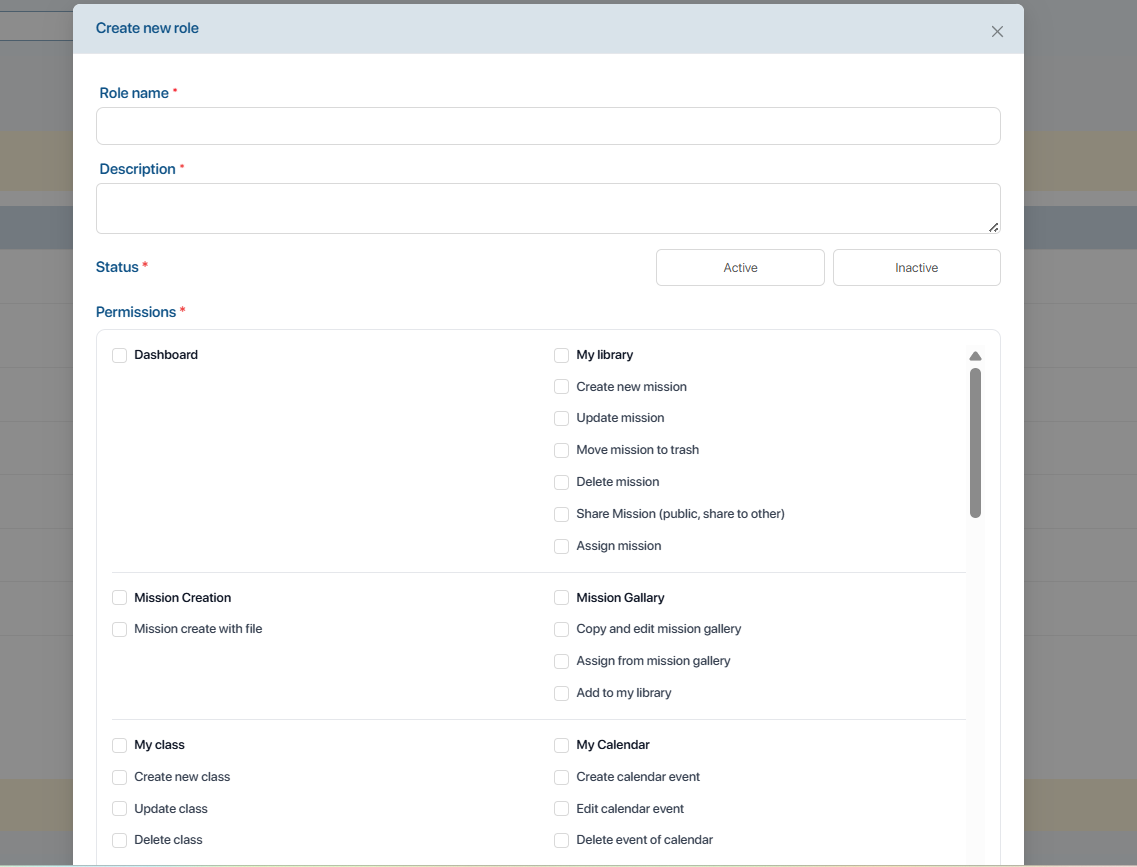
Step 3.Select the functions that these roles have access to.
Step 4.Select ![]() To confirm role creation.
To confirm role creation.
9.2 HOW TO ADJUST ROLES
Step 1. On the Manage role screen, the user selects![]() of the role you want to edit.
of the role you want to edit.
Step 2. Edit the necessary information and press![]()
10. MANAGE CLASS
10.1 HOW TO CREATE A NEW CLASS
Step 1. The user selects the button.![]() .
.
Step 2. On the New class screen, enter all the class information, including:
- Class Name: Enter the class name
- Grade/CEFR level: Enter Grade/Level
- Institution: Choose an organization
- Start date: Choose the start date for the class.
- End date: Select the end date for the class.
- Add co-teachers: Add co-teachers
Note: If the user does not select "End date," the class will default to having no end date..
Step 3. To add the owner and co-teachers to a class, users search for the teacher's username/email in the system and select the corresponding teacher account.
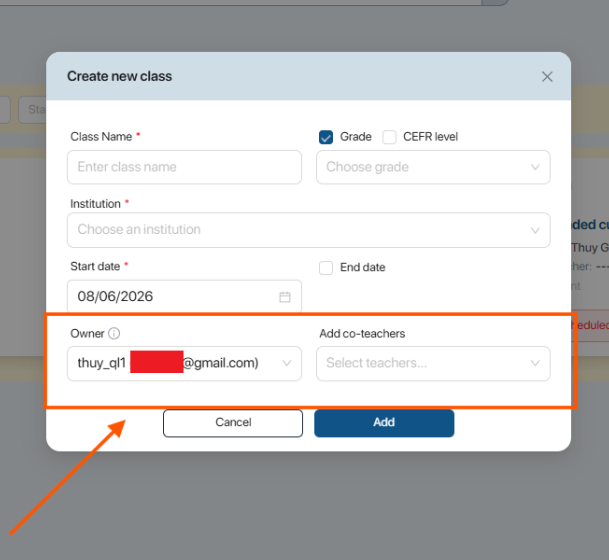
Note: Users can add more than one co-teacher..
Step 3. User selects![]() To confirm the creation of a new class.
To confirm the creation of a new class.
10.2 HOW TO ADDING STUDENTS TO THE CLASSROOM
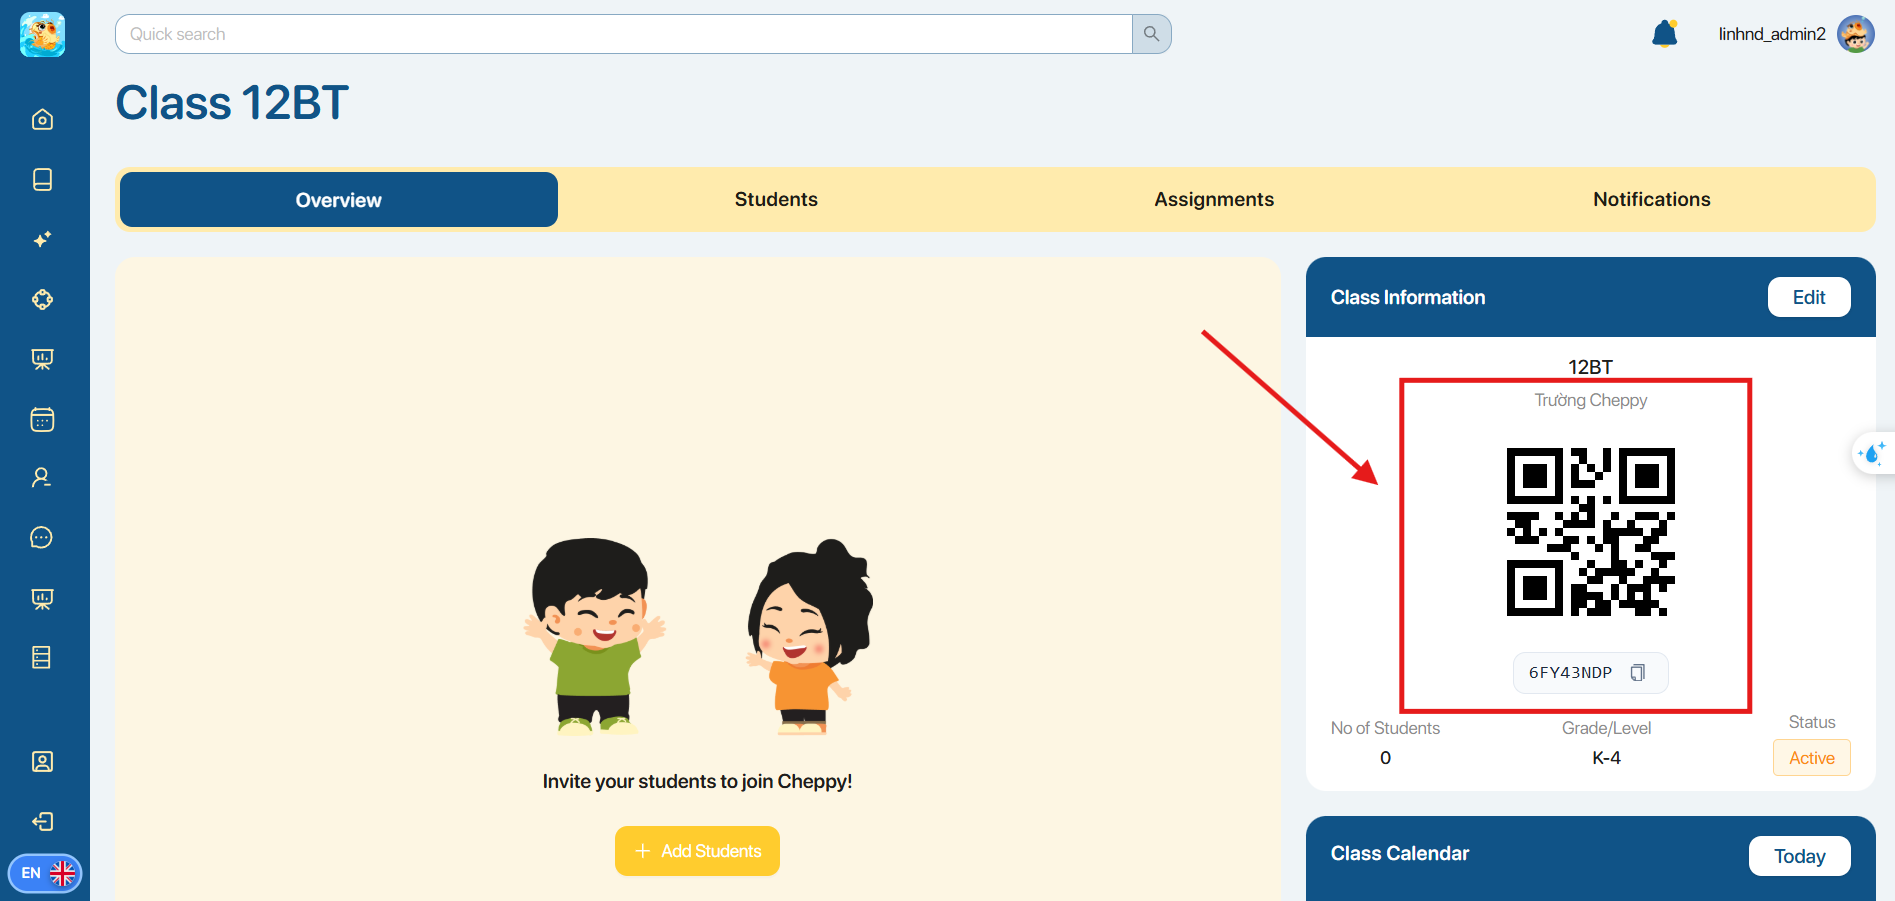
Step 1. The user selects a class that needs more students.
Step 2. Users can add students to a class in one of the following ways:
Method 1: Provide students with a class QR code to join the class.
After successful registration, the system will automatically update and display the new student's information in the student list.
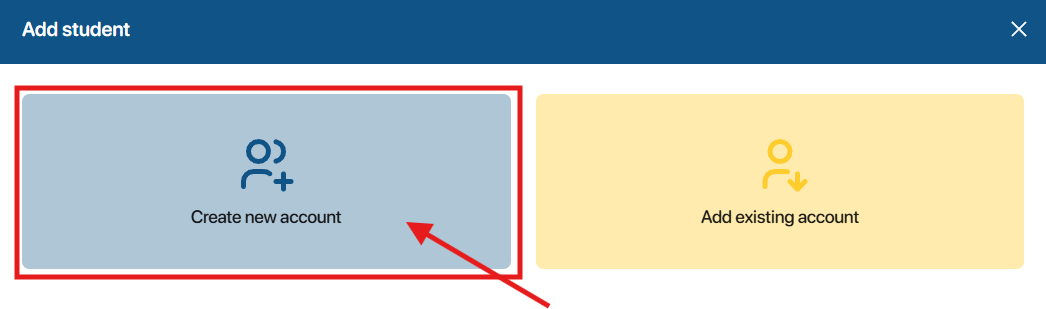
Method 2: Add students by creating a new account.
Step 2.1 In the Students section, the user selects![]()

Step 2.2 In the Add student popup, select Create new account.
Step 2.3 Here, users can manually enter or upload a student list file.
- Manually enter the list of students:Users must enter complete information including: the student's full name and the parent's email address.
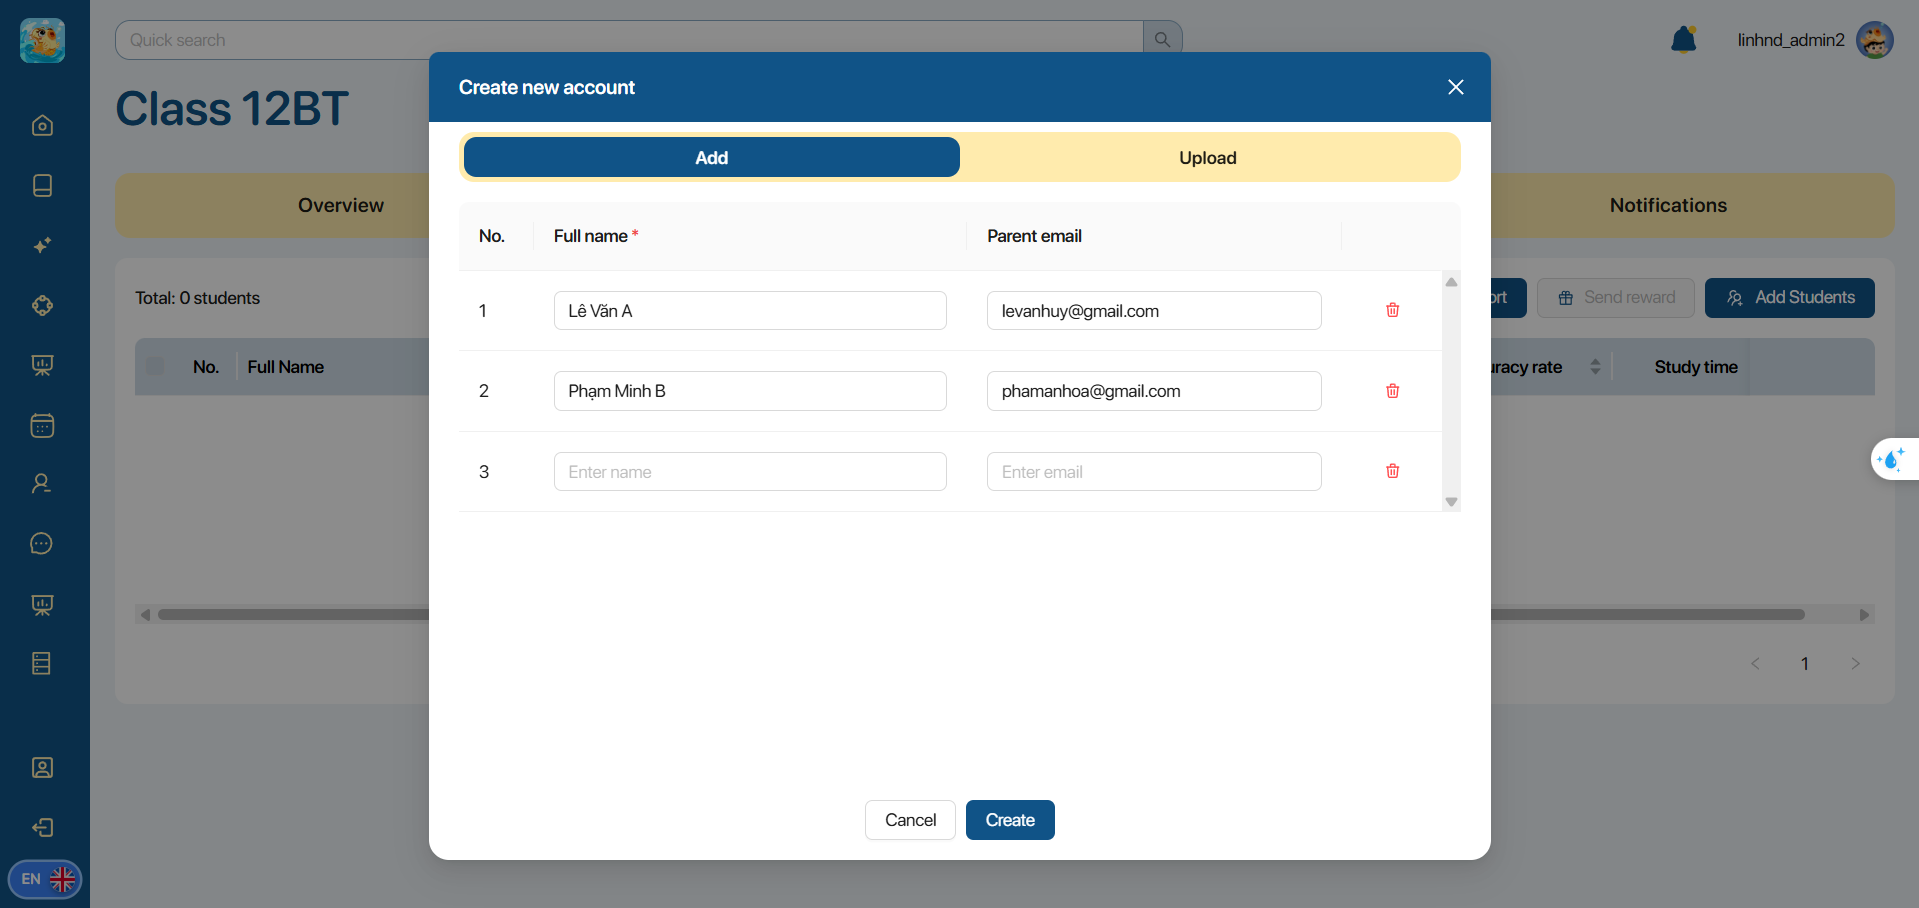
- Upload the student list file:In the CSV, XLS, and XLSX file upload area, users canDrag and drop files into the file upload area.or Select a file from your computer.by clicking on the Select area or dragging and dropping the file here.

Note:
- If the user wants to download the sample list file, click

- The system supports uploading files in various formats.CSV, XLS, XLSX, capacity not exceeding 10MB.
Step 2.3 Press the button![]() To confirm the addition of students to the class.
To confirm the addition of students to the class.
Method 3: Add students from an existing account
Step 3.1 In the Students section, the user selects![]()
Step 3.2 In the Add student popup, select Add existing account.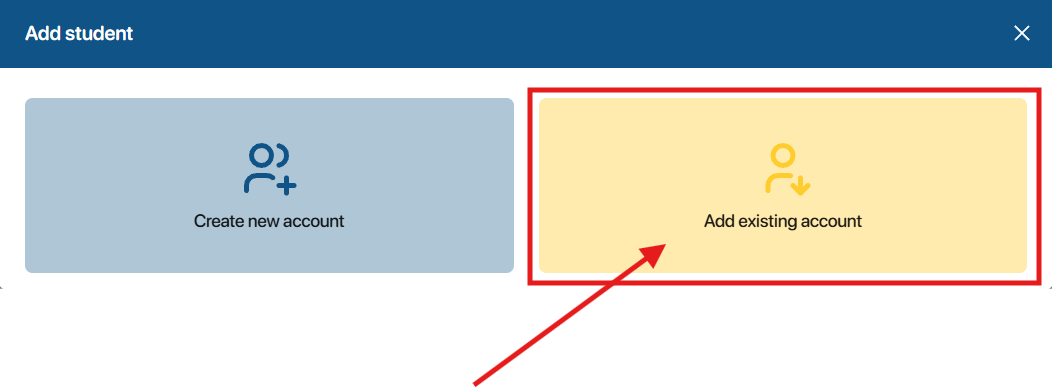
Step 3.3 Enter the username or email address of the student account to search.
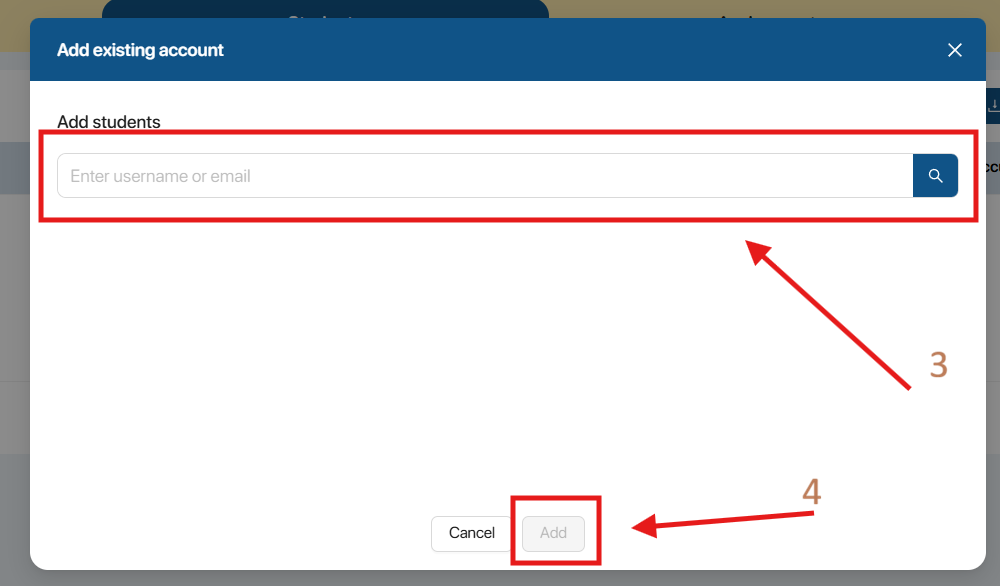
Step 3.4 Press the button![]() To confirm the addition of students to the class.
To confirm the addition of students to the class.
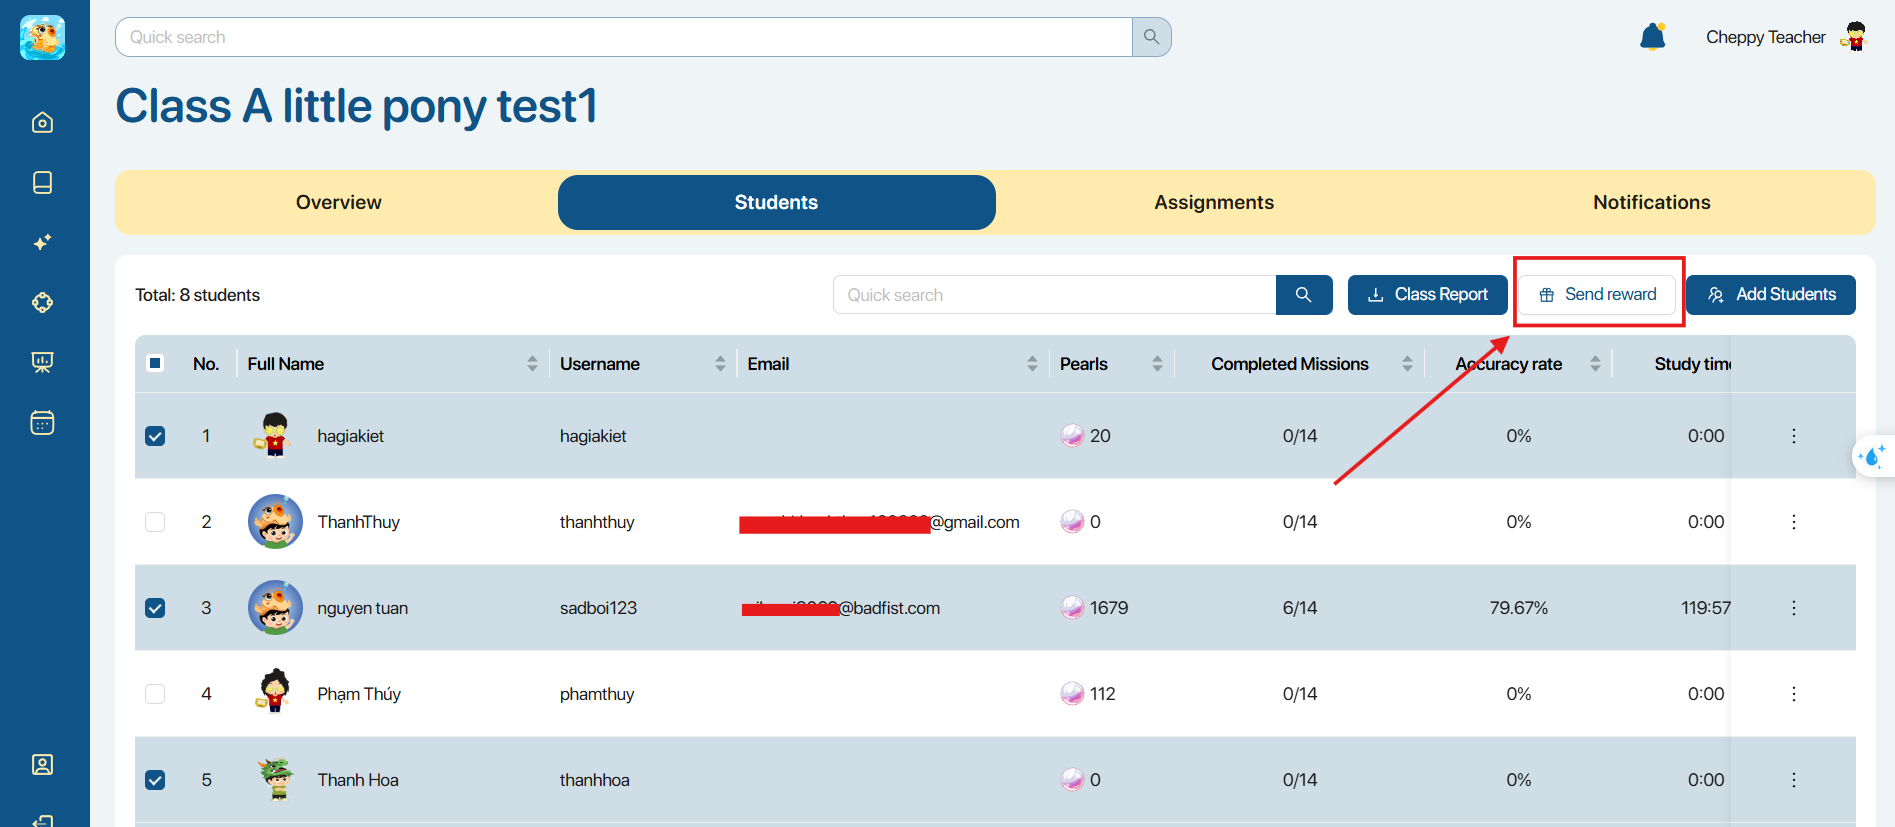
10.3 STUDENT MANAGEMENT GUIDELINES
Step 1. From the taskbar at the top, the user selects Students.
Step 2. In the search area, users can search for students or download class reports.

Step 3. To give gems to multiple students, the user selects the students in the list and presses the button.![]() .
.
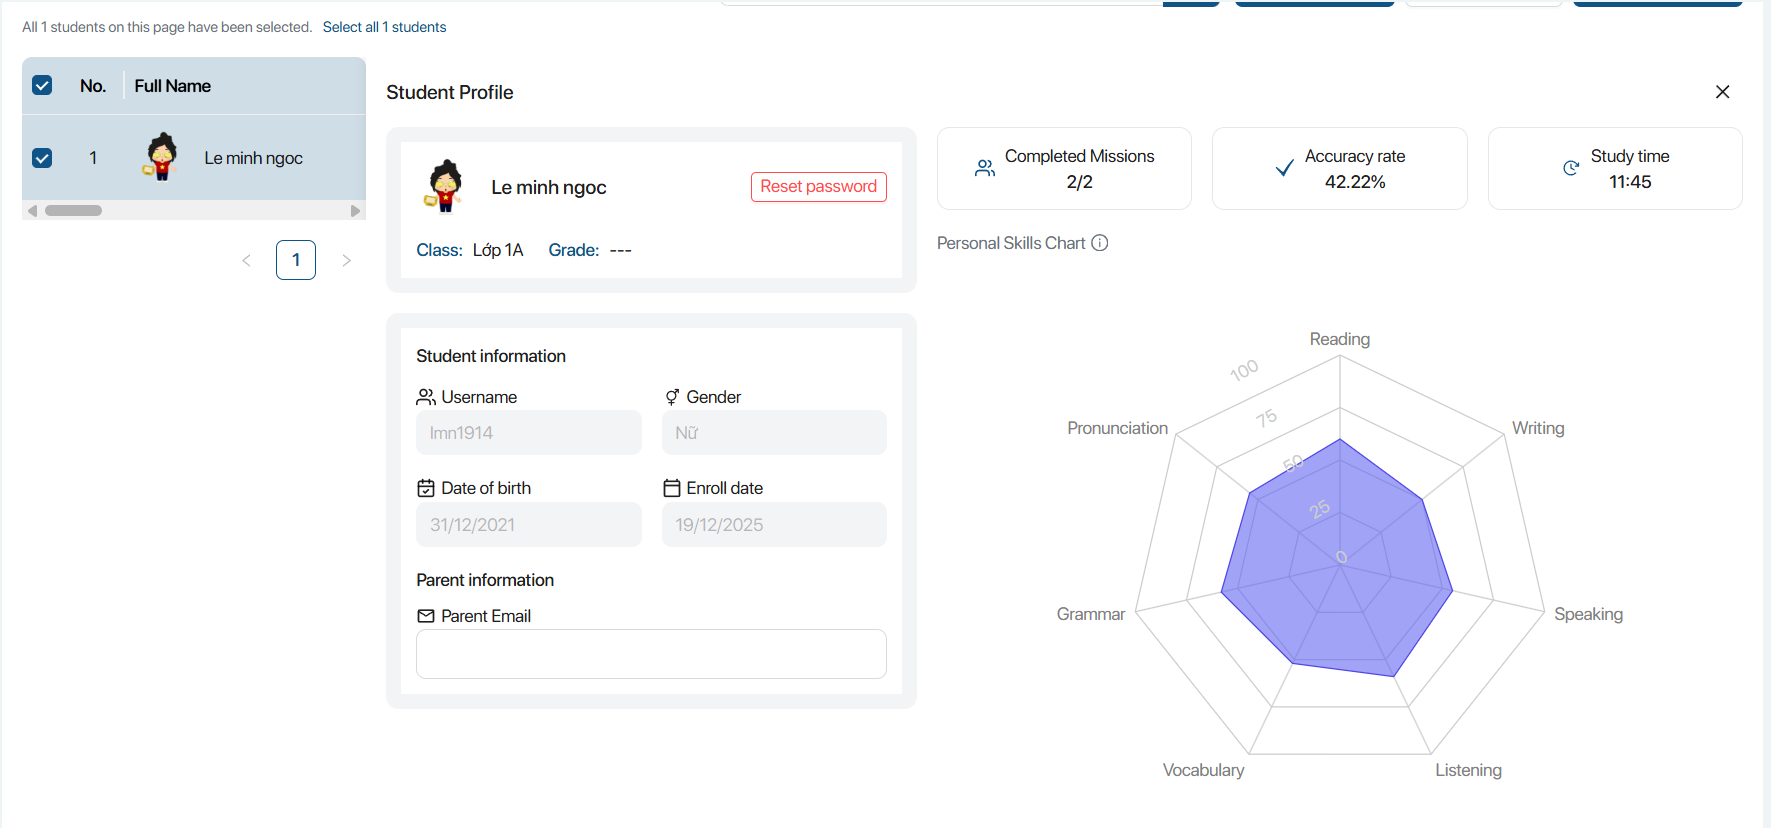
Step 3. When you click on any student, the screen will display that student's detailed profile, including:
- Personal information
- Number of tasks completed
- Accuracy rate
- Study time
- Individual skill charts include: Reading, Writing, Speaking, Listening, Vocabulary, Grammar, and Pronunciation.
Step 4. Click on the icon![]() For each assignment, the screen will display the following operation options:
For each assignment, the screen will display the following operation options:

| STT | Function | Operation |
|---|---|---|
| 1 | View resultsThe screen displays a table comparing the results between students. Users can view the following information:Mission: Mission NameLevel: ProficiencySchedule date: Start dateDeadline: DeadlineHighest score: The highest scoreCompleted time: Completion timeTime taken: Time allotted for the test 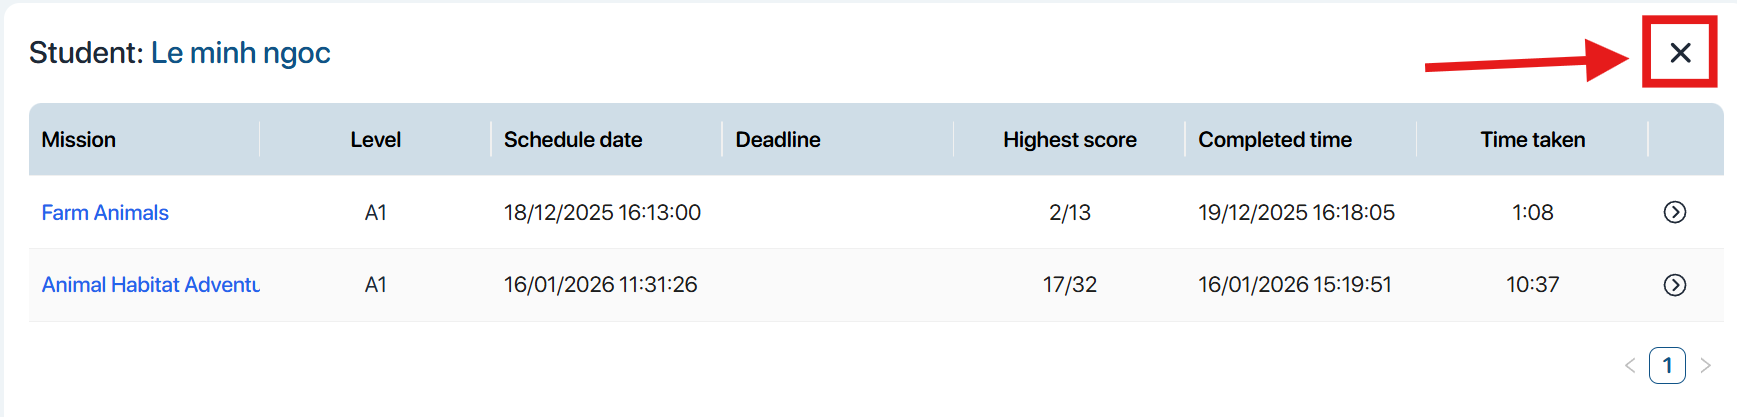 Note: Users press x to exit the results viewing tab. Note: Users press x to exit the results viewing tab. | |
| 2 | Gift of jadeMethod 1: Enter the number of gems or use the increase/decrease buttons.Method 2: Quickly select the quantity: 10/20/50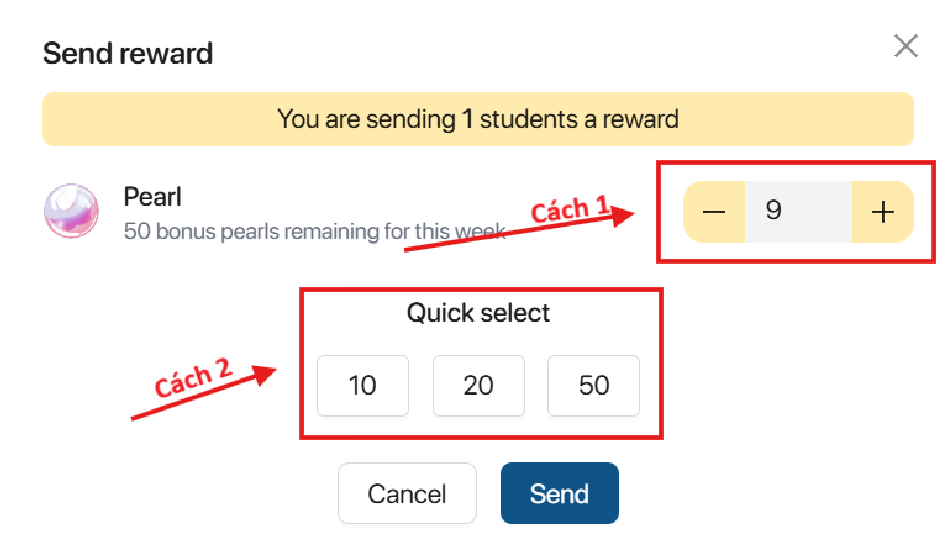 | |
| 3 | Remove studentSelect 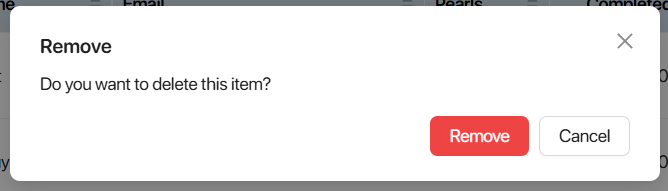 |
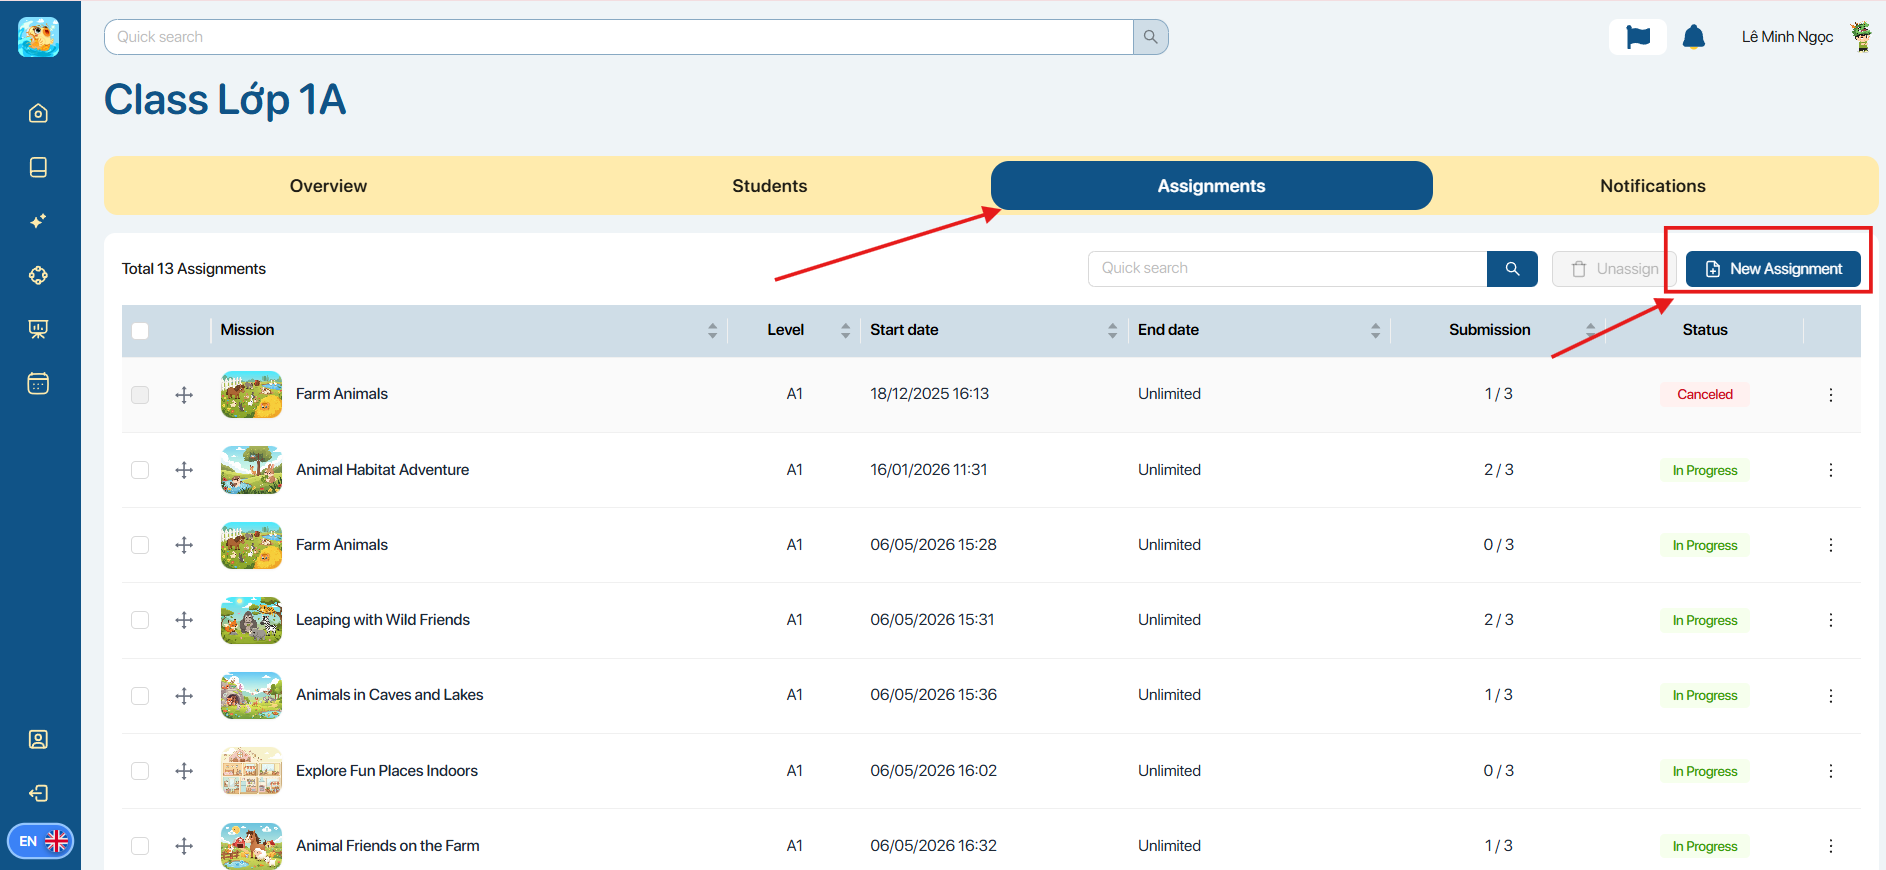
10.4 HOW TO ADD ASSIGNMENTS IN THE CLASSROOM
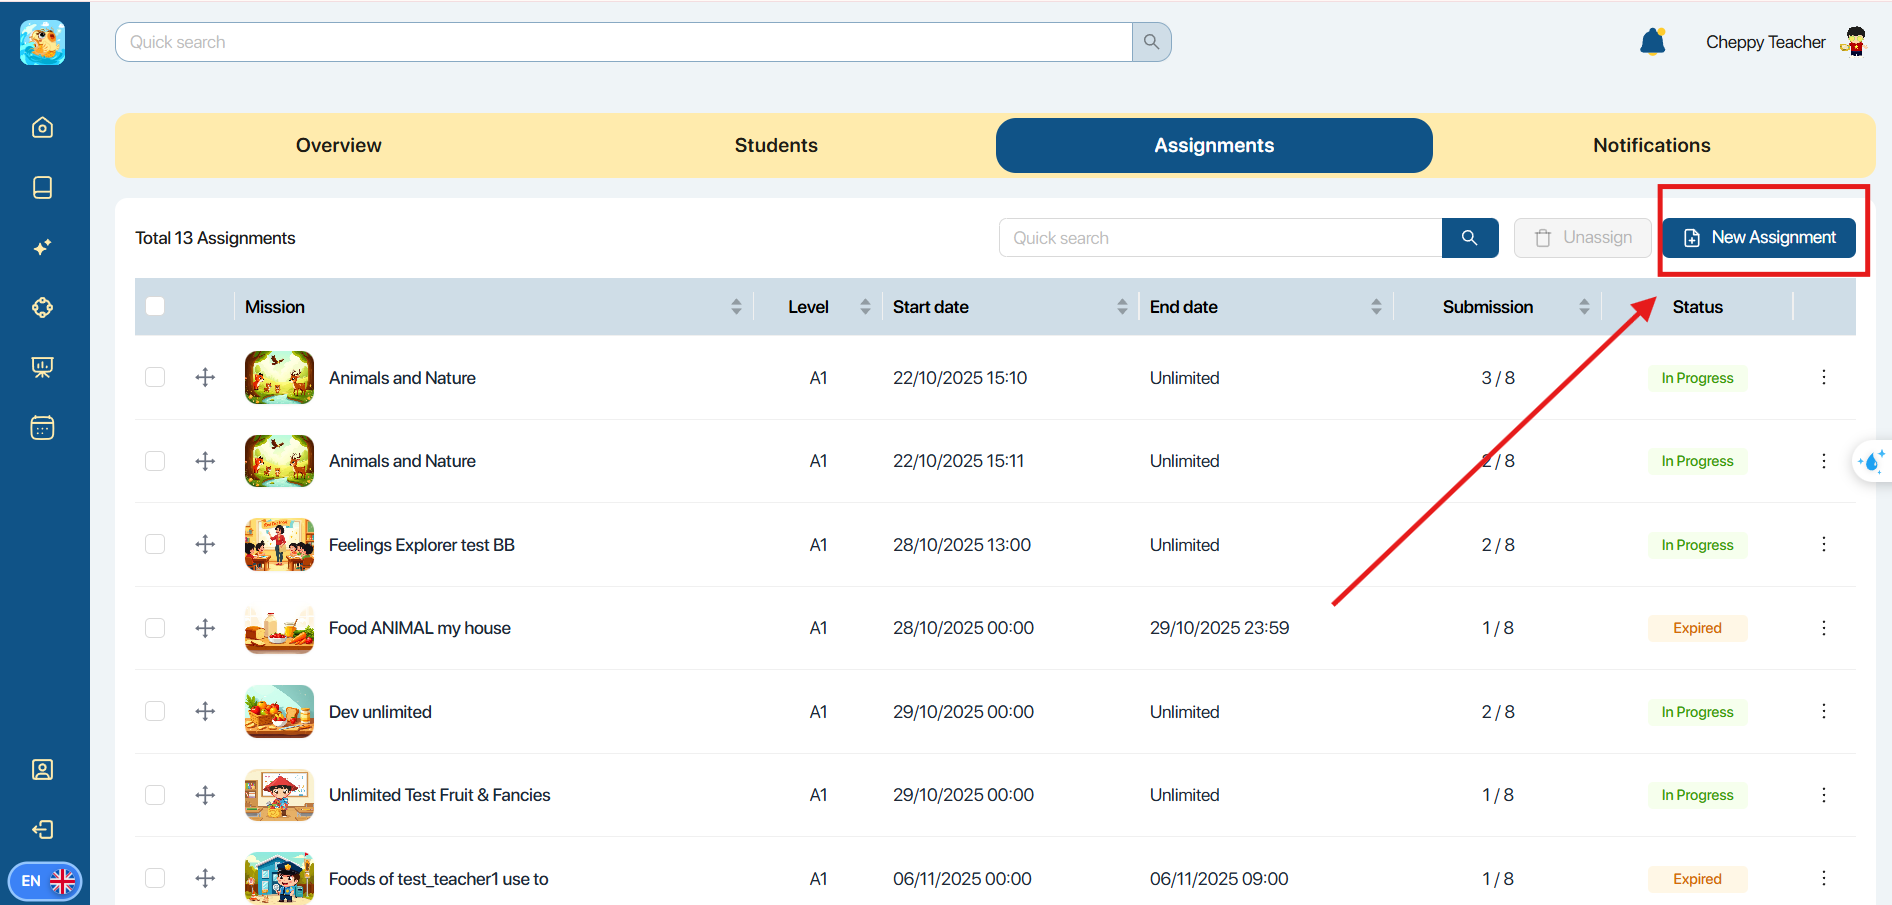
Step 1. From the Assignments screen, the user selects![]()
Step 2. Select a mission you want to assign to the class and press ![]()
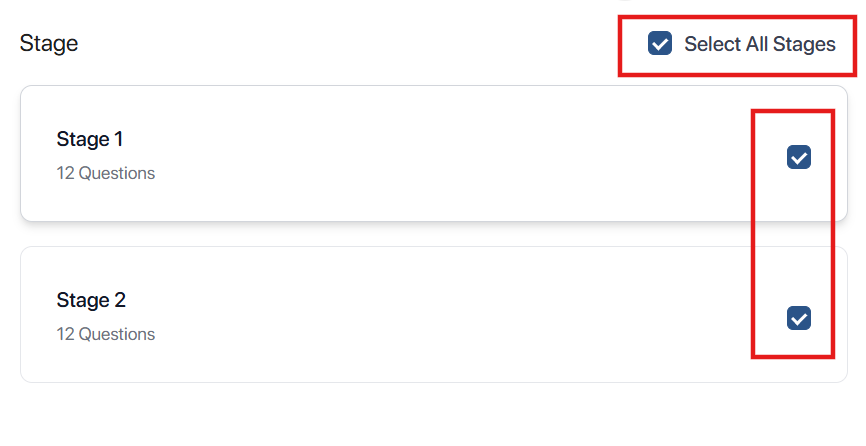
Step 3. Select the stages you want to assign from the selected mission and press ![]()
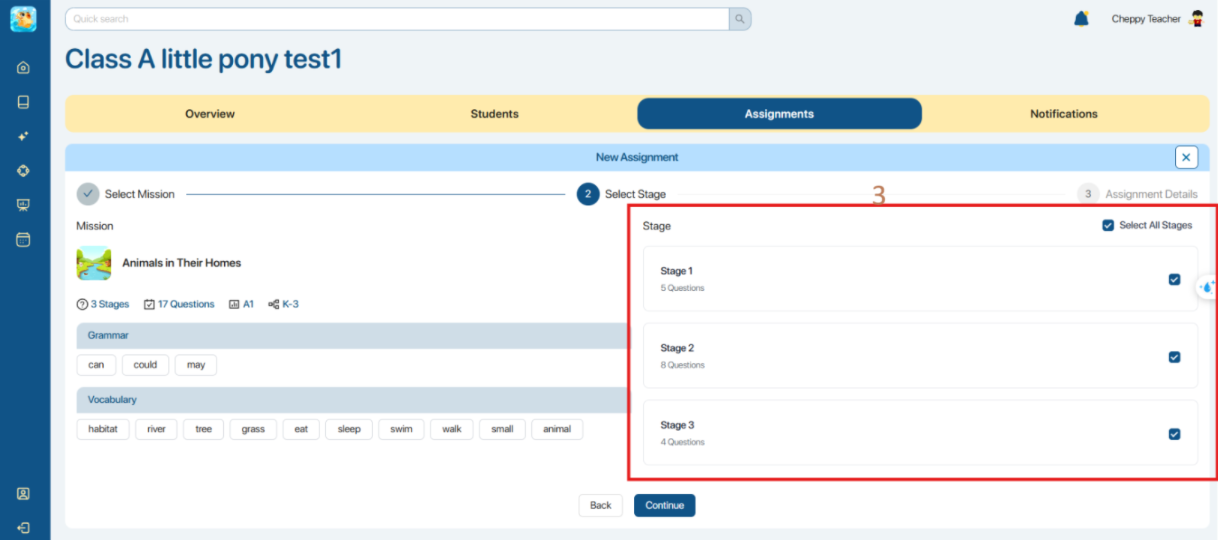
Note:
- The system defaults to selecting all stages.
- Users are required to select at least one leg of the journey in order to add an assignment.
Step 4. To configure the stages in Assignments, users can use the following two methods:
Method 1: Use the general installer and apply it to all stages. Users select the items they want to install and enter the information for each item. The installation categories are:
- Start date: The time when students begin their assignment.
- End date: Deadline for completing the task.
- Duration: The maximum time allowed for each attempt.
- Attempt limit: The number of attempts allowed.
- Mistake limit: The number of incorrect answers allowed.
- Shuffle question: Turn the question order on or off.
- Shuffle answer: Turn the order of the answers on or off.
The user presses![]() To confirm that the settings are applied to all stages.
To confirm that the settings are applied to all stages.
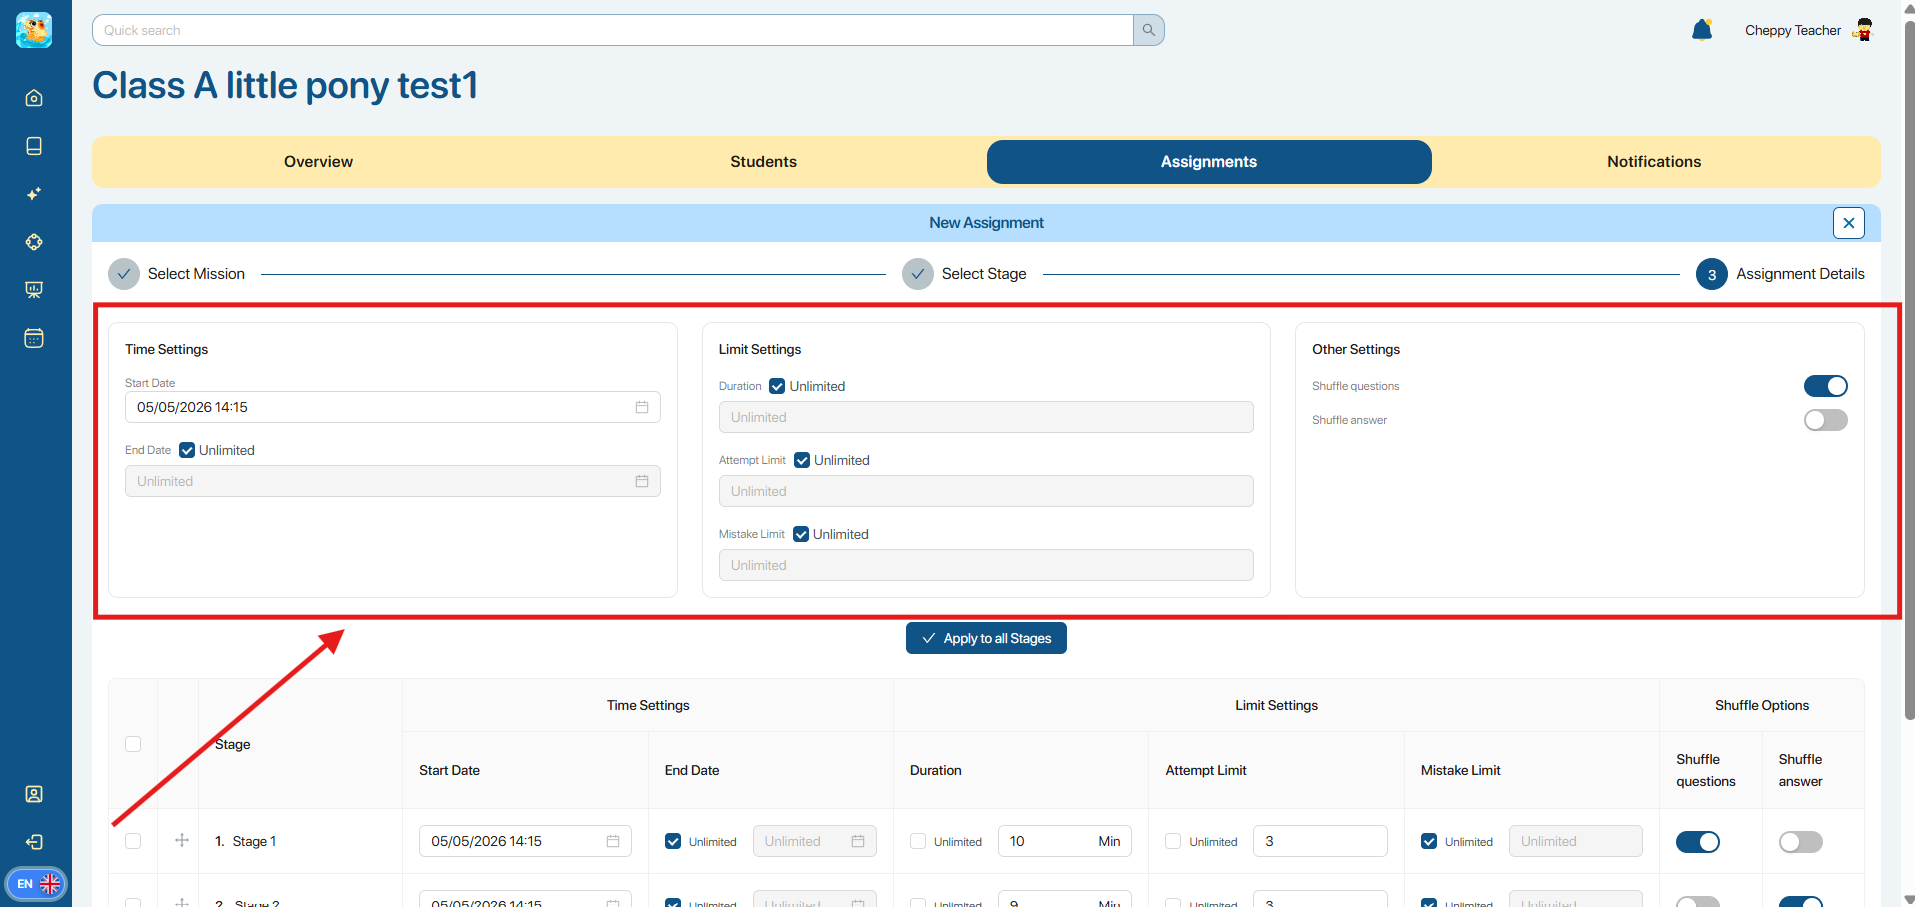
Note: The system defaults to not selecting any settings options.
Method 2: Enter individual settings for each stage of the mission.
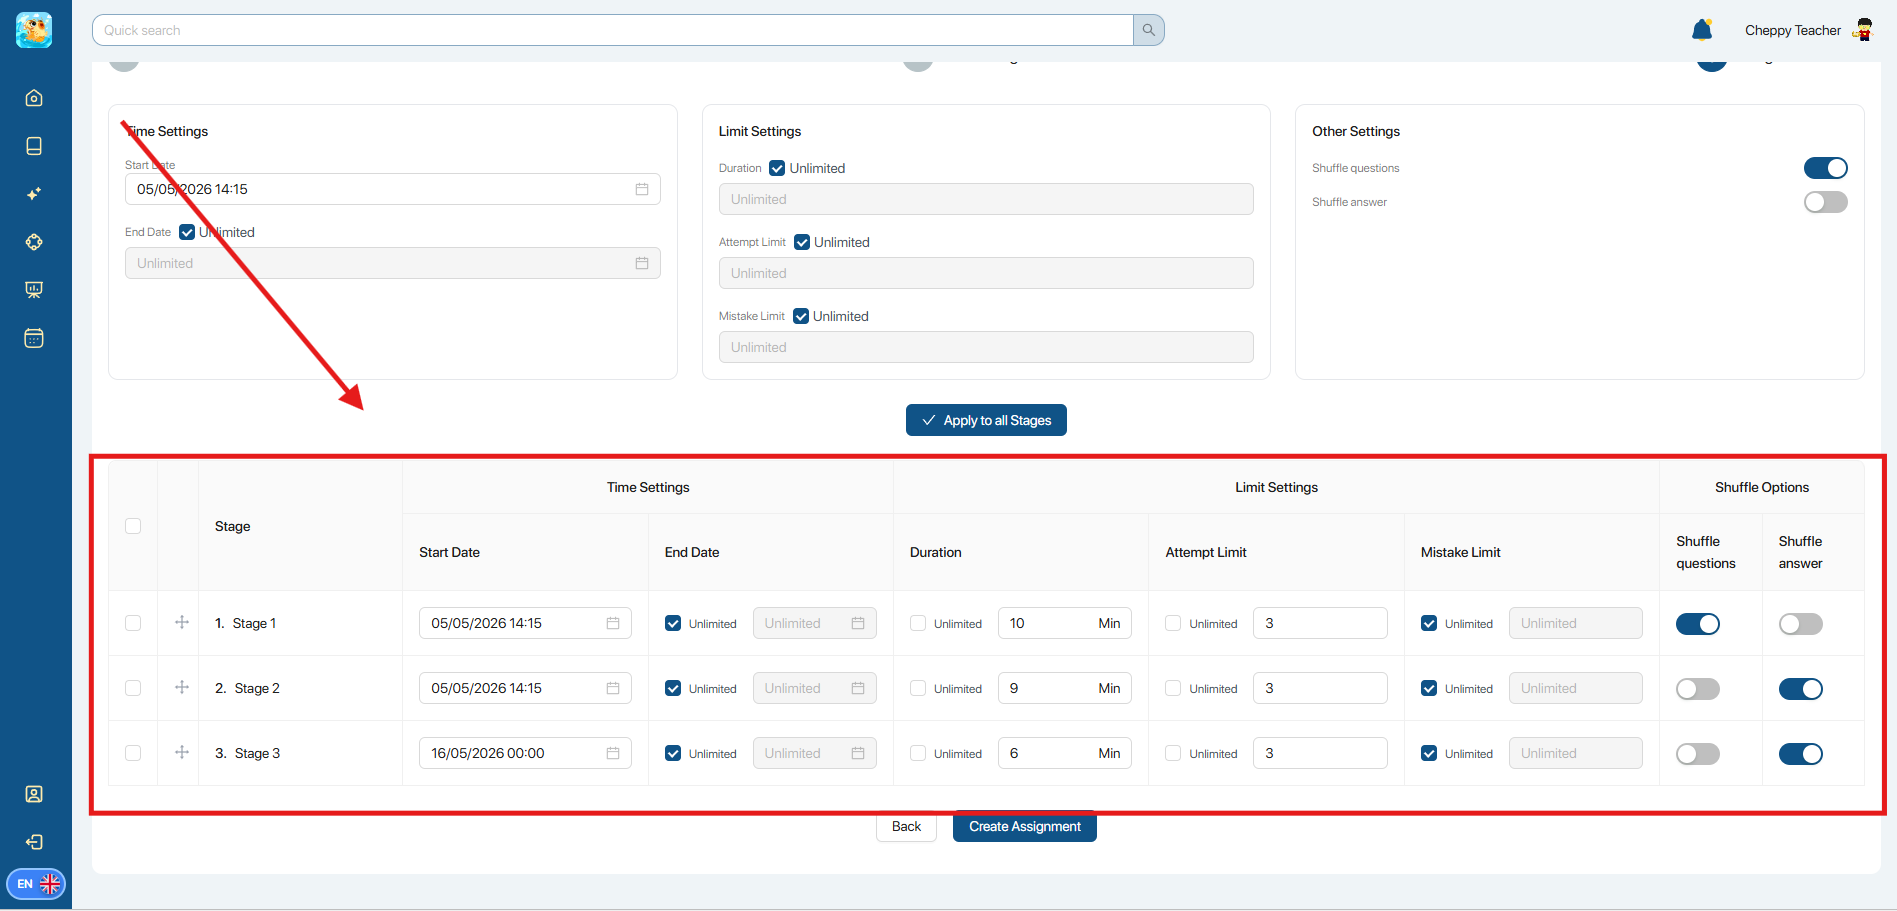
Note: Users can hold and drag the button![]() to change the order of the stages.
to change the order of the stages.
Step 5. Press ![]() to confirm the creation of the assignment.
to confirm the creation of the assignment.
10.5 HOW TO MANAGE ASSIGNMENTS LISTS
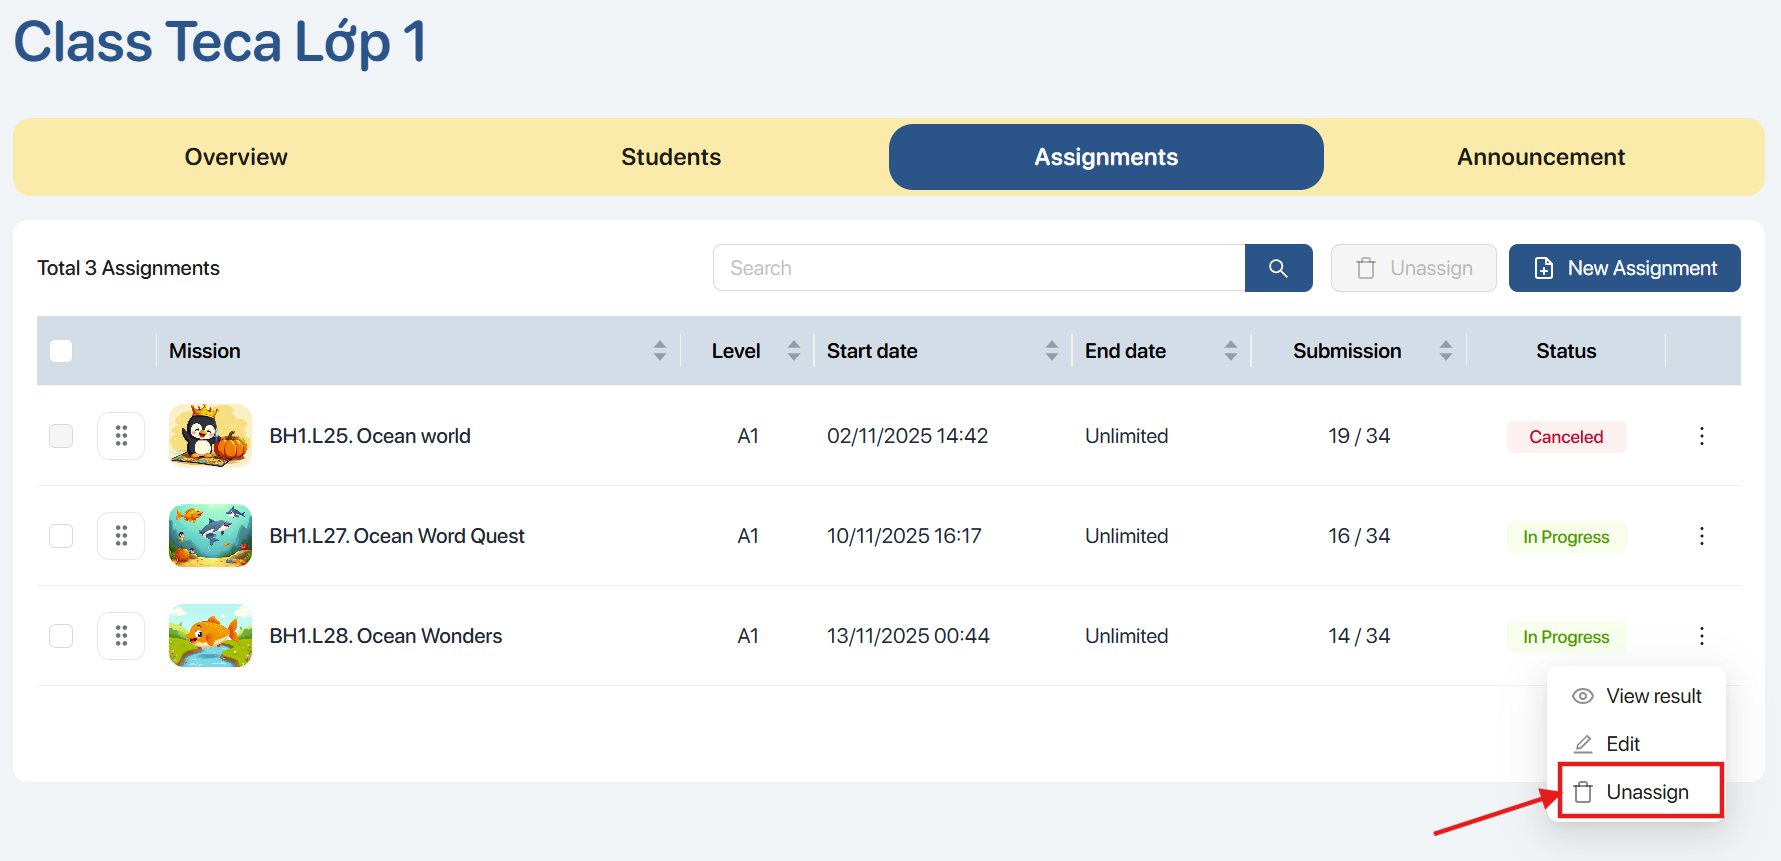
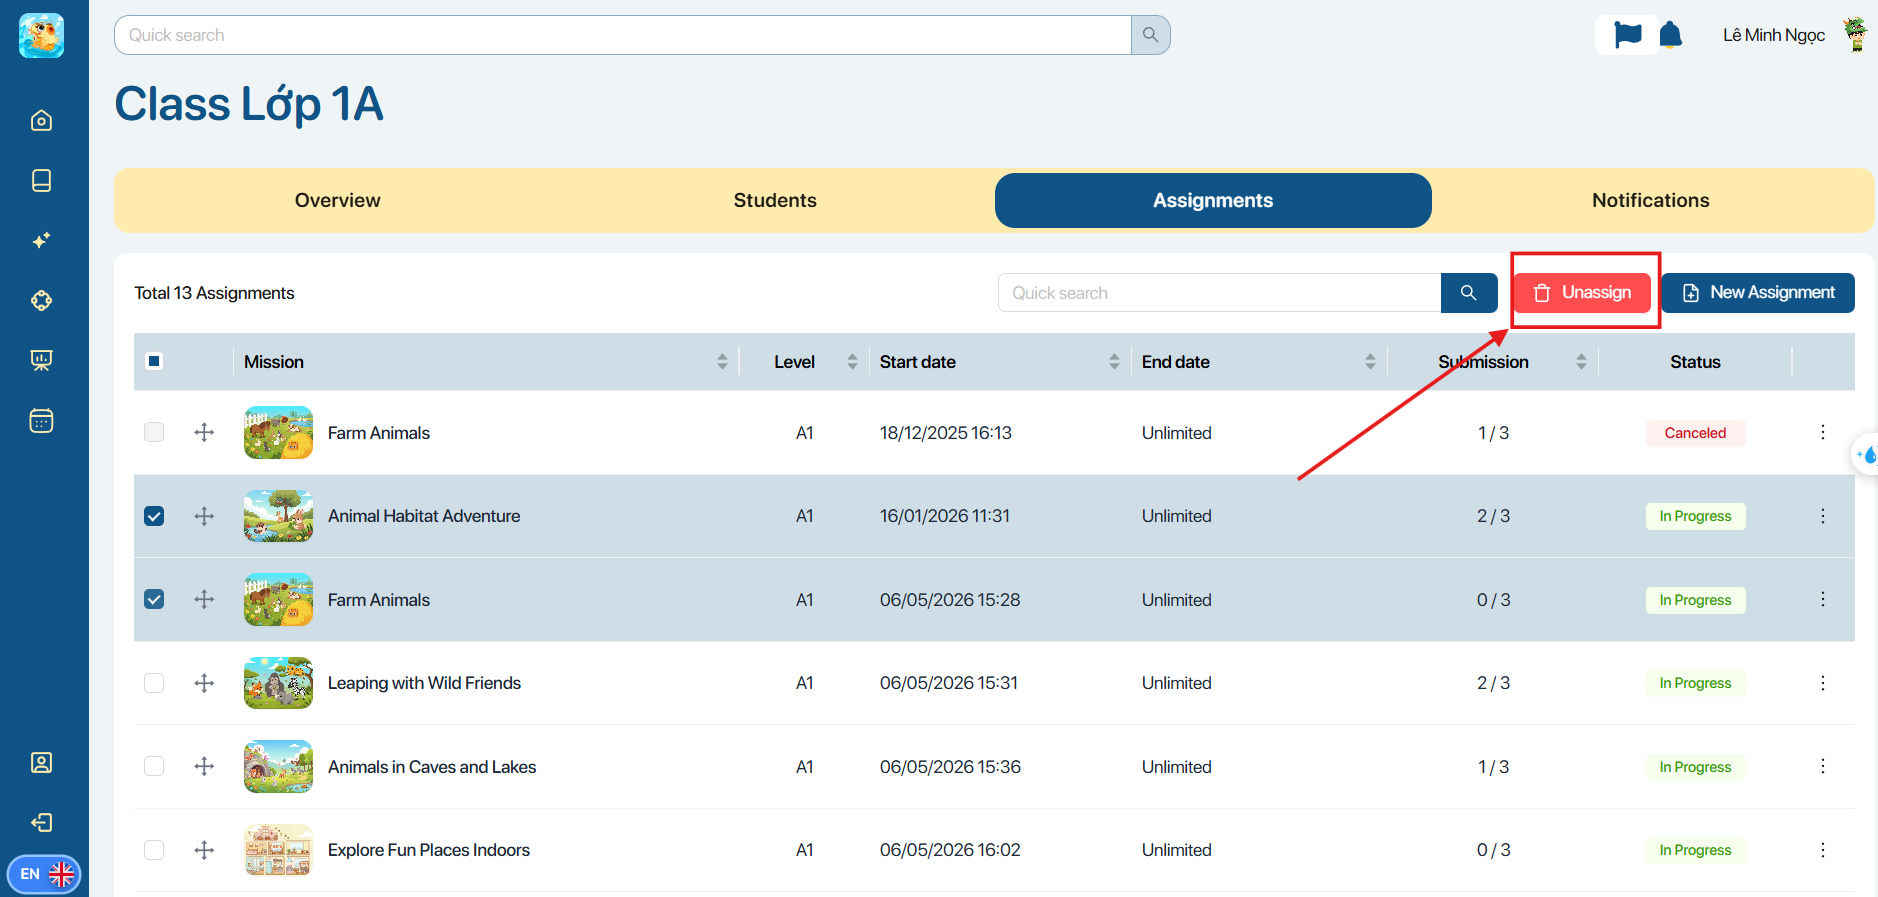
Step 1.From the taskbar at the top, the user selects Assignments.
Step 2.To cancel multiple tasks, the user selects the task in the list and presses the button.![]() .
.
Step. Click on the icon![]() For each assignment, the system will display the following operation options:
For each assignment, the system will display the following operation options:
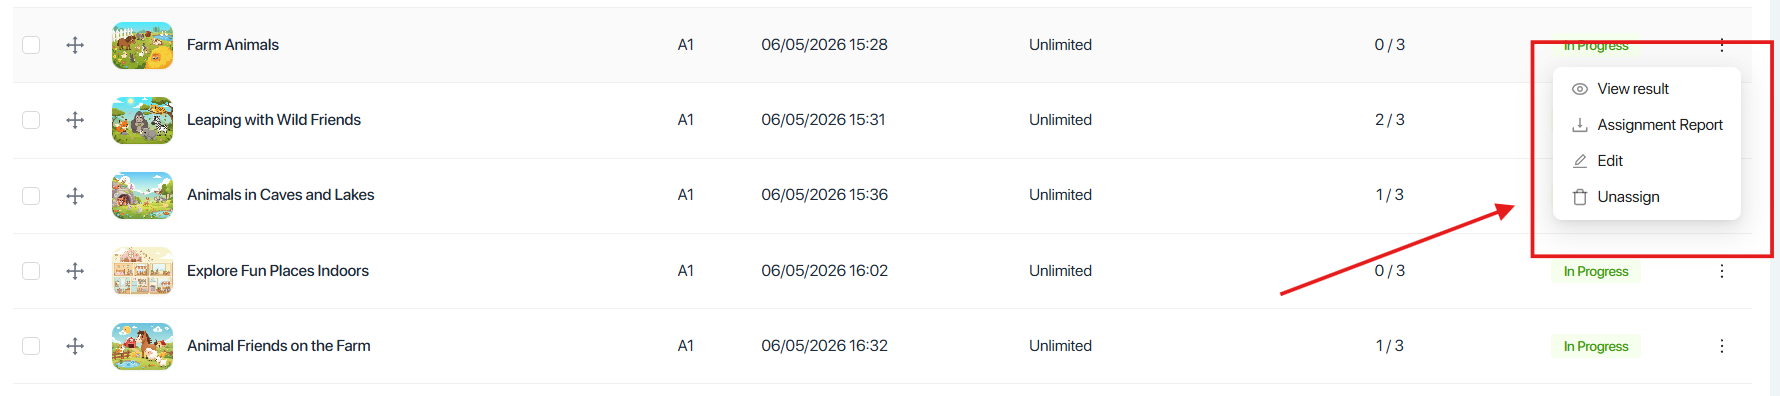
| STT | Function | Operation |
|---|---|---|
| 1 | View resultsThe screen displays a table comparing the results between students. Users can view the following information:Highest score: The highest score achieved by that student.Number of completed stages: Number of completed stagesCompleted time: completion time Duration: Status: Completed/Not Completed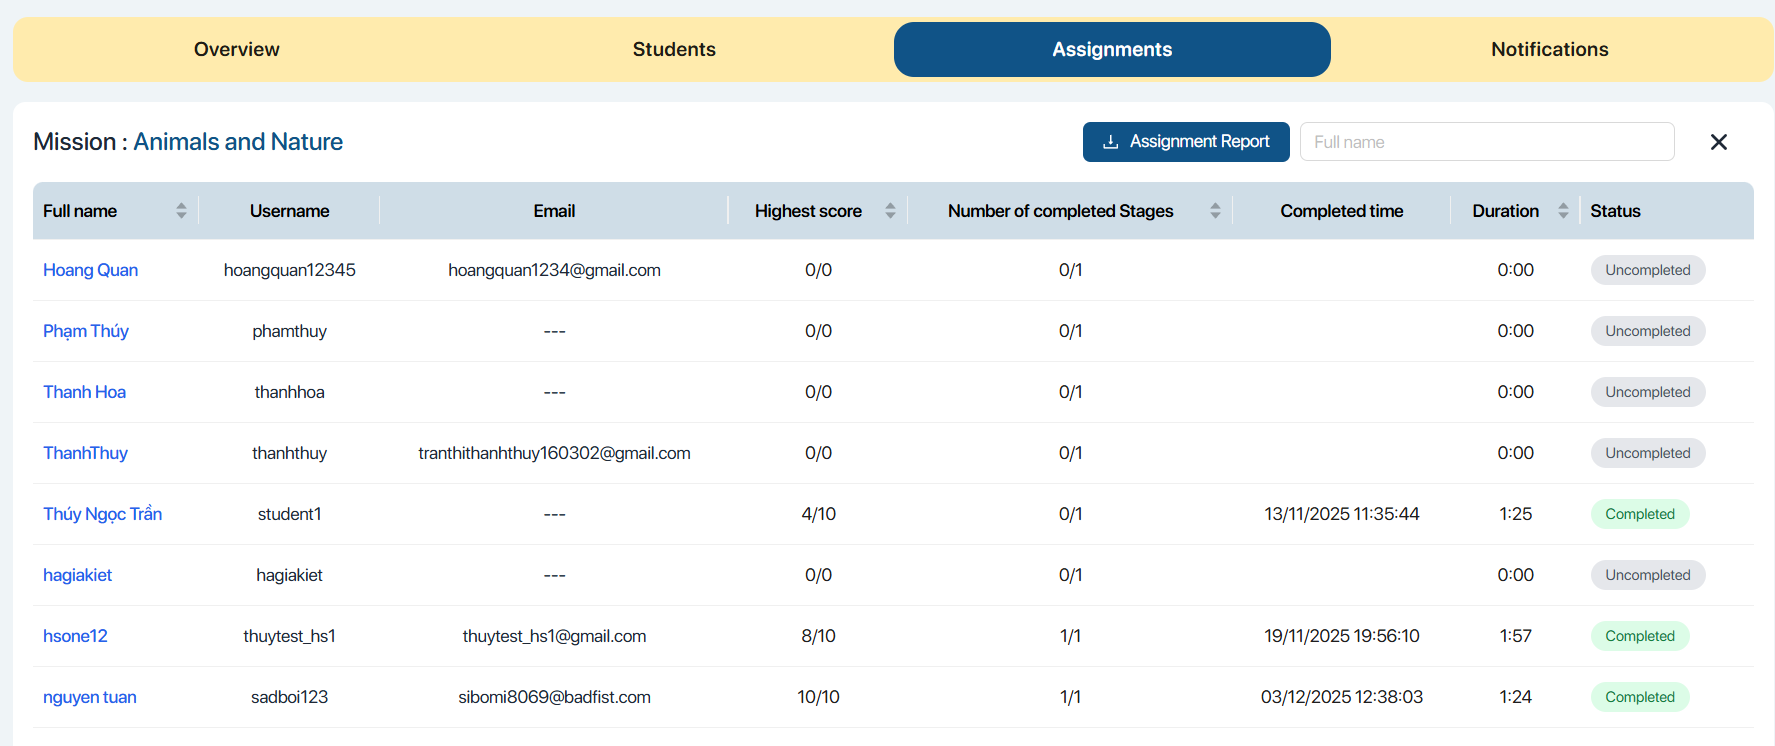 | |
| 2 | Download the results report.Users can download task reports. | |
| 3 | Edit tasksThe screen displays the assignment stage settings.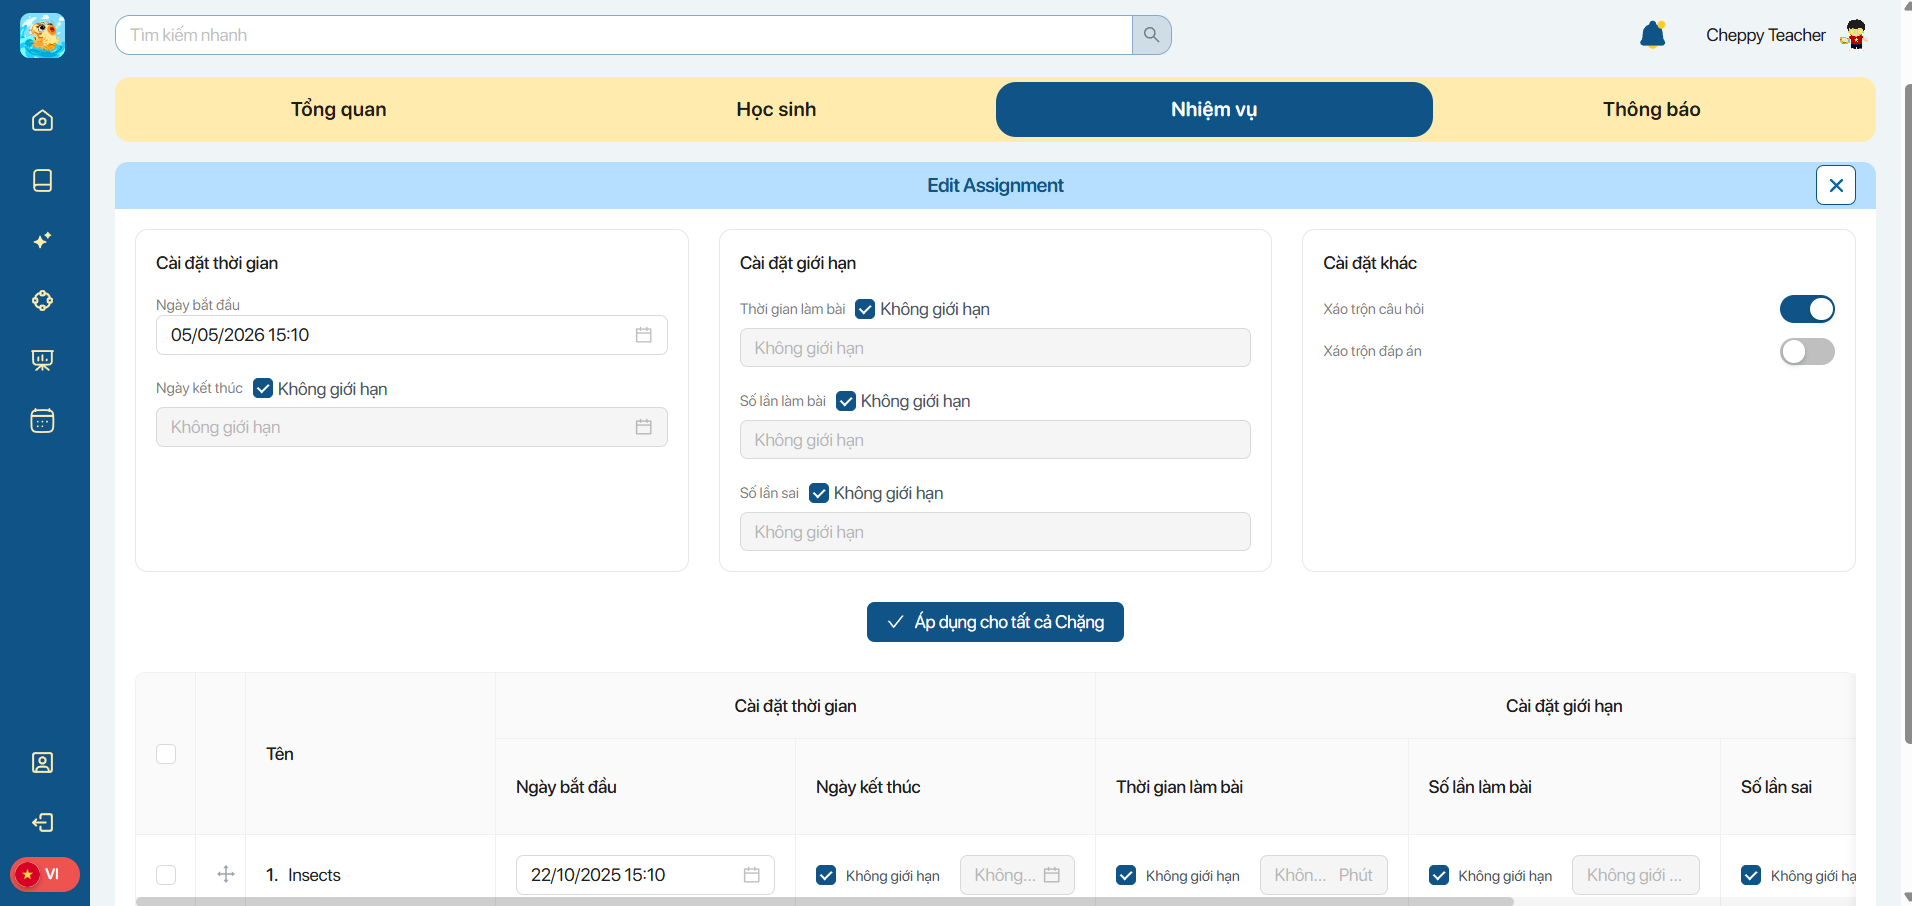 | |
| 4 | UnassignAllow users to unassign the mission |
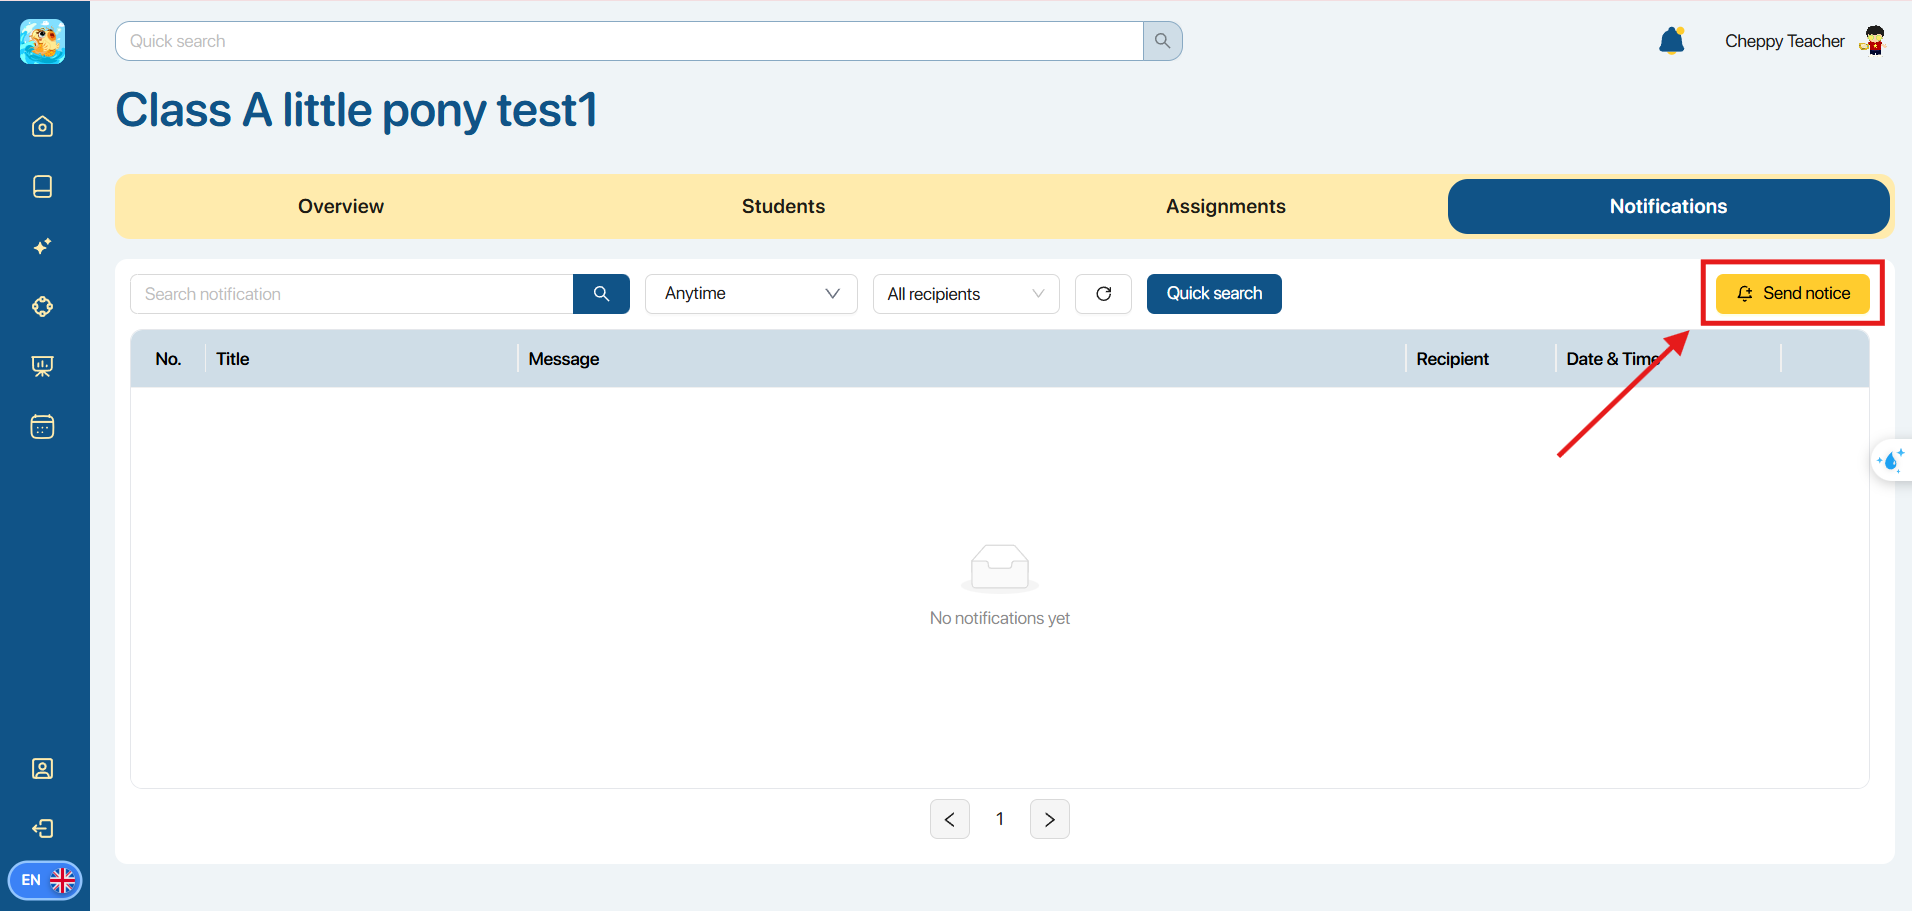
10.6 HOW TO SEND STUDENT NOTIFICATIONS/COMMENTS
Step 1. From the Notifications screen, the user selects![]()
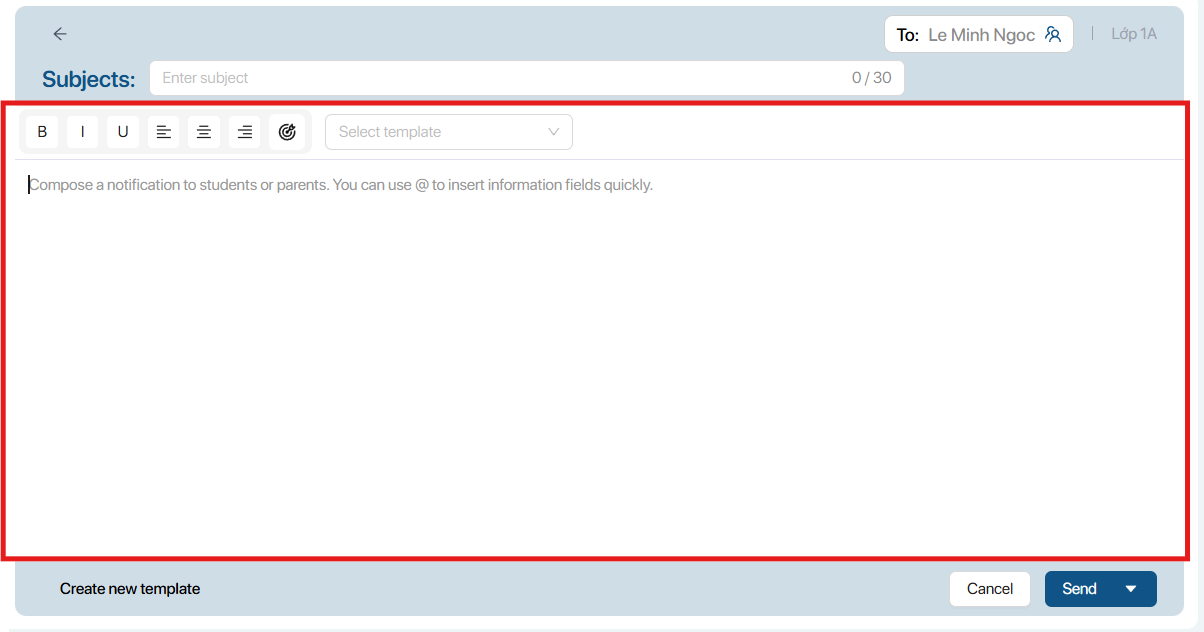
Step 2 Users enter the following information:
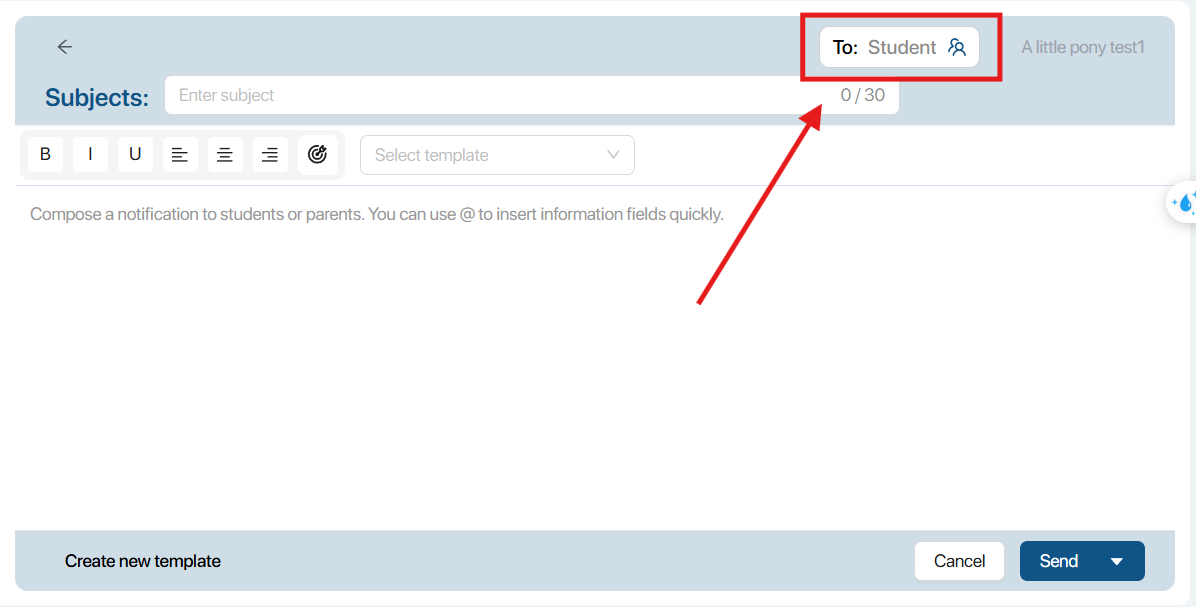
- Subjects: enter the title
- Content: The content of the comment/announcement
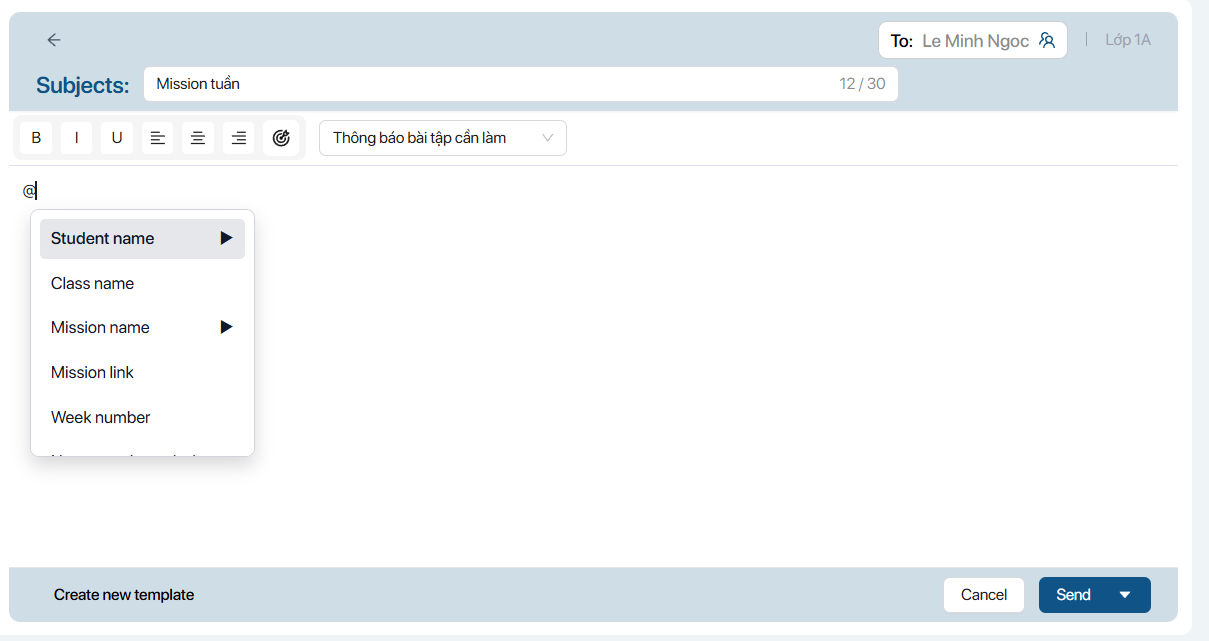
Note:
- Users can enter the "@" symbol to quickly insert information fields.
Step 2To edit the appearance of the notification content, users can use the following functions:
| STT | Function | Describe |
|---|---|---|
| 1 | Formatting toolsUsers can choose the appropriate formatting tool, including:B = Bold I = Italic U = Underline | |
| 2 |  | hingeUsers can select the appropriate margin type, including:Left alignmentMiddle roomRight alignment |
| 3 |  | Mission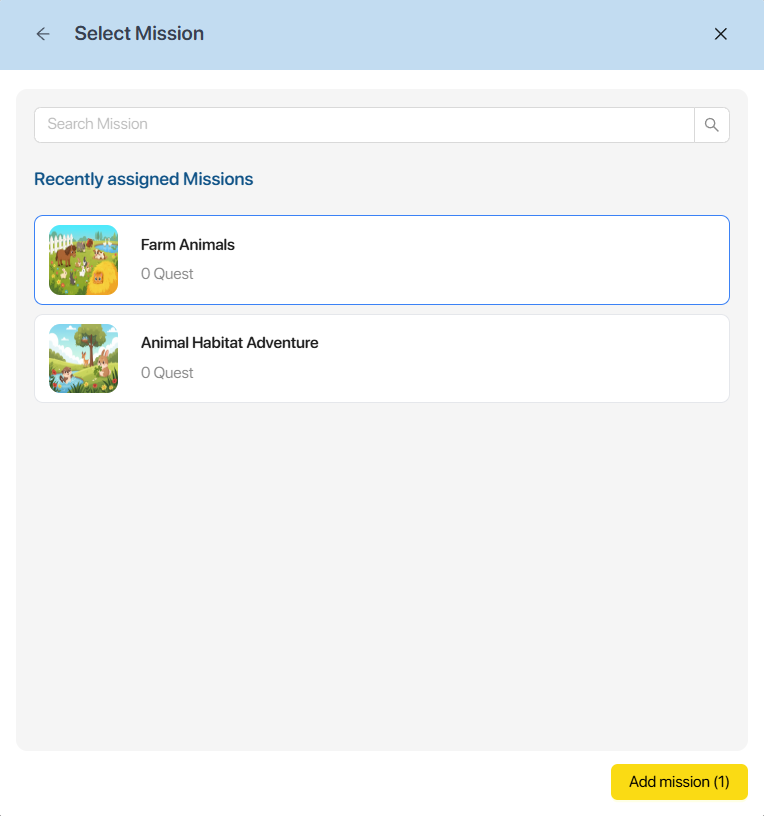 The user selects the task they want to attach to the notification content, then selects... The user selects the task they want to attach to the notification content, then selects... |
| 4 | Choose a template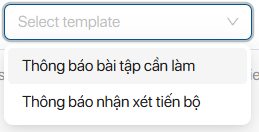 Users select a pre-designed notification template depending on the purpose of the notification.The system will then automatically display the corresponding message content.Users simply need to click on the fields that are in the format Users select a pre-designed notification template depending on the purpose of the notification.The system will then automatically display the corresponding message content.Users simply need to click on the fields that are in the format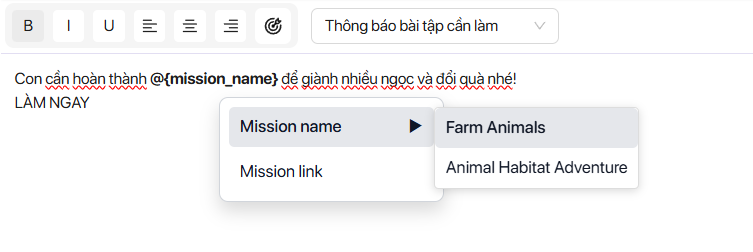 |
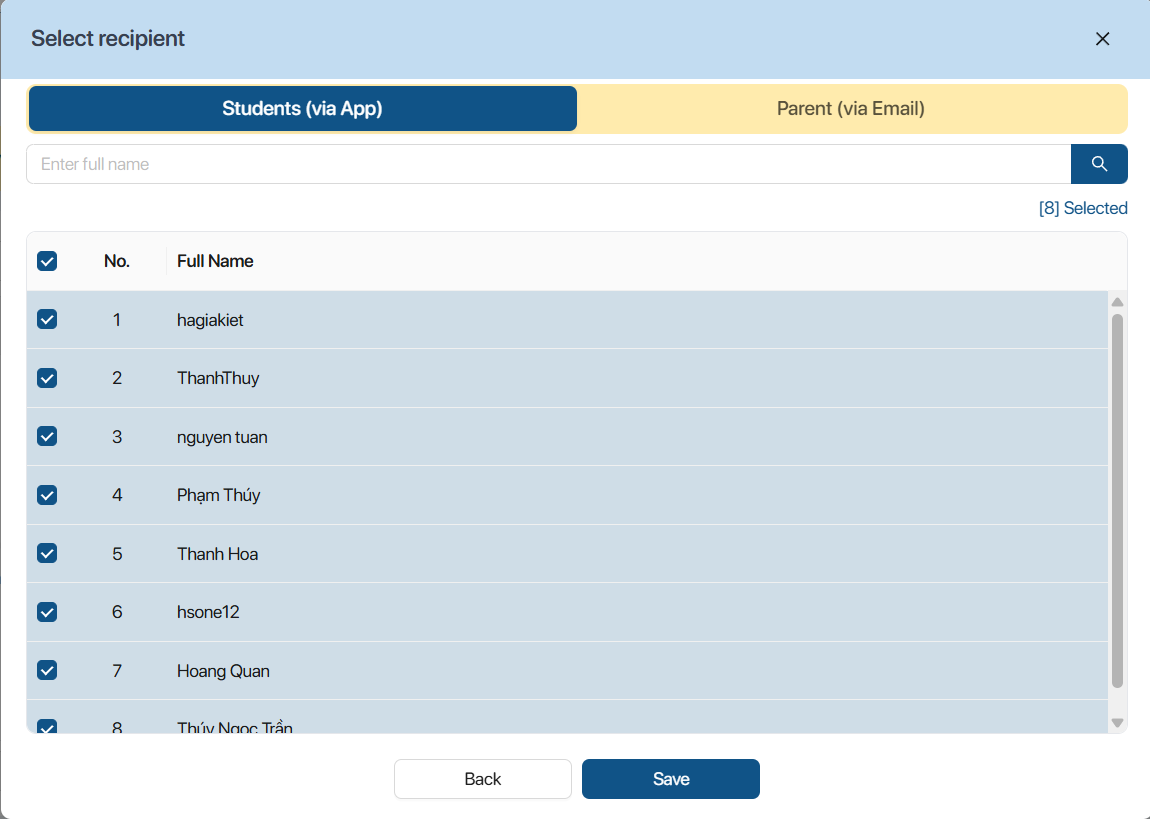
Step 3 User selects![]() to check the list of people who will receive notifications
to check the list of people who will receive notifications
Note: The system defaults to sending to all students.
Step 4 Users can select or deselect students from the list to send notifications via the app and press ![]() .
.
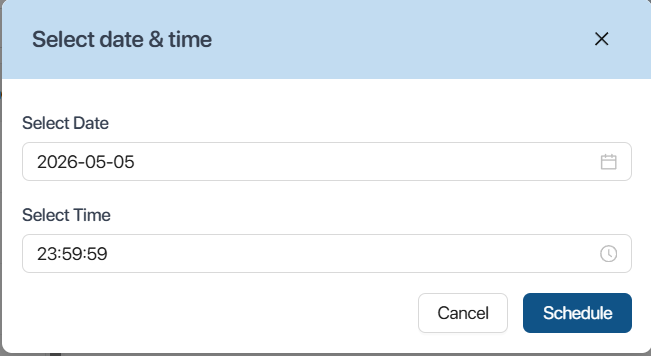
Step 5: To confirm receiving notifications, users can choose one of the following two methods:
Method 1: Select Send now to send the notification immediately.
Method 2: Select ![]() to schedule notifications. Users need to set the date and time for sending notifications and select a time.
to schedule notifications. Users need to set the date and time for sending notifications and select a time.
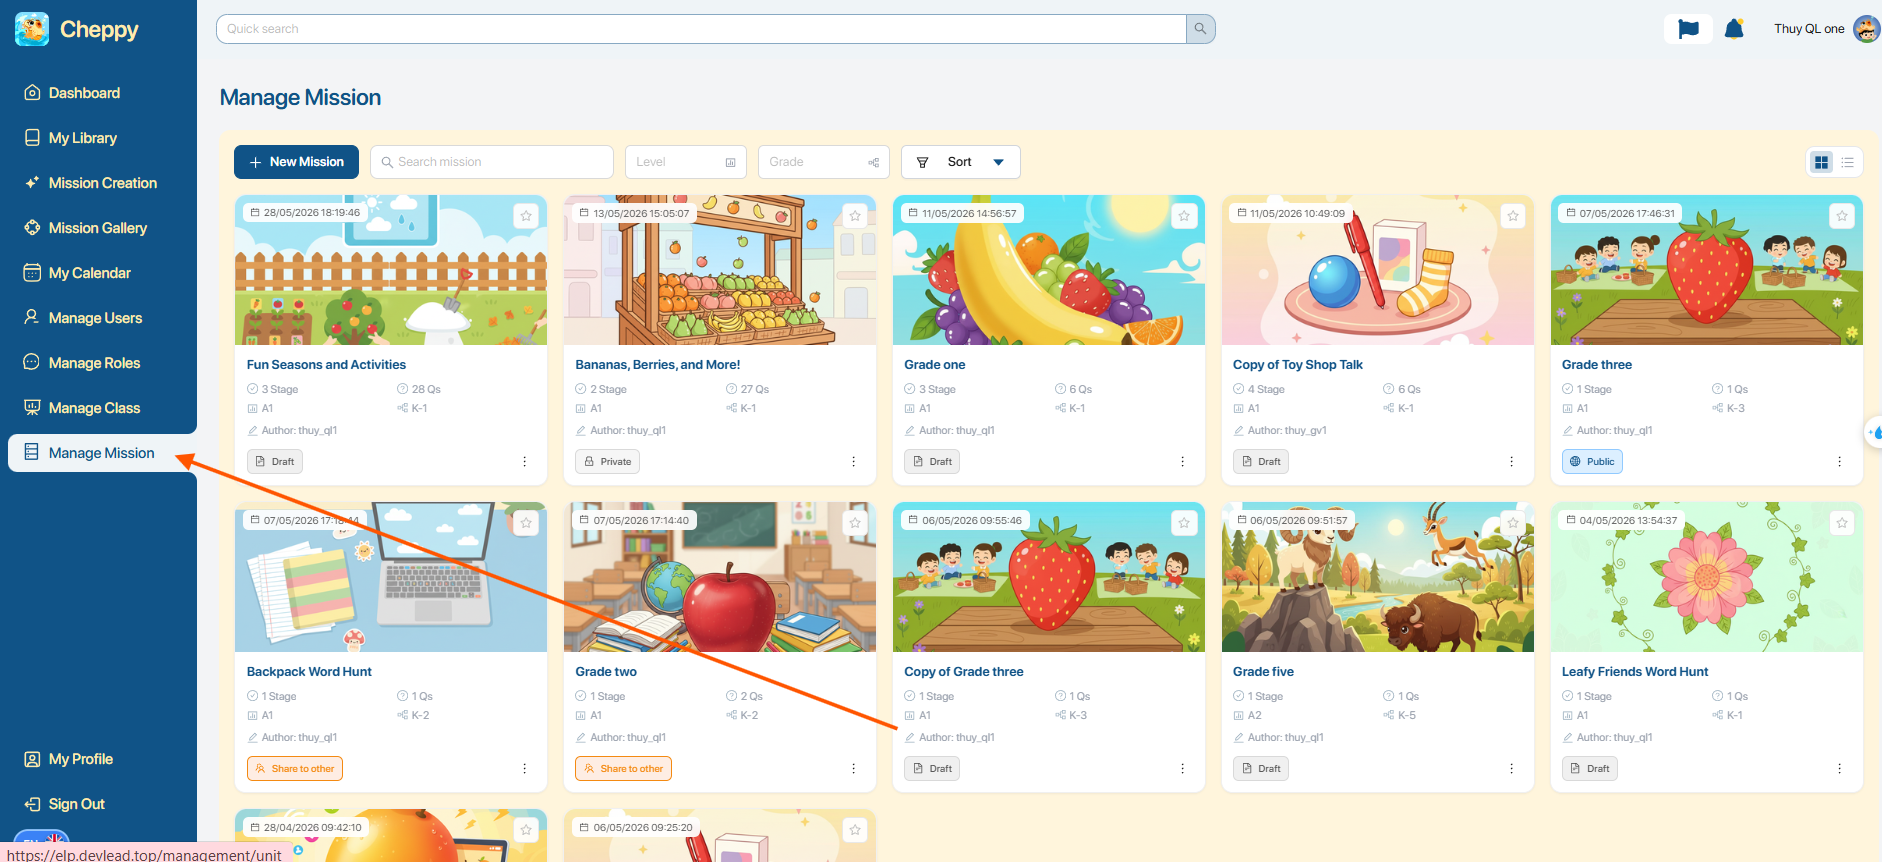
11. MANAGE MISSION
Description: Allows users to view all missions created by accounts within the organization.
Step 1. In the search bar area, users can use the filters to find the desired class.

| STT | Function | Describe |
|---|---|---|
| 1 | Search mission | Search for the Task name |
| 2 | Level | Select the task level according to the CEFR standard. |
| 3 | Grade | Select the Task Class Block |
| 4 | Sort | Choose to sort the listby update time or by Task name |
| 5 | | Select display modein Grid view or List view |
11.1 HOW TO SHARE MISSIONS
Step 1: Click on the icon![]() on Mission, the system will display the operation options.
on Mission, the system will display the operation options.
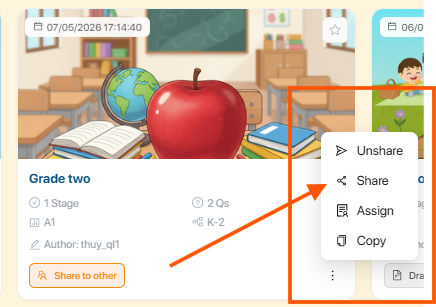
Step 2. Click on Share
Step 3: The user selects the sharing status as follows:
| STT | Function | Describe |
|---|---|---|
| 1 | Share public | Share public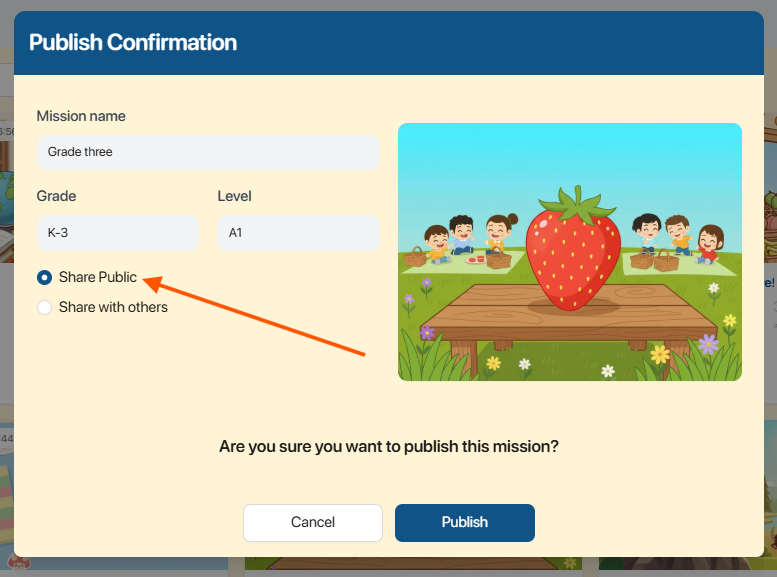 Missions are shared in the Mission Gallery, where all users can see them.Note:After sharing, the mission is saved in the following state: Missions are shared in the Mission Gallery, where all users can see them.Note:After sharing, the mission is saved in the following state: |
| 2 | Share with others | Share with others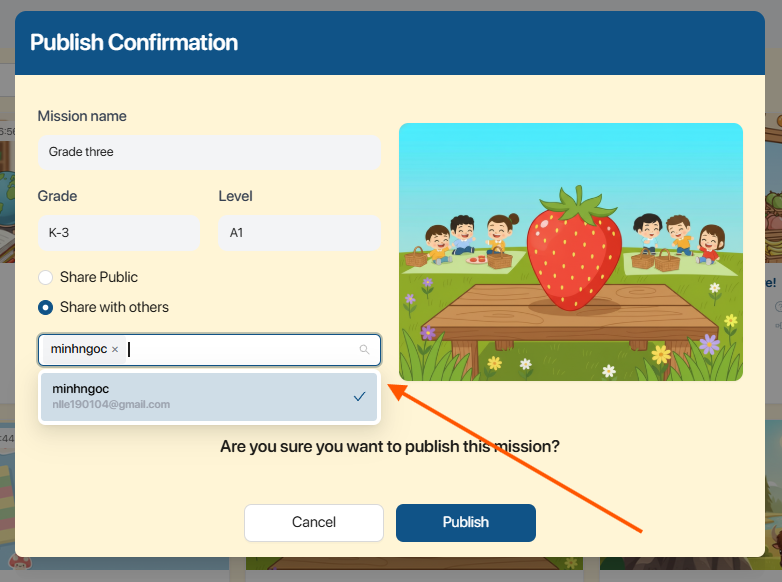 Search for and select accounts that are allowed to access Mission.Click Publish to confirm sharing the Mission with the selected users.Note:After sharing, the mission is saved in the following state: Search for and select accounts that are allowed to access Mission.Click Publish to confirm sharing the Mission with the selected users.Note:After sharing, the mission is saved in the following state: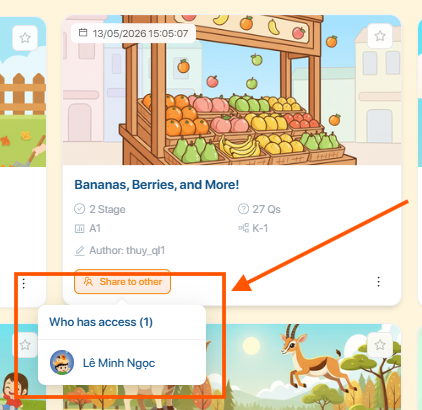 |
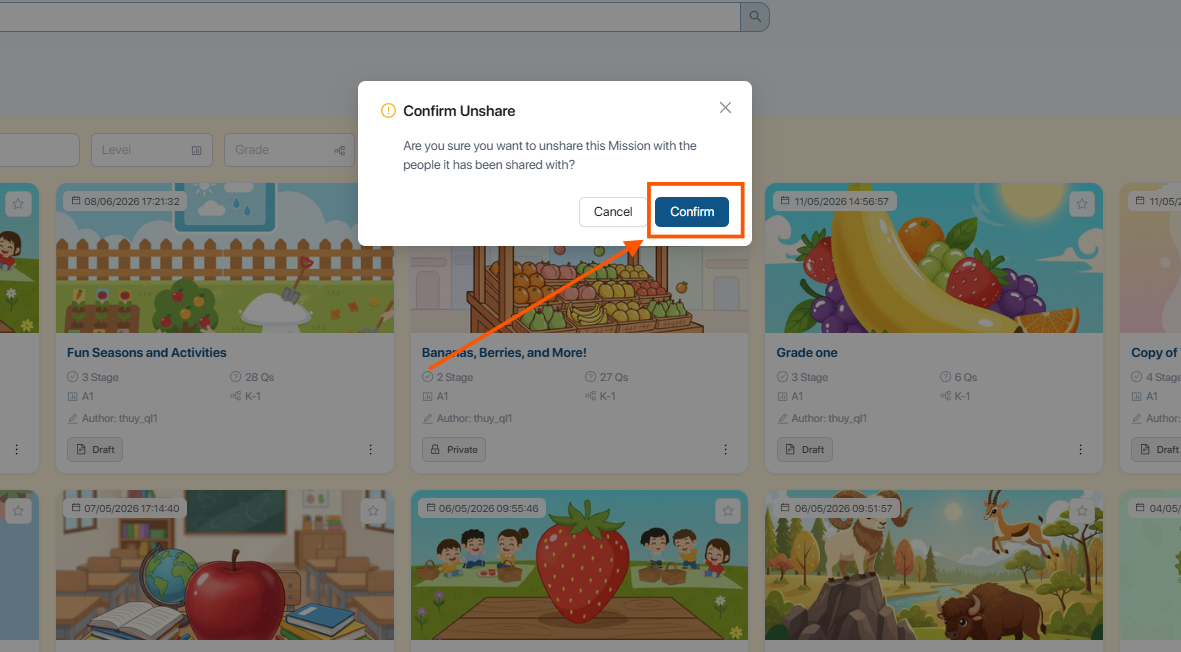
11.2 HOW TO PUBLISHING/UNPUBLISHING MISSIONS
Step 1: Click on the icon![]() on Mission, the system will display the operation options.
on Mission, the system will display the operation options.
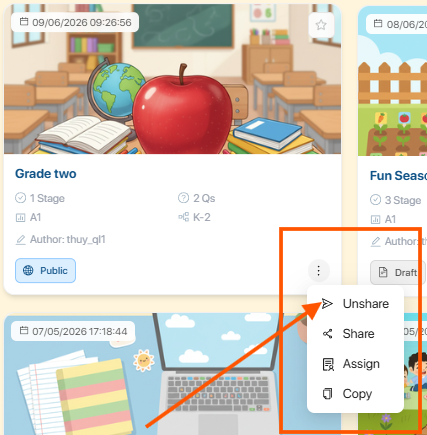
Step 2: Select ![]()
Step 3: Press ![]() To confirm unsharing this Mission. The mission's status will change to Private after unsharing.
To confirm unsharing this Mission. The mission's status will change to Private after unsharing.